llms.txt@08-Plugins-Skills · git:20260531.24c35cc · 2026-05-31 · sha256 79da72c1c925e13b
llms.txt@08-Plugins-Skills git:20260531.24c35ccC
Immutable. This exact content never changes and is served at /api/v1/blob/79da72c1c925e13b.
# Plugins Skills
All documentation for Plugins Skills.
---
## 02-skills-financial-applications.md
# Claude Skills for Financial Applications
Build real-world financial dashboards, portfolio analytics, and
automated reporting workflows using Claude\'s Excel, PowerPoint, and PDF
skills.
> **💡 Real-world Impact:** These are the same Skills that power
> **[Claude Creates
> Files](../19-Reference/claude-can-now-create-and-edit-files-claude.md)**, enabling Claude
> to create professional financial documents directly in the interface.
**What you\'ll learn:**
- Create comprehensive financial models in Excel with formulas and
charts
- Generate executive presentations from financial data
- Build portfolio analysis tools with risk metrics
- Automate multi-format reporting pipelines
:::
::: {.cell .markdown}
## Table of Contents
1. [Setup & Data Loading](#setup)
2. [Use Case 1: Financial Dashboard Creation](#financial-dashboard)
- [Excel Financial Model](#excel-model)
- [Executive PowerPoint](#executive-ppt)
- [PDF Financial Report](#pdf-report)
3. [Use Case 2: Portfolio Analysis Workflow](#portfolio-analysis)
- [Portfolio Analytics Excel](#portfolio-excel)
- [Investment Committee Deck](#investment-deck)
4. [Use Case 3: Automated Reporting Pipeline](#reporting-pipeline)
:::
::: {.cell .markdown}
## Prerequisites
This notebook assumes you\'ve completed **Notebook 1: Introduction to
Skills**.
If you haven\'t:
1. Complete the setup in Notebook 1 first
2. Verify your environment with the test cells
3. Ensure you can create and download files
**Required:**
- Anthropic API key configured
- SDK version 0.69.0 installed from whl
- Virtual environment activated
:::
::: {.cell .markdown}
## 1. Setup & Data Loading {#setup} {#1-setup--data-loading-setup}
Let\'s start by importing our dependencies and loading the financial
data we\'ll work with throughout this notebook.
:::
::: {.cell .code}
``` python
# Standard imports
import json
import os
import sys
from pathlib import Path
import pandas as pd
# Add parent directory for imports
sys.path.insert(0, str(Path.cwd().parent))
# Anthropic SDK
from anthropic import Anthropic
from dotenv import load_dotenv
# Our utilities
from file_utils import (
download_all_files,
print_download_summary,
)
# Load environment
load_dotenv(Path.cwd().parent / ".env")
# Configuration
API_KEY = os.getenv("ANTHROPIC_API_KEY")
MODEL = "claude-sonnet-4-5"
if not API_KEY:
raise ValueError("ANTHROPIC_API_KEY not found. Please configure your .env file.")
# Initialize client
client = Anthropic(api_key=API_KEY)
# Setup directories
OUTPUT_DIR = Path.cwd().parent / "outputs" / "financial"
OUTPUT_DIR.mkdir(parents=True, exist_ok=True)
DATA_DIR = Path.cwd().parent / "sample_data"
print("✓ Environment configured")
print(f"✓ Output directory: {OUTPUT_DIR}")
print(f"✓ Data directory: {DATA_DIR}")
```
:::
::: {.cell .markdown}
### Load Financial Data
We have four datasets representing different aspects of a company\'s
financial position:
:::
::: {.cell .code}
``` python
# Load financial statements
financial_statements = pd.read_csv(DATA_DIR / "financial_statements.csv")
print("📊 Financial Statements Overview:")
print(f" Shape: {financial_statements.shape}")
print(f" Categories: {len(financial_statements['Category'].unique())} financial metrics")
print(f" Quarters: {list(financial_statements.columns[1:5])}")
print()
# Show sample data
print("Sample data (first 5 rows):")
financial_statements.head()
```
:::
::: {.cell .code}
``` python
# Load portfolio holdings
with open(DATA_DIR / "portfolio_holdings.json") as f:
portfolio_data = json.load(f)
print("💼 Portfolio Overview:")
print(f" Portfolio: {portfolio_data['portfolio_name']}")
print(f" Total Value: ${portfolio_data['total_value']:,.2f}")
print(f" Holdings: {len(portfolio_data['holdings'])} stocks")
print(f" Cash Position: ${portfolio_data['cash_position']['amount']:,.2f}")
print(f" Total Return: {portfolio_data['performance_metrics']['total_return_percent']:.1f}%")
print()
# Convert holdings to DataFrame for easier manipulation
portfolio_df = pd.DataFrame(portfolio_data["holdings"])
print("Top 5 holdings by value:")
portfolio_df.nlargest(5, "market_value")[["ticker", "name", "market_value", "unrealized_gain"]]
```
:::
::: {.cell .code}
``` python
# Load quarterly metrics
with open(DATA_DIR / "quarterly_metrics.json") as f:
quarterly_metrics = json.load(f)
print("📈 Quarterly Metrics Overview:")
print(f" Quarters available: {len(quarterly_metrics['quarters'])}")
print(f" Metrics per quarter: {len(quarterly_metrics['quarters'][0])} KPIs")
print()
# Show latest quarter metrics
latest_quarter = quarterly_metrics["quarters"][-1]
print(f"Latest Quarter ({latest_quarter['quarter']}):")
for key, value in latest_quarter.items():
if key != "quarter" and isinstance(value, int | float):
if "revenue" in key.lower() or "cost" in key.lower():
print(f" {key.replace('_', ' ').title()}: ${value:,.0f}")
elif "percent" in key.lower() or "margin" in key.lower() or "rate" in key.lower():
print(f" {key.replace('_', ' ').title()}: {value:.1f}%")
else:
print(f" {key.replace('_', ' ').title()}: {value:,.0f}")
```
:::
::: {.cell .markdown}
### Helper Functions
Let\'s define some helper functions for this notebook:
:::
::: {.cell .code}
``` python
def create_skills_message(client, prompt, skills, prefix="", show_token_usage=True):
"""
Helper function to create messages with Skills.
Args:
client: Anthropic client
prompt: User prompt
skills: List of skill dicts [{"type": "anthropic", "skill_id": "xlsx", "version": "latest"}]
prefix: Prefix for downloaded files
show_token_usage: Whether to print token usage
Returns:
Tuple of (response, download_results)
"""
response = client.beta.messages.create(
model=MODEL,
max_tokens=4096,
container={"skills": skills},
tools=[{"type": "code_execution_20250825", "name": "code_execution"}],
messages=[{"role": "user", "content": prompt}],
betas=[
"code-execution-2025-08-25",
"files-api-2025-04-14",
"skills-2025-10-02",
],
)
if show_token_usage:
print(
f"\n📊 Token Usage: {response.usage.input_tokens} in, {response.usage.output_tokens} out"
)
# Download files
results = download_all_files(client, response, output_dir=str(OUTPUT_DIR), prefix=prefix)
return response, results
def format_financial_value(value, is_currency=True, decimals=0):
"""Format financial values for display."""
if is_currency:
return f"${value:,.{decimals}f}"
else:
return f"{value:,.{decimals}f}"
print("✓ Helper functions defined")
```
:::
::: {.cell .markdown}
## 2. Use Case 1: Financial Dashboard Creation {#financial-dashboard} {#2-use-case-1-financial-dashboard-creation-financial-dashboard}
Now that we have our data loaded and helper functions defined, let\'s
dive into our first practical use case: creating comprehensive financial
dashboards. We\'ll start by generating multi-sheet Excel workbooks that
automatically include formulas, formatting, and charts.
### 2.1 Excel Financial Model {#excel-model} {#21-excel-financial-model-excel-model}
We\'ll create a financial dashboard that includes:
- Profit & Loss statements with year-over-year comparisons
- Balance sheet analysis
- Cash flow tracking
- KPI dashboards with visualizations
This demonstrates how Claude\'s Skills can handle complex Excel
generation tasks that would typically require hours of manual work.
:::
::: {.cell .code}
``` python
# Create Financial Dashboard Excel
print("Creating financial dashboard Excel file...")
print("This creates a 2-sheet dashboard optimized for the Skills API.")
print("\n⏱️ Generation time: 1-2 minutes\n")
# Prepare the financial data
fs_data = financial_statements.to_dict("records")
quarters_2024 = ["Q1_2024", "Q2_2024", "Q3_2024", "Q4_2024"]
# Extract key financial metrics
revenue_by_quarter = {
"Q1 2024": financial_statements[financial_statements["Category"] == "Revenue"][
"Q1_2024"
].values[0],
"Q2 2024": financial_statements[financial_statements["Category"] == "Revenue"][
"Q2_2024"
].values[0],
"Q3 2024": financial_statements[financial_statements["Category"] == "Revenue"][
"Q3_2024"
].values[0],
"Q4 2024": financial_statements[financial_statements["Category"] == "Revenue"][
"Q4_2024"
].values[0],
}
financial_dashboard_prompt = f"""
Create a financial dashboard Excel workbook with 2 sheets:
Sheet 1 - "P&L Summary":
Create a Profit & Loss summary table for 2024 quarters with these rows:
- Revenue: {", ".join([f"Q{i + 1}: ${v / 1000000:.1f}M" for i, v in enumerate(revenue_by_quarter.values())])}
- Gross Profit: Use values from the data
- Operating Income: Use values from the data
- Net Income: Use values from the data
- Add a Total column with SUM formulas
- Add a row showing profit margins (Net Income / Revenue)
- Apply currency formatting and bold headers
- Add a simple bar chart showing quarterly revenue
Sheet 2 - "Key Metrics":
Create a metrics dashboard with:
- Total Revenue 2024: SUM of all quarters
- Average Quarterly Revenue: AVERAGE formula
- Q4 vs Q1 Growth: Percentage increase
- Best Quarter: MAX formula to identify
- Operating Margin Q4: Calculate from data
- Year-over-year growth vs 2023
Apply professional formatting with borders, bold headers, and currency formats.
"""
# Create the Excel financial dashboard
excel_response, excel_results = create_skills_message(
client,
financial_dashboard_prompt,
[{"type": "anthropic", "skill_id": "xlsx", "version": "latest"}],
prefix="financial_dashboard_",
)
print("\n" + "=" * 60)
print_download_summary(excel_results)
if len(excel_results) > 0 and excel_results[0]["success"]:
print("\n✅ Financial dashboard Excel created successfully!")
```
:::
::: {.cell .markdown}
### 💡 Best Practices for Excel Generation {#bulb-best-practices-for-excel-generation}
Based on our testing, here are the optimal approaches for creating Excel
files with Skills:
**Recommended Approach:**
- **2-3 sheets per workbook** works reliably and generates quickly
- **Focus each sheet** on a specific purpose (e.g., P&L, metrics,
charts)
- **Add complexity incrementally** - start simple, then enhance
**For Complex Dashboards:**
1. **Create multiple focused files** instead of one complex file
- Example: `financial_pnl.xlsx`, `balance_sheet.xlsx`,
`kpi_dashboard.xlsx`
2. **Use the pipeline pattern** to create and enhance files
sequentially
3. **Combine files programmatically** using pandas or openpyxl if
needed
**Performance Tips:**
- Simple 2-sheet dashboards: \~1-2 minutes
- PowerPoint and PDF generation: Very reliable for complex content
- Token usage: Structured data (JSON/CSV) is more efficient than prose
:::
::: {.cell .markdown}
### 2.2 Executive PowerPoint {#executive-ppt} {#22-executive-powerpoint-executive-ppt}
With our financial data now organized in Excel, let\'s create an
executive presentation that summarizes the key insights. This
demonstrates how Skills can generate professional PowerPoint
presentations with charts, formatted text, and multiple slides - perfect
for board meetings or investor updates.
The presentation will include:
- Q4 2024 performance highlights
- Financial metrics with year-over-year comparisons
- Profitability trends with visualizations
- Key takeaways and outlook
:::
::: {.cell .code}
``` python
print("Creating executive presentation from financial metrics...")
print("\n⏱️ Generation time: 1-2 minutes\n")
# Calculate some key metrics for the presentation
q4_2024_revenue = 14500000
q4_2023_revenue = 12300000
yoy_growth = (q4_2024_revenue - q4_2023_revenue) / q4_2023_revenue * 100
q4_2024_net_income = 1878750
q4_2023_net_income = 1209000
net_income_growth = (q4_2024_net_income - q4_2023_net_income) / q4_2023_net_income * 100
executive_ppt_prompt = f"""
Create a 4-slide executive presentation for Q4 2024 financial results:
Slide 1 - Title:
- Title: "Q4 2024 Financial Results"
- Subtitle: "Executive Summary - Acme Corporation"
- Date: January 2025
Slide 2 - Financial Highlights:
- Title: "Q4 2024 Performance Highlights"
- Create a two-column layout:
Left side - Key Metrics:
• Revenue: $14.5M (+{yoy_growth:.1f}% YoY)
• Net Income: $1.88M (+{net_income_growth:.1f}% YoY)
• Operating Margin: 17.9% (up 2.9pp)
• Operating Cash Flow: $2.85M
Right side - Column chart showing quarterly revenue:
Q1 2024: $12.5M
Q2 2024: $13.2M
Q3 2024: $13.8M
Q4 2024: $14.5M
Slide 3 - Profitability Trends:
- Title: "Margin Expansion & Profitability"
- Add a line chart showing net margin % by quarter:
Q1 2024: 11.4%
Q2 2024: 11.8%
Q3 2024: 12.4%
Q4 2024: 13.0%
- Add bullet points below:
• Consistent margin expansion throughout 2024
• Operating leverage driving profitability
• Cost optimization initiatives delivering results
Slide 4 - Key Takeaways:
- Title: "Key Takeaways & Outlook"
- Bullet points:
✓ Record Q4 revenue of $14.5M
✓ 17.9% YoY revenue growth
✓ 55% increase in net income YoY
✓ Strong cash generation: $2.85M operating cash flow
✓ Well-positioned for continued growth in 2025
Use professional corporate design:
- Dark blue (#003366) for headers
- Clean, modern layout
- Data-driven visualizations
"""
# Create the executive presentation
ppt_response, ppt_results = create_skills_message(
client,
executive_ppt_prompt,
[{"type": "anthropic", "skill_id": "pptx", "version": "latest"}],
prefix="executive_summary_",
)
print("\n" + "=" * 60)
print_download_summary(ppt_results)
if len(ppt_results) > 0 and ppt_results[0]["success"]:
print("\n✅ Executive presentation created successfully!")
```
:::
::: {.cell .markdown}
## 3. Use Case 2: Portfolio Analysis Workflow {#portfolio-analysis} {#3-use-case-2-portfolio-analysis-workflow-portfolio-analysis}
Now let\'s shift our focus from company financials to investment
portfolio analysis. In this section, we\'ll demonstrate how to create
comprehensive portfolio analytics and investment committee presentations
using the portfolio data we loaded earlier.
This workflow showcases:
- Detailed portfolio performance analysis in Excel
- Risk metrics and sector allocation visualization
- Professional investment committee presentations
- Data-driven rebalancing recommendations
We\'ll start by creating an Excel workbook with portfolio analytics,
then generate an investment committee presentation that summarizes our
findings.
:::
::: {.cell .markdown}
### First, let\'s create a comprehensive portfolio analysis Excel workbook
Before we create the investment committee presentation, we need to
analyze our portfolio data in detail. This Excel workbook will serve as
the foundation for our investment recommendations.
:::
::: {.cell .code}
``` python
print("Creating portfolio analysis Excel workbook...")
print("This creates a focused 2-sheet portfolio analysis optimized for the Skills API.")
print("\n⏱️ Generation time: 1-2 minutes\n")
# Prepare portfolio data for the prompt
top_holdings = portfolio_df.nlargest(5, "market_value")
sector_allocation = portfolio_data["sector_allocation"]
portfolio_excel_prompt = f"""
Create a portfolio analysis Excel workbook with 2 sheets:
Sheet 1 - "Portfolio Overview":
Create a comprehensive holdings and performance table:
Section 1 - Holdings (top of sheet):
{portfolio_df[["ticker", "name", "shares", "current_price", "market_value", "unrealized_gain", "allocation_percent"]].head(10).to_string()}
Section 2 - Portfolio Summary:
- Total portfolio value: ${portfolio_data["total_value"]:,.2f}
- Total unrealized gain: ${portfolio_df["unrealized_gain"].sum():,.2f}
- Total Return: {portfolio_data["performance_metrics"]["total_return_percent"]:.1f}%
- YTD Return: {portfolio_data["performance_metrics"]["year_to_date_return"]:.1f}%
- Sharpe Ratio: {portfolio_data["performance_metrics"]["sharpe_ratio"]:.2f}
- Portfolio Beta: {portfolio_data["performance_metrics"]["beta"]:.2f}
Apply conditional formatting: green for gains, red for losses.
Add a bar chart showing top 5 holdings by value.
Sheet 2 - "Sector Analysis & Risk":
Create sector allocation and risk metrics:
Section 1 - Sector Allocation:
{json.dumps(sector_allocation, indent=2)}
Include a pie chart of sector allocation.
Section 2 - Key Risk Metrics:
- Portfolio Beta: {portfolio_data["performance_metrics"]["beta"]:.2f}
- Standard Deviation: {portfolio_data["performance_metrics"]["standard_deviation"]:.1f}%
- Value at Risk (95%): $62,500
- Maximum Drawdown: -12.3%
- Sharpe Ratio: {portfolio_data["performance_metrics"]["sharpe_ratio"]:.2f}
Section 3 - Rebalancing Recommendations:
- Reduce Technology from 20% to 18%
- Increase Healthcare from 8.7% to 10%
- Maintain current diversification
Apply professional formatting with clear sections and headers.
"""
# Create portfolio analysis Excel
portfolio_response, portfolio_results = create_skills_message(
client,
portfolio_excel_prompt,
[{"type": "anthropic", "skill_id": "xlsx", "version": "latest"}],
prefix="portfolio_analysis_",
)
print("\n" + "=" * 60)
print_download_summary(portfolio_results)
if len(portfolio_results) > 0 and portfolio_results[0]["success"]:
print("\n✅ Portfolio analysis Excel created successfully!")
```
:::
::: {.cell .markdown}
### 3.2 Investment Committee Presentation {#investment-deck} {#32-investment-committee-presentation-investment-deck}
With our detailed portfolio analysis complete, let\'s now create a
professional presentation for the investment committee. This
presentation will distill the key insights from our Excel analysis into
a concise, visual format suitable for decision-makers.
The presentation will cover:
- Portfolio performance summary with key metrics
- Asset allocation and diversification analysis
- Risk metrics and risk-adjusted returns
- Strategic recommendations for rebalancing
:::
::: {.cell .code}
``` python
print("Creating investment committee presentation...")
print("\n⏱️ Generation time: 1-2 minutes\n")
investment_deck_prompt = f"""
Create a 5-slide investment committee presentation:
Slide 1 - Title:
- Title: "Portfolio Review - Q4 2024"
- Subtitle: "{portfolio_data["portfolio_name"]}"
- Date: January 2025
- Portfolio Value: ${portfolio_data["total_value"]:,.0f}
Slide 2 - Portfolio Overview:
- Title: "Portfolio Performance Summary"
- Two-column layout:
Left - Key Metrics:
• Total Value: ${portfolio_data["total_value"]:,.0f}
• YTD Return: +{portfolio_data["performance_metrics"]["year_to_date_return"]:.1f}%
• Total Return: ${portfolio_data["performance_metrics"]["total_return"]:,.0f}
• Sharpe Ratio: {portfolio_data["performance_metrics"]["sharpe_ratio"]:.2f}
Right - Bar chart of top 5 holdings by value:
{", ".join([f"{h['ticker']}: ${h['market_value']:,.0f}" for h in top_holdings.to_dict("records")])}
Slide 3 - Sector Allocation:
- Title: "Asset Allocation & Diversification"
- Pie chart showing:
Technology: {sector_allocation["Technology"]:.1f}%
Financials: {sector_allocation["Financials"]:.1f}%
Healthcare: {sector_allocation["Healthcare"]:.1f}%
Consumer: {sector_allocation["Consumer Discretionary"] + sector_allocation["Consumer Staples"]:.1f}%
Fixed Income: {sector_allocation["Bonds"]:.1f}%
Cash: {sector_allocation["Cash"]:.1f}%
Slide 4 - Risk Analysis:
- Title: "Risk Metrics & Analysis"
- Content:
Risk Indicators:
• Portfolio Beta: {portfolio_data["performance_metrics"]["beta"]:.2f} (lower market risk)
• Standard Deviation: {portfolio_data["performance_metrics"]["standard_deviation"]:.1f}%
• Maximum Drawdown: -12.3%
• Value at Risk (95%): $62,500
Risk-Adjusted Performance:
• Sharpe Ratio: {portfolio_data["performance_metrics"]["sharpe_ratio"]:.2f} (excellent)
• Alpha Generation: +2.3% vs benchmark
Slide 5 - Recommendations:
- Title: "Strategic Recommendations"
- Bullet points:
✓ Maintain current allocation - well diversified
✓ Consider profit-taking in Technology (20% → 18%)
✓ Increase Healthcare allocation (8.7% → 10%)
✓ Monitor bond duration given rate environment
✓ Rebalance quarterly to maintain targets
Use professional investment presentation design.
"""
# Create investment committee deck
investment_response, investment_results = create_skills_message(
client,
investment_deck_prompt,
[{"type": "anthropic", "skill_id": "pptx", "version": "latest"}],
prefix="investment_committee_",
)
print("\n" + "=" * 60)
print_download_summary(investment_results)
print("\n✅ Investment committee presentation created successfully!")
```
:::
::: {.cell .markdown}
## 4. Use Case 3: Automated Reporting Pipeline {#reporting-pipeline} {#4-use-case-3-automated-reporting-pipeline-reporting-pipeline}
So far, we\'ve created individual documents for specific purposes. Now
let\'s demonstrate the power of chaining multiple Skills together in an
automated workflow. This pipeline pattern is essential for production
systems where you need to generate multiple related documents from the
same data source.
In this example, we\'ll create a complete reporting suite that:
1. **Analyzes data** in Excel with calculations and charts
2. **Summarizes insights** in a PowerPoint presentation
3. **Documents the process** in a formal PDF report
This showcases how Skills can work together to create a comprehensive
reporting solution that would traditionally require multiple tools and
manual coordination.
**Key benefits of the pipeline approach:**
- Consistent data across all documents
- Reduced total generation time
- Token usage optimization
- Scalable to multiple report types
**⏱️ Total expected time:** 2-3 minutes for the complete pipeline
:::
::: {.cell .code}
``` python
print("🔄 Starting Automated Reporting Pipeline")
print("=" * 60)
print("This will create a complete reporting suite:")
print("1. Excel analysis → 2. PowerPoint summary → 3. PDF documentation")
print("\n⏱️ Total pipeline time: 2-3 minutes\n")
# Track token usage across the pipeline
pipeline_tokens = {"input": 0, "output": 0}
# Step 1: Create Excel Analysis
print("Step 1/3: Creating Excel analysis with quarterly metrics...")
excel_pipeline_prompt = f"""
Create a quarterly business metrics Excel file:
Sheet 1 - "Quarterly KPIs":
Create a table with these quarterly metrics for 2024:
{
json.dumps(
[
{
k: v
for k, v in q.items()
if k in ["quarter", "revenue", "gross_margin", "customer_count", "churn_rate"]
}
for q in quarterly_metrics["quarters"]
],
indent=2,
)
}
Add:
- Quarter-over-quarter growth calculations
- Average and total rows
- Conditional formatting for trends
- Line chart showing revenue trend
- Column chart showing customer count
Sheet 2 - "YoY Comparison":
Compare Q4 2024 vs Q4 2023 for all metrics.
Calculate percentage changes and highlight improvements.
Professional formatting with headers and borders.
"""
excel_response, excel_results = create_skills_message(
client,
excel_pipeline_prompt,
[{"type": "anthropic", "skill_id": "xlsx", "version": "latest"}],
prefix="pipeline_1_metrics_",
show_token_usage=False,
)
pipeline_tokens["input"] += excel_response.usage.input_tokens
pipeline_tokens["output"] += excel_response.usage.output_tokens
print(
f"✓ Excel created - Tokens: {excel_response.usage.input_tokens} in, {excel_response.usage.output_tokens} out"
)
# Step 2: Create PowerPoint Summary
print("\nStep 2/3: Creating PowerPoint summary from metrics...")
ppt_pipeline_prompt = """
Create a 3-slide quarterly metrics summary presentation:
Slide 1:
- Title: "Q4 2024 Metrics Summary"
- Subtitle: "Automated Reporting Pipeline Demo"
Slide 2:
- Title: "Key Performance Indicators"
- Show Q4 2024 metrics:
• Revenue: $3.2M (+15% QoQ)
• Customers: 850 (+8.9% QoQ)
• Gross Margin: 72%
• Churn Rate: 2.8% (improved from 3.5%)
- Add a simple bar chart comparing Q3 vs Q4 revenue
Slide 3:
- Title: "Quarterly Trend Analysis"
- Line chart showing revenue growth Q1-Q4
- Key insight bullets:
• Consistent QoQ growth
• Customer acquisition accelerating
• Churn reduction successful
Clean, data-focused design.
"""
ppt_response, ppt_results = create_skills_message(
client,
ppt_pipeline_prompt,
[{"type": "anthropic", "skill_id": "pptx", "version": "latest"}],
prefix="pipeline_2_summary_",
show_token_usage=False,
)
pipeline_tokens["input"] += ppt_response.usage.input_tokens
pipeline_tokens["output"] += ppt_response.usage.output_tokens
print(
f"✓ PowerPoint created - Tokens: {ppt_response.usage.input_tokens} in, {ppt_response.usage.output_tokens} out"
)
# Step 3: Create PDF Documentation
print("\nStep 3/3: Creating PDF documentation...")
pdf_pipeline_prompt = """
Create a PDF document summarizing the quarterly reporting pipeline:
AUTOMATED REPORTING PIPELINE
Q4 2024 Results Documentation
EXECUTIVE SUMMARY
This document summarizes the Q4 2024 business metrics generated through
our automated reporting pipeline.
KEY METRICS
- Revenue: $3.2M (15% QoQ growth)
- Customer Base: 850 active customers
- Gross Margin: 72%
- Churn Rate: 2.8% (improved from 3.5%)
PIPELINE COMPONENTS
1. Data Processing: Quarterly metrics analyzed in Excel
2. Visualization: Key insights presented in PowerPoint
3. Documentation: Formal report generated in PDF
AUTOMATION BENEFITS
• Reduced reporting time by 90%
• Consistent format and quality
• Eliminated manual errors
• Scalable to multiple reports
NEXT STEPS
- Expand pipeline to include predictive analytics
- Add automated email distribution
- Implement real-time data feeds
Generated: January 2025
Pipeline Version: 1.0
Format as a professional technical document.
"""
pdf_response, pdf_results = create_skills_message(
client,
pdf_pipeline_prompt,
[{"type": "anthropic", "skill_id": "pdf", "version": "latest"}],
prefix="pipeline_3_documentation_",
show_token_usage=False,
)
pipeline_tokens["input"] += pdf_response.usage.input_tokens
pipeline_tokens["output"] += pdf_response.usage.output_tokens
print(
f"✓ PDF created - Tokens: {pdf_response.usage.input_tokens} in, {pdf_response.usage.output_tokens} out"
)
# Pipeline Summary
print("\n" + "=" * 60)
print("🎯 PIPELINE COMPLETE!")
print("=" * 60)
print("\n📊 Pipeline Token Usage Summary:")
print(f" Total Input Tokens: {pipeline_tokens['input']:,}")
print(f" Total Output Tokens: {pipeline_tokens['output']:,}")
print(f" Total Tokens: {pipeline_tokens['input'] + pipeline_tokens['output']:,}")
print(f" Average per document: {(pipeline_tokens['input'] + pipeline_tokens['output']) // 3:,}")
print("\n📁 Generated Files:")
all_results = excel_results + ppt_results + pdf_results
for i, result in enumerate(all_results, 1):
if result["success"]:
print(f" {i}. {os.path.basename(result['output_path'])} ({result['size'] / 1024:.1f} KB)")
print("\n✅ Automated reporting pipeline executed successfully!")
print(" All three documents created and linked in workflow.")
```
:::
::: {.cell .markdown}
## Summary & Next Steps {#summary--next-steps}
### What We\'ve Accomplished
In this notebook, you\'ve learned how to:
✅ **Financial Dashboard Creation**
- Built multi-sheet Excel models with formulas and charts
- Generated executive PowerPoint presentations
- Created professional PDF reports
✅ **Portfolio Analysis**
- Developed portfolio analytics workbooks
- Created investment committee presentations
- Implemented risk metrics and rebalancing tools
✅ **Automated Pipelines**
- Chained multiple document formats
- Optimized token usage
- Built production-ready patterns
### Key Takeaways
1. **Skills dramatically simplify financial document creation** - What
would take hours manually takes minutes
2. **Token efficiency is excellent** - Skills use \~90% fewer tokens
than manual instructions
3. **Quality is professional-grade** - Documents are immediately usable
in business contexts
4. **Automation is straightforward** - Pipeline patterns enable complex
workflows
### Continue Your Learning
📚 **Next: [Notebook 3 - Custom Skills
Development](03_skills_custom_development.ipynb)**
- Build your own specialized financial skills
- Create company-specific templates
- Implement advanced automation
### Try These Experiments
1. **Modify the financial dashboard** to include your own metrics
2. **Create a custom portfolio** with different asset classes
3. **Build a pipeline** for your specific reporting needs
4. **Experiment with complexity** to understand generation times
5. **Track token usage** across different document types
### Resources
- [Claude API Documentation](https://docs.anthropic.com/en/api/messages)
- [Skills
Documentation](https://docs.claude.com/en/docs/agents-and-tools/agent-skills/overview)
- [Best
Practices](https://docs.claude.com/en/docs/agents-and-tools/agent-skills/best-practices)
- [Files API Reference](https://docs.claude.com/en/api/files-content)
:::
---
## 03-skills-custom-development.md
# Building Custom Skills for Claude
Learn how to create, deploy, and manage custom skills to extend
Claude\'s capabilities with your organization\'s specialized knowledge
and workflows.
:::
::: {.cell .markdown}
## Table of Contents
1. [Introduction & Setup](#introduction)
2. [Understanding Custom Skills Architecture](#architecture)
3. [Example 1: Financial Ratio Calculator](#financial-ratio)
4. [Example 2: Company Brand Guidelines](#brand-guidelines)
5. [Example 3: Financial Modeling Suite](#financial-modeling)
6. [Skill Management & Versioning](#management)
7. [Best Practices & Production Tips](#best-practices)
8. [Troubleshooting](#troubleshooting)
:::
::: {.cell .markdown}
## 1. Introduction & Setup {#introduction} {#1-introduction--setup-introduction}
### What are Custom Skills?
**Custom skills** are specialized expertise packages you create to teach
Claude your organization\'s unique workflows, domain knowledge, and best
practices. Unlike Anthropic\'s pre-built skills (Excel, PowerPoint,
PDF), custom skills allow you to:
- **Codify organizational knowledge** - Capture your team\'s specific
methodologies
- **Ensure consistency** - Apply the same standards across all
interactions
- **Automate complex workflows** - Chain together multi-step processes
- **Maintain intellectual property** - Keep proprietary methods secure
### Key Benefits
-----------------------------------------------------------------------
Benefit Description
----------------------------- -----------------------------------------
**Expertise at Scale** Deploy specialized knowledge to every
Claude interaction
**Version Control** Track changes and roll back if needed
**Composability** Combine multiple skills for complex tasks
**Privacy** Your skills remain private to your
organization
-----------------------------------------------------------------------
### Prerequisites
Before starting, ensure you have:
- Completed [Notebook 1: Introduction to
Skills](01_skills_introduction.ipynb)
- An Anthropic API key with Skills beta access
- Python environment with the local SDK installed
:::
::: {.cell .markdown}
### Environment Setup
Let\'s set up our environment and import necessary libraries:
:::
::: {.cell .code}
``` python
import os
import sys
from pathlib import Path
from typing import Any
# Add parent directory for imports
sys.path.insert(0, str(Path.cwd().parent))
from anthropic import Anthropic
from anthropic.lib import files_from_dir
from dotenv import load_dotenv
# Import our utilities
from file_utils import (
download_all_files,
extract_file_ids,
print_download_summary,
)
# We'll create skill_utils later in this notebook
# from skill_utils import (
# create_skill,
# list_skills,
# delete_skill,
# test_skill
# )
# Load environment variables
load_dotenv(Path.cwd().parent / ".env")
API_KEY = os.getenv("ANTHROPIC_API_KEY")
MODEL = os.getenv("ANTHROPIC_MODEL", "claude-sonnet-4-5")
if not API_KEY:
raise ValueError(
"ANTHROPIC_API_KEY not found. Copy ../.env.example to ../.env and add your API key."
)
# Initialize client with Skills beta
client = Anthropic(api_key=API_KEY, default_headers={"anthropic-beta": "skills-2025-10-02"})
# Setup directories
SKILLS_DIR = Path.cwd().parent / "custom_skills"
OUTPUT_DIR = Path.cwd().parent / "outputs"
OUTPUT_DIR.mkdir(exist_ok=True)
print("✓ API key loaded")
print(f"✓ Using model: {MODEL}")
print(f"✓ Custom skills directory: {SKILLS_DIR}")
print(f"✓ Output directory: {OUTPUT_DIR}")
print("\n📝 Skills beta header configured for skill management")
```
:::
::: {.cell .markdown}
## 2. Understanding Custom Skills Architecture {#architecture} {#2-understanding-custom-skills-architecture-architecture}
### Skill Structure
Every custom skill follows this directory structure:
skill_name/
├── SKILL.md # REQUIRED: Instructions with YAML frontmatter
├── *.md # Optional: Any additional .md files (documentation, guides)
├── scripts/ # Optional: Executable code
│ ├── process.py
│ └── utils.js
└── resources/ # Optional: Templates, data files
└── template.xlsx
**Important:**
- **SKILL.md is the ONLY required file** - everything else is optional
- **Multiple .md files allowed** - You can have any number of markdown
files in the top-level folder
- **All .md files are loaded** - Not just SKILL.md and REFERENCE.md, but
any .md file you include
- **Organize as needed** - Use multiple .md files to structure complex
documentation
📖 Read our engineering blog post on [Equipping agents for the real
world with
Skills](https://www.anthropic.com/engineering/equipping-agents-for-the-real-world-with-agent-skills)
### Skills Are Not Just Markdown

Skills can bundle various file types:
- **Markdown files**: Instructions and documentation (SKILL.md,
REFERENCE.md, etc.)
- **Scripts**: Python, JavaScript, or other executable code for complex
operations
- **Templates**: Pre-built files that can be customized (Excel
templates, document templates)
- **Resources**: Supporting data files, configuration, or assets
### SKILL.md Requirements {#skillmd-requirements}
The `SKILL.md` file must include:
1. **YAML Frontmatter** (name: 64 chars, description: 1024 chars)
- `name`: Lowercase alphanumeric with hyphens (required)
- `description`: Brief description of what the skill does (required)
2. **Instructions** (markdown format)
- Clear guidance for Claude
- Examples of usage
- Any constraints or rules
- Recommended: Keep under 5,000 tokens
### Additional Documentation Files
You can include multiple markdown files for better organization:
skill_name/
├── SKILL.md # Main instructions (required)
├── REFERENCE.md # API reference (optional)
├── EXAMPLES.md # Usage examples (optional)
├── TROUBLESHOOTING.md # Common issues (optional)
└── CHANGELOG.md # Version history (optional)
All `.md` files in the root directory will be available to Claude when
the skill is loaded.
### Bundled Files Example

This example shows how Skills can bundle multiple files:
- **SKILL.md**: Contains the main instructions with colors, typography,
and sections
- **slide-decks.md**: Additional documentation for specific use cases
- **Scripts and resources**: Can be referenced and used during skill
execution
### Progressive Disclosure
Skills load in three stages to optimize token usage:
----------------------------------------------------------------------------
Stage Content Token Cost When Loaded
---------------- --------------- -------------------- ----------------------
**1. Metadata** Name & name: 64 chars, Always visible
description description: 1024
chars
**2. All .md files \<5,000 tokens When relevant
Instructions** recommended
**3. Resources** Scripts & files As needed During execution
----------------------------------------------------------------------------
### API Workflow
``` python
# 1. Create skill
skill = client.beta.skills.create(
display_title="My Skill",
files=files_from_dir("path/to/skill")
)
# 2. Use in messages
response = client.beta.messages.create(
container={
"skills": [{
"type": "custom",
"skill_id": skill.id,
"version": "latest"
}]
},
# ... rest of message parameters
)
```
### Best Practices
For detailed guidance on skill creation and best practices, see:
- [Claude Skills Best
Practices](https://docs.claude.com/en/docs/agents-and-tools/agent-skills/best-practices)
- [Skills
Documentation](https://docs.claude.com/en/docs/agents-and-tools/agent-skills/overview)
:::
::: {.cell .markdown}
### Create Skill Utility Functions
Let\'s create helper functions for skill management:
:::
::: {.cell .code}
``` python
def create_skill(client: Anthropic, skill_path: str, display_title: str) -> dict[str, Any]:
"""
Create a new custom skill from a directory.
Args:
client: Anthropic client instance
skill_path: Path to skill directory
display_title: Human-readable skill name
Returns:
Dictionary with skill_id, version, and metadata
"""
try:
# Create skill using files_from_dir
skill = client.beta.skills.create(
display_title=display_title, files=files_from_dir(skill_path)
)
return {
"success": True,
"skill_id": skill.id,
"display_title": skill.display_title,
"latest_version": skill.latest_version,
"created_at": skill.created_at,
"source": skill.source,
}
except Exception as e:
return {"success": False, "error": str(e)}
def list_custom_skills(client: Anthropic) -> list[dict[str, Any]]:
"""
List all custom skills in the workspace.
Returns:
List of skill dictionaries
"""
try:
skills_response = client.beta.skills.list(source="custom")
skills = []
for skill in skills_response.data:
skills.append(
{
"skill_id": skill.id,
"display_title": skill.display_title,
"latest_version": skill.latest_version,
"created_at": skill.created_at,
"updated_at": skill.updated_at,
}
)
return skills
except Exception as e:
print(f"Error listing skills: {e}")
return []
def delete_skill(client: Anthropic, skill_id: str) -> bool:
"""
Delete a custom skill and all its versions.
Args:
client: Anthropic client
skill_id: ID of skill to delete
Returns:
True if successful, False otherwise
"""
try:
# First delete all versions
versions = client.beta.skills.versions.list(skill_id=skill_id)
for version in versions.data:
client.beta.skills.versions.delete(skill_id=skill_id, version=version.version)
# Then delete the skill itself
client.beta.skills.delete(skill_id)
return True
except Exception as e:
print(f"Error deleting skill: {e}")
return False
def test_skill(
client: Anthropic,
skill_id: str,
test_prompt: str,
model: str = "claude-sonnet-4-5",
) -> Any:
"""
Test a custom skill with a prompt.
Args:
client: Anthropic client
skill_id: ID of skill to test
test_prompt: Prompt to test the skill
model: Model to use for testing
Returns:
Response from Claude
"""
response = client.beta.messages.create(
model=model,
max_tokens=4096,
container={"skills": [{"type": "custom", "skill_id": skill_id, "version": "latest"}]},
tools=[{"type": "code_execution_20250825", "name": "code_execution"}],
messages=[{"role": "user", "content": test_prompt}],
betas=[
"code-execution-2025-08-25",
"files-api-2025-04-14",
"skills-2025-10-02",
],
)
return response
print("✓ Skill utility functions defined")
print(" - create_skill()")
print(" - list_custom_skills()")
print(" - delete_skill()")
print(" - test_skill()")
```
:::
::: {.cell .markdown}
### Check Existing Custom Skills
Let\'s see if any custom skills already exist in your workspace:
:::
::: {.cell .markdown}
### ⚠️ Important: Clean Up Existing Skills Before Starting {#warning-important-clean-up-existing-skills-before-starting}
If you\'re re-running this notebook, you may have skills from a previous
session. Skills cannot have duplicate display titles, so you have three
options:
1. **Delete existing skills** (recommended for testing) - Clean slate
approach
2. **Use different display titles** - Add timestamps or version numbers
to names
3. **Update existing skills with new versions** - See [Skill Management
& Versioning](#management) section
Let\'s check for and optionally clean up existing skills:
:::
::: {.cell .code}
``` python
# Check for existing skills that might conflict
existing_skills = list_custom_skills(client)
skill_titles_to_create = [
"Financial Ratio Analyzer",
"Corporate Brand Guidelines",
"Financial Modeling Suite",
]
conflicting_skills = []
if existing_skills:
print(f"Found {len(existing_skills)} existing custom skill(s):")
for skill in existing_skills:
print(f" - {skill['display_title']} (ID: {skill['skill_id']})")
if skill["display_title"] in skill_titles_to_create:
conflicting_skills.append(skill)
if conflicting_skills:
print(
f"\n⚠️ Found {len(conflicting_skills)} skill(s) that will conflict with this notebook:"
)
for skill in conflicting_skills:
print(f" - {skill['display_title']} (ID: {skill['skill_id']})")
print("\n" + "=" * 70)
print("To clean up these skills and start fresh, uncomment and run:")
print("=" * 70)
print("\n# UNCOMMENT THE LINES BELOW TO DELETE CONFLICTING SKILLS:")
print("# for skill in conflicting_skills:")
print("# if delete_skill(client, skill['skill_id']):")
print("# print(f\"✅ Deleted: {skill['display_title']}\")")
print("# else:")
print("# print(f\"❌ Failed to delete: {skill['display_title']}\")")
# for skill in conflicting_skills:
# if delete_skill(client, skill['skill_id']):
# print(f"✅ Deleted: {skill['display_title']}")
# else:
# print(f"❌ Failed to delete: {skill['display_title']}")
else:
print("\n✅ No conflicting skills found. Ready to proceed!")
else:
print("✅ No existing custom skills found. Ready to create new ones!")
```
:::
::: {.cell .markdown}
## 3. Example 1: Financial Ratio Calculator {#financial-ratio} {#3-example-1-financial-ratio-calculator-financial-ratio}
Let\'s create our first custom skill - a financial ratio calculator that
can analyze company financial health.
### Skill Overview
The **Financial Ratio Calculator** skill will:
- Calculate key financial ratios (ROE, P/E, Current Ratio, etc.)
- Interpret ratios with industry context
- Generate formatted reports
- Work with various data formats (CSV, JSON, text)
:::
::: {.cell .markdown}
### Upload the Financial Analyzer Skill
Now let\'s upload our financial analyzer skill to Claude:
:::
::: {.cell .code}
``` python
# Upload the Financial Analyzer skill
financial_skill_path = SKILLS_DIR / "analyzing-financial-statements"
if financial_skill_path.exists():
print("Uploading Financial Analyzer skill...")
result = create_skill(client, str(financial_skill_path), "Financial Ratio Analyzer")
if result["success"]:
financial_skill_id = result["skill_id"]
print("✅ Skill uploaded successfully!")
print(f" Skill ID: {financial_skill_id}")
print(f" Version: {result['latest_version']}")
print(f" Created: {result['created_at']}")
else:
print(f"❌ Upload failed: {result['error']}")
if "cannot reuse an existing display_title" in str(result["error"]):
print("\n💡 Solution: A skill with this name already exists.")
print(" Run the 'Clean Up Existing Skills' cell above to delete it first,")
print(" or change the display_title to something unique.")
else:
print(f"⚠️ Skill directory not found: {financial_skill_path}")
print(
"Please ensure the custom_skills directory contains the analyzing-financial-statements folder."
)
```
:::
::: {.cell .markdown}
### Test the Financial Analyzer Skill
Let\'s test the skill with sample financial data:
:::
::: {.cell .code}
``` python
# Test the Financial Analyzer skill
if "financial_skill_id" in locals():
test_prompt = """
Calculate financial ratios for this company:
Income Statement:
- Revenue: $1,000M
- EBITDA: $200M
- Net Income: $120M
Balance Sheet:
- Total Assets: $2,000M
- Current Assets: $500M
- Current Liabilities: $300M
- Total Debt: $400M
- Shareholders Equity: $1,200M
Market Data:
- Share Price: $50
- Shares Outstanding: 100M
Please calculate key ratios and provide analysis.
"""
print("Testing Financial Analyzer skill...")
response = test_skill(client, financial_skill_id, test_prompt)
# Print response
for content in response.content:
if content.type == "text":
print(content.text)
else:
print("⚠️ Please upload the Financial Analyzer skill first (run the previous cell)")
```
:::
::: {.cell .markdown}
## 4. Example 2: Company Brand Guidelines {#brand-guidelines} {#4-example-2-company-brand-guidelines-brand-guidelines}
Now let\'s create a skill that ensures all documents follow corporate
brand standards.
### Skill Overview {#skill-overview}
The **Brand Guidelines** skill will:
- Apply consistent colors, fonts, and layouts
- Ensure logo placement and usage
- Maintain professional tone and messaging
- Work across all document types (Excel, PowerPoint, PDF)
:::
::: {.cell .code}
``` python
# Upload the Brand Guidelines skill
brand_skill_path = SKILLS_DIR / "applying-brand-guidelines"
if brand_skill_path.exists():
print("Uploading Brand Guidelines skill...")
result = create_skill(client, str(brand_skill_path), "Corporate Brand Guidelines")
if result["success"]:
brand_skill_id = result["skill_id"]
print("✅ Skill uploaded successfully!")
print(f" Skill ID: {brand_skill_id}")
print(f" Version: {result['latest_version']}")
else:
print(f"❌ Upload failed: {result['error']}")
if "cannot reuse an existing display_title" in str(result["error"]):
print("\n💡 Solution: A skill with this name already exists.")
print(" Run the 'Clean Up Existing Skills' cell above to delete it first,")
print(" or change the display_title to something unique.")
else:
print(f"⚠️ Skill directory not found: {brand_skill_path}")
```
:::
::: {.cell .markdown}
### Test Brand Guidelines with Document Creation
Let\'s test the brand skill by creating a branded PowerPoint
presentation:
:::
::: {.cell .code}
``` python
# Test Brand Guidelines skill with PowerPoint creation
if "brand_skill_id" in locals():
# Combine brand skill with Anthropic's pptx skill
response = client.beta.messages.create(
model=MODEL,
max_tokens=4096,
container={
"skills": [
{"type": "custom", "skill_id": brand_skill_id, "version": "latest"},
{"type": "anthropic", "skill_id": "pptx", "version": "latest"},
]
},
tools=[{"type": "code_execution_20250825", "name": "code_execution"}],
messages=[
{
"role": "user",
"content": """Create a 3-slide PowerPoint presentation following Acme Corporation brand guidelines:
Slide 1: Title slide for "Q4 2025 Results"
Slide 2: Revenue Overview with a chart showing Q1-Q4 growth
Slide 3: Key Achievements (3 bullet points)
Apply all brand colors, fonts, and formatting standards.
""",
}
],
betas=[
"code-execution-2025-08-25",
"files-api-2025-04-14",
"skills-2025-10-02",
],
)
print("Response from Claude:")
for content in response.content:
if content.type == "text":
print(content.text[:500] + "..." if len(content.text) > 500 else content.text)
# Download generated file
file_ids = extract_file_ids(response)
if file_ids:
results = download_all_files(
client, response, output_dir=str(OUTPUT_DIR), prefix="branded_"
)
print_download_summary(results)
else:
print("⚠️ Please upload the Brand Guidelines skill first")
```
:::
::: {.cell .markdown}
## 5. Example 3: Financial Modeling Suite {#financial-modeling} {#5-example-3-financial-modeling-suite-financial-modeling}
Let\'s create our most advanced skill - a comprehensive financial
modeling suite for valuation and risk analysis.
### Skill Overview {#skill-overview}
The **Financial Modeling Suite** skill provides:
- **DCF Valuation**: Complete discounted cash flow models
- **Sensitivity Analysis**: Test impact of variables on valuation
- **Monte Carlo Simulation**: Risk modeling with probability
distributions
- **Scenario Planning**: Best/base/worst case analysis
This demonstrates a multi-file skill with complex calculations and
professional-grade financial modeling.
:::
::: {.cell .markdown}
### Upload the Financial Modeling Suite
First, upload the financial modeling skill:
:::
::: {.cell .code}
``` python
# Upload the Financial Modeling Suite skill
modeling_skill_path = SKILLS_DIR / "creating-financial-models"
if modeling_skill_path.exists():
print("Uploading Financial Modeling Suite skill...")
result = create_skill(client, str(modeling_skill_path), "Financial Modeling Suite")
if result["success"]:
modeling_skill_id = result["skill_id"]
print("✅ Skill uploaded successfully!")
print(f" Skill ID: {modeling_skill_id}")
print(f" Version: {result['latest_version']}")
print("\nThis skill includes:")
print(" - DCF valuation model (dcf_model.py)")
print(" - Sensitivity analysis framework (sensitivity_analysis.py)")
print(" - Monte Carlo simulation capabilities")
print(" - Scenario planning tools")
else:
print(f"❌ Upload failed: {result['error']}")
else:
print(f"⚠️ Skill directory not found: {modeling_skill_path}")
print(
"Please ensure the custom_skills directory contains the creating-financial-models folder."
)
```
:::
::: {.cell .markdown}
### Test the Financial Modeling Suite
Let\'s test the advanced modeling capabilities with a DCF valuation
request:
:::
::: {.cell .code}
``` python
# Test the Financial Modeling Suite with a DCF valuation
if "modeling_skill_id" in locals():
dcf_test_prompt = """
Perform a DCF valuation for TechCorp with the following data:
Historical Financials (Last 3 Years):
- Revenue: $500M, $600M, $750M
- EBITDA Margin: 25%, 27%, 30%
- CapEx: $50M, $55M, $60M
- Working Capital: 15% of revenue
Projections:
- Revenue growth: 20% for years 1-3, then declining to 5% by year 5
- EBITDA margin expanding to 35% by year 5
- Terminal growth rate: 3%
Market Assumptions:
- WACC: 10%
- Tax rate: 25%
- Current net debt: $200M
- Shares outstanding: 100M
Please create a complete DCF model with sensitivity analysis on WACC and terminal growth.
Generate an Excel file with the full model including:
1. Revenue projections
2. Free cash flow calculations
3. Terminal value
4. Enterprise value to equity value bridge
5. Sensitivity table
"""
print("Testing Financial Modeling Suite with DCF valuation...")
print("=" * 70)
print("\n⏱️ Note: Complex financial model generation may take 1-2 minutes.\n")
response = client.beta.messages.create(
model=MODEL,
max_tokens=4096,
container={
"skills": [
{"type": "custom", "skill_id": modeling_skill_id, "version": "latest"},
{"type": "anthropic", "skill_id": "xlsx", "version": "latest"},
]
},
tools=[{"type": "code_execution_20250825", "name": "code_execution"}],
messages=[{"role": "user", "content": dcf_test_prompt}],
betas=[
"code-execution-2025-08-25",
"files-api-2025-04-14",
"skills-2025-10-02",
],
)
# Print Claude's response
for content in response.content:
if content.type == "text":
# Print first 800 characters to keep output manageable
text = content.text
if len(text) > 800:
print(text[:800] + "\n\n[... Output truncated for brevity ...]")
else:
print(text)
# Download the DCF model if generated
file_ids = extract_file_ids(response)
if file_ids:
print("\n" + "=" * 70)
print("Downloading generated DCF model...")
results = download_all_files(
client, response, output_dir=str(OUTPUT_DIR), prefix="dcf_model_"
)
print_download_summary(results)
print("\n💡 Open the Excel file to explore the complete DCF valuation model!")
else:
print("⚠️ Please upload the Financial Modeling Suite skill first (run the previous cell)")
```
:::
::: {.cell .markdown}
## 6. Skill Management & Versioning {#management} {#6-skill-management--versioning-management}
Managing skills over time requires understanding versioning, updates,
and lifecycle management.
### Listing Your Skills
Get an overview of all custom skills in your workspace:
:::
::: {.cell .code}
``` python
# List all your custom skills
my_skills = list_custom_skills(client)
if my_skills:
print(f"You have {len(my_skills)} custom skill(s):\n")
print("=" * 70)
for i, skill in enumerate(my_skills, 1):
print(f"\n{i}. {skill['display_title']}")
print(f" Skill ID: {skill['skill_id']}")
print(f" Current Version: {skill['latest_version']}")
print(f" Created: {skill['created_at']}")
if skill.get("updated_at"):
print(f" Last Updated: {skill['updated_at']}")
print("\n" + "=" * 70)
else:
print("No custom skills found in your workspace.")
```
:::
::: {.cell .markdown}
### Creating New Versions
Skills support versioning to maintain history and enable rollback.
Let\'s make an enhancement to our Financial Analyzer skill and create a
new version.
#### Step 1: Enhance the Financial Analyzer
We\'ll add **healthcare industry** benchmarks to make our skill more
versatile. This is a real-world scenario where you\'d expand a skill\'s
capabilities based on user needs.
:::
::: {.cell .code}
``` python
# Add healthcare industry benchmarks to the Financial Analyzer
# This demonstrates a realistic skill enhancement scenario
if "financial_skill_id" in locals():
# Read the current interpret_ratios.py file
interpret_file_path = SKILLS_DIR / "analyzing-financial-statements" / "interpret_ratios.py"
with open(interpret_file_path) as f:
content = f.read()
# Add healthcare benchmarks after the 'manufacturing' section
healthcare_benchmarks = """ },
'healthcare': {
'current_ratio': {'excellent': 2.3, 'good': 1.8, 'acceptable': 1.4, 'poor': 1.0},
'debt_to_equity': {'excellent': 0.3, 'good': 0.6, 'acceptable': 1.0, 'poor': 1.8},
'roe': {'excellent': 0.22, 'good': 0.16, 'acceptable': 0.11, 'poor': 0.07},
'gross_margin': {'excellent': 0.65, 'good': 0.45, 'acceptable': 0.30, 'poor': 0.20},
'pe_ratio': {'undervalued': 18, 'fair': 28, 'growth': 40, 'expensive': 55}
"""
# Find the position after manufacturing section and before the closing brace
insert_pos = content.find(" }\n }") # Find the end of the BENCHMARKS dict
if insert_pos != -1:
# Insert the healthcare benchmarks
new_content = content[:insert_pos] + healthcare_benchmarks + content[insert_pos:]
# Save the enhanced file
with open(interpret_file_path, "w") as f:
f.write(new_content)
print("✅ Enhanced Financial Analyzer with healthcare industry benchmarks")
print("\nChanges made:")
print(" - Added healthcare industry to BENCHMARKS")
print(" - Includes specific thresholds for:")
print(" • Current ratio (liquidity)")
print(" • Debt-to-equity (leverage)")
print(" • ROE (profitability)")
print(" • Gross margin")
print(" • P/E ratio (valuation)")
print("\n📝 Now we can create a new version of the skill with this enhancement!")
else:
print("⚠️ Could not find the correct position to insert healthcare benchmarks")
print("The file structure may have changed.")
else:
print("⚠️ Please upload the Financial Analyzer skill first (run cells in Section 3)")
```
:::
::: {.cell .markdown}
#### Step 2: Create a New Version
Now that we\'ve enhanced our skill, let\'s create a new version to track
this change:
:::
::: {.cell .code}
``` python
# Create a new version of the enhanced Financial Analyzer skill
def create_skill_version(client: Anthropic, skill_id: str, skill_path: str):
"""Create a new version of an existing skill."""
try:
version = client.beta.skills.versions.create(
skill_id=skill_id, files=files_from_dir(skill_path)
)
return {
"success": True,
"version": version.version,
"created_at": version.created_at,
}
except Exception as e:
return {"success": False, "error": str(e)}
# Create the new version with our healthcare enhancement
if "financial_skill_id" in locals():
print("Creating new version of Financial Analyzer with healthcare benchmarks...")
result = create_skill_version(
client, financial_skill_id, str(SKILLS_DIR / "analyzing-financial-statements")
)
if result["success"]:
print("✅ New version created successfully!")
print(f" Version: {result['version']}")
print(f" Created: {result['created_at']}")
print("\n📊 Version History:")
print(" v1: Original skill with tech, retail, financial, manufacturing")
print(f" v{result['version']}: Enhanced with healthcare industry benchmarks")
else:
print(f"❌ Version creation failed: {result['error']}")
else:
print("⚠️ Please run the previous cells to upload the skill and make enhancements first")
```
:::
::: {.cell .markdown}
#### Step 3: Test the New Version
Let\'s verify our enhancement works by analyzing a healthcare company:
:::
::: {.cell .code}
``` python
# Test the enhanced skill with healthcare industry data
if "financial_skill_id" in locals():
healthcare_test_prompt = """
Analyze this healthcare company using the healthcare industry benchmarks:
Company: MedTech Solutions (Healthcare Industry)
Income Statement:
- Revenue: $800M
- EBITDA: $320M
- Net Income: $160M
Balance Sheet:
- Total Assets: $1,200M
- Current Assets: $400M
- Current Liabilities: $200M
- Total Debt: $300M
- Shareholders Equity: $700M
Market Data:
- Share Price: $75
- Shares Outstanding: 50M
Please calculate key ratios and provide healthcare-specific analysis.
"""
print("Testing enhanced Financial Analyzer with healthcare company...")
print("=" * 70)
response = test_skill(client, financial_skill_id, healthcare_test_prompt, MODEL)
# Print Claude's analysis
for content in response.content:
if content.type == "text":
# Print first 1000 characters to keep output manageable
text = content.text
if len(text) > 1000:
print(text[:1000] + "\n\n[... Output truncated for brevity ...]")
else:
print(text)
print(
"\n✅ The skill now recognizes 'healthcare' as an industry and applies specific benchmarks!"
)
else:
print("⚠️ Please run the previous cells to create the enhanced version first")
```
:::
::: {.cell .markdown}
### Cleanup: Managing Your Skills
When you\'re done testing or need to clean up your workspace, you can
selectively remove skills. Let\'s review what we\'ve created and provide
options for cleanup:
:::
::: {.cell .code}
``` python
# Comprehensive skill cleanup with detailed reporting
def review_and_cleanup_skills(client, dry_run=True):
"""
Review all skills and optionally clean up the ones created in this notebook.
Args:
client: Anthropic client
dry_run: If True, only show what would be deleted without actually deleting
"""
# Get all current skills
all_skills = list_custom_skills(client)
# Skills we created in this notebook
notebook_skill_names = [
"Financial Ratio Analyzer",
"Corporate Brand Guidelines",
"Financial Modeling Suite",
]
# Track skills created by this notebook
notebook_skills = []
other_skills = []
for skill in all_skills:
if skill["display_title"] in notebook_skill_names:
notebook_skills.append(skill)
else:
other_skills.append(skill)
print("=" * 70)
print("SKILL INVENTORY REPORT")
print("=" * 70)
print(f"\nTotal custom skills in workspace: {len(all_skills)}")
if notebook_skills:
print(f"\n📚 Skills created by this notebook ({len(notebook_skills)}):")
for skill in notebook_skills:
print(f" • {skill['display_title']}")
print(f" ID: {skill['skill_id']}")
print(f" Version: {skill['latest_version']}")
print(f" Created: {skill['created_at']}")
else:
print("\n✅ No skills from this notebook found")
if other_skills:
print(f"\n🔧 Other skills in workspace ({len(other_skills)}):")
for skill in other_skills:
print(f" • {skill['display_title']} (v{skill['latest_version']})")
# Cleanup options
if notebook_skills:
print("\n" + "=" * 70)
print("CLEANUP OPTIONS")
print("=" * 70)
if dry_run:
print("\n🔍 DRY RUN MODE - No skills will be deleted")
print("\nTo delete the notebook skills, uncomment and run:")
print("-" * 40)
print("# review_and_cleanup_skills(client, dry_run=False)")
print("-" * 40)
print("\nThis would delete:")
for skill in notebook_skills:
print(f" • {skill['display_title']}")
else:
print("\n⚠️ DELETION MODE - Skills will be permanently removed")
print("\nDeleting notebook skills...")
success_count = 0
for skill in notebook_skills:
if delete_skill(client, skill["skill_id"]):
print(f" ✅ Deleted: {skill['display_title']}")
success_count += 1
else:
print(f" ❌ Failed to delete: {skill['display_title']}")
print(f"\n📊 Cleanup complete: {success_count}/{len(notebook_skills)} skills deleted")
return {
"total_skills": len(all_skills),
"notebook_skills": len(notebook_skills),
"other_skills": len(other_skills),
"notebook_skill_ids": [s["skill_id"] for s in notebook_skills],
}
# Run the review (in dry-run mode by default)
print("Reviewing your custom skills workspace...")
cleanup_summary = review_and_cleanup_skills(client, dry_run=True)
# Store skill IDs for potential cleanup
if cleanup_summary["notebook_skill_ids"]:
skills_to_cleanup = cleanup_summary["notebook_skill_ids"]
print(f"\n💡 Tip: {len(skills_to_cleanup)} skill(s) can be cleaned up when you're done testing")
# UNCOMMENT THE LINE BELOW TO ACTUALLY DELETE THE NOTEBOOK SKILLS:
# review_and_cleanup_skills(client, dry_run=False)
```
:::
::: {.cell .markdown}
## 7. Best Practices & Production Tips {#best-practices} {#7-best-practices--production-tips-best-practices}
### Skill Design Principles
1. **Single Responsibility**: Each skill should focus on one area of
expertise
2. **Clear Documentation**: SKILL.md should be comprehensive yet
concise
3. **Error Handling**: Scripts should handle edge cases gracefully
4. **Version Control**: Use Git to track skill changes
5. **Testing**: Always test skills before production deployment
### Directory Structure Best Practices
custom_skills/
├── financial_analyzer/ # Single purpose, clear naming
│ ├── SKILL.md # Under 5,000 tokens
│ ├── scripts/ # Modular Python/JS files
│ └── tests/ # Unit tests for scripts
├── brand_guidelines/ # Organizational standards
│ ├── SKILL.md
│ ├── REFERENCE.md # Additional documentation
│ └── assets/ # Logos, templates
### Performance Optimization
-----------------------------------------------------------------------
Strategy Impact Implementation
-------------------- ---------------- ---------------------------------
**Minimal Faster skill name: 64 chars, description: 1024
Frontmatter** discovery chars
**Lazy Loading** Reduced token Reference files only when needed
usage
**Skill Avoid Combine skills vs. mega-skill
Composition** duplication
**Caching** Faster responses Reuse skill containers
-----------------------------------------------------------------------
### Security Considerations
- **API Keys**: Never hardcode credentials in skills
- **Data Privacy**: Don\'t include sensitive data in skill files
- **Access Control**: Skills are workspace-specific
- **Validation**: Sanitize inputs in scripts
- **Audit Trail**: Log skill usage for compliance
:::
::: {.cell .markdown}
## Next Steps
🎉 **Congratulations!** You\'ve learned how to create, deploy, and
manage custom skills for Claude.
### What You\'ve Learned
- ✅ Custom skill architecture and requirements
- ✅ Creating skills with SKILL.md and Python scripts
- ✅ Uploading skills via the API
- ✅ Combining custom and Anthropic skills
- ✅ Best practices for production deployment
- ✅ Troubleshooting common issues
### Continue Your Journey
1. **Experiment**: Modify the example skills for your use cases
2. **Build**: Create skills for your organization\'s workflows
3. **Optimize**: Monitor token usage and performance
4. **Share**: Document your skills for team collaboration
### Resources
- [Claude API Documentation](https://docs.anthropic.com/en/api/messages)
- [Skills
Documentation](https://docs.claude.com/en/docs/agents-and-tools/agent-skills/overview)
- [Best
Practices](https://docs.claude.com/en/docs/agents-and-tools/agent-skills/best-practices)
- [Files API
Documentation](https://docs.claude.com/en/api/files-content)
- Example Skills Repository (coming soon)
### Skill Ideas to Try
- 📊 **Data Pipeline**: ETL workflows with validation
- 📝 **Document Templates**: Contracts, proposals, reports
- 🔍 **Code Review**: Style guides and best practices
- 📈 **Analytics Dashboard**: KPI tracking and visualization
- 🤖 **Automation Suite**: Repetitive task workflows
Happy skill building! 🚀
:::
---
## a-complete-guide-to-building-skills-for-claude-claude.md

- Share
[Copy link](https://claude.com/blog/complete-guide-to-building-skills-for-claude#)
https://claude.com/blog/complete-guide-to-building-skills-for-claude
Since [launching Skills in October](https://claude.com/blog/skills), we've seen strong interest from developers who want Claude to follow specific workflows consistently, power users automating repeatable tasks like document creation or research processes, teams looking to standardize how Claude operates across their organization, and MCP connector builders pairing their integrations with reliable workflows.
The common thread: people want more detailed guidance on building effective skills—whether for standalone workflows or MCP-enhanced integrations—from planning and structure to testing and distribution.
We put together this guide to fill that gap. It covers everything from technical requirements and skill structure to testing approaches and common troubleshooting patterns. Whether you're building standalone skills that work with Claude's built-in capabilities or enhancing an MCP integration, you'll find the guidance relevant—with a dedicated section on MCP + Skills for those who want it.
**What you'll learn:**
- Technical requirements and best practices for skill structure
- Patterns for standalone skills and MCP-enhanced workflows
- Patterns that have worked across different use cases
- How to test, iterate, and distribute your skills
If you know the top 2-3 workflows you want to automate, expect about 15-30 minutes to build and test your first working skill using the skill-creator.
**Who this is for:**
- Developers who want Claude to follow specific workflows consistently
- MCP connector builders adding workflow knowledge to their integrations
- Power users automating repeatable tasks
- Teams looking to standardize how Claude works across their organization
Download the guide [here](https://resources.anthropic.com/hubfs/The-Complete-Guide-to-Building-Skill-for-Claude.pdf?hsLang=en).
## Transform how your organization operates with Claude
Get the developer newsletter
Product updates, how-tos, community spotlights, and more. Delivered monthly to your inbox.
Please provide your email address if you'd like to receive our monthly developer newsletter. You can unsubscribe at any time.
Thank you! You’re subscribed.
Sorry, there was a problem with your submission, please try again later.
---
## advanced-plugin.md
# Advanced Plugin Example
A complex, enterprise-grade plugin with MCP integration and advanced organization.
## Directory Structure
```
enterprise-devops/
├── .claude-plugin/
│ └── plugin.json
├── commands/
│ ├── ci/
│ │ ├── build.md
│ │ ├── test.md
│ │ └── deploy.md
│ ├── monitoring/
│ │ ├── status.md
│ │ └── logs.md
│ └── admin/
│ ├── configure.md
│ └── manage.md
├── agents/
│ ├── orchestration/
│ │ ├── deployment-orchestrator.md
│ │ └── rollback-manager.md
│ └── specialized/
│ ├── kubernetes-expert.md
│ ├── terraform-expert.md
│ └── security-auditor.md
├── skills/
│ ├── kubernetes-ops/
│ │ ├── SKILL.md
│ │ ├── references/
│ │ │ ├── deployment-patterns.md
│ │ │ ├── troubleshooting.md
│ │ │ └── security.md
│ │ ├── examples/
│ │ │ ├── basic-deployment.yaml
│ │ │ ├── stateful-set.yaml
│ │ │ └── ingress-config.yaml
│ │ └── scripts/
│ │ ├── validate-manifest.sh
│ │ └── health-check.sh
│ ├── terraform-iac/
│ │ ├── SKILL.md
│ │ ├── references/
│ │ │ └── best-practices.md
│ │ └── examples/
│ │ └── module-template/
│ └── ci-cd-pipelines/
│ ├── SKILL.md
│ └── references/
│ └── pipeline-patterns.md
├── hooks/
│ ├── hooks.json
│ └── scripts/
│ ├── security/
│ │ ├── scan-secrets.sh
│ │ ├── validate-permissions.sh
│ │ └── audit-changes.sh
│ ├── quality/
│ │ ├── check-config.sh
│ │ └── verify-tests.sh
│ └── workflow/
│ ├── notify-team.sh
│ └── update-status.sh
├── .mcp.json
├── servers/
│ ├── kubernetes-mcp/
│ │ ├── index.js
│ │ ├── package.json
│ │ └── lib/
│ ├── terraform-mcp/
│ │ ├── main.py
│ │ └── requirements.txt
│ └── github-actions-mcp/
│ ├── server.js
│ └── package.json
├── lib/
│ ├── core/
│ │ ├── logger.js
│ │ ├── config.js
│ │ └── auth.js
│ ├── integrations/
│ │ ├── slack.js
│ │ ├── pagerduty.js
│ │ └── datadog.js
│ └── utils/
│ ├── retry.js
│ └── validation.js
└── config/
├── environments/
│ ├── production.json
│ ├── staging.json
│ └── development.json
└── templates/
├── deployment.yaml
└── service.yaml
```
## File Contents
### .claude-plugin/plugin.json
```json
{
"name": "enterprise-devops",
"version": "2.3.1",
"description": "Comprehensive DevOps automation for enterprise CI/CD pipelines, infrastructure management, and monitoring",
"author": {
"name": "DevOps Platform Team",
"email": "devops-platform@company.com",
"url": "https://company.com/teams/devops"
},
"homepage": "https://docs.company.com/plugins/devops",
"repository": {
"type": "git",
"url": "https://github.com/company/devops-plugin.git"
},
"license": "Apache-2.0",
"keywords": [
"devops",
"ci-cd",
"kubernetes",
"terraform",
"automation",
"infrastructure",
"deployment",
"monitoring"
],
"commands": [
"./commands/ci",
"./commands/monitoring",
"./commands/admin"
],
"agents": [
"./agents/orchestration",
"./agents/specialized"
],
"hooks": "./hooks/hooks.json",
"mcpServers": "./.mcp.json"
}
```
### .mcp.json
```json
{
"mcpServers": {
"kubernetes": {
"command": "node",
"args": ["${CLAUDE_PLUGIN_ROOT}/servers/kubernetes-mcp/index.js"],
"env": {
"KUBECONFIG": "${KUBECONFIG}",
"K8S_NAMESPACE": "${K8S_NAMESPACE:-default}"
}
},
"terraform": {
"command": "python",
"args": ["${CLAUDE_PLUGIN_ROOT}/servers/terraform-mcp/main.py"],
"env": {
"TF_STATE_BUCKET": "${TF_STATE_BUCKET}",
"AWS_REGION": "${AWS_REGION}"
}
},
"github-actions": {
"command": "node",
"args": ["${CLAUDE_PLUGIN_ROOT}/servers/github-actions-mcp/server.js"],
"env": {
"GITHUB_TOKEN": "${GITHUB_TOKEN}",
"GITHUB_ORG": "${GITHUB_ORG}"
}
}
}
}
```
### commands/ci/build.md
```markdown
---
name: build
description: Trigger and monitor CI build pipeline
---
# Build Command
Trigger CI/CD build pipeline and monitor progress in real-time.
## Process
1. **Validation**: Check prerequisites
- Verify branch status
- Check for uncommitted changes
- Validate configuration files
2. **Trigger**: Start build via MCP server
\`\`\`javascript
// Uses github-actions MCP server
const build = await tools.github_actions_trigger_workflow({
workflow: 'build.yml',
ref: currentBranch
})
\`\`\`
3. **Monitor**: Track build progress
- Display real-time logs
- Show test results as they complete
- Alert on failures
4. **Report**: Summarize results
- Build status
- Test coverage
- Performance metrics
- Deploy readiness
## Integration
After successful build:
- Offer to deploy to staging
- Suggest performance optimizations
- Generate deployment checklist
```
### agents/orchestration/deployment-orchestrator.md
```markdown
---
description: Orchestrates complex multi-environment deployments with rollback capabilities and health monitoring
capabilities:
- Plan and execute multi-stage deployments
- Coordinate service dependencies
- Monitor deployment health
- Execute automated rollbacks
- Manage deployment approvals
---
# Deployment Orchestrator Agent
Specialized agent for orchestrating complex deployments across multiple environments.
## Expertise
- **Deployment strategies**: Blue-green, canary, rolling updates
- **Dependency management**: Service startup ordering, dependency injection
- **Health monitoring**: Service health checks, metric validation
- **Rollback automation**: Automatic rollback on failure detection
- **Approval workflows**: Multi-stage approval processes
## Orchestration Process
1. **Planning Phase**
- Analyze deployment requirements
- Identify service dependencies
- Generate deployment plan
- Calculate rollback strategy
2. **Validation Phase**
- Verify environment readiness
- Check resource availability
- Validate configurations
- Run pre-deployment tests
3. **Execution Phase**
- Deploy services in dependency order
- Monitor health after each stage
- Validate metrics and logs
- Proceed to next stage on success
4. **Verification Phase**
- Run smoke tests
- Validate service integration
- Check performance metrics
- Confirm deployment success
5. **Rollback Phase** (if needed)
- Detect failure conditions
- Execute rollback plan
- Restore previous state
- Notify stakeholders
## MCP Integration
Uses multiple MCP servers:
- `kubernetes`: Deploy and manage containers
- `terraform`: Provision infrastructure
- `github-actions`: Trigger deployment pipelines
## Monitoring Integration
Integrates with monitoring tools via lib:
\`\`\`javascript
const { DatadogClient } = require('${CLAUDE_PLUGIN_ROOT}/lib/integrations/datadog')
const metrics = await DatadogClient.getMetrics(service, timeRange)
\`\`\`
## Notification Integration
Sends updates via Slack and PagerDuty:
\`\`\`javascript
const { SlackClient } = require('${CLAUDE_PLUGIN_ROOT}/lib/integrations/slack')
await SlackClient.notify({
channel: '#deployments',
message: 'Deployment started',
metadata: deploymentPlan
})
\`\`\`
```
### skills/kubernetes-ops/SKILL.md
```markdown
---
name: Kubernetes Operations
description: This skill should be used when deploying to Kubernetes, managing K8s resources, troubleshooting cluster issues, configuring ingress/services, scaling deployments, or working with Kubernetes manifests. Provides comprehensive Kubernetes operational knowledge and best practices.
version: 2.0.0
---
# Kubernetes Operations
Comprehensive operational knowledge for managing Kubernetes clusters and workloads.
## Overview
Manage Kubernetes infrastructure effectively through:
- Deployment strategies and patterns
- Resource configuration and optimization
- Troubleshooting and debugging
- Security best practices
- Performance tuning
## Core Concepts
### Resource Management
**Deployments**: Use for stateless applications
- Rolling updates for zero-downtime deployments
- Rollback capabilities for failed deployments
- Replica management for scaling
**StatefulSets**: Use for stateful applications
- Stable network identities
- Persistent storage
- Ordered deployment and scaling
**DaemonSets**: Use for node-level services
- Log collectors
- Monitoring agents
- Network plugins
### Configuration
**ConfigMaps**: Store non-sensitive configuration
- Environment-specific settings
- Application configuration files
- Feature flags
**Secrets**: Store sensitive data
- API keys and tokens
- Database credentials
- TLS certificates
Use external secret management (Vault, AWS Secrets Manager) for production.
### Networking
**Services**: Expose applications internally
- ClusterIP for internal communication
- NodePort for external access (non-production)
- LoadBalancer for external access (production)
**Ingress**: HTTP/HTTPS routing
- Path-based routing
- Host-based routing
- TLS termination
- Load balancing
## Deployment Strategies
### Rolling Update
Default strategy, gradual replacement:
\`\`\`yaml
strategy:
type: RollingUpdate
rollingUpdate:
maxSurge: 1
maxUnavailable: 0
\`\`\`
**When to use**: Standard deployments, minor updates
### Recreate
Stop all pods, then create new ones:
\`\`\`yaml
strategy:
type: Recreate
\`\`\`
**When to use**: Stateful apps that can't run multiple versions
### Blue-Green
Run two complete environments, switch traffic:
1. Deploy new version (green)
2. Test green environment
3. Switch traffic to green
4. Keep blue for quick rollback
**When to use**: Critical services, need instant rollback
### Canary
Gradually roll out to subset of users:
1. Deploy canary version (10% traffic)
2. Monitor metrics and errors
3. Increase traffic gradually
4. Complete rollout or rollback
**When to use**: High-risk changes, want gradual validation
## Resource Configuration
### Resource Requests and Limits
Always set for production workloads:
\`\`\`yaml
resources:
requests:
memory: "256Mi"
cpu: "250m"
limits:
memory: "512Mi"
cpu: "500m"
\`\`\`
**Requests**: Guaranteed resources
**Limits**: Maximum allowed resources
### Health Checks
Essential for reliability:
\`\`\`yaml
livenessProbe:
httpGet:
path: /health
port: 8080
initialDelaySeconds: 30
periodSeconds: 10
readinessProbe:
httpGet:
path: /ready
port: 8080
initialDelaySeconds: 5
periodSeconds: 5
\`\`\`
**Liveness**: Restart unhealthy pods
**Readiness**: Remove unready pods from service
## Troubleshooting
### Common Issues
1. **Pods not starting**
- Check: `kubectl describe pod <name>`
- Look for: Image pull errors, resource constraints
- Fix: Verify image name, increase resources
2. **Service not reachable**
- Check: `kubectl get svc`, `kubectl get endpoints`
- Look for: No endpoints, wrong selector
- Fix: Verify pod labels match service selector
3. **High memory usage**
- Check: `kubectl top pods`
- Look for: Pods near memory limit
- Fix: Increase limits, optimize application
4. **Frequent restarts**
- Check: `kubectl get pods`, `kubectl logs <name>`
- Look for: Liveness probe failures, OOMKilled
- Fix: Adjust health checks, increase memory
### Debugging Commands
Get pod details:
\`\`\`bash
kubectl describe pod <name>
kubectl logs <name>
kubectl logs <name> --previous # logs from crashed container
\`\`\`
Execute commands in pod:
\`\`\`bash
kubectl exec -it <name> -- /bin/sh
kubectl exec <name> -- env
\`\`\`
Check resource usage:
\`\`\`bash
kubectl top nodes
kubectl top pods
\`\`\`
## Security Best Practices
### Pod Security
- Run as non-root user
- Use read-only root filesystem
- Drop unnecessary capabilities
- Use security contexts
Example:
\`\`\`yaml
securityContext:
runAsNonRoot: true
runAsUser: 1000
readOnlyRootFilesystem: true
capabilities:
drop:
- ALL
\`\`\`
### Network Policies
Restrict pod communication:
\`\`\`yaml
apiVersion: networking.k8s.io/v1
kind: NetworkPolicy
metadata:
name: api-allow
spec:
podSelector:
matchLabels:
app: api
ingress:
- from:
- podSelector:
matchLabels:
app: frontend
\`\`\`
### Secrets Management
- Never commit secrets to git
- Use external secret managers
- Rotate secrets regularly
- Limit secret access with RBAC
## Performance Optimization
### Resource Tuning
1. **Start conservative**: Set low limits initially
2. **Monitor usage**: Track actual resource consumption
3. **Adjust gradually**: Increase based on metrics
4. **Set appropriate requests**: Match typical usage
5. **Set safe limits**: 2x requests for headroom
### Horizontal Pod Autoscaling
Automatically scale based on metrics:
\`\`\`yaml
apiVersion: autoscaling/v2
kind: HorizontalPodAutoscaler
metadata:
name: api-hpa
spec:
scaleTargetRef:
apiVersion: apps/v1
kind: Deployment
name: api
minReplicas: 2
maxReplicas: 10
metrics:
- type: Resource
resource:
name: cpu
target:
type: Utilization
averageUtilization: 70
\`\`\`
## MCP Server Integration
This skill works with the kubernetes MCP server for operations:
**List pods**:
\`\`\`javascript
const pods = await tools.k8s_list_pods({ namespace: 'default' })
\`\`\`
**Get pod logs**:
\`\`\`javascript
const logs = await tools.k8s_get_logs({ pod: 'api-xyz', container: 'app' })
\`\`\`
**Apply manifests**:
\`\`\`javascript
const result = await tools.k8s_apply_manifest({ file: 'deployment.yaml' })
\`\`\`
## Detailed References
For in-depth information:
- **Deployment patterns**: `references/deployment-patterns.md`
- **Troubleshooting guide**: `references/troubleshooting.md`
- **Security hardening**: `references/security.md`
## Example Manifests
For copy-paste examples:
- **Basic deployment**: `examples/basic-deployment.yaml`
- **StatefulSet**: `examples/stateful-set.yaml`
- **Ingress config**: `examples/ingress-config.yaml`
## Validation Scripts
For manifest validation:
\`\`\`bash
bash ${CLAUDE_PLUGIN_ROOT}/skills/kubernetes-ops/scripts/validate-manifest.sh deployment.yaml
\`\`\`
```
### hooks/hooks.json
```json
{
"PreToolUse": [
{
"matcher": "Write|Edit",
"hooks": [
{
"type": "command",
"command": "bash ${CLAUDE_PLUGIN_ROOT}/hooks/scripts/security/scan-secrets.sh",
"timeout": 30
}
]
},
{
"matcher": "Bash",
"hooks": [
{
"type": "prompt",
"prompt": "Evaluate if this bash command is safe for production environment. Check for destructive operations, missing safeguards, and potential security issues. Commands should be idempotent and reversible.",
"timeout": 20
}
]
}
],
"PostToolUse": [
{
"matcher": "Bash",
"hooks": [
{
"type": "command",
"command": "bash ${CLAUDE_PLUGIN_ROOT}/hooks/scripts/workflow/update-status.sh",
"timeout": 15
}
]
}
],
"Stop": [
{
"matcher": ".*",
"hooks": [
{
"type": "command",
"command": "bash ${CLAUDE_PLUGIN_ROOT}/hooks/scripts/quality/check-config.sh",
"timeout": 45
},
{
"type": "command",
"command": "bash ${CLAUDE_PLUGIN_ROOT}/hooks/scripts/workflow/notify-team.sh",
"timeout": 30
}
]
}
],
"SessionStart": [
{
"matcher": ".*",
"hooks": [
{
"type": "command",
"command": "bash ${CLAUDE_PLUGIN_ROOT}/hooks/scripts/security/validate-permissions.sh",
"timeout": 20
}
]
}
]
}
```
## Key Features
### Multi-Level Organization
**Commands**: Organized by function (CI, monitoring, admin)
**Agents**: Separated by role (orchestration vs. specialized)
**Skills**: Rich resources (references, examples, scripts)
### MCP Integration
Three custom MCP servers:
- **Kubernetes**: Cluster operations
- **Terraform**: Infrastructure provisioning
- **GitHub Actions**: CI/CD automation
### Shared Libraries
Reusable code in `lib/`:
- **Core**: Common utilities (logging, config, auth)
- **Integrations**: External services (Slack, Datadog)
- **Utils**: Helper functions (retry, validation)
### Configuration Management
Environment-specific configs in `config/`:
- **Environments**: Per-environment settings
- **Templates**: Reusable deployment templates
### Security Automation
Multiple security hooks:
- Secret scanning before writes
- Permission validation on session start
- Configuration auditing on completion
### Monitoring Integration
Built-in monitoring via lib integrations:
- Datadog for metrics
- PagerDuty for alerts
- Slack for notifications
## Use Cases
1. **Multi-environment deployments**: Orchestrated rollouts across dev/staging/prod
2. **Infrastructure as code**: Terraform automation with state management
3. **CI/CD automation**: Build, test, deploy pipelines
4. **Monitoring and observability**: Integrated metrics and alerting
5. **Security enforcement**: Automated security scanning and validation
6. **Team collaboration**: Slack notifications and status updates
## When to Use This Pattern
- Large-scale enterprise deployments
- Multiple environment management
- Complex CI/CD workflows
- Integrated monitoring requirements
- Security-critical infrastructure
- Team collaboration needs
## Scaling Considerations
- **Performance**: Separate MCP servers for parallel operations
- **Organization**: Multi-level directories for scalability
- **Maintainability**: Shared libraries reduce duplication
- **Flexibility**: Environment configs enable customization
- **Security**: Layered security hooks and validation
---
## agent-sdk-development-plugin.md
# Agent SDK Development Plugin
A comprehensive plugin for creating and verifying Claude Agent SDK applications in Python and TypeScript.
## Overview
The Agent SDK Development Plugin streamlines the entire lifecycle of building Agent SDK applications, from initial scaffolding to verification against best practices. It helps you quickly start new projects with the latest SDK versions and ensures your applications follow official documentation patterns.
## Features
### Command: `/new-sdk-app`
Interactive command that guides you through creating a new Claude Agent SDK application.
**What it does:**
- Asks clarifying questions about your project (language, name, agent type, starting point)
- Checks for and installs the latest SDK version
- Creates all necessary project files and configuration
- Sets up proper environment files (.env.example, .gitignore)
- Provides a working example tailored to your use case
- Runs type checking (TypeScript) or syntax validation (Python)
- Automatically verifies the setup using the appropriate verifier agent
**Usage:**
```bash
/new-sdk-app my-project-name
```
Or simply:
```bash
/new-sdk-app
```
The command will interactively ask you:
1. Language choice (TypeScript or Python)
2. Project name (if not provided)
3. Agent type (coding, business, custom)
4. Starting point (minimal, basic, or specific example)
5. Tooling preferences (npm/yarn/pnpm or pip/poetry)
**Example:**
```bash
/new-sdk-app customer-support-agent
# → Creates a new Agent SDK project for a customer support agent
# → Sets up TypeScript or Python environment
# → Installs latest SDK version
# → Verifies the setup automatically
```
### Agent: `agent-sdk-verifier-py`
Thoroughly verifies Python Agent SDK applications for correct setup and best practices.
**Verification checks:**
- SDK installation and version
- Python environment setup (requirements.txt, pyproject.toml)
- Correct SDK usage and patterns
- Agent initialization and configuration
- Environment and security (.env, API keys)
- Error handling and functionality
- Documentation completeness
**When to use:**
- After creating a new Python SDK project
- After modifying an existing Python SDK application
- Before deploying a Python SDK application
**Usage:**
The agent runs automatically after `/new-sdk-app` creates a Python project, or you can trigger it by asking:
```
"Verify my Python Agent SDK application"
"Check if my SDK app follows best practices"
```
**Output:**
Provides a comprehensive report with:
- Overall status (PASS / PASS WITH WARNINGS / FAIL)
- Critical issues that prevent functionality
- Warnings about suboptimal patterns
- List of passed checks
- Specific recommendations with SDK documentation references
### Agent: `agent-sdk-verifier-ts`
Thoroughly verifies TypeScript Agent SDK applications for correct setup and best practices.
**Verification checks:**
- SDK installation and version
- TypeScript configuration (tsconfig.json)
- Correct SDK usage and patterns
- Type safety and imports
- Agent initialization and configuration
- Environment and security (.env, API keys)
- Error handling and functionality
- Documentation completeness
**When to use:**
- After creating a new TypeScript SDK project
- After modifying an existing TypeScript SDK application
- Before deploying a TypeScript SDK application
**Usage:**
The agent runs automatically after `/new-sdk-app` creates a TypeScript project, or you can trigger it by asking:
```
"Verify my TypeScript Agent SDK application"
"Check if my SDK app follows best practices"
```
**Output:**
Provides a comprehensive report with:
- Overall status (PASS / PASS WITH WARNINGS / FAIL)
- Critical issues that prevent functionality
- Warnings about suboptimal patterns
- List of passed checks
- Specific recommendations with SDK documentation references
## Workflow Example
Here's a typical workflow using this plugin:
1. **Create a new project:**
```bash
/new-sdk-app code-reviewer-agent
```
2. **Answer the interactive questions:**
```
Language: TypeScript
Agent type: Coding agent (code review)
Starting point: Basic agent with common features
```
3. **Automatic verification:**
The command automatically runs `agent-sdk-verifier-ts` to ensure everything is correctly set up.
4. **Start developing:**
```bash
# Set your API key
echo "ANTHROPIC_API_KEY=your_key_here" > .env
# Run your agent
npm start
```
5. **Verify after changes:**
```
"Verify my SDK application"
```
## Installation
This plugin is included in the Claude Code repository. To use it:
1. Ensure Claude Code is installed
2. The plugin commands and agents are automatically available
## Best Practices
- **Always use the latest SDK version**: `/new-sdk-app` checks for and installs the latest version
- **Verify before deploying**: Run the verifier agent before deploying to production
- **Keep API keys secure**: Never commit `.env` files or hardcode API keys
- **Follow SDK documentation**: The verifier agents check against official patterns
- **Type check TypeScript projects**: Run `npx tsc --noEmit` regularly
- **Test your agents**: Create test cases for your agent's functionality
## Resources
- [Agent SDK Overview](https://docs.claude.com/en/api/agent-sdk/overview)
- [TypeScript SDK Reference](https://docs.claude.com/en/api/agent-sdk/typescript)
- [Python SDK Reference](https://docs.claude.com/en/api/agent-sdk/python)
- [Agent SDK Examples](https://docs.claude.com/en/api/agent-sdk/examples)
## Troubleshooting
### Type errors in TypeScript project
**Issue**: TypeScript project has type errors after creation
**Solution**:
- The `/new-sdk-app` command runs type checking automatically
- If errors persist, check that you're using the latest SDK version
- Verify your `tsconfig.json` matches SDK requirements
### Python import errors
**Issue**: Cannot import from `claude_agent_sdk`
**Solution**:
- Ensure you've installed dependencies: `pip install -r requirements.txt`
- Activate your virtual environment if using one
- Check that the SDK is installed: `pip show claude-agent-sdk`
### Verification fails with warnings
**Issue**: Verifier agent reports warnings
**Solution**:
- Review the specific warnings in the report
- Check the SDK documentation references provided
- Warnings don't prevent functionality but indicate areas for improvement
## Author
Ashwin Bhat (ashwin@anthropic.com)
## Version
1.0.0
---
## agent-sdk-plugins-8416c8e5b2.md
> ## Documentation Index
> Fetch the complete documentation index at: https://code.claude.com/docs/llms.txt
> Use this file to discover all available pages before exploring further.
# Plugins in the SDK
> Load custom plugins to extend Claude Code with commands, agents, skills, and hooks through the Agent SDK
Plugins allow you to extend Claude Code with custom functionality that can be shared across projects. Through the Agent SDK, you can programmatically load plugins from local directories to add custom slash commands, agents, skills, hooks, and MCP servers to your agent sessions.
## What are plugins?
Plugins are packages of Claude Code extensions that can include:
* **Skills**: Model-invoked capabilities that Claude uses autonomously (can also be invoked with `/skill-name`)
* **Agents**: Specialized subagents for specific tasks
* **Hooks**: Event handlers that respond to tool use and other events
* **MCP servers**: External tool integrations via Model Context Protocol
<Note>
The `commands/` directory is a legacy format. Use `skills/` for new plugins. Claude Code continues to support both formats for backward compatibility.
</Note>
For complete information on plugin structure and how to create plugins, see [Plugins](create-plugins-claude-code-docs.md).
## Loading plugins
Load plugins by providing their local file system paths in your options configuration. The SDK supports loading multiple plugins from different locations.
<CodeGroup>
```typescript TypeScript theme={null}
import { query } from "@anthropic-ai/claude-agent-sdk";
for await (const message of query({
prompt: "Hello",
options: {
plugins: [
{ type: "local", path: "./my-plugin" },
{ type: "local", path: "/absolute/path/to/another-plugin" }
]
}
})) {
// Plugin commands, agents, and other features are now available
}
```
```python Python theme={null}
import asyncio
from claude_agent_sdk import query
async def main():
async for message in query(
prompt="Hello",
options={
"plugins": [
{"type": "local", "path": "./my-plugin"},
{"type": "local", "path": "/absolute/path/to/another-plugin"},
]
},
):
# Plugin commands, agents, and other features are now available
pass
asyncio.run(main())
```
</CodeGroup>
### Path specifications
Plugin paths can be:
* **Relative paths**: Resolved relative to your current working directory (for example, `"./plugins/my-plugin"`)
* **Absolute paths**: Full file system paths (for example, `"/home/user/plugins/my-plugin"`)
<Note>
The path should point to the plugin's root directory (the directory containing `.claude-plugin/plugin.json`).
</Note>
## Verifying plugin installation
When plugins load successfully, they appear in the system initialization message. You can verify that your plugins are available:
<CodeGroup>
```typescript TypeScript theme={null}
import { query } from "@anthropic-ai/claude-agent-sdk";
for await (const message of query({
prompt: "Hello",
options: {
plugins: [{ type: "local", path: "./my-plugin" }]
}
})) {
if (message.type === "system" && message.subtype === "init") {
// Check loaded plugins
console.log("Plugins:", message.plugins);
// Example: [{ name: "my-plugin", path: "./my-plugin" }]
// Check available commands from plugins
console.log("Commands:", message.slash_commands);
// Example: ["/help", "/compact", "my-plugin:custom-command"]
}
}
```
```python Python theme={null}
import asyncio
from claude_agent_sdk import query
async def main():
async for message in query(
prompt="Hello", options={"plugins": [{"type": "local", "path": "./my-plugin"}]}
):
if message.type == "system" and message.subtype == "init":
# Check loaded plugins
print("Plugins:", message.data.get("plugins"))
# Example: [{"name": "my-plugin", "path": "./my-plugin"}]
# Check available commands from plugins
print("Commands:", message.data.get("slash_commands"))
# Example: ["/help", "/compact", "my-plugin:custom-command"]
asyncio.run(main())
```
</CodeGroup>
## Using plugin skills
Skills from plugins are automatically namespaced with the plugin name to avoid conflicts. When invoked as slash commands, the format is `plugin-name:skill-name`.
<CodeGroup>
```typescript TypeScript theme={null}
import { query } from "@anthropic-ai/claude-agent-sdk";
// Load a plugin with a custom /greet skill
for await (const message of query({
prompt: "/my-plugin:greet", // Use plugin skill with namespace
options: {
plugins: [{ type: "local", path: "./my-plugin" }]
}
})) {
// Claude executes the custom greeting skill from the plugin
if (message.type === "assistant") {
console.log(message.message.content);
}
}
```
```python Python theme={null}
import asyncio
from claude_agent_sdk import query, AssistantMessage, TextBlock
async def main():
# Load a plugin with a custom /greet skill
async for message in query(
prompt="/demo-plugin:greet", # Use plugin skill with namespace
options={"plugins": [{"type": "local", "path": "./plugins/demo-plugin"}]},
):
# Claude executes the custom greeting skill from the plugin
if isinstance(message, AssistantMessage):
for block in message.content:
if isinstance(block, TextBlock):
print(f"Claude: {block.text}")
asyncio.run(main())
```
</CodeGroup>
<Note>
If you installed a plugin via the CLI (for example, `/plugin install my-plugin@marketplace`), you can still use it in the SDK by providing its installation path. Check `~/.claude/plugins/` for CLI-installed plugins.
</Note>
## Complete example
Here's a full example demonstrating plugin loading and usage:
<CodeGroup>
```typescript TypeScript theme={null}
import { query } from "@anthropic-ai/claude-agent-sdk";
import * as path from "path";
async function runWithPlugin() {
const pluginPath = path.join(__dirname, "plugins", "my-plugin");
console.log("Loading plugin from:", pluginPath);
for await (const message of query({
prompt: "What custom commands do you have available?",
options: {
plugins: [{ type: "local", path: pluginPath }],
maxTurns: 3
}
})) {
if (message.type === "system" && message.subtype === "init") {
console.log("Loaded plugins:", message.plugins);
console.log("Available commands:", message.slash_commands);
}
if (message.type === "assistant") {
console.log("Assistant:", message.message.content);
}
}
}
runWithPlugin().catch(console.error);
```
```python Python theme={null}
#!/usr/bin/env python3
"""Example demonstrating how to use plugins with the Agent SDK."""
from pathlib import Path
import anyio
from claude_agent_sdk import (
AssistantMessage,
ClaudeAgentOptions,
TextBlock,
query,
)
async def run_with_plugin():
"""Example using a custom plugin."""
plugin_path = Path(__file__).parent / "plugins" / "demo-plugin"
print(f"Loading plugin from: {plugin_path}")
options = ClaudeAgentOptions(
plugins=[{"type": "local", "path": str(plugin_path)}],
max_turns=3,
)
async for message in query(
prompt="What custom commands do you have available?", options=options
):
if message.type == "system" and message.subtype == "init":
print(f"Loaded plugins: {message.data.get('plugins')}")
print(f"Available commands: {message.data.get('slash_commands')}")
if isinstance(message, AssistantMessage):
for block in message.content:
if isinstance(block, TextBlock):
print(f"Assistant: {block.text}")
if __name__ == "__main__":
anyio.run(run_with_plugin)
```
</CodeGroup>
## Plugin structure reference
A plugin directory must contain a `.claude-plugin/plugin.json` manifest file. It can optionally include:
```text theme={null}
my-plugin/
├── .claude-plugin/
│ └── plugin.json # Required: plugin manifest
├── skills/ # Agent Skills (invoked autonomously or via /skill-name)
│ └── my-skill/
│ └── SKILL.md
├── commands/ # Legacy: use skills/ instead
│ └── custom-cmd.md
├── agents/ # Custom agents
│ └── specialist.md
├── hooks/ # Event handlers
│ └── hooks.json
└── .mcp.json # MCP server definitions
```
For detailed information on creating plugins, see:
* [Plugins](create-plugins-claude-code-docs.md) - Complete plugin development guide
* [Plugins reference](plugins-reference-44aeea7968.md) - Technical specifications and schemas
## Common use cases
### Development and testing
Load plugins during development without installing them globally:
```typescript theme={null}
plugins: [{ type: "local", path: "./dev-plugins/my-plugin" }];
```
### Project-specific extensions
Include plugins in your project repository for team-wide consistency:
```typescript theme={null}
plugins: [{ type: "local", path: "./project-plugins/team-workflows" }];
```
### Multiple plugin sources
Combine plugins from different locations:
```typescript theme={null}
plugins: [
{ type: "local", path: "./local-plugin" },
{ type: "local", path: "~/.claude/custom-plugins/shared-plugin" }
];
```
## Troubleshooting
### Plugin not loading
If your plugin doesn't appear in the init message:
1. **Check the path**: Ensure the path points to the plugin root directory (containing `.claude-plugin/`)
2. **Validate plugin.json**: Ensure your manifest file has valid JSON syntax
3. **Check file permissions**: Ensure the plugin directory is readable
### Skills not appearing
If plugin skills don't work:
1. **Use the namespace**: Plugin skills require the `plugin-name:skill-name` format when invoked as slash commands
2. **Check init message**: Verify the skill appears in `slash_commands` with the correct namespace
3. **Validate skill files**: Ensure each skill has a `SKILL.md` file in its own subdirectory under `skills/` (for example, `skills/my-skill/SKILL.md`)
### Path resolution issues
If relative paths don't work:
1. **Check working directory**: Relative paths are resolved from your current working directory
2. **Use absolute paths**: For reliability, consider using absolute paths
3. **Normalize paths**: Use path utilities to construct paths correctly
## See also
* [Plugins](create-plugins-claude-code-docs.md) - Complete plugin development guide
* [Plugins reference](plugins-reference-44aeea7968.md) - Technical specifications
* [Slash Commands](/en/agent-sdk/slash-commands) - Using slash commands in the SDK
* [Subagents](/en/agent-sdk/subagents) - Working with specialized agents
* [Skills](/en/agent-sdk/skills) - Using Agent Skills
---
## agent-sdk-skills-2d478078db.md
> ## Documentation Index
> Fetch the complete documentation index at: https://code.claude.com/docs/llms.txt
> Use this file to discover all available pages before exploring further.
# Agent Skills in the SDK
> Extend Claude with specialized capabilities using Agent Skills in the Claude Agent SDK
## Overview
Agent Skills extend Claude with specialized capabilities that Claude autonomously invokes when relevant. Skills are packaged as `SKILL.md` files containing instructions, descriptions, and optional supporting resources.
For comprehensive information about Skills, including benefits, architecture, and authoring guidelines, see the [Agent Skills overview](../04-API-Reference/Agents-Tools/agents-and-tools-agent-skills-overview-a6ba167cbe.md).
## How Skills Work with the SDK
When using the Claude Agent SDK, Skills are:
1. **Defined as filesystem artifacts**: Created as `SKILL.md` files in specific directories (`.claude/skills/`)
2. **Loaded from filesystem**: Skills are loaded from filesystem locations governed by `settingSources` (TypeScript) or `setting_sources` (Python)
3. **Automatically discovered**: Once filesystem settings are loaded, Skill metadata is discovered at startup from user and project directories; full content loaded when triggered
4. **Model-invoked**: Claude autonomously chooses when to use them based on context
5. **Enabled via allowed\_tools**: Add `"Skill"` to your `allowed_tools` to enable Skills
Unlike subagents (which can be defined programmatically), Skills must be created as filesystem artifacts. The SDK does not provide a programmatic API for registering Skills.
<Note>
Skills are discovered through the filesystem setting sources. With default `query()` options, the SDK loads user and project sources, so skills in `~/.claude/skills/` and `<cwd>/.claude/skills/` are available. If you set `settingSources` explicitly, include `'user'` or `'project'` to keep skill discovery, or use the [`plugins` option](/en/agent-sdk/plugins) to load skills from a specific path.
</Note>
## Using Skills with the SDK
To use Skills with the SDK, you need to:
1. Include `"Skill"` in your `allowed_tools` configuration
2. Configure `settingSources`/`setting_sources` to load Skills from the filesystem
Once configured, Claude automatically discovers Skills from the specified directories and invokes them when relevant to the user's request.
<CodeGroup>
```python Python theme={null}
import asyncio
from claude_agent_sdk import query, ClaudeAgentOptions
async def main():
options = ClaudeAgentOptions(
cwd="/path/to/project", # Project with .claude/skills/
setting_sources=["user", "project"], # Load Skills from filesystem
allowed_tools=["Skill", "Read", "Write", "Bash"], # Enable Skill tool
)
async for message in query(
prompt="Help me process this PDF document", options=options
):
print(message)
asyncio.run(main())
```
```typescript TypeScript theme={null}
import { query } from "@anthropic-ai/claude-agent-sdk";
for await (const message of query({
prompt: "Help me process this PDF document",
options: {
cwd: "/path/to/project", // Project with .claude/skills/
settingSources: ["user", "project"], // Load Skills from filesystem
allowedTools: ["Skill", "Read", "Write", "Bash"] // Enable Skill tool
}
})) {
console.log(message);
}
```
</CodeGroup>
## Skill Locations
Skills are loaded from filesystem directories based on your `settingSources`/`setting_sources` configuration:
* **Project Skills** (`.claude/skills/`): Shared with your team via git - loaded when `setting_sources` includes `"project"`
* **User Skills** (`~/.claude/skills/`): Personal Skills across all projects - loaded when `setting_sources` includes `"user"`
* **Plugin Skills**: Bundled with installed Claude Code plugins
## Creating Skills
Skills are defined as directories containing a `SKILL.md` file with YAML frontmatter and Markdown content. The `description` field determines when Claude invokes your Skill.
**Example directory structure**:
```bash theme={null}
.claude/skills/processing-pdfs/
└── SKILL.md
```
For complete guidance on creating Skills, including SKILL.md structure, multi-file Skills, and examples, see:
* [Agent Skills in Claude Code](extend-claude-with-skills-claude-code-docs.md): Complete guide with examples
* [Agent Skills Best Practices](../04-API-Reference/Agents-Tools/agents-and-tools-agent-skills-best-practices-d1da876439.md): Authoring guidelines and naming conventions
## Tool Restrictions
<Note>
The `allowed-tools` frontmatter field in SKILL.md is only supported when using Claude Code CLI directly. **It does not apply when using Skills through the SDK**.
When using the SDK, control tool access through the main `allowedTools` option in your query configuration.
</Note>
To control tool access for Skills in SDK applications, use `allowedTools` to pre-approve specific tools. Without a `canUseTool` callback, anything not in the list is denied:
<Note>
Import statements from the first example are assumed in the following code snippets.
</Note>
<CodeGroup>
```python Python theme={null}
options = ClaudeAgentOptions(
setting_sources=["user", "project"], # Load Skills from filesystem
allowed_tools=["Skill", "Read", "Grep", "Glob"],
)
async for message in query(prompt="Analyze the codebase structure", options=options):
print(message)
```
```typescript TypeScript theme={null}
for await (const message of query({
prompt: "Analyze the codebase structure",
options: {
settingSources: ["user", "project"], // Load Skills from filesystem
allowedTools: ["Skill", "Read", "Grep", "Glob"],
permissionMode: "dontAsk" // Deny anything not in allowedTools
}
})) {
console.log(message);
}
```
</CodeGroup>
## Discovering Available Skills
To see which Skills are available in your SDK application, simply ask Claude:
<CodeGroup>
```python Python theme={null}
options = ClaudeAgentOptions(
setting_sources=["user", "project"], # Load Skills from filesystem
allowed_tools=["Skill"],
)
async for message in query(prompt="What Skills are available?", options=options):
print(message)
```
```typescript TypeScript theme={null}
for await (const message of query({
prompt: "What Skills are available?",
options: {
settingSources: ["user", "project"], // Load Skills from filesystem
allowedTools: ["Skill"]
}
})) {
console.log(message);
}
```
</CodeGroup>
Claude will list the available Skills based on your current working directory and installed plugins.
## Testing Skills
Test Skills by asking questions that match their descriptions:
<CodeGroup>
```python Python theme={null}
options = ClaudeAgentOptions(
cwd="/path/to/project",
setting_sources=["user", "project"], # Load Skills from filesystem
allowed_tools=["Skill", "Read", "Bash"],
)
async for message in query(prompt="Extract text from invoice.pdf", options=options):
print(message)
```
```typescript TypeScript theme={null}
for await (const message of query({
prompt: "Extract text from invoice.pdf",
options: {
cwd: "/path/to/project",
settingSources: ["user", "project"], // Load Skills from filesystem
allowedTools: ["Skill", "Read", "Bash"]
}
})) {
console.log(message);
}
```
</CodeGroup>
Claude automatically invokes the relevant Skill if the description matches your request.
## Troubleshooting
### Skills Not Found
**Check settingSources configuration**: Skills are discovered through the `user` and `project` setting sources. If you set `settingSources`/`setting_sources` explicitly and omit those sources, skills are not loaded:
<CodeGroup>
```python Python theme={null}
# Skills not loaded: setting_sources excludes user and project
options = ClaudeAgentOptions(setting_sources=[], allowed_tools=["Skill"])
# Skills loaded: user and project sources included
options = ClaudeAgentOptions(
setting_sources=["user", "project"],
allowed_tools=["Skill"],
)
```
```typescript TypeScript theme={null}
// Skills not loaded: settingSources excludes user and project
const options = {
settingSources: [],
allowedTools: ["Skill"]
};
// Skills loaded: user and project sources included
const options = {
settingSources: ["user", "project"],
allowedTools: ["Skill"]
};
```
</CodeGroup>
For more details on `settingSources`/`setting_sources`, see the [TypeScript SDK reference](/en/agent-sdk/typescript#setting-source) or [Python SDK reference](/en/agent-sdk/python#setting-source).
**Check working directory**: The SDK loads Skills relative to the `cwd` option. Ensure it points to a directory containing `.claude/skills/`:
<CodeGroup>
```python Python theme={null}
# Ensure your cwd points to the directory containing .claude/skills/
options = ClaudeAgentOptions(
cwd="/path/to/project", # Must contain .claude/skills/
setting_sources=["user", "project"], # Loads skills from these sources
allowed_tools=["Skill"],
)
```
```typescript TypeScript theme={null}
// Ensure your cwd points to the directory containing .claude/skills/
const options = {
cwd: "/path/to/project", // Must contain .claude/skills/
settingSources: ["user", "project"], // Loads skills from these sources
allowedTools: ["Skill"]
};
```
</CodeGroup>
See the "Using Skills with the SDK" section above for the complete pattern.
**Verify filesystem location**:
```bash theme={null}
# Check project Skills
ls .claude/skills/*/SKILL.md
# Check personal Skills
ls ~/.claude/skills/*/SKILL.md
```
### Skill Not Being Used
**Check the Skill tool is enabled**: Confirm `"Skill"` is in your `allowedTools`.
**Check the description**: Ensure it's specific and includes relevant keywords. See [Agent Skills Best Practices](../04-API-Reference/Agents-Tools/agents-and-tools-agent-skills-best-practices-d1da876439.md#writing-effective-descriptions) for guidance on writing effective descriptions.
### Additional Troubleshooting
For general Skills troubleshooting (YAML syntax, debugging, etc.), see the [Claude Code Skills troubleshooting section](/en/skills#troubleshooting).
## Related Documentation
### Skills Guides
* [Agent Skills in Claude Code](extend-claude-with-skills-claude-code-docs.md): Complete Skills guide with creation, examples, and troubleshooting
* [Agent Skills Overview](../04-API-Reference/Agents-Tools/agents-and-tools-agent-skills-overview-a6ba167cbe.md): Conceptual overview, benefits, and architecture
* [Agent Skills Best Practices](../04-API-Reference/Agents-Tools/agents-and-tools-agent-skills-best-practices-d1da876439.md): Authoring guidelines for effective Skills
* [Agent Skills Cookbook](https://platform.claude.com/cookbook/skills-notebooks-01-skills-introduction): Example Skills and templates
### SDK Resources
* [Subagents in the SDK](/en/agent-sdk/subagents): Similar filesystem-based agents with programmatic options
* [Slash Commands in the SDK](/en/agent-sdk/slash-commands): User-invoked commands
* [SDK Overview](/en/agent-sdk/overview): General SDK concepts
* [TypeScript SDK Reference](/en/agent-sdk/typescript): Complete API documentation
* [Python SDK Reference](/en/agent-sdk/python): Complete API documentation
---
## best-practices-for-skill-creators-agent-skills-a7c579abbd.md
# Best practices for skill creators
How to write skills that are well-scoped and calibrated to the task.
Start from real expertise
A common pitfall in skill creation is asking an LLM to generate a skill without providing domain-specific context — relying solely on the LLM’s general training knowledge. The result is vague, generic procedures (“handle errors appropriately,” “follow best practices for authentication”) rather than the specific API patterns, edge cases, and project conventions that make a skill valuable. Effective skills are grounded in real expertise. The key is feeding domain-specific context into the creation process.
Extract from a hands-on task
Complete a real task in conversation with an agent, providing context, corrections, and preferences along the way. Then extract the reusable pattern into a skill. Pay attention to:
- **Steps that worked** — the sequence of actions that led to success
- **Corrections you made** — places where you steered the agent’s approach (e.g., “use library X instead of Y,” “check for edge case Z”)
- **Input/output formats** — what the data looked like going in and coming out
- **Context you provided** — project-specific facts, conventions, or constraints the agent didn’t already know
Synthesize from existing project artifacts
When you have a body of existing knowledge, you can feed it into an LLM and ask it to synthesize a skill. A data-pipeline skill synthesized from your team’s actual incident reports and runbooks will outperform one synthesized from a generic “data engineering best practices” article, because it captures *your* schemas, failure modes, and recovery procedures. The key is project-specific material, not generic references. Good source material includes:
- Internal documentation, runbooks, and style guides
- API specifications, schemas, and configuration files
- Code review comments and issue trackers (captures recurring concerns and reviewer expectations)
- Version control history, especially patches and fixes (reveals patterns through what actually changed)
- Real-world failure cases and their resolutions
Refine with real execution
The first draft of a skill usually needs refinement. Run the skill against real tasks, then feed the results — all of them, not just failures — back into the creation process. Ask: what triggered false positives? What was missed? What could be cut? Even a single pass of execute-then-revise noticeably improves quality, and complex domains often benefit from several.
Read agent execution traces, not just final outputs. If the agent wastes time on unproductive steps, common causes include instructions that are too vague (the agent tries several approaches before finding one that works), instructions that don’t apply to the current task (the agent follows them anyway), or too many options presented without a clear default.
For a more structured approach to iteration, including test cases, assertions, and grading, see [Evaluating skill output quality](/skill-creation/evaluating-skills).
Spending context wisely
Once a skill activates, its full `SKILL.md` body loads into the agent’s context window alongside conversation history, system context, and other active skills. Every token in your skill competes for the agent’s attention with everything else in that window.
Add what the agent lacks, omit what it knows
Focus on what the agent *wouldn’t* know without your skill: project-specific conventions, domain-specific procedures, non-obvious edge cases, and the particular tools or APIs to use. You don’t need to explain what a PDF is, how HTTP works, or what a database migration does.
Report incorrect code
Copy
```` shiki
<!-- Too verbose — the agent already knows what PDFs are -->
## Extract PDF text
PDF (Portable Document Format) files are a common file format that contains
text, images, and other content. To extract text from a PDF, you'll need to
use a library. pdfplumber is recommended because it handles most cases well.
<!-- Better — jumps straight to what the agent wouldn't know on its own -->
## Extract PDF text
Use pdfplumber for text extraction. For scanned documents, fall back to
pdf2image with pytesseract.
```python
import pdfplumber
with pdfplumber.open("file.pdf") as pdf:
text = pdf.pages[0].extract_text()
```
````
Ask yourself about each piece of content: “Would the agent get this wrong without this instruction?” If the answer is no, cut it. If you’re unsure, test it. And if the agent already handles the entire task well without the skill, the skill may not be adding value. See [Evaluating skill output quality](/skill-creation/evaluating-skills) for how to test this systematically.
Design coherent units
Deciding what a skill should cover is like deciding what a function should do: you want it to encapsulate a coherent unit of work that composes well with other skills. Skills scoped too narrowly force multiple skills to load for a single task, risking overhead and conflicting instructions. Skills scoped too broadly become hard to activate precisely. A skill for querying a database and formatting the results may be one coherent unit, while a skill that also covers database administration is probably trying to do too much.
Aim for moderate detail
Overly comprehensive skills can hurt more than they help — the agent struggles to extract what’s relevant and may pursue unproductive paths triggered by instructions that don’t apply to the current task. Concise, stepwise guidance with a working example tends to outperform exhaustive documentation. When you find yourself covering every edge case, consider whether most are better handled by the agent’s own judgment.
Structure large skills with progressive disclosure
The [specification](/specification#progressive-disclosure) recommends keeping `SKILL.md` under 500 lines and 5,000 tokens — just the core instructions the agent needs on every run. When a skill legitimately needs more content, move detailed reference material to separate files in `references/` or similar directories. The key is telling the agent *when* to load each file. “Read `references/api-errors.md` if the API returns a non-200 status code” is more useful than a generic “see references/ for details.” This lets the agent load context on demand rather than up front, which is how [progressive disclosure](/what-are-skills#how-skills-work) is designed to work.
Calibrating control
Not every part of a skill needs the same level of prescriptiveness. Match the specificity of your instructions to the fragility of the task.
Match specificity to fragility
**Give the agent freedom** when multiple approaches are valid and the task tolerates variation. For flexible instructions, explaining *why* can be more effective than rigid directives — an agent that understands the purpose behind an instruction makes better context-dependent decisions. A code review skill can describe what to look for without prescribing exact steps:
Report incorrect code
Copy
```python
## Code review process
1. Check all database queries for SQL injection (use parameterized queries)
2. Verify authentication checks on every endpoint
3. Look for race conditions in concurrent code paths
4. Confirm error messages don't leak internal details
```
**Be prescriptive** when operations are fragile, consistency matters, or a specific sequence must be followed:
Report incorrect code
Copy
```` shiki
## Database migration
Run exactly this sequence:
```bash
python scripts/migrate.py --verify --backup
```
Do not modify the command or add additional flags.
````
Most skills have a mix. Calibrate each part independently.
Provide defaults, not menus
When multiple tools or approaches could work, pick a default and mention alternatives briefly rather than presenting them as equal options.
Report incorrect code
Copy
```` shiki
<!-- Too many options -->
You can use pypdf, pdfplumber, PyMuPDF, or pdf2image...
<!-- Clear default with escape hatch -->
Use pdfplumber for text extraction:
```python
import pdfplumber
```
For scanned PDFs requiring OCR, use pdf2image with pytesseract instead.
````
Favor procedures over declarations
A skill should teach the agent *how to approach* a class of problems, not *what to produce* for a specific instance. Compare:
Report incorrect code
Copy
```python
<!-- Specific answer — only useful for this exact task -->
Join the `orders` table to `customers` on `customer_id`, filter where
`region = 'EMEA'`, and sum the `amount` column.
<!-- Reusable method — works for any analytical query -->
1. Read the schema from `references/schema.yaml` to find relevant tables
2. Join tables using the `_id` foreign key convention
3. Apply any filters from the user's request as WHERE clauses
4. Aggregate numeric columns as needed and format as a markdown table
```
This doesn’t mean skills can’t include specific details — output format templates (see [Templates for output format](#templates-for-output-format)), constraints like “never output PII,” and tool-specific instructions are all valuable. The point is that the *approach* should generalize even when individual details are specific.
Patterns for effective instructions
These are reusable techniques for structuring skill content. Not every skill needs all of them — use the ones that fit your task.
Gotchas sections
The highest-value content in many skills is a list of gotchas — environment-specific facts that defy reasonable assumptions. These aren’t general advice (“handle errors appropriately”) but concrete corrections to mistakes the agent will make without being told otherwise:
Report incorrect code
Copy
```python
## Gotchas
- The `users` table uses soft deletes. Queries must include
`WHERE deleted_at IS NULL` or results will include deactivated accounts.
- The user ID is `user_id` in the database, `uid` in the auth service,
and `accountId` in the billing API. All three refer to the same value.
- The `/health` endpoint returns 200 as long as the web server is running,
even if the database connection is down. Use `/ready` to check full
service health.
```
Keep gotchas in `SKILL.md` where the agent reads them before encountering the situation. A separate reference file works if you tell the agent when to load it, but for non-obvious issues, the agent may not recognize the trigger.
When an agent makes a mistake you have to correct, add the correction to the gotchas section. This is one of the most direct ways to improve a skill iteratively (see [Refine with real execution](#refine-with-real-execution)).
Templates for output format
When you need the agent to produce output in a specific format, provide a template. This is more reliable than describing the format in prose, because agents pattern-match well against concrete structures. Short templates can live inline in `SKILL.md`; for longer templates, or templates only needed in certain cases, store them in `assets/` and reference them from `SKILL.md` so they only load when needed.
Report incorrect code
Copy
```` shiki
## Report structure
Use this template, adapting sections as needed for the specific analysis:
```markdown
# [Analysis Title]
## Executive summary
[One-paragraph overview of key findings]
## Key findings
- Finding 1 with supporting data
- Finding 2 with supporting data
## Recommendations
1. Specific actionable recommendation
2. Specific actionable recommendation
```
````
Checklists for multi-step workflows
An explicit checklist helps the agent track progress and avoid skipping steps, especially when steps have dependencies or validation gates.
Report incorrect code
Copy
```python
## Form processing workflow
Progress:
- [ ] Step 1: Analyze the form (run `scripts/analyze_form.py`)
- [ ] Step 2: Create field mapping (edit `fields.json`)
- [ ] Step 3: Validate mapping (run `scripts/validate_fields.py`)
- [ ] Step 4: Fill the form (run `scripts/fill_form.py`)
- [ ] Step 5: Verify output (run `scripts/verify_output.py`)
```
Validation loops
Instruct the agent to validate its own work before moving on. The pattern is: do the work, run a validator (a script, a reference checklist, or a self-check), fix any issues, and repeat until validation passes.
Report incorrect code
Copy
```python
## Editing workflow
1. Make your edits
2. Run validation: `python scripts/validate.py output/`
3. If validation fails:
- Review the error message
- Fix the issues
- Run validation again
4. Only proceed when validation passes
```
A reference document can also serve as the “validator” — instruct the agent to check its work against the reference before finalizing.
Plan-validate-execute
For batch or destructive operations, have the agent create an intermediate plan in a structured format, validate it against a source of truth, and only then execute.
Report incorrect code
Copy
```python
## PDF form filling
1. Extract form fields: `python scripts/analyze_form.py input.pdf` → `form_fields.json`
(lists every field name, type, and whether it's required)
2. Create `field_values.json` mapping each field name to its intended value
3. Validate: `python scripts/validate_fields.py form_fields.json field_values.json`
(checks that every field name exists in the form, types are compatible, and
required fields aren't missing)
4. If validation fails, revise `field_values.json` and re-validate
5. Fill the form: `python scripts/fill_form.py input.pdf field_values.json output.pdf`
```
The key ingredient is step 3: a validation script that checks the plan (`field_values.json`) against the source of truth (`form_fields.json`). Errors like “Field ‘signature_date’ not found — available fields: customer_name, order_total, signature_date_signed” give the agent enough information to self-correct.
Bundling reusable scripts
When [iterating on a skill](/skill-creation/evaluating-skills), compare the agent’s execution traces across test cases. If you notice the agent independently reinventing the same logic each run — building charts, parsing a specific format, validating output — that’s a signal to write a tested script once and bundle it in `scripts/`. For more on designing and bundling scripts, see [Using scripts in skills](/skill-creation/using-scripts).
Next steps
Once you have a working skill, two guides can help you refine it further:
- **[Evaluating skill output quality](/skill-creation/evaluating-skills)** — Set up test cases, grade results, and iterate systematically.
- **[Optimizing skill descriptions](/skill-creation/optimizing-descriptions)** — Test and improve your skill’s `description` field so it triggers on the right prompts.
[Quickstart](/skill-creation/quickstart)[Optimizing descriptions](/skill-creation/optimizing-descriptions)
---
## building-skills-for-claude-code-claude.md
## **When AI lacks your institutional knowledge**
Your team has built up hard-won knowledge about your data—you know which tables are the source of truth, why certain filters must always apply, and how revenue can be calculated differently, depending on the context. But Claude doesn't retain context from previous sessions.
Without a way to share your team's data playbook, you end up re-explaining the same details through prompting. Skills let you package that expertise into something Claude Code can discover and use automatically.
## **How Skills solve the knowledge gap**
Skills give Claude Code access to your procedural knowledge through progressive disclosure, revealing information in layers only when needed, rather than flooding the context window.
Here's how it works: Claude always sees a lightweight index of available skills (names and descriptions, about 100 words each). When you ask Claude to analyze revenue data, it recognizes that your data warehouse SQL skill applies and loads those instructions. Detailed documentation about specific tables loads only when needed during execution.
This design solves the fundamental tension between comprehensive knowledge and limited context. You can build a skill with dozens of table definitions and pages of business logic documentation, but Claude only loads what's relevant for the current query.
## **The anatomy of a skill**
Every skill follows a specific structure designed for both human maintenance and AI consumption. Let's look at how a data warehouse skill would be structured.
### **SKILL.md: The core instructions**
The SKILL.md file starts with YAML frontmatter containing two critical fields:
```
name: sql-analysis
description: Use when analyzing business data: revenue, ARR, customer segments, product usage, or sales pipeline. Provides table schemas, metric definitions, required filters, and query patterns specific to ACME's data warehouse.
```
That description determines when Claude loads your skill. When someone says "what was our revenue last quarter" or "show me customer churn by segment," Claude recognizes this skill applies.
The markdown body contains your actual instructions, organized for progressive disclosure:
```
# SQL Analysis Skill
## Quick Start Workflow
When a user asks for data analysis:
1. **Clarify the request**
- What time period? (default to current year if unspecified)
- Which customer segment? (clarify "customers" - accounts or organizations?)
- What business decision will this inform?
2. **Check for existing dashboards**
- Look in `references/dashboards.md` for pre-built reports
- If a dashboard exists, direct them there first
3. **Identify the data source**
- Prefer aggregated tables over raw event data
- Verify table has required columns before querying
4. **Execute the analysis**
- Apply required filters (exclude test accounts, etc.)
- Validate results against known benchmarks
### Standard Query Filters
For all revenue queries:
- Always exclude test accounts: `WHERE account != 'Test'`
- Always use complete periods: `WHERE month <= DATE_TRUNC(CURRENT_DATE(), MONTH)`
### ARR Calculations
- Monthly to ARR: `monthly_revenue * 12`
- 7-day run rate: `rolling_7d * 52`
## Knowledge Base
For detailed table schemas and query patterns, see:
- **Revenue & Finance** → `references/finance.md`
- **Product Usage** → `references/product.md`
- **Sales & Pipeline** → `references/sales.md`
- **Customer Success** → `references/customers.md`
```
Notice how the SKILL.md provides high-level workflow guidance and critical business logic, while pointing to reference files for detailed documentation.
**References: On-demand documentation**
The `references/` directory contains detailed documentation Claude loads only when needed. Here's what ACME's `references/finance.md` might look like:
- **Table schemas**: Column names, data types, and descriptions for key tables like `monthly_revenue` and `arr_metrics`
- **Standard filters**: Which WHERE clauses should always apply (e.g., excluding test accounts, using complete periods only)
- **Metric definitions**: How to calculate ARR, run rates, and other business metrics with exact formulas
- **Common query patterns**: Ready-to-adapt SQL snippets for frequent requests like "revenue by customer segment and region" or "ARR trends over time"
- **Edge cases**: Known quirks, like when to use one table over another, or columns are commonly used for JOINs even though the naming convention might not match
Each reference file might be thousands of words, but users only pay the context cost for what they actually need.
A key principle to remember: information should live in either SKILL.md or reference files but not both, so keep SKILL.md lean with high-level instructions while putting detailed specifications in references.
**Skills vs CLAUDE.md**
Skills and CLAUDE.md files both give Claude context, but serve different purposes. CLAUDE.md is always loaded into Claude’s context. It’s for project-specific guidance (coding conventions, local workflows, common commands) that lives in your repo as a single markdown file, and works only in Claude Code.
Skills use progressive disclosure, loading only when relevant, and work across all Claude platforms (claude.ai, Claude Code, and Claude API). Beyond the context management advantages, Skills can include executable code and reference files—not just markdown. This makes them ideal for substantial, reusable knowledge that spans projects, such as data warehouse schemas, company design standards, or domain expertise.
## **Building your first Skill**
Start by installing Claude Code in your terminal or IDE:
```
curl -fsSL https://claude.ai/install.sh | bash
```
Then add the Claude Code [plugin](https://web.archive.org/web/20251219031003/https://github.com/anthropics/skills/blob/0f77e501e6506235956d953cd2d7a2a4aa9ba133/.claude-plugin/marketplace.json#L24-L42) which includes the [skill-creator skill](https://web.archive.org/web/20251219031003/https://support.claude.com/en/articles/12599426-how-to-create-a-skill-with-claude-through-conversation). Now identify your first candidate. The best skills share these characteristics:
- **Cross-repo relevance**: Knowledge that applies across multiple projects
- **Multi-audience value**: Both technical and non-technical users benefit
- **Stable patterns**: Procedures that don't change with every commit
Data warehouse queries, internal platform documentation, and company-wide standards all make excellent skills.
Claude can also serve as your documentation partner here. Start off by describing your workflow conversationally:
```
Help me create a data warehouse skill. I'll walk you through our tables
and business logic, and you can help me structure it properly.
```
Claude will ask clarifying questions during this process to collect details around your workflow: What are your key tables? What business terms need definition? What filters should always apply? This extraction process surfaces knowledge critical to the skill's effectiveness.
Once you've outlined your domain, Claude will help you structure the SKILL.md and organize reference files. As you use the skill, you can always add in more reference files as you discover what’s missing.
### **Storing and sharing skills**
Skills live locally on your machine, giving you full control over when and how they're updated. When you're ready to share a skill with your team, you have several options depending on your workflow:
- **Zip file:** Share skills directly with teammates for quick, informal collaboration
- **Internal versioned repository:** Host skills in a centralized repo where your organization can access approved, maintained versions alongside code
- **Git repository:** Version your skills alongside code, with full commit history and branch management
- **Plugin bundle:** Package skills into a Claude Code plugin for easy distribution across your team
Choose the approach that fits how your team already works. Teams with strong Git workflows often prefer repository-based sharing, while organizations with formal tooling standards may benefit from plugin bundles or a centralized skill repository.
## **Real implementation patterns**
Here are examples from the community that show Skills in action:
[Playwright skill](https://web.archive.org/web/20251219031003/https://github.com/lackeyjb/playwright-skill): Enables Claude to write and run browser automation on the fly using Playwright. Ask Claude to test a webpage, verify forms work correctly, or capture screenshots—Claude writes the code, executes it, and returns results without requiring any manual setup.
[Web assets generator skill:](https://web.archive.org/web/20251219031003/https://www.reddit.com/r/ClaudeAI/comments/1ocm1if/built_a_claude_code_skill_that_completely/) Creates favicons, app icons, and social media images from logos, text, or emojis. Tell Claude you need a favicon for your startup or Open Graph images for your blog, and it generates properly sized assets ready for your project.
This [Skills marketplace shares even more examples to inspire you.](https://web.archive.org/web/20251219031003/https://skillsmp.com/) Explore community-built skills that extend what Claude can do—from automated testing and data visualization to code review and domain name brainstorming.
## **Getting started with Claude Code and Skills**
Skills let you encode institutional knowledge that works across teams and platforms. By capturing your procedures, terminology, and business logic into a skill, you create organizational memory that scales. New analysts query data correctly on day one, data scientists stop explaining the same table relationships, and business users can self-serve accurate metrics. Start building your first Skill in [Claude Code](https://web.archive.org/web/20251219031003/https://www.claude.com/product/claude-code) today.
---
## burn-kb-architecture-verified.md
# Burn Knowledgebase Architecture — Verified Against Claude Code Source
**Date**: 2026-03-15
**Verification**: Based on analysis of Claude Code 2.1.75 source (`claude-api` skill and `claude-code-guide` agent)
---
## What Anthropic Actually Does
After reviewing the built-in `claude-api` skill and `claude-code-guide` agent implementations, here's the **actual pattern** Anthropic uses:
### Pattern 1: Skills with Embedded Documentation (`claude-api` skill)
**Location**: `2.1.76_resplit/4572.js`
**How it works**:
```javascript
// All documentation is bundled as strings in the binary
const UB$ = {
"python/claude-api/README.md": "<full markdown content>",
"python/agent-sdk/README.md": "<full markdown content>",
"typescript/claude-api/README.md": "<full markdown content>",
"shared/tool-use-concepts.md": "<full markdown content>",
// ... ~20 docs total, all embedded
};
// Skill definition
{
name: "claude-api",
description: "Build apps with the Claude API or Anthropic SDK...",
allowedTools: ["Read", "Grep", "Glob", "WebFetch"],
// Key method: builds prompt dynamically on invocation
async getPromptForCommand(userArgs) {
// 1. Auto-detect project language
const lang = await detectLanguage(); // checks for .py, .ts, etc.
// 2. Filter docs to relevant language + shared
const relevantDocs = Object.keys(UB$)
.filter(path => path.startsWith(`${lang}/`) || path.startsWith("shared/"));
// 3. Build massive prompt with ALL docs in <doc> tags
const allDocs = relevantDocs.map(path => {
return `<doc path="${path}">
${UB$[path].trim()}
</doc>`;
}).join('\n\n');
// 4. Return prompt with quick reference guide + all docs + user request
return [{
type: "text",
text: `${quickReferenceGuide}\n\n${allDocs}\n\n## User Request\n\n${userArgs}`
}];
}
}
```
**Key findings**:
- **All docs bundled in binary** — No external database, no file I/O at runtime
- **Language detection** — Auto-detects Python/TypeScript/etc from project files
- **Filtered injection** — Only injects relevant language docs (not all 20)
- **On-demand loading** — Docs only injected when skill is invoked
- **Single massive prompt** — ALL relevant docs in one shot (~50-100KB of markdown)
### Pattern 2: Agents with Dynamic SystemPrompt (`claude-code-guide` agent)
**Location**: `2.1.76_resplit/2880.js`
**How it works**:
```javascript
{
agentType: "claude-code-guide",
whenToUse: "Use when user asks about Claude Code, Agent SDK, or Claude API...",
tools: ["Read", "WebFetch", "WebSearch", "WebBrowse"],
source: "built-in",
model: "haiku",
// Dynamic systemPrompt builder
getSystemPrompt({ toolUseContext }) {
const commands = toolUseContext.options.commands;
const agents = toolUseContext.options.agentDefinitions.activeAgents;
const mcpClients = toolUseContext.options.mcpClients;
const settings = getCurrentSettings();
const sections = [];
// Add available custom skills
if (commands.filter(c => c.type === "prompt").length > 0) {
sections.push(`**Available custom skills in this project:**
${commands.map(c => `- /${c.name}: ${c.description}`).join('\n')}`);
}
// Add available custom agents
const customAgents = agents.filter(a => a.source !== "built-in");
if (customAgents.length > 0) {
sections.push(`**Available custom agents:**
${customAgents.map(a => `- ${a.agentType}: ${a.whenToUse}`).join('\n')}`);
}
// Add MCP servers
if (mcpClients && mcpClients.length > 0) {
sections.push(`**Configured MCP servers:**
${mcpClients.map(c => `- ${c.name}`).join('\n')}`);
}
// Add user settings
if (Object.keys(settings).length > 0) {
sections.push(`**User's settings.json:**
\`\`\`json
${JSON.stringify(settings, null, 2)}
\`\`\``);
}
// Combine base prompt + runtime context
const basePrompt = getBaseGuidePrompt(); // Static knowledge
if (sections.length > 0) {
return `${basePrompt}
---
# User's Current Configuration
${sections.join('\n\n')}`;
}
return basePrompt;
}
}
```
**Key findings**:
- **Dynamic context injection** — `getSystemPrompt()` receives runtime `toolUseContext`
- **Environment awareness** — Injects list of installed skills, agents, MCP servers, settings
- **Base + runtime split** — Static knowledge in base prompt, dynamic config appended
- **No database queries** — All info comes from in-memory state
- **Called on agent spawn** — Built fresh each time agent is created
---
## How This Compares to My Original Proposal
### What I Got Right
1. **Multi-tier architecture is correct**
- Tier 1 (agent systemPrompt): Verified
- Tier 2 (shared resources): Partially verified
- Tier 3 (skills for coordination): Verified
2. **Agent isolation for knowledge partitioning**
- Confirmed: Each agent has separate `getSystemPrompt()`
- Confirmed: Tool restrictions create security boundaries
3. **Skills inject on-demand**
- Confirmed: `getPromptForCommand()` builds prompts at invocation time
4. **Dynamic context in systemPrompts**
- Confirmed: `getSystemPrompt({ toolUseContext })` receives runtime state
---
## Revised Optimal Architecture (Based on Verified Patterns)
### Tier 1: Agent SystemPrompts (Dynamic Runtime Context)
Each agent's `getSystemPrompt({ toolUseContext })` builds a prompt with:
- **Static domain knowledge** (embedded in the function)
- **Dynamic runtime context** (from `toolUseContext`)
**Example: `burn-architect` agent**
```javascript
// In plugin agents/burn-architect.js
export default {
name: "burn-architect",
description: "Burn architecture specialist — tensors, modules, autodiff...",
tools: ["Read", "Write", "Grep", "Glob"],
model: "sonnet",
// Dynamic systemPrompt builder
getSystemPrompt({ toolUseContext }) {
const baseKnowledge = `
You are the Burn architecture specialist with deep expertise in:
## Core Tensor Operations (Memorized)
- \`Tensor::zeros(shape)\` — zero-initialized tensor
- \`Tensor::ones(shape)\` — one-initialized
- \`Tensor::matmul(other)\` — matrix multiplication
- \`tensor.reshape(new_shape)\` — view with new dimensions
- \`tensor.transpose()\` — swap last two dims
## Module Design Patterns
### Record Pattern (State Management)
All learnable modules implement \`Module<B>\`:
\`\`\`rust
#[derive(Module, Debug)]
pub struct LinearLayer<B: Backend> {
weight: Param<Tensor<B, 2>>,
bias: Param<Tensor<B, 1>>,
}
\`\`\`
### Config Pattern (Initialization)
\`\`\`rust
#[derive(Config, Debug)]
pub struct ConvBlockConfig {
in_channels: usize,
out_channels: usize,
}
impl ConvBlockConfig {
pub fn init<B: Backend>(&self) -> ConvBlock<B> { ... }
}
\`\`\`
## Common Pitfalls to Prevent
1. **Shape mismatch on matmul**: \`[B, N, D] @ [D, D]\` → Need broadcast
2. **Missing \`.inner()\`**: When crossing train/inference boundary
3. **Backend type leakage**: Return \`Tensor<B, 2>\`, not \`Tensor<WgpuBackend, 2>\`
`;
// Add runtime context (current project state)
const sections = [];
// Check if Burn is already in dependencies
const hasBurn = toolUseContext.readFileState.has("Cargo.toml") &&
toolUseContext.readFileState.get("Cargo.toml")?.content?.includes("burn =");
if (hasBurn) {
sections.push("**Burn detected in project** — Ready to assist with implementation.");
} else {
sections.push("**Burn not yet added** — Will help set up dependencies if needed.");
}
// Check for existing Burn code
const burnFiles = Array.from(toolUseContext.readFileState.keys())
.filter(path => path.endsWith('.rs') &&
toolUseContext.readFileState.get(path)?.content?.includes('burn::'));
if (burnFiles.length > 0) {
sections.push(`**Burn code found in:**\n${burnFiles.map(f => `- ${f}`).join('\n')}`);
}
if (sections.length > 0) {
return `${baseKnowledge}\n\n---\n\n# Current Project Context\n\n${sections.join('\n\n')}`;
}
return baseKnowledge;
}
};
```
**Why this works**:
- Static knowledge = domain expertise (tensor APIs, patterns)
- Dynamic context = project state (dependencies, existing files)
- No external queries needed — all from in-memory `toolUseContext`
### Tier 2: Skills with Embedded Reference (Language-Filtered Injection)
Following the `claude-api` pattern, create a skill that bundles documentation and injects language-filtered subsets.
**Example: `burn-docs` skill**
```javascript
// In plugin skills/burn-docs/index.js
import { burnApiDocs } from './bundled-docs.js';
export default {
name: "burn-docs",
description: "Load Burn framework API documentation (tensor ops, modules, backends, training).",
allowedTools: ["Read", "Grep"],
userInvocable: true,
async getPromptForCommand(userQuery) {
// burnApiDocs structure:
// {
// "tensor-ops.md": "<markdown>",
// "modules.md": "<markdown>",
// "backends.md": "<markdown>",
// "training.md": "<markdown>",
// "examples/mnist.md": "<markdown>",
// // ... etc
// }
// Filter docs based on query keywords
const keywords = userQuery.toLowerCase();
let relevantDocs = [];
if (keywords.includes('tensor') || keywords.includes('operation')) {
relevantDocs.push('tensor-ops.md');
}
if (keywords.includes('module') || keywords.includes('layer')) {
relevantDocs.push('modules.md');
}
if (keywords.includes('backend') || keywords.includes('gpu') || keywords.includes('wgpu')) {
relevantDocs.push('backends.md');
}
if (keywords.includes('train') || keywords.includes('optimizer') || keywords.includes('learner')) {
relevantDocs.push('training.md');
}
// If no specific match, include core docs
if (relevantDocs.length === 0) {
relevantDocs = ['tensor-ops.md', 'modules.md', 'training.md'];
}
// Build prompt with filtered docs
const docsContent = relevantDocs.map(path => {
return `<doc path="${path}">
${burnApiDocs[path].trim()}
</doc>`;
}).join('\n\n');
const quickRef = `# Burn Framework Reference
## Quick Navigation
**Tensor operations**: See tensor-ops.md
**Module patterns**: See modules.md
**Backend selection**: See backends.md
**Training setup**: See training.md
---
## Included Documentation
${docsContent}
---
## User Query
${userQuery}`;
return [{ type: "text", text: quickRef }];
}
};
```
**Building the bundled docs** (`bundled-docs.js`):
```javascript
// Generated at build time from docs/
export const burnApiDocs = {
"tensor-ops.md": `# Burn Tensor Operations
## Creating Tensors
\`\`\`rust
use burn::tensor::Tensor;
let zeros = Tensor::<Backend, 2>::zeros([3, 4], &device);
let ones = Tensor::<Backend, 2>::ones([3, 4], &device);
\`\`\`
...
`,
"modules.md": `# Burn Modules
## Module Trait
\`\`\`rust
#[derive(Module, Debug)]
pub struct MyModel<B: Backend> {
linear: Linear<B>,
}
\`\`\`
...
`,
// ... etc
};
```
**Why this works**:
- All docs bundled at plugin install time (no runtime I/O)
- Keyword-based filtering (simple, fast, no database)
- Injects 2-5 docs per query (not all 20+)
- Works offline, zero latency
### Tier 3: Routing Skills (Coordination Logic)
Same as originally proposed — inject decision trees and collaboration patterns.
**No changes needed** — this pattern is already verified in built-in skills.
---
## When to Use Database vs. Bundled Docs
| Scenario | Use Bundled Docs | Use Database |
|----------|------------------|--------------|
| **Documentation is stable** (released framework) | ✅ Bundle | ❌ Overkill |
| **Docs change frequently** (internal APIs) | ❌ Stale | ✅ Live queries |
| **Offline usage required** | ✅ Bundle | ❌ Needs connection |
| **< 50 doc files** | ✅ Bundle | ❌ Overkill |
| **> 1000 doc files** | ❌ Binary bloat | ✅ Database |
| **Need fuzzy search** | ❌ Basic filtering | ✅ FTS5 |
| **Need structured queries** (version, tags, etc.) | ❌ Limited | ✅ SQL |
**For Burn plugin**: **Bundle docs** (stable framework, ~20-30 doc files, offline usage)
---
## Revised Implementation Plan
### Phase 1: Bundle Documentation
1. **Create docs structure**:
```
plugin/docs/
├── tensor-ops.md
├── modules.md
├── backends.md
├── training.md
├── autodiff.md
├── examples/
│ ├── mnist.md
│ ├── gpt.md
│ └── resnet.md
└── patterns/
├── custom-op.md
└── multi-backend.md
```
2. **Build bundled-docs.js**:
```bash
# At plugin build time
node scripts/bundle-docs.js
# Reads docs/*.md, generates agents/bundled-docs.js
```
3. **Import in agents**:
```javascript
import { burnApiDocs } from './bundled-docs.js';
```
### Phase 2: Agent SystemPrompts (Dynamic Context)
1. **Implement `getSystemPrompt({ toolUseContext })` for each agent**
2. **Embed static domain knowledge** (APIs, patterns, pitfalls)
3. **Inject runtime context** (project files, dependencies, existing code)
4. **No external queries** — all from `toolUseContext.readFileState`
### Phase 3: Skills with Filtered Injection
1. **Implement `getPromptForCommand(query)` for `burn-docs` skill**
2. **Keyword-based filtering** → select 2-5 relevant docs
3. **Inject in `<doc>` tags** with quick reference guide
4. **Return as prompt messages**
### Phase 4: Routing Coordinator
1. **Implement `burn-router` skill** with decision tree
2. **Inject on first Burn query** — persists for session
3. **Lists all specialist agents** with when-to-use guides
---
## Key Differences from Original Proposal
| Aspect | Original Proposal | Verified Pattern |
|--------|-------------------|------------------|
| **Knowledgebase storage** | SQLite database | Bundled strings in code |
| **Query mechanism** | MCP tool calls to DB | Keyword filtering of bundle |
| **Injection size** | Single doc per query | All relevant docs (2-5 at once) |
| **Update mechanism** | SQL updates | Rebuild bundle |
| **Offline support** | Requires database file | Built into binary |
| **Setup complexity** | Database + MCP server | Just bundle at build time |
| **Latency** | ~5ms query | 0ms (in-memory) |
| **Fuzzy search** | FTS5 ranking | Basic keyword match |
---
## Conclusion
**Anthropic's actual pattern is simpler and more pragmatic than my proposal.**
### What they do:
1. **Bundle all docs as strings** in the plugin/binary
2. **Filter by keywords or language** at invocation time
3. **Inject all relevant docs** in one shot (rely on large context windows)
4. **Dynamic systemPrompt** builds runtime context from in-memory state
### Why it works:
- ✅ Zero latency (in-memory)
- ✅ Works offline
- ✅ No database setup
- ✅ Simple keyword filtering is "good enough"
- ✅ 200K context makes injecting 5-10 docs cheap
### When to deviate:
- Large knowledgebase (>1000 docs) → Use database
- Frequently updated docs → Use database or live fetching
- Need complex queries → Use FTS5 or vector search
- Multi-tenancy or versioning → Use database
**For a Burn ML plugin with ~30 stable documentation files, follow Anthropic's bundled pattern.**
---
## Updated File Structure
```
burn-plugin/
├── manifest.json
├── agents/
│ ├── burn-architect.js # getSystemPrompt() with embedded knowledge
│ ├── burn-trainer.js
│ ├── burn-deployer.js
│ ├── burn-importer.js
│ └── bundled-docs.js # Generated from docs/ at build time
├── skills/
│ ├── burn-docs/
│ │ └── index.js # getPromptForCommand() filters & injects docs
│ ├── burn-router/
│ │ └── SKILL.md # Routing decision tree
│ └── burn-cubecl/
│ └── SKILL.md
├── docs/ # Source markdown (not shipped)
│ ├── tensor-ops.md
│ ├── modules.md
│ ├── backends.md
│ └── ...
└── scripts/
└── bundle-docs.js # Build script: docs/*.md → bundled-docs.js
```
**Build process**:
```bash
# During plugin development
npm run bundle-docs # Generates agents/bundled-docs.js
# At plugin install time
# User gets pre-bundled plugin with docs already in bundled-docs.js
```
**Verification**: ✅ Confirmed against Claude Code 2.1.75 source code.
---
## burn-knowledgebase-architecture.md
# Burn Knowledgebase Architecture Strategy
**Date**: 2026-03-15
**Context**: Designing knowledge organization for a Burn ML development team plugin with 8 specialist agents + 3 coordinator skills
---
## Executive Summary
**Optimal Strategy**: **Hybrid 3-tier architecture**
1. **Tier 1 (Agent-Specific)**: Specialist knowledge embedded in each agent's systemPrompt
2. **Tier 2 (Shared MCP)**: Common reference accessible via MCP tools (database-backed)
3. **Tier 3 (Coordinator Skills)**: Cross-cutting knowledge injected by routing/orchestration skills
**Why This Works**:
- Teammates are isolated agents with separate system prompts → natural knowledge partitioning
- MCP tools are callable by any agent → shared resource layer
- Skills inject context into main conversation → cross-cutting orchestration
- Database backend → structured queryable knowledge at scale
---
## The Four Extension Channels (Quick Reference)
From our MCP Agent Persona research (`reports/mcp-agent-knowledgebase.md`):
| Channel | Scope | Persistence | Use Case |
|---------|-------|-------------|----------|
| **Channel 1**: MCP `instructions` | Always-on, all agents | Every turn | Tool usage guide, persona framing |
| **Channel 2**: Agent `.md` files | Per-agent, isolated | Agent lifetime | Specialist domain knowledge |
| **Channel 3**: SKILL.md | Main conversation | Session | Cross-cutting reference, orchestration |
| **Channel 4**: MCP Prompts | On-demand | Transient | Dynamic queries, code generation |
---
## Tier 1: Agent-Specific Knowledge (Channel 2)
### What Goes Here
**Deep specialist knowledge that only one agent needs**
Each agent's `.md` file contains domain-specific knowledge in its systemPrompt section.
### Example: `burn-architect` Agent
```markdown
---
name: burn-architect
description: >
Burn architecture specialist — tensors, modules, configs, autodiff, records.
Use when designing model architecture, choosing tensor operations, or
implementing custom modules.
tools:
- "mcp__burn-kb__query_api_docs"
- "mcp__burn-kb__search_examples"
- "Read"
- "Write"
- "Grep"
- "Glob"
model: sonnet
memory: project
---
You are the Burn architecture specialist. You have deep expertise in:
## Tensor Operations (Memorized Reference)
### Core Tensor Methods
- `Tensor::zeros(shape)` — zero-initialized tensor
- `Tensor::ones(shape)` — one-initialized
- `Tensor::full(shape, value)` — constant fill
- `Tensor::random(shape, distribution)` — random init
- `tensor.reshape(new_shape)` — view with new dimensions
- `tensor.transpose()` — swap last two dims
- `tensor.permute(dims)` — arbitrary dim reordering
- `tensor.squeeze(dim)` — remove dim of size 1
- `tensor.unsqueeze(dim)` — add dim of size 1
### Shape Semantics (Critical Knowledge)
**Burn uses row-major (C-order) layout:**
- Shape `[B, C, H, W]` → Batch, Channels, Height, Width
- Innermost dimension is contiguous in memory
- Broadcasting follows NumPy rules (trailing dims align)
### Backend Portability Patterns
**Type-parameterized code for backend-agnostic modules:**
```rust
pub struct ConvBlock<B: Backend> {
conv: Conv2d<B>,
norm: BatchNorm<B>,
_backend: PhantomData<B>,
}
```
**Never hard-code backend types — always use generic `B: Backend`.**
## Module Design Patterns
### 1. Record Pattern (State Management)
All learnable modules implement `Module<B>` and have a `<Name>Record`:
```rust
#[derive(Module, Debug)]
pub struct LinearLayer<B: Backend> {
weight: Param<Tensor<B, 2>>,
bias: Param<Tensor<B, 1>>,
}
// Auto-generated by #[derive(Module)]
pub struct LinearLayerRecord<B: Backend> {
weight: Param<Tensor<B, 2>>,
bias: Param<Tensor<B, 1>>,
}
```
### 2. Config Pattern (Initialization)
Separate config from runtime module:
```rust
#[derive(Config, Debug)]
pub struct ConvBlockConfig {
in_channels: usize,
out_channels: usize,
kernel_size: usize,
}
impl ConvBlockConfig {
pub fn init<B: Backend>(&self, device: &B::Device) -> ConvBlock<B> {
ConvBlock {
conv: Conv2dConfig::new([self.in_channels, self.out_channels], [self.kernel_size, self.kernel_size])
.init(device),
norm: BatchNormConfig::new(self.out_channels).init(device),
_backend: PhantomData,
}
}
}
```
### 3. AutodiffModule (Training vs Inference)
Modules that need different behavior for training:
```rust
impl<B: AutodiffBackend> AutodiffModule<B> for MyModel<B> {
fn forward(&self, input: Tensor<B, 2>) -> Tensor<B, 2> {
// Has access to grads, can use dropout/batchnorm train mode
self.linear.forward(input)
}
fn valid(&self, input: Tensor<B, 2>) -> Tensor<B, 2> {
// Inference mode — no grads, eval mode for batchnorm
self.forward(input.inner())
}
}
```
## Common Pitfalls (Prevent These)
1. **Shape mismatch on matmul**: `[B, N, D] @ [D, D]` → Error! Need `[D, D].unsqueeze::<3>(0).repeat(0, B)`
2. **Missing `.inner()` on autodiff tensors**: When crossing train/inference boundary
3. **Backend type leakage**: Don't return `Tensor<WgpuBackend, 2>`, return `Tensor<B, 2>`
4. **Forgetting `device` parameter**: All tensor creation needs `.to_device(device)`
5. **Config not implementing `Config` derive**: Causes cryptic serialization errors
## When to Query MCP Knowledgebase
Use `mcp__burn-kb__query_api_docs` when:
- User asks about a specific function/struct you don't have memorized
- Checking current API (Burn evolves quickly, your knowledge may be stale)
- Need examples of advanced usage (e.g., custom autodiff operations)
Use `mcp__burn-kb__search_examples` when:
- Looking for similar architecture patterns
- Finding full working code for a specific task
- Checking idiomatic Burn style
**Always query before hallucinating API details.**
```
### Key Properties
- ✅ **Scoped to agent's domain** — burn-architect knows tensor ops, not training loops
- ✅ **Isolated from other agents** — burn-trainer doesn't see this detail
- ✅ **Memorized hot-path knowledge** — common operations are embedded, not retrieved
- ✅ **MCP fallback for cold paths** — rare APIs use `query_api_docs` tool
---
## Tier 2: Shared Knowledgebase (MCP Tools + Database)
### What Goes Here
**Common reference that multiple agents need to query**
### Architecture
```
┌─────────────────────────────────────────────────────────────┐
│ burn-kb MCP Server │
│ │
│ ┌──────────────────┐ ┌────────────────┐ ┌─────────────┐ │
│ │ query_api_docs │ │ search_examples│ │ get_pattern │ │
│ └────────┬─────────┘ └────────┬───────┘ └──────┬──────┘ │
│ │ │ │ │
│ └─────────────────────┴──────────────────┘ │
│ │ │
│ ┌─────────▼──────────┐ │
│ │ SQLite Database │ │
│ │ ───────────────── │ │
│ │ • api_docs table │ │
│ │ • examples table │ │
│ │ • patterns table │ │
│ │ • FTS5 index │ │
│ └────────────────────┘ │
└─────────────────────────────────────────────────────────────┘
┌─────────────────────────────────────────────────────────────┐
│ Knowledgebase Sources │
│ │
│ docs.rs/burn → Scraped API docs → api_docs table │
│ burn/examples → Parsed examples → examples table │
│ patterns/*.md → Curated patterns → patterns table │
└─────────────────────────────────────────────────────────────┘
```
### Database Schema
```sql
-- Full API documentation
CREATE TABLE api_docs (
id INTEGER PRIMARY KEY,
module TEXT NOT NULL, -- e.g., "burn::tensor"
name TEXT NOT NULL, -- e.g., "Tensor::matmul"
kind TEXT NOT NULL, -- "struct" | "fn" | "trait" | "macro"
signature TEXT, -- Full Rust signature
description TEXT, -- Doc comment
examples TEXT, -- Code examples from docs
since_version TEXT, -- "0.20.0"
deprecated BOOLEAN DEFAULT 0,
url TEXT, -- Link to docs.rs
created_at TIMESTAMP DEFAULT CURRENT_TIMESTAMP
);
-- Full-text search on API docs
CREATE VIRTUAL TABLE api_docs_fts USING fts5(
module, name, signature, description, examples,
content='api_docs',
content_rowid='id'
);
-- Curated examples from burn/examples/
CREATE TABLE examples (
id INTEGER PRIMARY KEY,
name TEXT NOT NULL, -- "mnist-training"
category TEXT NOT NULL, -- "vision" | "nlp" | "rl"
description TEXT,
code TEXT NOT NULL, -- Full source code
tags TEXT, -- JSON array: ["cnn", "classification"]
difficulty TEXT, -- "beginner" | "intermediate" | "advanced"
burn_version TEXT, -- "0.20.0"
file_path TEXT, -- Original path in repo
created_at TIMESTAMP DEFAULT CURRENT_TIMESTAMP
);
CREATE VIRTUAL TABLE examples_fts USING fts5(
name, description, code, tags,
content='examples',
content_rowid='id'
);
-- Design patterns and best practices
CREATE TABLE patterns (
id INTEGER PRIMARY KEY,
name TEXT NOT NULL, -- "custom-autodiff-op"
category TEXT NOT NULL, -- "architecture" | "training" | "optimization"
problem TEXT NOT NULL, -- What problem does this solve?
solution TEXT NOT NULL, -- Pattern description + code
when_to_use TEXT,
alternatives TEXT,
tags TEXT, -- JSON array
created_at TIMESTAMP DEFAULT CURRENT_TIMESTAMP
);
CREATE VIRTUAL TABLE patterns_fts USING fts5(
name, problem, solution, when_to_use,
content='patterns',
content_rowid='id'
);
```
### MCP Tool Definitions
```python
from mcp.server import Server
import sqlite3
import json
app = Server("burn-kb")
# Channel 1: Instructions field (tool usage guide)
INSTRUCTIONS = """
You are connected to the Burn ML Framework knowledgebase.
## Available Tools
- `query_api_docs` — Search Burn API documentation (structs, functions, traits)
- `search_examples` — Find code examples from burn/examples/
- `get_pattern` — Retrieve design patterns and best practices
- `get_changelog` — Check what changed between Burn versions
## When to Use Each Tool
**Use `query_api_docs` when:**
- User asks "how do I..." about a specific operation
- You need to verify an API signature
- Checking if a feature exists in current version
**Use `search_examples` when:**
- User wants to see full working code
- Looking for similar architecture implementations
- Checking idiomatic Burn patterns
**Use `get_pattern` when:**
- User asks about best practices
- Designing custom operations or backends
- Performance optimization questions
**Always query before guessing API details** — Burn evolves rapidly.
"""
@app.initialize()
async def initialize():
return {
"server_name": "burn-kb",
"server_version": "1.0.0",
"instructions": INSTRUCTIONS, # <-- Channel 1
"capabilities": app.get_capabilities(...)
}
@app.tool()
async def query_api_docs(
query: str,
kind: str | None = None, # "struct" | "fn" | "trait" | None
module: str | None = None,
limit: int = 5
) -> str:
"""Search Burn API documentation with full-text search."""
db = sqlite3.connect("/path/to/burn-kb.db")
cursor = db.cursor()
# Build FTS5 query
fts_query = query
conditions = ["api_docs_fts.description MATCH ?"]
params = [fts_query]
if kind:
conditions.append("api_docs.kind = ?")
params.append(kind)
if module:
conditions.append("api_docs.module LIKE ?")
params.append(f"{module}%")
sql = f"""
SELECT
api_docs.module,
api_docs.name,
api_docs.kind,
api_docs.signature,
api_docs.description,
api_docs.examples,
api_docs.url,
rank
FROM api_docs_fts
JOIN api_docs ON api_docs_fts.rowid = api_docs.id
WHERE {' AND '.join(conditions)}
ORDER BY rank
LIMIT ?
"""
params.append(limit)
results = cursor.execute(sql, params).fetchall()
if not results:
return f"No API docs found for query: {query}"
# Format results
output = f"# Burn API Search Results: '{query}'\n\n"
for row in results:
module, name, kind, sig, desc, examples, url, _ = row
output += f"## `{module}::{name}` ({kind})\n\n"
if sig:
output += f"```rust\n{sig}\n```\n\n"
if desc:
output += f"{desc}\n\n"
if examples:
output += f"**Examples:**\n```rust\n{examples}\n```\n\n"
output += f"[View full docs]({url})\n\n---\n\n"
return output
@app.tool()
async def search_examples(
query: str,
category: str | None = None, # "vision" | "nlp" | "rl"
difficulty: str | None = None,
limit: int = 3
) -> str:
"""Search curated Burn code examples."""
db = sqlite3.connect("/path/to/burn-kb.db")
cursor = db.cursor()
conditions = ["examples_fts.code MATCH ?"]
params = [query]
if category:
conditions.append("examples.category = ?")
params.append(category)
if difficulty:
conditions.append("examples.difficulty = ?")
params.append(difficulty)
sql = f"""
SELECT
name,
category,
description,
code,
tags,
difficulty,
file_path
FROM examples_fts
JOIN examples ON examples_fts.rowid = examples.id
WHERE {' AND '.join(conditions)}
ORDER BY rank
LIMIT ?
"""
params.append(limit)
results = cursor.execute(sql, params).fetchall()
if not results:
return f"No examples found for: {query}"
output = f"# Burn Examples: '{query}'\n\n"
for row in results:
name, cat, desc, code, tags, diff, path = row
tags_list = json.loads(tags) if tags else []
output += f"## {name} ({cat}, {diff})\n\n"
output += f"{desc}\n\n"
output += f"**Tags:** {', '.join(tags_list)}\n\n"
output += f"```rust\n{code}\n```\n\n"
output += f"*Source: {path}*\n\n---\n\n"
return output
@app.tool()
async def get_pattern(
name: str | None = None,
category: str | None = None,
search: str | None = None
) -> str:
"""Retrieve Burn design patterns and best practices."""
db = sqlite3.connect("/path/to/burn-kb.db")
cursor = db.cursor()
if name:
# Direct lookup
sql = "SELECT * FROM patterns WHERE name = ?"
result = cursor.execute(sql, [name]).fetchone()
if not result:
return f"Pattern not found: {name}"
# Format single pattern...
elif search:
# FTS search
sql = """
SELECT patterns.*
FROM patterns_fts
JOIN patterns ON patterns_fts.rowid = patterns.id
WHERE patterns_fts.solution MATCH ?
ORDER BY rank
LIMIT 5
"""
results = cursor.execute(sql, [search]).fetchall()
# Format results...
else:
# List all in category
sql = "SELECT * FROM patterns WHERE category = ? ORDER BY name"
results = cursor.execute(sql, [category]).fetchall()
# Format list...
```
### Why Database-Backed?
| Approach | Pros | Cons |
|----------|------|------|
| **Embedded in systemPrompts** | Fast, no latency | Bloats context, stale data, can't scale |
| **Markdown files + Read tool** | Simple, versionable | Sequential search, no structure, slow |
| **Vector DB (embeddings)** | Semantic search | Requires embeddings, complex setup, overkill |
| **SQLite + FTS5** ✅ | Fast full-text search, structured, scales to millions of docs, single file, no server | Requires initial indexing |
**Recommended: SQLite + FTS5**
- Single-file database (portable, versionable)
- Full-text search with ranking
- Sub-millisecond queries
- Structured relations (docs → examples → patterns)
- Handles 100K+ documents easily
---
## Tier 3: Cross-Cutting Knowledge (Skills — Channel 3)
### What Goes Here
**Knowledge that multiple agents need at different times, injected on-demand**
### Example: `burn-router` Skill
The routing skill injects high-level decision trees and delegation guides.
```markdown
---
name: burn-router
description: >
Route Burn ML queries to the appropriate specialist agent. Use this when
the user asks a Burn-related question and you need to delegate to the
right expert.
when_to_use: >
Invoke automatically whenever the user asks about Burn framework, deep
learning in Rust, training models, or ML deployment. This skill loads
the routing decision tree and available specialist agents.
---
# Burn ML Development Team — Routing Guide
## Available Specialist Agents
### Core Team (4 agents)
1. **burn-architect** (Tensors, Modules, Autodiff)
- Invoke when: Designing model architecture, choosing tensor operations, implementing custom modules
- Expertise: Tensor APIs, module patterns, backend portability, autodiff internals
- Example queries: "How do I implement a custom attention layer?", "What's the right way to handle variable-length sequences?"
2. **burn-trainer** (Training Loops, Datasets, Optimizers)
- Invoke when: Setting up training, debugging convergence, implementing custom loss functions
- Expertise: Learner API, dataloaders, metrics, learning rate schedules, checkpointing
- Example queries: "Why isn't my model converging?", "How do I implement early stopping?"
3. **burn-deployer** (Backends, Optimization, Production)
- Invoke when: Choosing backend, optimizing performance, deploying to production
- Expertise: WGPU, CUDA, Metal, model quantization, inference optimization
- Example queries: "Which backend should I use for ARM servers?", "How do I optimize for Apple Silicon?"
4. **burn-importer** (ONNX, PyTorch, Model Conversion)
- Invoke when: Importing pre-trained models, converting from other frameworks
- Expertise: ONNX import, weight loading, operator mapping, model surgery
- Example queries: "How do I load a pretrained ResNet?", "Can I import a HuggingFace model?"
### Ecosystem Team (4 specialists)
5. **burn-lm** (Language Models, Transformers, NLP)
- Invoke when: Building language models, implementing transformers, NLP tasks
- Expertise: burn-lm library, attention mechanisms, tokenization, generation
- Example queries: "How do I implement GPT-style generation?", "What's the best way to handle padding?"
6. **burn-central** (Experiment Tracking, MLOps)
- Invoke when: Setting up experiment tracking, managing training runs
- Expertise: burn-central integration, metrics logging, hyperparameter tracking
- Example queries: "How do I log training curves?", "Can I track multiple experiments?"
7. **burn-models** (Pre-trained Models, Model Zoo)
- Invoke when: Using pre-trained models, finding reference implementations
- Expertise: Available models, loading pre-trained weights, fine-tuning
- Example queries: "Is there a pretrained ViT?", "How do I fine-tune BERT?"
8. **burn-bench** (Benchmarking, Profiling, Performance)
- Invoke when: Performance analysis, comparing backends, optimization debugging
- Expertise: Profiling tools, benchmark interpretation, performance tuning
- Example queries: "Why is my model slower than PyTorch?", "How do I profile GPU kernels?"
## Routing Decision Tree
```
User Query
│
├─ "How do I..." / "implement..." / "design..."
│ │
│ ├─ Contains: "tensor", "module", "layer", "architecture"
│ │ └─→ burn-architect
│ │
│ ├─ Contains: "train", "loss", "optimizer", "convergence"
│ │ └─→ burn-trainer
│ │
│ ├─ Contains: "deploy", "backend", "performance", "GPU"
│ │ └─→ burn-deployer
│ │
│ └─ Contains: "import", "ONNX", "PyTorch", "convert"
│ └─→ burn-importer
│
├─ "Why isn't..." / "debug..." / "error..."
│ │
│ ├─ Training/convergence issue
│ │ └─→ burn-trainer
│ │
│ └─ Performance/backend issue
│ └─→ burn-deployer
│
└─ Domain-specific
│
├─ Language models, NLP
│ └─→ burn-lm
│
├─ Experiment tracking
│ └─→ burn-central
│
├─ Pre-trained models
│ └─→ burn-models
│
└─ Benchmarking
└─→ burn-bench
```
## Multi-Agent Collaboration Patterns
### Pattern 1: Sequential Pipeline
User wants to train a custom model on GPU:
1. **burn-architect** → Design the model architecture
2. **burn-trainer** → Set up training loop and dataset
3. **burn-deployer** → Optimize for target GPU backend
### Pattern 2: Parallel Research
User asks "What's the best way to implement multi-head attention?"
1. **burn-architect** → Core implementation approach
2. **burn-lm** → NLP-specific considerations (parallel)
3. Synthesize both responses
### Pattern 3: Import-Then-Train
User wants to fine-tune a HuggingFace model:
1. **burn-importer** → Convert model to Burn
2. **burn-trainer** → Set up fine-tuning loop
3. **burn-deployer** → Optimize for production
## When to Delegate vs. Answer Directly
### Delegate to specialist when:
- Question requires deep domain expertise (e.g., "What's the best positional encoding for long sequences?")
- Implementation involves multiple files or complex code
- User explicitly asks for a specialist (e.g., "Can I talk to the backend expert?")
### Answer directly when:
- Simple factual question (e.g., "What version of Burn is current?")
- Routing question (e.g., "Who should I talk to about...?")
- Meta-question (e.g., "What can this team do?")
## Coordination with Task System
If user request involves multiple steps:
1. Break into tasks using TaskCreate
2. Assign specialists to tasks (description mentions agent)
3. Specialists auto-claim their tasks from shared task list
4. Monitor progress via TaskList
```
### Key Properties
- ✅ **Injected once per session** — routing tree loads when needed, persists
- ✅ **Cross-cutting knowledge** — decision logic that applies across all agents
- ✅ **Coordination patterns** — multi-agent collaboration workflows
- ✅ **No tool calls needed** — pure reference, lightweight
---
## Tier 4: Dynamic Context (MCP Prompts — Channel 4)
### What Goes Here
**On-demand generated context, code scaffolding, templates**
### Example Prompts
```python
@app.list_prompts()
async def list_prompts():
return [
{
"name": "scaffold_model",
"description": "Generate a complete Burn model scaffold with config, module, and training boilerplate",
"arguments": [
{"name": "architecture", "description": "Model type: cnn|transformer|mlp", "required": True},
{"name": "task", "description": "Task: classification|regression|generation", "required": True},
]
},
{
"name": "changelog",
"description": "Show what changed in Burn between two versions",
"arguments": [
{"name": "from_version", "description": "Starting version (e.g., 0.19.0)", "required": True},
{"name": "to_version", "description": "Target version (e.g., 0.20.0)", "required": True},
]
}
]
@app.get_prompt()
async def get_prompt(name: str, arguments: dict):
if name == "scaffold_model":
arch = arguments["architecture"]
task = arguments["task"]
# Query database for best template
db = sqlite3.connect("/path/to/burn-kb.db")
template_code = db.execute(
"SELECT code FROM patterns WHERE name = ? AND category = 'scaffold'",
[f"{arch}_{task}"]
).fetchone()[0]
return {
"messages": [
{
"role": "user",
"content": {
"type": "text",
"text": f"# Burn {arch.upper()} Model Scaffold ({task})\n\n{template_code}\n\nCustomize this scaffold for the user's specific requirements."
}
}
]
}
```
---
## Complete Architecture Diagram
```
┌─────────────────────────────────────────────────────────────────────┐
│ User Request │
│ "How do I implement a transformer in Burn?" │
└────────────────────────────┬────────────────────────────────────────┘
│
┌────────▼─────────┐
│ burn-router │ ← Tier 3 (SKILL.md)
│ (routing skill) │ Cross-cutting decision tree
└────────┬─────────┘
│
┌──────────────┴──────────────┐
│ Delegates to specialist │
└──────────────┬──────────────┘
│
┌────────▼─────────┐
│ burn-architect │ ← Tier 1 (agent .md)
│ (agent) │ Specialist domain knowledge
└────────┬─────────┘
│
├─ Memorized knowledge (systemPrompt):
│ • Core tensor APIs
│ • Common patterns
│ • Shape semantics
│
├─ MCP tool calls (Tier 2):
│ │
│ ├─→ query_api_docs("transformer attention")
│ │ └─→ SQLite FTS5 → API docs
│ │
│ ├─→ search_examples("transformer")
│ │ └─→ SQLite → Full code examples
│ │
│ └─→ get_pattern("multi-head-attention")
│ └─→ SQLite → Design patterns
│
└─ Optional MCP prompt (Tier 4):
│
└─→ /mcp__burn-kb__scaffold_model transformer generation
└─→ Dynamic template generation
┌────────▼─────────┐
│ Response to │
│ team lead │
└──────────────────┘
```
---
## Knowledge Segmentation Matrix
| Knowledge Type | Storage | Access | Audience | Update Frequency |
|----------------|---------|--------|----------|------------------|
| **Hot-path APIs** (e.g., `Tensor::matmul`) | Agent systemPrompt | Embedded | Single specialist | Per Burn release |
| **Cold-path APIs** (e.g., `NdArray::try_from_iter`) | SQLite `api_docs` | MCP tool query | All agents | Daily scrape |
| **Code examples** | SQLite `examples` | MCP tool query | All agents | Per Burn release |
| **Design patterns** | SQLite `patterns` | MCP tool query | All agents | Manual curation |
| **Routing logic** | burn-router SKILL.md | Session injection | Team lead | Iterative refinement |
| **Specialist expertise** | Agent .md systemPrompt | Embedded | Single agent | Per agent version |
| **Scaffolding templates** | MCP prompts | On-demand | All agents | Template updates |
| **Tool usage guide** | MCP `instructions` | Every turn | All agents | Per MCP version |
---
## Implementation Checklist
### Phase 1: Database Setup
- [ ] Create SQLite database schema (`api_docs`, `examples`, `patterns` tables)
- [ ] Set up FTS5 virtual tables for full-text search
- [ ] Scrape docs.rs/burn → populate `api_docs`
- [ ] Parse burn/examples → populate `examples`
- [ ] Curate design patterns → populate `patterns`
- [ ] Build indexes and test queries
### Phase 2: MCP Server
- [ ] Implement `burn-kb` MCP server with `instructions` field
- [ ] Implement `query_api_docs` tool (FTS5 search)
- [ ] Implement `search_examples` tool
- [ ] Implement `get_pattern` tool
- [ ] Implement `get_changelog` tool (version diffs)
- [ ] Implement MCP prompts (`scaffold_model`, etc.)
- [ ] Test all tools in isolation
### Phase 3: Agent Definitions
- [ ] Write `burn-architect.md` with embedded tensor/module knowledge
- [ ] Write `burn-trainer.md` with training loop patterns
- [ ] Write `burn-deployer.md` with backend selection guide
- [ ] Write `burn-importer.md` with ONNX import reference
- [ ] Write ecosystem agent definitions (burn-lm, burn-central, etc.)
- [ ] Test each agent in isolation with MCP tools
### Phase 4: Skills
- [ ] Write `burn-router` SKILL.md with routing decision tree
- [ ] Write `burn-cubecl` SKILL.md for custom GPU kernel guidance
- [ ] Write `burn-contrib` SKILL.md for framework contribution guide
- [ ] Test skill injection and persistence
### Phase 5: Plugin Integration
- [ ] Create plugin manifest with all agents + skills
- [ ] Register `burn-kb` MCP server in `.mcp.json`
- [ ] Test full team collaboration with task system
- [ ] Benchmark knowledge retrieval latency
- [ ] Optimize query performance if needed
---
## Performance Characteristics
### Knowledge Retrieval Latency
| Source | Latency | Cache | Scalability |
|--------|---------|-------|-------------|
| Embedded in systemPrompt | 0ms (in-context) | N/A | Limited by context window (~100KB) |
| SQLite FTS5 query | <5ms | OS page cache | Millions of docs, <50MB file |
| Read tool on markdown | 10-50ms | Filesystem cache | Hundreds of files |
| External API (docs.rs) | 100-500ms | HTTP cache | Unlimited, but slow |
**Recommended for 100K+ docs: SQLite FTS5**
### Context Window Budget
Assuming 200K token context:
- System prompt base: ~5K tokens
- Agent systemPrompt (embedded knowledge): ~10K tokens per agent
- MCP tool results (retrieved knowledge): ~5K tokens per query
- Conversation history: ~50K tokens
- Remaining for user queries: ~130K tokens
**Trade-off**: Embed hot-path knowledge (10K tokens), query cold-path (5K tokens per retrieval).
---
## Anti-Patterns to Avoid
### ❌ Don't: Duplicate knowledge across all agents
**Problem**: Bloats context, stale data when one copy updates
**Solution**: Centralize in MCP tools, embed only specialist-specific knowledge
### ❌ Don't: Embed entire API reference in systemPrompt
**Problem**: Wastes context on rarely-used APIs
**Solution**: Embed hot-path (top 20% of APIs), query cold-path via MCP
### ❌ Don't: Use Read tool to search large codebases
**Problem**: Sequential search is O(n), slow, no ranking
**Solution**: Index codebase into SQLite FTS5, query with ranking
### ❌ Don't: Hard-code knowledge in tool implementations
**Problem**: Requires code deploy to update knowledge
**Solution**: Store knowledge in database, update via SQL without code changes
### ❌ Don't: Share state between agents via filesystem
**Problem**: Race conditions, no schema, hard to debug
**Solution**: Use message passing (mailbox system) or shared task list
---
## Migration Path from Existing Skills
If you already have standalone skills (e.g., `burn-router`, `burn-train`, etc.), here's how to migrate:
### Step 1: Identify Knowledge Categories
Map existing skill content to tiers:
- **Tier 1** (agent-specific): Move to agent `.md` systemPrompt
- **Tier 2** (shared reference): Extract to SQLite database
- **Tier 3** (cross-cutting): Keep in SKILL.md, simplify to routing/coordination
- **Tier 4** (dynamic): Convert to MCP prompts
### Step 2: Extract to Database
```python
# Example: Extract API reference from burn-router skill
import re
with open('.claude/skills/burn-router/SKILL.md', 'r') as f:
content = f.read()
# Parse sections like "## Tensor Operations"
api_sections = re.findall(r'### (.+?)\n```rust\n(.+?)\n```', content, re.DOTALL)
db = sqlite3.connect('burn-kb.db')
for name, code in api_sections:
db.execute(
"INSERT INTO api_docs (name, signature, examples) VALUES (?, ?, ?)",
[name, code, ""]
)
db.commit()
```
### Step 3: Convert Skills to Agents
```bash
# Before: Standalone skill
.claude/skills/burn-architect/SKILL.md
# After: Agent definition
.claude/agents/burn-architect.md
```
Agent file inherits skill's knowledge but adds:
- `tools` restriction (security boundary)
- `memory` field (persistent learning)
- `whenToUse` (auto-invocation trigger)
### Step 4: Simplify Routing Skill
Remove embedded knowledge, keep only decision trees and delegation patterns.
---
## Conclusion
**Optimal architecture**: Hybrid 3-tier system
1. **Agent systemPrompts** (Tier 1): Specialist hot-path knowledge
2. **SQLite + MCP tools** (Tier 2): Shared queryable reference
3. **Routing skills** (Tier 3): Cross-cutting coordination
**Why it works**:
- Natural knowledge partitioning via agent isolation
- Scalable shared reference (SQLite handles millions of docs)
- Fast retrieval (<5ms FTS5 queries)
- Context-efficient (embed hot-path, query cold-path)
- Maintainable (update database without code changes)
**Next steps**: Implement Phase 1 (database setup) and test FTS5 query performance.
---
## burn-team-plugin-summary.md
# Burn Development Team Plugin - Complete Implementation Guide
**Date**: 2026-03-14
**Claude Code Version**: 2.1.76
**Based On**: Complete teammate + plugin architecture analysis
---
## Quick Summary
You have **two complete, production-ready systems** that can be integrated:
1. **Teammate System** (`CLAUDE_CODE_EXPERIMENTAL_AGENT_TEAMS=1`) - Multi-agent coordination via teams, tasks, and message passing
2. **Plugin System** (feature-flagged as `tengu_orchid_trellis`) - Marketplace-based plugin distribution with agents/skills/commands
**Integration Strategy**: Create a plugin that defines 8 Burn specialist agents. When invoked, spawn them as teammates on a shared team with coordinated task execution.
---
## Three Documents Created
1. **`teammate-architecture.md`** - Complete teammate system reference (lifecycle, message passing, task coordination)
2. **`plugin-teammate-integration.md`** - How to wire teammates into a plugin (agents, skills, file structure, examples)
3. **This document** - Executive summary with critical findings
---
## Critical Findings from Additional Analysis
### Plugin Marketplace Status (from PLUGIN_MARKETPLACE_REALITY_CHECK.md)
**What it is**: Enterprise managed deployment system, NOT CoWork-specific
**Status**: Infrastructure complete, feature-flagged off (`tengu_orchid_trellis = false`)
**Missing**: Plugin signing, sandboxing, security hardening
**Key Environment Variables**:
- `CLAUDE_CODE_PLUGIN_SEED_DIR` - Shared read-only plugin cache (enterprise IT managed)
- `CLAUDE_COWORK_MEMORY_PATH_OVERRIDE` - Team memory sync (separate feature)
**Current Use Case**: Likely internal use at Anthropic for their own teams
### Seed Directory Architecture
```bash
# Corporate IT sets up shared plugins
export CLAUDE_CODE_PLUGIN_SEED_DIR=/nfs/corporate/claude-plugins
/nfs/corporate/claude-plugins/
├── cache/
│ ├── corporate-internal/
│ │ └── security-scanner/1.0.0/ # Pre-downloaded
│ └── official/
│ └── database-assistant/1.5.0/
└── known_marketplaces.json
# Users get instant access to pre-approved plugins (no download)
# Can still install personal plugins to ~/.claude/plugins/
```
**Benefit**: Perfect for team deployments - all team members get same plugin versions instantly.
### For Your Burn Team Plugin
**Two deployment paths**:
1. **Individual Developer** (default):
```bash
mkdir -p ~/.claude/plugins/burn-dev-team
# Place plugin files there
# Enable in settings.json
```
2. **Team/Enterprise** (seed directory):
```bash
# Admin pre-installs for whole team
export CLAUDE_CODE_PLUGIN_SEED_DIR=/shared/team-plugins
/shared/team-plugins/cache/local/burn-dev-team/1.0.0/
# Everyone gets instant access
```
---
## Complete Architecture Stack
```
┌─────────────────────────────────────────────────────────────┐
│ User Invokes │
│ /burn-router [task] │
└────────────────────────┬─────────────────────────────────────┘
│
├─ Skill analyzes request
│ (skills/burn-router/SKILL.md)
│
▼
┌─────────────────────────────────────────────────────────────┐
│ TeamCreate Tool │
│ { team_name: "burn-impl", description: "..." } │
│ Creates ~/.claude/teams/burn-impl/ │
│ Creates ~/.claude/tasks/burn-impl/ │
└────────────────────────┬─────────────────────────────────────┘
│
├─ TaskCreate (break down work)
│
▼
┌─────────────────────────────────────────────────────────────┐
│ Agent Tool (8 teammates) │
│ Agent({ name: "architect", team_name: "burn-impl", │
│ subagent_type: "burn:burn-architect", ... }) │
│ → Loads plugin agent definition │
│ → Spawns via backend (tmux/iTerm/in-process) │
│ → Registers in team config │
└────────────────────────┬─────────────────────────────────────┘
│
├─ Teammates start execution loops
│
▼
┌─────────────────────────────────────────────────────────────┐
│ Teammate Execution (In-Process Example) │
│ 1. Initialize with team lead's message │
│ 2. Execute work turn (Fy generator) │
│ 3. Mark idle, send notification to team lead │
│ 4. Poll mailbox for: │
│ - shutdown_request (priority 1) │
│ - Messages from team lead (priority 2) │
│ - Any unread messages (priority 3) │
│ - Available tasks from TaskList │
│ 5. Process message → execute work turn → repeat │
└────────────────────────┬─────────────────────────────────────┘
│
├─ Task coordination
│ (auto-claim unblocked tasks by ID order)
│
▼
┌─────────────────────────────────────────────────────────────┐
│ Message Passing System │
│ ~/.claude/teams/burn-impl/mailbox/ │
│ team-lead.json │
│ architect.json │
│ trainer.json │
│ deployer.json │
│ ... │
│ → File-based async queues │
│ → Lock-protected writes │
│ → Read status tracking │
└────────────────────────┬─────────────────────────────────────┘
│
├─ Work completion
│
▼
┌─────────────────────────────────────────────────────────────┐
│ Graceful Shutdown │
│ SendMessage({ to: "*", message: { │
│ type: "shutdown_request", reason: "Work complete" │
│ }}) │
│ → Teammates process shutdown │
│ → Respond with shutdown_response │
│ → Exit execution loops │
│ TeamDelete() - cleanup team + tasks │
└─────────────────────────────────────────────────────────────┘
```
---
## Plugin File Structure
```
~/.claude/plugins/burn-dev-team/
├── plugin.json # Manifest
│
├── agents/ # 8 specialist agents
│ ├── burn-architect.md # Core: tensors, modules, autodiff
│ ├── burn-trainer.md # Core: training loops, learner
│ ├── burn-deployer.md # Core: backends, deployment
│ ├── burn-importer.md # Core: ONNX import
│ ├── burn-lm.md # Ecosystem: language models
│ ├── burn-central.md # Ecosystem: experiment tracking
│ ├── burn-models.md # Ecosystem: model zoo
│ └── burn-bench.md # Ecosystem: benchmarking
│
├── skills/ # 3 coordinator skills
│ ├── burn-router/
│ │ └── SKILL.md # Main: route to specialists
│ ├── burn-cubecl/
│ │ └── SKILL.md # GPU kernels skill
│ └── burn-contrib/
│ └── SKILL.md # Contributing guide skill
│
├── hooks/
│ └── hooks.json # TeammateIdle, TaskCompleted hooks
│
└── .mcp.json # Optional: Burn docs MCP server
```
---
## Agent Definition Template
**agents/burn-architect.md**:
```markdown
---
name: burn-architect
description: Burn architecture specialist - tensors, modules, autodiff, records. Full-stack developer who designs, debugs, and reviews within the architecture domain.
tools: ["*"]
skills: ["burn-router"]
model: sonnet
color: blue
memory: project
permissionMode: acceptEdits
effort: high
---
# Burn Architecture Specialist
You are an expert Burn framework architect on a development team.
## Your Expertise
- Tensor operations and shape management
- Module system and neural network architectures
- Automatic differentiation and gradient computation
- Config pattern for reproducible experiments
- Record system for model persistence
## Team Workflow
As a teammate:
1. **Check TaskList** after completing each task
2. **Claim unassigned, unblocked tasks** related to architecture (prefer lowest ID)
3. **Communicate via SendMessage** - your text output is NOT visible to the team
4. **Mark tasks completed** with TaskUpdate when done
5. **Debug and review** your own work - you're a full-stack specialist
6. **Ask for help** via SendMessage when blocked
## Architecture Patterns
### Tensor Shape Management
```rust
use burn::tensor::Tensor;
// Always document expected shapes
fn linear_forward<B: Backend>(
input: Tensor<B, 2>, // [batch_size, input_dim]
weight: Tensor<B, 2>, // [output_dim, input_dim]
) -> Tensor<B, 2> { // [batch_size, output_dim]
input.matmul(weight.transpose())
}
```
[... extensive domain-specific patterns, debugging guides, review checklists ...]
```
---
## Routing Skill (Orchestrator)
**skills/burn-router/SKILL.md**:
```markdown
---
trigger: burn-router
description: Route Burn queries to specialized development team
tools: ["Agent", "TeamCreate", "SendMessage", "TaskCreate", "TaskUpdate", "TaskList"]
model: haiku
effort: low
context: fork
---
# Burn Development Team Router
## Specialist Mapping
- **Tensors, modules, autodiff** → burn-architect
- **Training, learner, metrics** → burn-trainer
- **Backends, deployment** → burn-deployer
- **ONNX import** → burn-importer
- **Language models** → burn-lm
- **Experiment tracking** → burn-central
- **Model zoo** → burn-models
- **Benchmarking** → burn-bench
## Workflow
1. Analyze request complexity
2. Single specialist OR full team?
3. For teams:
```
TeamCreate({ team_name: "burn-impl", description: "..." })
TaskCreate([
{ subject: "Design architecture", owner: null },
{ subject: "Implement training", blockedBy: ["1"] },
{ subject: "Export to ONNX", blockedBy: ["2"] }
])
Agent({ name: "architect", team_name: "burn-impl",
subagent_type: "burn:burn-architect", ... })
Agent({ name: "trainer", team_name: "burn-impl",
subagent_type: "burn:burn-trainer", ... })
Agent({ name: "importer", team_name: "burn-impl",
subagent_type: "burn:burn-importer", ... })
# Monitor, coordinate, shutdown when complete
SendMessage({ to: "*", message: { type: "shutdown_request" } })
TeamDelete()
```
[... detailed routing logic ...]
```
---
## Installation & Usage
### Step 1: Install Plugin
```bash
# Set required env var
export CLAUDE_CODE_EXPERIMENTAL_AGENT_TEAMS=1
# Option A: User-level
mkdir -p ~/.claude/plugins/burn-dev-team
cd ~/.claude/plugins/burn-dev-team
# Copy plugin files here
# Option B: Team-level (seed directory)
export CLAUDE_CODE_PLUGIN_SEED_DIR=/shared/team-plugins
# Admin pre-installs plugin to seed directory
```
### Step 2: Enable Plugin
**~/.claude/settings.json**:
```json
{
"enabledPlugins": {
"burn-dev-team": true
}
}
```
### Step 3: Use the Team
```bash
claude
# Single specialist (simple task)
/burn-router Optimize tensor operations in my CNN
# Full team (complex task)
/burn-router Implement a Llama model with training loop and ONNX export
# Manual team creation
TeamCreate({ team_name: "burn-impl", description: "Implement ResNet" })
TaskCreate({ subject: "Design ResNet architecture" })
TaskCreate({ subject: "Implement training loop", blockedBy: ["1"] })
TaskCreate({ subject: "Benchmark on CUDA backend", blockedBy: ["2"] })
Agent({
name: "architect",
team_name: "burn-impl",
subagent_type: "burn:burn-architect",
prompt: "Check TaskList for architecture tasks",
description: "ResNet architecture"
})
# ... spawn other specialists as needed
# Monitor progress
TaskList()
SendMessage({ to: "architect", message: "Use 3x3 kernels" })
# Cleanup when done
SendMessage({ to: "*", message: { type: "shutdown_request" } })
TeamDelete()
```
---
## Key Integration Points
### 1. Plugin → Agent Registration
```javascript
// Plugin loading (pgH function)
// Scans agents/ directory for *.md files
// Parses frontmatter + content
// Registers as: "burn:burn-architect", "burn:burn-trainer", etc.
// Agent tool resolution
// When user calls Agent({ subagent_type: "burn:burn-architect" })
// System finds plugin agent definition
// Loads systemPrompt, tools, permissions
// Spawns as teammate
```
### 2. Teammate → Task Auto-Claiming
```javascript
// In teammate execution loop (AE6 function)
// After idle, poll loop checks:
// 1. Pending user messages
// 2. Mailbox messages
// 3. Available tasks (BCf function)
async function BCf(taskListId, agentName) {
let tasks = await uI(taskListId);
let availableTask = HE6(tasks); // Find unblocked, unowned
if (availableTask) {
await QEA(taskListId, availableTask.id, agentName); // Claim
await DC(taskListId, availableTask.id, { status: "in_progress" });
return taskPrompt(availableTask); // Return as message
}
return null;
}
```
### 3. Message Passing → Coordination
```javascript
// File-based mailboxes
~/.claude/teams/burn-impl/mailbox/architect.json
[
{
"id": "msg-123",
"from": "team-lead",
"text": "Use 3x3 kernels for convolutions",
"timestamp": "...",
"read": false
}
]
// Teammates poll mailbox (BQ function)
// Mark messages read (vQH function)
// Process in priority order (shutdown > team-lead > any)
```
---
## Performance Characteristics
### In-Process Backend (Default for Non-Interactive)
**Pros**:
- No external dependencies (tmux, iTerm2)
- Works in CI/CD, headless environments
- Lower latency (no IPC overhead)
- Easier debugging (single process)
**Cons**:
- Higher memory usage (all agents in same process)
- Shared context window (compaction more frequent)
- Cannot visualize separate panes
**Best For**: Automated workflows, CI/CD, non-interactive usage
### Tmux Backend (Visual Panes)
**Pros**:
- Visual separation (each teammate in own pane)
- Independent context windows
- Easy monitoring (see all teammates at once)
- Native terminal feel
**Cons**:
- Requires tmux installed
- Higher complexity (IPC via tmux)
- Pane management overhead
**Best For**: Interactive development, team monitoring, visual workflows
### iTerm2 Backend (Native Split Panes)
**Pros**:
- Native macOS integration
- Beautiful pane borders with colors
- it2 CLI for automation
**Cons**:
- macOS only
- Requires it2 CLI (`pip install it2`)
- Fallback to tmux if not available
**Best For**: macOS developers wanting native UI
---
## Hooks for Observability
**hooks/hooks.json**:
```json
{
"TeammateIdle": [
{
"matcher": "",
"hooks": [
{
"type": "command",
"command": "echo '$(date) [${AGENT_NAME}] Idle: ${IDLE_REASON}' >> ~/.claude/burn-team.log",
"statusMessage": "Logging teammate idle event"
}
]
}
],
"TaskCompleted": [
{
"matcher": "",
"hooks": [
{
"type": "command",
"command": "notify-send 'Burn Team' 'Task ${TASK_ID} completed by ${OWNER}'",
"statusMessage": "Notifying task completion"
}
]
}
]
}
```
**Hook Variables**:
- `TeammateIdle`: `AGENT_NAME`, `IDLE_REASON`, `SUMMARY`, `COMPLETED_STATUS`, `FAILURE_REASON`
- `TaskCompleted`: `TASK_ID`, `STATUS`, `OWNER`, `SUBJECT`
---
## Debugging Tips
### 1. Enable Debug Logging
```bash
export CLAUDE_CODE_DEBUG=1
claude --verbose
```
Watch for:
- `[InProcessBackend] spawn() called for <name>`
- `[inProcessRunner] <agentId> received new message from <from>`
- `[Tasks] Task <id> claimed by <agent>`
### 2. Monitor Mailboxes
```bash
watch -n 1 'ls -lh ~/.claude/teams/burn-impl/mailbox/'
cat ~/.claude/teams/burn-impl/mailbox/architect.json | jq
```
### 3. Monitor Task List
```bash
watch -n 1 'ls -lh ~/.claude/tasks/burn-impl/'
cat ~/.claude/tasks/burn-impl/1.json | jq
```
### 4. Team Config Inspection
```bash
cat ~/.claude/teams/burn-impl/config.json | jq
```
### 5. Check Agent Loading
```bash
# Verify plugin agents loaded
claude --debug 2>&1 | grep "Loaded.*agents from plugin burn-dev-team"
```
---
## Migration Path from Current Skills
### Before (11 standalone skills)
```
User → /burn-app-dev
→ Single agent execution
→ No coordination
→ Sequential work
```
### After (8 teammates + 3 coordinator skills)
```
User → /burn-router
├─ TeamCreate
├─ Spawn 8 teammates
├─ Task breakdown
├─ Parallel execution
├─ Auto-claiming
└─ Coordinated completion
```
### Skill Consolidation
**Old**: `burn-debugger`, `burn-reviewer` (separate skills)
**New**: Each teammate has debug + review capability in their domain
**Old**: `burn-onnx-surgeon` (separate skill)
**New**: Merged into `burn-importer` (same domain)
**Old**: `burn-ecosystem` (catch-all)
**New**: Split into 4 specialists (`burn-lm`, `burn-central`, `burn-models`, `burn-bench`)
---
## Security Considerations
### Plugin Security (Not Yet Implemented)
**Missing** (per marketplace analysis):
- ✗ Plugin signing/verification
- ✗ Sandboxing
- ✗ Granular permissions
- ✗ Code review/moderation
**Current State**: Plugins run with full access in main process
**Mitigation for Burn Team**:
- Self-hosted plugin (you control the code)
- No external dependencies
- Review all agent prompts
- Use `memory: project` for containment
### Teammate Security
**Built-in**:
- ✓ Permission modes (`acceptEdits`, `plan`, etc.)
- ✓ Tool allowlists/denylists
- ✓ Shutdown protocol (graceful termination)
- ✓ Task-based isolation (teammates can't interfere)
**Best Practices**:
- Use `permissionMode: acceptEdits` for core teammates
- Use `tools: ["*"]` only for trusted specialists
- Monitor via hooks for unexpected behavior
- Set `maxTurns` to prevent runaway loops
---
## Next Steps
1. **Create plugin structure** following file layout above
2. **Define 8 agent .md files** with domain-specific prompts
3. **Implement burn-router skill** with routing logic
4. **Test with simple task** (single specialist)
5. **Test with complex task** (full team coordination)
6. **Add hooks** for observability
7. **Document usage** for your team
8. **Deploy** (individual OR seed directory for team)
---
## Resources
- **teammate-architecture.md** - Full teammate system spec (lifecycle, protocols, message passing)
- **plugin-teammate-integration.md** - Detailed integration guide (agents, skills, examples)
- **PLUGIN_MARKETPLACE_REALITY_CHECK.md** - Enterprise deployment context
- **PLUGIN_MARKETPLACE_COMPLETE_ANALYSIS.md** - Marketplace infrastructure deep dive
---
## Final Architecture Diagram
```
┌──────────────────────────────────────────────────────────────┐
│ Burn Development Team │
│ (Plugin System) │
└────────────────┬─────────────────────────────────────────────┘
│
├─ 8 Agent Definitions (agents/*.md)
├─ 3 Coordinator Skills (skills/*/SKILL.md)
├─ Hooks (hooks/hooks.json)
└─ Manifest (plugin.json)
│
▼
┌──────────────────────────────────────────────────────────────┐
│ Teammate System │
│ (CLAUDE_CODE_EXPERIMENTAL_AGENT_TEAMS=1) │
└────────────────┬─────────────────────────────────────────────┘
│
├─ Team Creation (TeamCreate)
├─ Task Management (TaskCreate/Update/List)
├─ Agent Spawning (Agent tool)
├─ Message Passing (SendMessage)
└─ Lifecycle Hooks (TeammateIdle, TaskCompleted)
│
▼
┌──────────────────────────────────────────────────────────────┐
│ Execution Backends │
│ (in-process | tmux | iTerm2) │
└────────────────┬─────────────────────────────────────────────┘
│
├─ Parallel Execution (8 teammates)
├─ Auto Task Claiming (by ID order)
├─ Message Queue Polling (mailbox/*.json)
└─ Graceful Shutdown (shutdown_request protocol)
│
▼
┌──────────────────────────────────────────────────────────────┐
│ User's Work │
│ (Burn ML models, training, deployment) │
└──────────────────────────────────────────────────────────────┘
```
---
**Status**: Complete architecture designed
**Ready to implement**: Yes - all components specified
**Estimated complexity**: Medium (well-defined patterns)
**Dependencies**: Claude Code 2.1.76+, `CLAUDE_CODE_EXPERIMENTAL_AGENT_TEAMS=1`
This is a **production-ready architecture** using **stable, documented systems**. The teammate system is fully implemented and the plugin system provides the perfect distribution mechanism. You have everything needed to build a true multi-agent Burn development team.
---
## cla-plugins.md
# Plugins in the SDK
Load custom plugins to extend Claude Code with commands, agents, skills, and hooks through the Agent SDK
---
Plugins allow you to extend Claude Code with custom functionality that can be shared across projects. Through the Agent SDK, you can programmatically load plugins from local directories to add custom slash commands, agents, skills, hooks, and MCP servers to your agent sessions.
## What are plugins?
Plugins are packages of Claude Code extensions that can include:
- **Commands**: Custom slash commands
- **Agents**: Specialized subagents for specific tasks
- **Skills**: Model-invoked capabilities that Claude uses autonomously
- **Hooks**: Event handlers that respond to tool use and other events
- **MCP servers**: External tool integrations via Model Context Protocol
For complete information on plugin structure and how to create plugins, see [Plugins](create-plugins-claude-code-docs.md).
## Loading plugins
Load plugins by providing their local file system paths in your options configuration. The SDK supports loading multiple plugins from different locations.
<CodeGroup>
```typescript TypeScript
import { query } from "@anthropic-ai/claude-agent-sdk";
for await (const message of query({
prompt: "Hello",
options: {
plugins: [
{ type: "local", path: "./my-plugin" },
{ type: "local", path: "/absolute/path/to/another-plugin" }
]
}
})) {
// Plugin commands, agents, and other features are now available
}
```
```python Python
import asyncio
from claude_agent_sdk import query
async def main():
async for message in query(
prompt="Hello",
options={
"plugins": [
{"type": "local", "path": "./my-plugin"},
{"type": "local", "path": "/absolute/path/to/another-plugin"}
]
}
):
# Plugin commands, agents, and other features are now available
pass
asyncio.run(main())
```
</CodeGroup>
### Path specifications
Plugin paths can be:
- **Relative paths**: Resolved relative to your current working directory (e.g., `"./plugins/my-plugin"`)
- **Absolute paths**: Full file system paths (e.g., `"/home/user/plugins/my-plugin"`)
<Note>
The path should point to the plugin's root directory (the directory containing `.claude-plugin/plugin.json`).
</Note>
## Verifying plugin installation
When plugins load successfully, they appear in the system initialization message. You can verify that your plugins are available:
<CodeGroup>
```typescript TypeScript
import { query } from "@anthropic-ai/claude-agent-sdk";
for await (const message of query({
prompt: "Hello",
options: {
plugins: [{ type: "local", path: "./my-plugin" }]
}
})) {
if (message.type === "system" && message.subtype === "init") {
// Check loaded plugins
console.log("Plugins:", message.plugins);
// Example: [{ name: "my-plugin", path: "./my-plugin" }]
// Check available commands from plugins
console.log("Commands:", message.slash_commands);
// Example: ["/help", "/compact", "my-plugin:custom-command"]
}
}
```
```python Python
import asyncio
from claude_agent_sdk import query
async def main():
async for message in query(
prompt="Hello",
options={"plugins": [{"type": "local", "path": "./my-plugin"}]}
):
if message.type == "system" and message.subtype == "init":
# Check loaded plugins
print("Plugins:", message.data.get("plugins"))
# Example: [{"name": "my-plugin", "path": "./my-plugin"}]
# Check available commands from plugins
print("Commands:", message.data.get("slash_commands"))
# Example: ["/help", "/compact", "my-plugin:custom-command"]
asyncio.run(main())
```
</CodeGroup>
## Using plugin commands
Commands from plugins are automatically namespaced with the plugin name to avoid conflicts. The format is `plugin-name:command-name`.
<CodeGroup>
```typescript TypeScript
import { query } from "@anthropic-ai/claude-agent-sdk";
// Load a plugin with a custom /greet command
for await (const message of query({
prompt: "/my-plugin:greet", // Use plugin command with namespace
options: {
plugins: [{ type: "local", path: "./my-plugin" }]
}
})) {
// Claude executes the custom greeting command from the plugin
if (message.type === "assistant") {
console.log(message.content);
}
}
```
```python Python
import asyncio
from claude_agent_sdk import query, AssistantMessage, TextBlock
async def main():
# Load a plugin with a custom /greet command
async for message in query(
prompt="/demo-plugin:greet", # Use plugin command with namespace
options={"plugins": [{"type": "local", "path": "./plugins/demo-plugin"}]}
):
# Claude executes the custom greeting command from the plugin
if isinstance(message, AssistantMessage):
for block in message.content:
if isinstance(block, TextBlock):
print(f"Claude: {block.text}")
asyncio.run(main())
```
</CodeGroup>
<Note>
If you installed a plugin via the CLI (e.g., `/plugin install my-plugin@marketplace`), you can still use it in the SDK by providing its installation path. Check `~/.claude/plugins/` for CLI-installed plugins.
</Note>
## Complete example
Here's a full example demonstrating plugin loading and usage:
<CodeGroup>
```typescript TypeScript
import { query } from "@anthropic-ai/claude-agent-sdk";
import * as path from "path";
async function runWithPlugin() {
const pluginPath = path.join(__dirname, "plugins", "my-plugin");
console.log("Loading plugin from:", pluginPath);
for await (const message of query({
prompt: "What custom commands do you have available?",
options: {
plugins: [
{ type: "local", path: pluginPath }
],
maxTurns: 3
}
})) {
if (message.type === "system" && message.subtype === "init") {
console.log("Loaded plugins:", message.plugins);
console.log("Available commands:", message.slash_commands);
}
if (message.type === "assistant") {
console.log("Assistant:", message.content);
}
}
}
runWithPlugin().catch(console.error);
```
```python Python
#!/usr/bin/env python3
"""Example demonstrating how to use plugins with the Agent SDK."""
from pathlib import Path
import anyio
from claude_agent_sdk import (
AssistantMessage,
ClaudeAgentOptions,
TextBlock,
query,
)
async def run_with_plugin():
"""Example using a custom plugin."""
plugin_path = Path(__file__).parent / "plugins" / "demo-plugin"
print(f"Loading plugin from: {plugin_path}")
options = ClaudeAgentOptions(
plugins=[
{"type": "local", "path": str(plugin_path)}
],
max_turns=3,
)
async for message in query(
prompt="What custom commands do you have available?",
options=options
):
if message.type == "system" and message.subtype == "init":
print(f"Loaded plugins: {message.data.get('plugins')}")
print(f"Available commands: {message.data.get('slash_commands')}")
if isinstance(message, AssistantMessage):
for block in message.content:
if isinstance(block, TextBlock):
print(f"Assistant: {block.text}")
if __name__ == "__main__":
anyio.run(run_with_plugin)
```
</CodeGroup>
## Plugin structure reference
A plugin directory must contain a `.claude-plugin/plugin.json` manifest file. It can optionally include:
```
my-plugin/
├── .claude-plugin/
│ └── plugin.json # Required: plugin manifest
├── commands/ # Custom slash commands
│ └── custom-cmd.md
├── agents/ # Custom agents
│ └── specialist.md
├── skills/ # Agent Skills
│ └── my-skill/
│ └── SKILL.md
├── hooks/ # Event handlers
│ └── hooks.json
└── .mcp.json # MCP server definitions
```
For detailed information on creating plugins, see:
- [Plugins](create-plugins-claude-code-docs.md) - Complete plugin development guide
- [Plugins reference](plugins-reference-claude-code-docs.md) - Technical specifications and schemas
## Common use cases
### Development and testing
Load plugins during development without installing them globally:
```typescript
plugins: [
{ type: "local", path: "./dev-plugins/my-plugin" }
]
```
### Project-specific extensions
Include plugins in your project repository for team-wide consistency:
```typescript
plugins: [
{ type: "local", path: "./project-plugins/team-workflows" }
]
```
### Multiple plugin sources
Combine plugins from different locations:
```typescript
plugins: [
{ type: "local", path: "./local-plugin" },
{ type: "local", path: "~/.claude/custom-plugins/shared-plugin" }
]
```
## Troubleshooting
### Plugin not loading
If your plugin doesn't appear in the init message:
1. **Check the path**: Ensure the path points to the plugin root directory (containing `.claude-plugin/`)
2. **Validate plugin.json**: Ensure your manifest file has valid JSON syntax
3. **Check file permissions**: Ensure the plugin directory is readable
### Commands not available
If plugin commands don't work:
1. **Use the namespace**: Plugin commands require the `plugin-name:command-name` format
2. **Check init message**: Verify the command appears in `slash_commands` with the correct namespace
3. **Validate command files**: Ensure command markdown files are in the `commands/` directory
### Path resolution issues
If relative paths don't work:
1. **Check working directory**: Relative paths are resolved from your current working directory
2. **Use absolute paths**: For reliability, consider using absolute paths
3. **Normalize paths**: Use path utilities to construct paths correctly
## See also
- [Plugins](create-plugins-claude-code-docs.md) - Complete plugin development guide
- [Plugins reference](plugins-reference-claude-code-docs.md) - Technical specifications
- [Slash Commands](/docs/en/agent-sdk/slash-commands) - Using slash commands in the SDK
- [Subagents](/docs/en/agent-sdk/subagents) - Working with specialized agents
- [Skills](/docs/en/agent-sdk/skills) - Using Agent Skills
---
## claude-code-plugins.md
# Claude Code Plugins
This directory contains some official Claude Code plugins that extend functionality through custom commands, agents, and workflows. These are examples of what's possible with the Claude Code plugin system—many more plugins are available through community marketplaces.
## What are Claude Code Plugins?
Claude Code plugins are extensions that enhance Claude Code with custom slash commands, specialized agents, hooks, and MCP servers. Plugins can be shared across projects and teams, providing consistent tooling and workflows.
Learn more in the [official plugins documentation](https://docs.claude.com/en/docs/claude-code/plugins).
## Plugins in This Directory
| Name | Description | Contents |
|------|-------------|----------|
| [agent-sdk-dev](./agent-sdk-dev/) | Development kit for working with the Claude Agent SDK | **Command:** `/new-sdk-app` - Interactive setup for new Agent SDK projects<br>**Agents:** `agent-sdk-verifier-py`, `agent-sdk-verifier-ts` - Validate SDK applications against best practices |
| [claude-opus-4-5-migration](./claude-opus-4-5-migration/) | Migrate code and prompts from Sonnet 4.x and Opus 4.1 to Opus 4.5 | **Skill:** `claude-opus-4-5-migration` - Automated migration of model strings, beta headers, and prompt adjustments |
| [code-review](./code-review/) | Automated PR code review using multiple specialized agents with confidence-based scoring to filter false positives | **Command:** `/code-review` - Automated PR review workflow<br>**Agents:** 5 parallel Sonnet agents for CLAUDE.md compliance, bug detection, historical context, PR history, and code comments |
| [commit-commands](./commit-commands/) | Git workflow automation for committing, pushing, and creating pull requests | **Commands:** `/commit`, `/commit-push-pr`, `/clean_gone` - Streamlined git operations |
| [explanatory-output-style](./explanatory-output-style/) | Adds educational insights about implementation choices and codebase patterns (mimics the deprecated Explanatory output style) | **Hook:** SessionStart - Injects educational context at the start of each session |
| [feature-dev](./feature-dev/) | Comprehensive feature development workflow with a structured 7-phase approach | **Command:** `/feature-dev` - Guided feature development workflow<br>**Agents:** `code-explorer`, `code-architect`, `code-reviewer` - For codebase analysis, architecture design, and quality review |
| [frontend-design](./frontend-design/) | Create distinctive, production-grade frontend interfaces that avoid generic AI aesthetics | **Skill:** `frontend-design` - Auto-invoked for frontend work, providing guidance on bold design choices, typography, animations, and visual details |
| [hookify](./hookify/) | Easily create custom hooks to prevent unwanted behaviors by analyzing conversation patterns or explicit instructions | **Commands:** `/hookify`, `/hookify:list`, `/hookify:configure`, `/hookify:help`<br>**Agent:** `conversation-analyzer` - Analyzes conversations for problematic behaviors<br>**Skill:** `writing-rules` - Guidance on hookify rule syntax |
| [learning-output-style](./learning-output-style/) | Interactive learning mode that requests meaningful code contributions at decision points (mimics the unshipped Learning output style) | **Hook:** SessionStart - Encourages users to write meaningful code (5-10 lines) at decision points while receiving educational insights |
| [plugin-dev](./plugin-dev/) | Comprehensive toolkit for developing Claude Code plugins with 7 expert skills and AI-assisted creation | **Command:** `/plugin-dev:create-plugin` - 8-phase guided workflow for building plugins<br>**Agents:** `agent-creator`, `plugin-validator`, `skill-reviewer`<br>**Skills:** Hook development, MCP integration, plugin structure, settings, commands, agents, and skill development |
| [pr-review-toolkit](./pr-review-toolkit/) | Comprehensive PR review agents specializing in comments, tests, error handling, type design, code quality, and code simplification | **Command:** `/pr-review-toolkit:review-pr` - Run with optional review aspects (comments, tests, errors, types, code, simplify, all)<br>**Agents:** `comment-analyzer`, `pr-test-analyzer`, `silent-failure-hunter`, `type-design-analyzer`, `code-reviewer`, `code-simplifier` |
| [ralph-wiggum](./ralph-wiggum/) | Interactive self-referential AI loops for iterative development. Claude works on the same task repeatedly until completion | **Commands:** `/ralph-loop`, `/cancel-ralph` - Start/stop autonomous iteration loops<br>**Hook:** Stop - Intercepts exit attempts to continue iteration |
| [security-guidance](./security-guidance/) | Security reminder hook that warns about potential security issues when editing files | **Hook:** PreToolUse - Monitors 9 security patterns including command injection, XSS, eval usage, dangerous HTML, pickle deserialization, and os.system calls |
## Installation
These plugins are included in the Claude Code repository. To use them in your own projects:
1. Install Claude Code globally:
```bash
npm install -g @anthropic-ai/claude-code
```
2. Navigate to your project and run Claude Code:
```bash
claude
```
3. Use the `/plugin` command to install plugins from marketplaces, or configure them in your project's `.claude/settings.json`.
For detailed plugin installation and configuration, see the [official documentation](https://docs.claude.com/en/docs/claude-code/plugins).
## Plugin Structure
Each plugin follows the standard Claude Code plugin structure:
```
plugin-name/
├── .claude-plugin/
│ └── plugin.json # Plugin metadata
├── commands/ # Slash commands (optional)
├── agents/ # Specialized agents (optional)
├── skills/ # Agent Skills (optional)
├── hooks/ # Event handlers (optional)
├── .mcp.json # External tool configuration (optional)
└── README.md # Plugin documentation
```
## Contributing
When adding new plugins to this directory:
1. Follow the standard plugin structure
2. Include a comprehensive README.md
3. Add plugin metadata in `.claude-plugin/plugin.json`
4. Document all commands and agents
5. Provide usage examples
## Learn More
- [Claude Code Documentation](https://docs.claude.com/en/docs/claude-code/overview)
- [Plugin System Documentation](https://docs.claude.com/en/docs/claude-code/plugins)
- [Agent SDK Documentation](https://docs.claude.com/en/api/agent-sdk/overview)
---
## claude-opus-4.5-migration-plugin.md
# Claude Opus 4.5 Migration Plugin
Migrate your code and prompts from Sonnet 4.x and Opus 4.1 to Opus 4.5.
## Overview
This skill updates your code and prompts to be compatible with Opus 4.5. It automates the migration process, handling model strings, beta headers, and other configuration details. If you run into any issues with Opus 4.5 after migration, you can continue using this skill to adjust your prompts.
## Usage
```
"Migrate my codebase to Opus 4.5"
```
## Learn More
Refer to our [prompting guide](../10-Prompting-Guides/build-with-claude-prompt-engineering-claude-4-best-practices.md) for best practices on prompting Claude models.
## Authors
William Hu (whu@anthropic.com)
---
## claude.md
# Skills Cookbook - Claude Code Guide
## Project Overview
This is a comprehensive Jupyter notebook cookbook demonstrating Claude's Skills feature for document generation (Excel, PowerPoint, PDF). It's designed for developers learning to integrate Skills into their applications.
## Quick Start Commands
### Environment Setup
```bash
# Create and activate virtual environment
python -m venv venv
source venv/bin/activate # On Windows: venv\Scripts\activate
# Install dependencies (MUST use local whl for Skills support)
pip install -r requirements.txt
# Configure API key
cp .env.example .env
# Edit .env and add your ANTHROPIC_API_KEY
```
### Running Notebooks
```bash
# Launch Jupyter
jupyter notebook
# Or use VSCode with Jupyter extension
# Make sure to select the venv kernel in VSCode: Cmd+Shift+P → "Python: Select Interpreter"
```
### Testing & Verification
```bash
# Verify environment and SDK version
python -c "import anthropic; print(f'SDK Version: {anthropic.__version__}')"
# Check outputs directory for generated files
ls -lh outputs/
```
## Architecture Overview
### Directory Structure
```
skills/
├── notebooks/ # 3 progressive Jupyter notebooks
│ ├── 01_skills_introduction.ipynb
│ ├── 02_skills_financial_applications.ipynb # WIP
│ └── 03_skills_custom_development.ipynb # WIP
├── sample_data/ # Financial datasets for examples
├── custom_skills/ # Custom skill development area
├── outputs/ # Generated files (xlsx, pptx, pdf)
├── file_utils.py # Files API helper functions
└── docs/ # Implementation tracking
```
### Key Technical Details
**Beta API Requirements:**
- All Skills functionality uses `client.beta.*` namespace
- Required beta headers: `code-execution-2025-08-25`, `files-api-2025-04-14`, `skills-2025-10-02`
- Must use `client.beta.messages.create()` with `container` parameter
- Code execution tool (`code_execution_20250825`) is REQUIRED
- Use pre-built Agent skills by referencing their `skill_id` or create and upload your own via the Skills API
**Files API Integration:**
- Skills generate files and return `file_id` attributes
- Must use `client.beta.files.download()` to download files
- Must use `client.beta.files.retrieve_metadata()` to get file info
- Helper functions in `file_utils.py` handle extraction and download
**Built-in Skills:**
- `xlsx` - Excel workbooks with formulas and charts
- `pptx` - PowerPoint presentations
- `pdf` - PDF documents
- `docx` - Word documents
## Development Gotchas
### 1. SDK Version
**Important**: Ensure you have the Anthropic SDK version 0.71.0 or later with Skills support
```bash
pip install anthropic>=0.71.0
# Restart Jupyter kernel after installation if upgrading!
```
### 2. Beta Namespace Required
**Problem**: `container` parameter not recognized, files API fails
**Solution**: Use `client.beta.messages.create()` and `client.beta.files.*`
```python
# ❌ Wrong
response = client.messages.create(container={...})
content = client.files.content(file_id)
# ✅ Correct
response = client.beta.messages.create(container={...})
content = client.beta.files.content(file_id)
```
### 3. Beta Headers Placement
**Problem**: Setting Skills beta in default_headers requires code_execution on ALL requests
**Solution**: Use `betas` parameter per-request instead
```python
# ❌ Wrong (affects all requests)
client = Anthropic(default_headers={"anthropic-beta": "skills-2025-10-02"})
# ✅ Correct (per-request)
response = client.beta.messages.create(
betas=["code-execution-2025-08-25", "files-api-2025-04-14", "skills-2025-10-02"],
...
)
```
### 4. File ID Extraction
**Problem**: Response structure differs from standard Messages API
**Solution**: File IDs in `bash_code_execution_tool_result.content.content[0].file_id`
```python
# Use file_utils.extract_file_ids() - handles beta response structure
from file_utils import extract_file_ids, download_all_files
file_ids = extract_file_ids(response)
```
### 5. Files API Response Objects
**Problem**: `'BinaryAPIResponse' object has no attribute 'content'`, `'FileMetadata' object has no attribute 'size'`
**Solution**: Use `.read()` for file content and `.size_bytes` for file size
```python
# ❌ Wrong
file_content = client.beta.files.download(file_id)
with open(path, 'wb') as f:
f.write(file_content.content) # No .content attribute!
# ✅ Correct
file_content = client.beta.files.download(file_id)
with open(path, 'wb') as f:
f.write(file_content.read()) # Use .read()
# FileMetadata fields: id, filename, size_bytes (not size), mime_type, created_at, type, downloadable
metadata = client.beta.files.retrieve_metadata(file_id)
print(f"Size: {metadata.size_bytes} bytes") # Use size_bytes, not size
```
### 6. Jupyter Kernel Selection
**Problem**: Wrong Python interpreter = wrong dependencies
**Solution**: Always select venv kernel in VSCode/Jupyter
- VSCode: Cmd+Shift+P → "Python: Select Interpreter" → select venv
- Jupyter: Kernel → Change Kernel → select venv
### 7. Module Reload Required
**Problem**: Changes to `file_utils.py` not reflected in running notebooks
**Solution**: Restart kernel or reload module
```python
import importlib
importlib.reload(file_utils)
```
### 8. Document Generation Times
**Problem**: File creation takes longer than typical API calls, users may think cell is frozen
**Actual Observed Times:**
- Excel: ~2 minutes
- PowerPoint: ~1-2 minutes (simple 2-3 slide presentations)
- PDF: ~1-2 minutes
**Solution**: Add clear timing expectations before file creation cells
```markdown
**⏱️ Note**: Excel generation typically takes 1-2 minutes.
Be patient - the cell will show [*] while running!
```
**Important**: Keep examples simple and focused. Generation times are consistent at 1-2 minutes for well-scoped examples.
## Common Tasks
### Adding a New Notebook Section
1. Follow existing structure in `01_skills_introduction.ipynb`
2. Include setup cell with imports and beta headers
3. Show API call, response handling, file download
4. Add error handling examples
5. Update `docs/skills_cookbook_plan.md` checklist
### Creating Sample Data
1. Add realistic financial data to `sample_data/`
2. Use CSV for tabular, JSON for structured
3. Include headers and proper formatting
4. Reference in notebook with pandas
5. Keep file sizes reasonable (<100KB)
### Testing File Download
1. Run notebook cell to generate file
2. Check response for file_id
3. Use `download_all_files()` helper
4. Verify file in `outputs/` directory
5. Open file in native app to validate
**Note**: Files are overwritten by default. You'll see `[overwritten]` in the download summary when a file already existed. Set `overwrite=False` to prevent this.
### Debugging API Errors
1. Check SDK version: `anthropic.__version__` should be `0.69.0`
2. Verify beta headers are passed per-request
3. Ensure code_execution tool is included
4. Check response structure with `print(response)`
5. Look for error details in `response.stop_reason`
## Testing Checklist
Before committing notebook changes:
- [ ] Restart kernel and run all cells
- [ ] Verify all file downloads work
- [ ] Check outputs/ for generated files
- [ ] Validate files open correctly in native apps
- [ ] Update skills_cookbook_plan.md checklist
- [ ] Test in fresh virtual environment
## Resources
- **API Reference**: https://docs.claude.com/en/api/messages
- **Files API**: https://docs.claude.com/en/api/files-content
- **Skills Documentation**: https://docs.claude.com/en/docs/agents-and-tools/agent-skills/overview
## Project-Specific Notes
- **Focus Domain**: Finance & Analytics with practical business applications
- **Target Audience**: Intermediate developers and business analysts
- **Notebook 1**: Complete and tested (file downloads working)
- **Notebook 2**: Financial Applications - next priority
- **Notebook 3**: Custom Skills Development - after Notebook 2
## Environment Variables
Required in `.env`:
```bash
ANTHROPIC_API_KEY=your-api-key-here
```
Optional (for advanced examples):
```bash
ANTHROPIC_BASE_URL=https://api.anthropic.com # If using proxy
```
---
## code-architect.md
You are a senior software architect who delivers comprehensive, actionable architecture blueprints by deeply understanding codebases and making confident architectural decisions.
## Core Process
**1. Codebase Pattern Analysis**
Extract existing patterns, conventions, and architectural decisions. Identify the technology stack, module boundaries, abstraction layers, and CLAUDE.md guidelines. Find similar features to understand established approaches.
**2. Architecture Design**
Based on patterns found, design the complete feature architecture. Make decisive choices - pick one approach and commit. Ensure seamless integration with existing code. Design for testability, performance, and maintainability.
**3. Complete Implementation Blueprint**
Specify every file to create or modify, component responsibilities, integration points, and data flow. Break implementation into clear phases with specific tasks.
## Output Guidance
Deliver a decisive, complete architecture blueprint that provides everything needed for implementation. Include:
- **Patterns & Conventions Found**: Existing patterns with file:line references, similar features, key abstractions
- **Architecture Decision**: Your chosen approach with rationale and trade-offs
- **Component Design**: Each component with file path, responsibilities, dependencies, and interfaces
- **Implementation Map**: Specific files to create/modify with detailed change descriptions
- **Data Flow**: Complete flow from entry points through transformations to outputs
- **Build Sequence**: Phased implementation steps as a checklist
- **Critical Details**: Error handling, state management, testing, performance, and security considerations
Make confident architectural choices rather than presenting multiple options. Be specific and actionable - provide file paths, function names, and concrete steps.
---
## code-explorer.md
You are an expert code analyst specializing in tracing and understanding feature implementations across codebases.
## Core Mission
Provide a complete understanding of how a specific feature works by tracing its implementation from entry points to data storage, through all abstraction layers.
## Analysis Approach
**1. Feature Discovery**
- Find entry points (APIs, UI components, CLI commands)
- Locate core implementation files
- Map feature boundaries and configuration
**2. Code Flow Tracing**
- Follow call chains from entry to output
- Trace data transformations at each step
- Identify all dependencies and integrations
- Document state changes and side effects
**3. Architecture Analysis**
- Map abstraction layers (presentation → business logic → data)
- Identify design patterns and architectural decisions
- Document interfaces between components
- Note cross-cutting concerns (auth, logging, caching)
**4. Implementation Details**
- Key algorithms and data structures
- Error handling and edge cases
- Performance considerations
- Technical debt or improvement areas
## Output Guidance
Provide a comprehensive analysis that helps developers understand the feature deeply enough to modify or extend it. Include:
- Entry points with file:line references
- Step-by-step execution flow with data transformations
- Key components and their responsibilities
- Architecture insights: patterns, layers, design decisions
- Dependencies (external and internal)
- Observations about strengths, issues, or opportunities
- List of files that you think are absolutely essential to get an understanding of the topic in question
Structure your response for maximum clarity and usefulness. Always include specific file paths and line numbers.
---
## code-review-plugin.md
# Code Review Plugin
Automated code review for pull requests using multiple specialized agents with confidence-based scoring to filter false positives.
## Overview
The Code Review Plugin automates pull request review by launching multiple agents in parallel to independently audit changes from different perspectives. It uses confidence scoring to filter out false positives, ensuring only high-quality, actionable feedback is posted.
## Commands
### `/code-review`
Performs automated code review on a pull request using multiple specialized agents.
**What it does:**
1. Checks if review is needed (skips closed, draft, trivial, or already-reviewed PRs)
2. Gathers relevant CLAUDE.md guideline files from the repository
3. Summarizes the pull request changes
4. Launches 4 parallel agents to independently review:
- **Agents #1 & #2**: Audit for CLAUDE.md compliance
- **Agent #3**: Scan for obvious bugs in changes
- **Agent #4**: Analyze git blame/history for context-based issues
5. Scores each issue 0-100 for confidence level
6. Filters out issues below 80 confidence threshold
7. Outputs review (to terminal by default, or as PR comment with `--comment` flag)
**Usage:**
```bash
/code-review [--comment]
```
**Options:**
- `--comment`: Post the review as a comment on the pull request (default: outputs to terminal only)
**Example workflow:**
```bash
# On a PR branch, run locally (outputs to terminal):
/code-review
# Post review as PR comment:
/code-review --comment
# Claude will:
# - Launch 4 review agents in parallel
# - Score each issue for confidence
# - Output issues ≥80 confidence (to terminal or PR depending on flag)
# - Skip if no high-confidence issues found
```
**Features:**
- Multiple independent agents for comprehensive review
- Confidence-based scoring reduces false positives (threshold: 80)
- CLAUDE.md compliance checking with explicit guideline verification
- Bug detection focused on changes (not pre-existing issues)
- Historical context analysis via git blame
- Automatic skipping of closed, draft, or already-reviewed PRs
- Links directly to code with full SHA and line ranges
**Review comment format:**
```markdown
## Code review
Found 3 issues:
1. Missing error handling for OAuth callback (CLAUDE.md says "Always handle OAuth errors")
https://github.com/owner/repo/blob/abc123.../src/auth.ts#L67-L72
2. Memory leak: OAuth state not cleaned up (bug due to missing cleanup in finally block)
https://github.com/owner/repo/blob/abc123.../src/auth.ts#L88-L95
3. Inconsistent naming pattern (src/conventions/CLAUDE.md says "Use camelCase for functions")
https://github.com/owner/repo/blob/abc123.../src/utils.ts#L23-L28
```
**Confidence scoring:**
- **0**: Not confident, false positive
- **25**: Somewhat confident, might be real
- **50**: Moderately confident, real but minor
- **75**: Highly confident, real and important
- **100**: Absolutely certain, definitely real
**False positives filtered:**
- Pre-existing issues not introduced in PR
- Code that looks like a bug but isn't
- Pedantic nitpicks
- Issues linters will catch
- General quality issues (unless in CLAUDE.md)
- Issues with lint ignore comments
## Installation
This plugin is included in the Claude Code repository. The command is automatically available when using Claude Code.
## Best Practices
### Using `/code-review`
- Maintain clear CLAUDE.md files for better compliance checking
- Trust the 80+ confidence threshold - false positives are filtered
- Run on all non-trivial pull requests
- Review agent findings as a starting point for human review
- Update CLAUDE.md based on recurring review patterns
### When to use
- All pull requests with meaningful changes
- PRs touching critical code paths
- PRs from multiple contributors
- PRs where guideline compliance matters
### When not to use
- Closed or draft PRs (automatically skipped anyway)
- Trivial automated PRs (automatically skipped)
- Urgent hotfixes requiring immediate merge
- PRs already reviewed (automatically skipped)
## Workflow Integration
### Standard PR review workflow:
```bash
# Create PR with changes
# Run local review (outputs to terminal)
/code-review
# Review the automated feedback
# Make any necessary fixes
# Optionally post as PR comment
/code-review --comment
# Merge when ready
```
### As part of CI/CD:
```bash
# Trigger on PR creation or update
# Use --comment flag to post review comments
/code-review --comment
# Skip if review already exists
```
## Requirements
- Git repository with GitHub integration
- GitHub CLI (`gh`) installed and authenticated
- CLAUDE.md files (optional but recommended for guideline checking)
## Troubleshooting
### Review takes too long
**Issue**: Agents are slow on large PRs
**Solution**:
- Normal for large changes - agents run in parallel
- 4 independent agents ensure thoroughness
- Consider splitting large PRs into smaller ones
### Too many false positives
**Issue**: Review flags issues that aren't real
**Solution**:
- Default threshold is 80 (already filters most false positives)
- Make CLAUDE.md more specific about what matters
- Consider if the flagged issue is actually valid
### No review comment posted
**Issue**: `/code-review` runs but no comment appears
**Solution**:
Check if:
- PR is closed (reviews skipped)
- PR is draft (reviews skipped)
- PR is trivial/automated (reviews skipped)
- PR already has review (reviews skipped)
- No issues scored ≥80 (no comment needed)
### Link formatting broken
**Issue**: Code links don't render correctly in GitHub
**Solution**:
Links must follow this exact format:
```
https://github.com/owner/repo/blob/[full-sha]/path/file.ext#L[start]-L[end]
```
- Must use full SHA (not abbreviated)
- Must use `#L` notation
- Must include line range with at least 1 line of context
### GitHub CLI not working
**Issue**: `gh` commands fail
**Solution**:
- Install GitHub CLI: `brew install gh` (macOS) or see [GitHub CLI installation](https://cli.github.com/)
- Authenticate: `gh auth login`
- Verify repository has GitHub remote
## Tips
- **Write specific CLAUDE.md files**: Clear guidelines = better reviews
- **Include context in PRs**: Helps agents understand intent
- **Use confidence scores**: Issues ≥80 are usually correct
- **Iterate on guidelines**: Update CLAUDE.md based on patterns
- **Review automatically**: Set up as part of PR workflow
- **Trust the filtering**: Threshold prevents noise
## Configuration
### Adjusting confidence threshold
The default threshold is 80. To adjust, modify the command file at `commands/code-review.md`:
```markdown
Filter out any issues with a score less than 80.
```
Change `80` to your preferred threshold (0-100).
### Customizing review focus
Edit `commands/code-review.md` to add or modify agent tasks:
- Add security-focused agents
- Add performance analysis agents
- Add accessibility checking agents
- Add documentation quality checks
## Technical Details
### Agent architecture
- **2x CLAUDE.md compliance agents**: Redundancy for guideline checks
- **1x bug detector**: Focused on obvious bugs in changes only
- **1x history analyzer**: Context from git blame and history
- **Nx confidence scorers**: One per issue for independent scoring
### Scoring system
- Each issue independently scored 0-100
- Scoring considers evidence strength and verification
- Threshold (default 80) filters low-confidence issues
- For CLAUDE.md issues: verifies guideline explicitly mentions it
### GitHub integration
Uses `gh` CLI for:
- Viewing PR details and diffs
- Fetching repository data
- Reading git blame and history
- Posting review comments
## Author
Boris Cherny (boris@anthropic.com)
## Version
1.0.0
---
## code-review.md
Provide a code review for the given pull request.
**Agent assumptions (applies to all agents and subagents):**
- All tools are functional and will work without error. Do not test tools or make exploratory calls. Make sure this is clear to every subagent that is launched.
- Only call a tool if it is required to complete the task. Every tool call should have a clear purpose.
To do this, follow these steps precisely:
1. Launch a haiku agent to check if any of the following are true:
- The pull request is closed
- The pull request is a draft
- The pull request does not need code review (e.g. automated PR, trivial change that is obviously correct)
- Claude has already commented on this PR (check `gh pr view <PR> --comments` for comments left by claude)
If any condition is true, stop and do not proceed.
Note: Still review Claude generated PR's.
2. Launch a haiku agent to return a list of file paths (not their contents) for all relevant CLAUDE.md files including:
- The root CLAUDE.md file, if it exists
- Any CLAUDE.md files in directories containing files modified by the pull request
3. Launch a sonnet agent to view the pull request and return a summary of the changes
4. Launch 4 agents in parallel to independently review the changes. Each agent should return the list of issues, where each issue includes a description and the reason it was flagged (e.g. "CLAUDE.md adherence", "bug"). The agents should do the following:
Agents 1 + 2: CLAUDE.md compliance sonnet agents
Audit changes for CLAUDE.md compliance in parallel. Note: When evaluating CLAUDE.md compliance for a file, you should only consider CLAUDE.md files that share a file path with the file or parents.
Agent 3: Opus bug agent (parallel subagent with agent 4)
Scan for obvious bugs. Focus only on the diff itself without reading extra context. Flag only significant bugs; ignore nitpicks and likely false positives. Do not flag issues that you cannot validate without looking at context outside of the git diff.
Agent 4: Opus bug agent (parallel subagent with agent 3)
Look for problems that exist in the introduced code. This could be security issues, incorrect logic, etc. Only look for issues that fall within the changed code.
**CRITICAL: We only want HIGH SIGNAL issues.** Flag issues where:
- The code will fail to compile or parse (syntax errors, type errors, missing imports, unresolved references)
- The code will definitely produce wrong results regardless of inputs (clear logic errors)
- Clear, unambiguous CLAUDE.md violations where you can quote the exact rule being broken
Do NOT flag:
- Code style or quality concerns
- Potential issues that depend on specific inputs or state
- Subjective suggestions or improvements
If you are not certain an issue is real, do not flag it. False positives erode trust and waste reviewer time.
In addition to the above, each subagent should be told the PR title and description. This will help provide context regarding the author's intent.
5. For each issue found in the previous step by agents 3 and 4, launch parallel subagents to validate the issue. These subagents should get the PR title and description along with a description of the issue. The agent's job is to review the issue to validate that the stated issue is truly an issue with high confidence. For example, if an issue such as "variable is not defined" was flagged, the subagent's job would be to validate that is actually true in the code. Another example would be CLAUDE.md issues. The agent should validate that the CLAUDE.md rule that was violated is scoped for this file and is actually violated. Use Opus subagents for bugs and logic issues, and sonnet agents for CLAUDE.md violations.
6. Filter out any issues that were not validated in step 5. This step will give us our list of high signal issues for our review.
7. If issues were found, skip to step 8 to post inline comments directly.
If NO issues were found, post a summary comment using `gh pr comment` (if `--comment` argument is provided):
"No issues found. Checked for bugs and CLAUDE.md compliance."
8. Create a list of all comments that you plan on leaving. This is only for you to make sure you are comfortable with the comments. Do not post this list anywhere.
9. Post inline comments for each issue using `mcp__github_inline_comment__create_inline_comment`. For each comment:
- Provide a brief description of the issue
- For small, self-contained fixes, include a committable suggestion block
- For larger fixes (6+ lines, structural changes, or changes spanning multiple locations), describe the issue and suggested fix without a suggestion block
- Never post a committable suggestion UNLESS committing the suggestion fixes the issue entirely. If follow up steps are required, do not leave a committable suggestion.
**IMPORTANT: Only post ONE comment per unique issue. Do not post duplicate comments.**
Use this list when evaluating issues in Steps 4 and 5 (these are false positives, do NOT flag):
- Pre-existing issues
- Something that appears to be a bug but is actually correct
- Pedantic nitpicks that a senior engineer would not flag
- Issues that a linter will catch (do not run the linter to verify)
- General code quality concerns (e.g., lack of test coverage, general security issues) unless explicitly required in CLAUDE.md
- Issues mentioned in CLAUDE.md but explicitly silenced in the code (e.g., via a lint ignore comment)
Notes:
- Use gh CLI to interact with GitHub (e.g., fetch pull requests, create comments). Do not use web fetch.
- Create a todo list before starting.
- You must cite and link each issue in inline comments (e.g., if referring to a CLAUDE.md, include a link to it).
- If no issues are found, post a comment with the following format:
---
## Code review
No issues found. Checked for bugs and CLAUDE.md compliance.
---
- When linking to code in inline comments, follow the following format precisely, otherwise the Markdown preview won't render correctly: https://github.com/anthropics/claude-code/blob/c21d3c10bc8e898b7ac1a2d745bdc9bc4e423afe/package.json#L10-L15
- Requires full git sha
- You must provide the full sha. Commands like `https://github.com/owner/repo/blob/$(git rev-parse HEAD)/foo/bar` will not work, since your comment will be directly rendered in Markdown.
- Repo name must match the repo you're code reviewing
- # sign after the file name
- Line range format is L[start]-L[end]
- Provide at least 1 line of context before and after, centered on the line you are commenting about (eg. if you are commenting about lines 5-6, you should link to `L4-7`)
---
## code-reviewer.md
You are an expert code reviewer specializing in modern software development across multiple languages and frameworks. Your primary responsibility is to review code against project guidelines in CLAUDE.md with high precision to minimize false positives.
## Review Scope
By default, review unstaged changes from `git diff`. The user may specify different files or scope to review.
## Core Review Responsibilities
**Project Guidelines Compliance**: Verify adherence to explicit project rules (typically in CLAUDE.md or equivalent) including import patterns, framework conventions, language-specific style, function declarations, error handling, logging, testing practices, platform compatibility, and naming conventions.
**Bug Detection**: Identify actual bugs that will impact functionality - logic errors, null/undefined handling, race conditions, memory leaks, security vulnerabilities, and performance problems.
**Code Quality**: Evaluate significant issues like code duplication, missing critical error handling, accessibility problems, and inadequate test coverage.
## Confidence Scoring
Rate each potential issue on a scale from 0-100:
- **0**: Not confident at all. This is a false positive that doesn't stand up to scrutiny, or is a pre-existing issue.
- **25**: Somewhat confident. This might be a real issue, but may also be a false positive. If stylistic, it wasn't explicitly called out in project guidelines.
- **50**: Moderately confident. This is a real issue, but might be a nitpick or not happen often in practice. Not very important relative to the rest of the changes.
- **75**: Highly confident. Double-checked and verified this is very likely a real issue that will be hit in practice. The existing approach is insufficient. Important and will directly impact functionality, or is directly mentioned in project guidelines.
- **100**: Absolutely certain. Confirmed this is definitely a real issue that will happen frequently in practice. The evidence directly confirms this.
**Only report issues with confidence ≥ 80.** Focus on issues that truly matter - quality over quantity.
## Output Guidance
Start by clearly stating what you're reviewing. For each high-confidence issue, provide:
- Clear description with confidence score
- File path and line number
- Specific project guideline reference or bug explanation
- Concrete fix suggestion
Group issues by severity (Critical vs Important). If no high-confidence issues exist, confirm the code meets standards with a brief summary.
Structure your response for maximum actionability - developers should know exactly what to fix and why.
---
## code-reviewer2.md
You are an expert code reviewer specializing in modern software development across multiple languages and frameworks. Your primary responsibility is to review code against project guidelines in CLAUDE.md with high precision to minimize false positives.
## Review Scope
By default, review unstaged changes from `git diff`. The user may specify different files or scope to review.
## Core Review Responsibilities
**Project Guidelines Compliance**: Verify adherence to explicit project rules (typically in CLAUDE.md or equivalent) including import patterns, framework conventions, language-specific style, function declarations, error handling, logging, testing practices, platform compatibility, and naming conventions.
**Bug Detection**: Identify actual bugs that will impact functionality - logic errors, null/undefined handling, race conditions, memory leaks, security vulnerabilities, and performance problems.
**Code Quality**: Evaluate significant issues like code duplication, missing critical error handling, accessibility problems, and inadequate test coverage.
## Issue Confidence Scoring
Rate each issue from 0-100:
- **0-25**: Likely false positive or pre-existing issue
- **26-50**: Minor nitpick not explicitly in CLAUDE.md
- **51-75**: Valid but low-impact issue
- **76-90**: Important issue requiring attention
- **91-100**: Critical bug or explicit CLAUDE.md violation
**Only report issues with confidence ≥ 80**
## Output Format
Start by listing what you're reviewing. For each high-confidence issue provide:
- Clear description and confidence score
- File path and line number
- Specific CLAUDE.md rule or bug explanation
- Concrete fix suggestion
Group issues by severity (Critical: 90-100, Important: 80-89).
If no high-confidence issues exist, confirm the code meets standards with a brief summary.
Be thorough but filter aggressively - quality over quantity. Focus on issues that truly matter.
---
## code-simplifier.md
You are an expert code simplification specialist focused on enhancing code clarity, consistency, and maintainability while preserving exact functionality. Your expertise lies in applying project-specific best practices to simplify and improve code without altering its behavior. You prioritize readable, explicit code over overly compact solutions. This is a balance that you have mastered as a result your years as an expert software engineer.
You will analyze recently modified code and apply refinements that:
1. **Preserve Functionality**: Never change what the code does - only how it does it. All original features, outputs, and behaviors must remain intact.
2. **Apply Project Standards**: Follow the established coding standards from CLAUDE.md including:
- Use ES modules with proper import sorting and extensions
- Prefer `function` keyword over arrow functions
- Use explicit return type annotations for top-level functions
- Follow proper React component patterns with explicit Props types
- Use proper error handling patterns (avoid try/catch when possible)
- Maintain consistent naming conventions
3. **Enhance Clarity**: Simplify code structure by:
- Reducing unnecessary complexity and nesting
- Eliminating redundant code and abstractions
- Improving readability through clear variable and function names
- Consolidating related logic
- Removing unnecessary comments that describe obvious code
- IMPORTANT: Avoid nested ternary operators - prefer switch statements or if/else chains for multiple conditions
- Choose clarity over brevity - explicit code is often better than overly compact code
4. **Maintain Balance**: Avoid over-simplification that could:
- Reduce code clarity or maintainability
- Create overly clever solutions that are hard to understand
- Combine too many concerns into single functions or components
- Remove helpful abstractions that improve code organization
- Prioritize "fewer lines" over readability (e.g., nested ternaries, dense one-liners)
- Make the code harder to debug or extend
5. **Focus Scope**: Only refine code that has been recently modified or touched in the current session, unless explicitly instructed to review a broader scope.
Your refinement process:
1. Identify the recently modified code sections
2. Analyze for opportunities to improve elegance and consistency
3. Apply project-specific best practices and coding standards
4. Ensure all functionality remains unchanged
5. Verify the refined code is simpler and more maintainable
6. Document only significant changes that affect understanding
You operate autonomously and proactively, refining code immediately after it's written or modified without requiring explicit requests. Your goal is to ensure all code meets the highest standards of elegance and maintainability while preserving its complete functionality.
---
## command-development-skill.md
# Command Development Skill
Comprehensive guidance on creating Claude Code slash commands, including file format, frontmatter options, dynamic arguments, and best practices.
## Overview
This skill provides knowledge about:
- Slash command file format and structure
- YAML frontmatter configuration fields
- Dynamic arguments ($ARGUMENTS, $1, $2, etc.)
- File references with @ syntax
- Bash execution with !` syntax
- Command organization and namespacing
- Best practices for command development
- Plugin-specific features (${CLAUDE_PLUGIN_ROOT}, plugin patterns)
- Integration with plugin components (agents, skills, hooks)
- Validation patterns and error handling
## Skill Structure
### SKILL.md (~2,470 words)
Core skill content covering:
**Fundamentals:**
- Command basics and locations
- File format (Markdown with optional frontmatter)
- YAML frontmatter fields overview
- Dynamic arguments ($ARGUMENTS and positional)
- File references (@ syntax)
- Bash execution (!` syntax)
- Command organization patterns
- Best practices and common patterns
- Troubleshooting
**Plugin-Specific:**
- ${CLAUDE_PLUGIN_ROOT} environment variable
- Plugin command discovery and organization
- Plugin command patterns (configuration, template, multi-script)
- Integration with plugin components (agents, skills, hooks)
- Validation patterns (argument, file, resource, error handling)
### References
Detailed documentation:
- **frontmatter-reference.md**: Complete YAML frontmatter field specifications
- All field descriptions with types and defaults
- When to use each field
- Examples and best practices
- Validation and common errors
- **plugin-features-reference.md**: Plugin-specific command features
- Plugin command discovery and organization
- ${CLAUDE_PLUGIN_ROOT} environment variable usage
- Plugin command patterns (configuration, template, multi-script)
- Integration with plugin agents, skills, and hooks
- Validation patterns and error handling
### Examples
Practical command examples:
- **simple-commands.md**: 10 complete command examples
- Code review commands
- Testing commands
- Deployment commands
- Documentation generators
- Git integration commands
- Analysis and research commands
- **plugin-commands.md**: 10 plugin-specific command examples
- Simple plugin commands with scripts
- Multi-script workflows
- Template-based generation
- Configuration-driven deployment
- Agent and skill integration
- Multi-component workflows
- Validated input commands
- Environment-aware commands
## When This Skill Triggers
Claude Code activates this skill when users:
- Ask to "create a slash command" or "add a command"
- Need to "write a custom command"
- Want to "define command arguments"
- Ask about "command frontmatter" or YAML configuration
- Need to "organize commands" or use namespacing
- Want to create commands with file references
- Ask about "bash execution in commands"
- Need command development best practices
## Progressive Disclosure
The skill uses progressive disclosure:
1. **SKILL.md** (~2,470 words): Core concepts, common patterns, and plugin features overview
2. **References** (~13,500 words total): Detailed specifications
- frontmatter-reference.md (~1,200 words)
- plugin-features-reference.md (~1,800 words)
- interactive-commands.md (~2,500 words)
- advanced-workflows.md (~1,700 words)
- testing-strategies.md (~2,200 words)
- documentation-patterns.md (~2,000 words)
- marketplace-considerations.md (~2,200 words)
3. **Examples** (~6,000 words total): Complete working command examples
- simple-commands.md
- plugin-commands.md
Claude loads references and examples as needed based on task.
## Command Basics Quick Reference
### File Format
```markdown
---
description: Brief description
argument-hint: [arg1] [arg2]
allowed-tools: Read, Bash(git:*)
---
Command prompt content with:
- Arguments: $1, $2, or $ARGUMENTS
- Files: @path/to/file
- Bash: !`command here`
```
### Locations
- **Project**: `.claude/commands/` (shared with team)
- **Personal**: `~/.claude/commands/` (your commands)
- **Plugin**: `plugin-name/commands/` (plugin-specific)
### Key Features
**Dynamic arguments:**
- `$ARGUMENTS` - All arguments as single string
- `$1`, `$2`, `$3` - Positional arguments
**File references:**
- `@path/to/file` - Include file contents
**Bash execution:**
- `!`command`` - Execute and include output
## Frontmatter Fields Quick Reference
| Field | Purpose | Example |
|-------|---------|---------|
| `description` | Brief description for /help | `"Review code for issues"` |
| `allowed-tools` | Restrict tool access | `Read, Bash(git:*)` |
| `model` | Specify model | `sonnet`, `opus`, `haiku` |
| `argument-hint` | Document arguments | `[pr-number] [priority]` |
| `disable-model-invocation` | Manual-only command | `true` |
## Common Patterns
### Simple Review Command
```markdown
---
description: Review code for issues
---
Review this code for quality and potential bugs.
```
### Command with Arguments
```markdown
---
description: Deploy to environment
argument-hint: [environment] [version]
---
Deploy to $1 environment using version $2
```
### Command with File Reference
```markdown
---
description: Document file
argument-hint: [file-path]
---
Generate documentation for @$1
```
### Command with Bash Execution
```markdown
---
description: Show Git status
allowed-tools: Bash(git:*)
---
Current status: !`git status`
Recent commits: !`git log --oneline -5`
```
## Development Workflow
1. **Design command:**
- Define purpose and scope
- Determine required arguments
- Identify needed tools
2. **Create file:**
- Choose appropriate location
- Create `.md` file with command name
- Write basic prompt
3. **Add frontmatter:**
- Start minimal (just description)
- Add fields as needed (allowed-tools, etc.)
- Document arguments with argument-hint
4. **Test command:**
- Invoke with `/command-name`
- Verify arguments work
- Check bash execution
- Test file references
5. **Refine:**
- Improve prompt clarity
- Handle edge cases
- Add examples in comments
- Document requirements
## Best Practices Summary
1. **Single responsibility**: One command, one clear purpose
2. **Clear descriptions**: Make discoverable in `/help`
3. **Document arguments**: Always use argument-hint
4. **Minimal tools**: Use most restrictive allowed-tools
5. **Test thoroughly**: Verify all features work
6. **Add comments**: Explain complex logic
7. **Handle errors**: Consider missing arguments/files
## Status
**Completed enhancements:**
- ✓ Plugin command patterns (${CLAUDE_PLUGIN_ROOT}, discovery, organization)
- ✓ Integration patterns (agents, skills, hooks coordination)
- ✓ Validation patterns (input, file, resource validation, error handling)
**Remaining enhancements (in progress):**
- Advanced workflows (multi-step command sequences)
- Testing strategies (how to test commands effectively)
- Documentation patterns (command documentation best practices)
- Marketplace considerations (publishing and distribution)
## Maintenance
To update this skill:
1. Keep SKILL.md focused on core fundamentals
2. Move detailed specifications to references/
3. Add new examples/ for different use cases
4. Update frontmatter when new fields added
5. Ensure imperative/infinitive form throughout
6. Test examples work with current Claude Code
## Version History
**v0.1.0** (2025-01-15):
- Initial release with basic command fundamentals
- Frontmatter field reference
- 10 simple command examples
- Ready for plugin-specific pattern additions
---
## comment-analyzer.md
You are a meticulous code comment analyzer with deep expertise in technical documentation and long-term code maintainability. You approach every comment with healthy skepticism, understanding that inaccurate or outdated comments create technical debt that compounds over time.
Your primary mission is to protect codebases from comment rot by ensuring every comment adds genuine value and remains accurate as code evolves. You analyze comments through the lens of a developer encountering the code months or years later, potentially without context about the original implementation.
When analyzing comments, you will:
1. **Verify Factual Accuracy**: Cross-reference every claim in the comment against the actual code implementation. Check:
- Function signatures match documented parameters and return types
- Described behavior aligns with actual code logic
- Referenced types, functions, and variables exist and are used correctly
- Edge cases mentioned are actually handled in the code
- Performance characteristics or complexity claims are accurate
2. **Assess Completeness**: Evaluate whether the comment provides sufficient context without being redundant:
- Critical assumptions or preconditions are documented
- Non-obvious side effects are mentioned
- Important error conditions are described
- Complex algorithms have their approach explained
- Business logic rationale is captured when not self-evident
3. **Evaluate Long-term Value**: Consider the comment's utility over the codebase's lifetime:
- Comments that merely restate obvious code should be flagged for removal
- Comments explaining 'why' are more valuable than those explaining 'what'
- Comments that will become outdated with likely code changes should be reconsidered
- Comments should be written for the least experienced future maintainer
- Avoid comments that reference temporary states or transitional implementations
4. **Identify Misleading Elements**: Actively search for ways comments could be misinterpreted:
- Ambiguous language that could have multiple meanings
- Outdated references to refactored code
- Assumptions that may no longer hold true
- Examples that don't match current implementation
- TODOs or FIXMEs that may have already been addressed
5. **Suggest Improvements**: Provide specific, actionable feedback:
- Rewrite suggestions for unclear or inaccurate portions
- Recommendations for additional context where needed
- Clear rationale for why comments should be removed
- Alternative approaches for conveying the same information
Your analysis output should be structured as:
**Summary**: Brief overview of the comment analysis scope and findings
**Critical Issues**: Comments that are factually incorrect or highly misleading
- Location: [file:line]
- Issue: [specific problem]
- Suggestion: [recommended fix]
**Improvement Opportunities**: Comments that could be enhanced
- Location: [file:line]
- Current state: [what's lacking]
- Suggestion: [how to improve]
**Recommended Removals**: Comments that add no value or create confusion
- Location: [file:line]
- Rationale: [why it should be removed]
**Positive Findings**: Well-written comments that serve as good examples (if any)
Remember: You are the guardian against technical debt from poor documentation. Be thorough, be skeptical, and always prioritize the needs of future maintainers. Every comment should earn its place in the codebase by providing clear, lasting value.
IMPORTANT: You analyze and provide feedback only. Do not modify code or comments directly. Your role is advisory - to identify issues and suggest improvements for others to implement.
---
## commit-commands-plugin.md
# Commit Commands Plugin
Streamline your git workflow with simple commands for committing, pushing, and creating pull requests.
## Overview
The Commit Commands Plugin automates common git operations, reducing context switching and manual command execution. Instead of running multiple git commands, use a single slash command to handle your entire workflow.
## Commands
### `/commit`
Creates a git commit with an automatically generated commit message based on staged and unstaged changes.
**What it does:**
1. Analyzes current git status
2. Reviews both staged and unstaged changes
3. Examines recent commit messages to match your repository's style
4. Drafts an appropriate commit message
5. Stages relevant files
6. Creates the commit
**Usage:**
```bash
/commit
```
**Example workflow:**
```bash
# Make some changes to your code
# Then simply run:
/commit
# Claude will:
# - Review your changes
# - Stage the files
# - Create a commit with an appropriate message
# - Show you the commit status
```
**Features:**
- Automatically drafts commit messages that match your repo's style
- Follows conventional commit practices
- Avoids committing files with secrets (.env, credentials.json)
- Includes Claude Code attribution in commit message
### `/commit-push-pr`
Complete workflow command that commits, pushes, and creates a pull request in one step.
**What it does:**
1. Creates a new branch (if currently on main)
2. Stages and commits changes with an appropriate message
3. Pushes the branch to origin
4. Creates a pull request using `gh pr create`
5. Provides the PR URL
**Usage:**
```bash
/commit-push-pr
```
**Example workflow:**
```bash
# Make your changes
# Then run:
/commit-push-pr
# Claude will:
# - Create a feature branch (if needed)
# - Commit your changes
# - Push to remote
# - Open a PR with summary and test plan
# - Give you the PR URL to review
```
**Features:**
- Analyzes all commits in the branch (not just the latest)
- Creates comprehensive PR descriptions with:
- Summary of changes (1-3 bullet points)
- Test plan checklist
- Claude Code attribution
- Handles branch creation automatically
- Uses GitHub CLI (`gh`) for PR creation
**Requirements:**
- GitHub CLI (`gh`) must be installed and authenticated
- Repository must have a remote named `origin`
### `/clean_gone`
Cleans up local branches that have been deleted from the remote repository.
**What it does:**
1. Lists all local branches to identify [gone] status
2. Identifies and removes worktrees associated with [gone] branches
3. Deletes all branches marked as [gone]
4. Provides feedback on removed branches
**Usage:**
```bash
/clean_gone
```
**Example workflow:**
```bash
# After PRs are merged and remote branches are deleted
/clean_gone
# Claude will:
# - Find all branches marked as [gone]
# - Remove any associated worktrees
# - Delete the stale local branches
# - Report what was cleaned up
```
**Features:**
- Handles both regular branches and worktree branches
- Safely removes worktrees before deleting branches
- Shows clear feedback about what was removed
- Reports if no cleanup was needed
**When to use:**
- After merging and deleting remote branches
- When your local branch list is cluttered with stale branches
- During regular repository maintenance
## Installation
This plugin is included in the Claude Code repository. The commands are automatically available when using Claude Code.
## Best Practices
### Using `/commit`
- Review the staged changes before committing
- Let Claude analyze your changes and match your repo's commit style
- Trust the automated message, but verify it's accurate
- Use for routine commits during development
### Using `/commit-push-pr`
- Use when you're ready to create a PR
- Ensure all your changes are complete and tested
- Claude will analyze the full branch history for the PR description
- Review the PR description and edit if needed
- Use when you want to minimize context switching
### Using `/clean_gone`
- Run periodically to keep your branch list clean
- Especially useful after merging multiple PRs
- Safe to run - only removes branches already deleted remotely
- Helps maintain a tidy local repository
## Workflow Integration
### Quick commit workflow:
```bash
# Write code
/commit
# Continue development
```
### Feature branch workflow:
```bash
# Develop feature across multiple commits
/commit # First commit
# More changes
/commit # Second commit
# Ready to create PR
/commit-push-pr
```
### Maintenance workflow:
```bash
# After several PRs are merged
/clean_gone
# Clean workspace ready for next feature
```
## Requirements
- Git must be installed and configured
- For `/commit-push-pr`: GitHub CLI (`gh`) must be installed and authenticated
- Repository must be a git repository with a remote
## Troubleshooting
### `/commit` creates empty commit
**Issue**: No changes to commit
**Solution**:
- Ensure you have unstaged or staged changes
- Run `git status` to verify changes exist
### `/commit-push-pr` fails to create PR
**Issue**: `gh pr create` command fails
**Solution**:
- Install GitHub CLI: `brew install gh` (macOS) or see [GitHub CLI installation](https://cli.github.com/)
- Authenticate: `gh auth login`
- Ensure repository has a GitHub remote
### `/clean_gone` doesn't find branches
**Issue**: No branches marked as [gone]
**Solution**:
- Run `git fetch --prune` to update remote tracking
- Branches must be deleted from the remote to show as [gone]
## Tips
- **Combine with other tools**: Use `/commit` during development, then `/commit-push-pr` when ready
- **Let Claude draft messages**: The commit message analysis learns from your repo's style
- **Regular cleanup**: Run `/clean_gone` weekly to maintain a clean branch list
- **Review before pushing**: Always review the commit message and changes before pushing
## Author
Anthropic (support@anthropic.com)
## Version
1.0.0
---
## commit-push-pr.md
## Context
- Current git status: !`git status`
- Current git diff (staged and unstaged changes): !`git diff HEAD`
- Current branch: !`git branch --show-current`
## Your task
Based on the above changes:
1. Create a new branch if on main
2. Create a single commit with an appropriate message
3. Push the branch to origin
4. Create a pull request using `gh pr create`
5. You have the capability to call multiple tools in a single response. You MUST do all of the above in a single message. Do not use any other tools or do anything else. Do not send any other text or messages besides these tool calls.
---
## commit.md
## Context
- Current git status: !`git status`
- Current git diff (staged and unstaged changes): !`git diff HEAD`
- Current branch: !`git branch --show-current`
- Recent commits: !`git log --oneline -10`
## Your task
Based on the above changes, create a single git commit.
You have the capability to call multiple tools in a single response. Stage and create the commit using a single message. Do not use any other tools or do anything else. Do not send any other text or messages besides these tool calls.
---
## complete-guide-to-skills.md
# The Complete Guide to Building Skills for Claude

# Contents
| Introduction | 3 |
|------------------------------|----|
| Fundamentals | 4 |
| Planning and design | 7 |
| Testing and iteration | 14 |
| Distribution and sharing | 18 |
| Patterns and troubleshooting | 21 |
| Resources and references | 28 |
# <span id="page-2-0"></span>Introduction
A [skill](https://claude.com/blog/skills) is a set of instructions - packaged as a simple folder - that teaches Claude how to handle specific tasks or workflows. Skills are one of the most powerful ways to customize Claude for your specific needs. Instead of re-explaining your preferences, processes, and domain expertise in every conversation, skills let you teach Claude once and benefit every time.
Skills are powerful when you have repeatable workflows: generating frontend designs from specs, conducting research with consistent methodology, creating documents that follow your team's style guide, or orchestrating multi-step processes. They work well with Claude's built-in capabilities like code execution and document creation. For those building MCP integrations, skills add another powerful layer helping turn raw tool access into reliable, optimized workflows.
This guide covers everything you need to know to build effective skills - from planning and structure to testing and distribution. Whether you're building a skill for yourself, your team, or for the community, you'll find practical patterns and real-world examples throughout.
# What you'll learn:
- Technical requirements and best practices for skill structure
- Patterns for standalone skills and MCP-enhanced workflows
- Patterns we've seen work well across different use cases
- How to test, iterate, and distribute your skills
#### Who this is for:
- Developers who want Claude to follow specific workflows consistently
- Power users who want Claude to follow specific workflows
- Teams looking to standardize how Claude works across their organization
#### Two Paths Through This Guide
Building standalone skills? Focus on Fundamentals, Planning and Design, and category 1-2. Enhancing an MCP integration? The "Skills + MCP" section and category 3 are for you. Both paths share the same technical requirements, but you choose what's relevant to your use case.
What you'll get out of this guide: By the end, you'll be able to build a functional skill in a single sitting. Expect about 15-30 minutes to build and test your first working skill using the skill-creator.
Let's get started.
<span id="page-3-0"></span>
# Fundamentals
# Fundamentals
# What is a skill?
A skill is a folder containing:
- SKILL.md (required): Instructions in Markdown with YAML frontmatter
- scripts/ (optional): Executable code (Python, Bash, etc.)
- references/ (optional): Documentation loaded as needed
- assets/ (optional): Templates, fonts, icons used in output
# Core design principles
# Progressive Disclosure
Skills use a three-level system:
- First level (YAML frontmatter): Always loaded in Claude's system prompt. Provides just enough information for Claude to know when each skill should be used without loading all of it into context.
- Second level (SKILL.md body): Loaded when Claude thinks the skill is relevant to the current task. Contains the full instructions and guidance.
- Third level (Linked files): Additional files bundled within the skill directory that Claude can choose to navigate and discover only as needed.
This progressive disclosure minimizes token usage while maintaining specialized expertise.
# Composability
Claude can load multiple skills simultaneously. Your skill should work well alongside others, not assume it's the only capability available.
# Portability
Skills work identically across Claude.ai, Claude Code, and API. Create a skill once and it works across all surfaces without modification, provided the environment supports any dependencies the skill requires.
# For MCP Builders: Skills + Connectors
*Building standalone skills without MCP? Skip to Planning and Design - you can always return here later.*
If you already have a [working MCP server](https://support.claude.com/en/articles/10949351-getting-started-with-local-mcp-servers-on-claude-desktop), you've done the hard part. Skills are the knowledge layer on top - capturing the workflows and best practices you already know, so Claude can apply them consistently.
# The kitchen analogy
MCP provides the professional kitchen: access to tools, ingredients, and equipment.
Skills provide the recipes: step-by-step instructions on how to create something valuable.
Together, they enable users to accomplish complex tasks without needing to figure out every step themselves.
How they work together:
| MCP (Connectivity) | Skills (Knowledge) |
|------------------------------------------------------------------|-------------------------------------------------------|
| Connects Claude to your service<br>(Notion, Asana, Linear, etc.) | Teaches Claude how to use your service<br>effectively |
| Provides real-time data access and tool<br>invocation | Captures workflows and best practices |
| What Claude can do | How Claude should do it |
# Why this matters for your MCP users
# Without skills:
- Users connect your MCP but don't know what to do next
- Support tickets asking "how do I do X with your integration"
- Each conversation starts from scratch
- Inconsistent results because users prompt differently each time
- Users blame your connector when the real issue is workflow guidance
### With skills:
- Pre-built workflows activate automatically when needed
- Consistent, reliable tool usage
- Best practices embedded in every interaction
- Lower learning curve for your integration
<span id="page-6-0"></span>
# Planning and design
# Planning and design
# Start with use cases
Before writing any code, identify 2-3 concrete use cases your skill should enable.
# Good use case definition:
Use Case: Project Sprint Planning
Trigger: User says "help me plan this sprint" or "create
sprint tasks"
#### Steps:
- 1. Fetch current project status from Linear (via MCP)
- 2. Analyze team velocity and capacity
- 3. Suggest task prioritization
- 4. Create tasks in Linear with proper labels and estimates
Result: Fully planned sprint with tasks created
# Ask yourself:
- What does a user want to accomplish?
- What multi-step workflows does this require?
- Which tools are needed (built-in or MCP?)
- What domain knowledge or best practices should be embedded?
# Common skill use case categories
At Anthropic, we've observed three common use cases:
# Category 1: Document & Asset Creation
Used for: Creating consistent, high-quality output including documents, presentations, apps, designs, code, etc.
*Real example:* [frontend-design skill](https://github.com/anthropics/skills/tree/main/skills/frontend-design) (also see [skills for docx, pptx, xlsx, and](https://github.com/anthropics/skills/tree/main/skills) [ppt](https://github.com/anthropics/skills/tree/main/skills))
"Create distinctive, production-grade frontend interfaces with high design quality. Use when building web components, pages, artifacts, posters, or applications."
- Embedded style guides and brand standards
- Template structures for consistent output
- Quality checklists before finalizing
- No external tools required uses Claude's built-in capabilities
# <span id="page-8-0"></span>Category 2: Workflow Automation
Used for: Multi-step processes that benefit from consistent methodology, including coordination across multiple MCP servers.
#### *Real example:* [skill-creator skill](https://github.com/anthropics/skills/blob/main/skills/skill-creator/SKILL.md)
"Interactive guide for creating new skills. Walks the user through use case definition, frontmatter generation, instruction writing, and validation."
#### Key techniques:
- Step-by-step workflow with validation gates
- Templates for common structures
- Built-in review and improvement suggestions
- Iterative refinement loops
# Category 3: MCP Enhancement
Used for: Workflow guidance to enhance the tool access an MCP server provides.
# *Real example:* [sentry-code-review skill \(from Sentry\)](https://github.com/getsentry/sentry-for-claude/tree/main/skills)
"Automatically analyzes and fixes detected bugs in GitHub Pull Requests using Sentry's error monitoring data via their MCP server."
# Key techniques:
- Coordinates multiple MCP calls in sequence
- Embeds domain expertise
- Provides context users would otherwise need to specify
- Error handling for common MCP issues
# Define success criteria
# How will you know your skill is working?
These are aspirational targets - rough benchmarks rather than precise thresholds. Aim for rigor but accept that there will be an element of vibes-based assessment. We are actively developing more robust measurement guidance and tooling.
## Quantitative metrics:
- Skill triggers on 90% of relevant queries
- *– How to measure:* Run 10-20 test queries that should trigger your skill. Track how many times it loads automatically vs. requires explicit invocation.
- Completes workflow in X tool calls
- *– How to measure:* Compare the same task with and without the skill enabled. Count tool calls and total tokens consumed.
- 0 failed API calls per workflow
- *– How to measure:* Monitor MCP server logs during test runs. Track retry rates and error codes.
# Qualitative metrics:
- Users don't need to prompt Claude about next steps
- *– How to assess:* During testing, note how often you need to redirect or clarify. Ask beta users for feedback.
- Workflows complete without user correction
- *– How to assess:* Run the same request 3-5 times. Compare outputs for structural consistency and quality.
- Consistent results across sessions
- *– How to assess:* Can a new user accomplish the task on first try with minimal guidance?
# Technical requirements
### File structure
```
your-skill-name/
├── SKILL.md # Required - main skill file
├── scripts/ # Optional - executable code
│ ├── process_data.py # Example
│ └── validate.sh # Example
├── references/ # Optional - documentation
│ ├── api-guide.md # Example
│ └── examples/ # Example
└── assets/ # Optional - templates, etc.
└── report-template.md # Example
```
# Critical rules
#### SKILL.md naming:
- Must be exactly SKILL.md (case-sensitive)
- No variations accepted (SKILL.MD, skill.md, etc.)
# Skill folder naming:
- Use kebab-case: notion-project-setup ✅
- No spaces: Notion Project Setup ❌
- No underscores: notion\_project\_setup ❌
- No capitals: NotionProjectSetup ❌
#### No README.md:
- Don't include README.md inside your skill folder
- All documentation goes in SKILL.md or references/
- Note: when distributing via GitHub, you'll still want a repo-level README for human users — see Distribution and Sharing.
# YAML frontmatter: The most important part
The YAML frontmatter is how Claude decides whether to load your skill. Get this right.
#### Minimal required format
```
---
name: your-skill-name
description: What it does. Use when user asks to [specific
phrases].
---
```
That's all you need to start.
# Field requirements
name (required):
- kebab-case only
- No spaces or capitals
- Should match folder name
# description (required):
- MUST include BOTH:
- *–* What the skill does
- *–* When to use it (trigger conditions)
- Under 1024 characters
- No XML tags (< or >)
- Include specific tasks users might say
- Mention file types if relevant
### license (optional):
- Use if making skill open source
- Common: MIT, Apache-2.0
#### compatibility (optional)
- 1-500 characters
- Indicates environment requirements: e.g. intended product, required system packages, network access needs, etc.
#### metadata (optional):
- Any custom key-value pairs
- Suggested: author, version, mcp-server
```
• Example:
```yaml
metadata:
author: ProjectHub
version: 1.0.0 mcp-server: projecthub
```
# Security restrictions
#### Forbidden in frontmatter:
- XML angle brackets (< >)
- Skills with "claude" or "anthropic" in name (reserved)
Why: Frontmatter appears in Claude's system prompt. Malicious content could inject instructions.
# Writing effective skills
# The description field
According to Anthropic's [engineering blog](https://www.anthropic.com/engineering/equipping-agents-for-the-real-world-with-agent-skills): "This metadata...provides just enough information for Claude to know when each skill should be used without loading all of it into context." This is the first level of progressive disclosure.
#### Structure:
```
[What it does] + [When to use it] + [Key capabilities]
```
#### Examples of good descriptions:
```
# Good - specific and actionable
description: Analyzes Figma design files and generates
developer handoff documentation. Use when user uploads .fig
files, asks for "design specs", "component documentation", or
"design-to-code handoff".
# Good - includes trigger phrases
description: Manages Linear project workflows including sprint
planning, task creation, and status tracking. Use when user
mentions "sprint", "Linear tasks", "project planning", or asks
to "create tickets".
# Good - clear value proposition
description: End-to-end customer onboarding workflow for
PayFlow. Handles account creation, payment setup, and
subscription management. Use when user says "onboard new
customer", "set up subscription", or "create PayFlow account".
```
#### Examples of bad descriptions:
```
# Too vague
description: Helps with projects.
# Missing triggers
description: Creates sophisticated multi-page documentation
systems.
# Too technical, no user triggers
description: Implements the Project entity model with
hierarchical relationships.
```
# Writing the main instructions
After the frontmatter, write the actual instructions in Markdown.
#### Recommended structure:
*Adapt this template for your skill. Replace bracketed sections with your specific content.*
```
---
name: your-skill
description: [...]
---
# Your Skill Name
# Instructions
### Step 1: [First Major Step]
Clear explanation of what happens.
```
```
Example:
```bash
python scripts/fetch_data.py --project-id PROJECT_ID
Expected output: [describe what success looks like]
```
(Add more steps as needed)
# Examples
# Example 1: [common scenario]
User says: "Set up a new marketing campaign"
Actions:
- 1. Fetch existing campaigns via MCP
- 2. Create new campaign with provided parameters
Result: Campaign created with confirmation link
(Add more examples as needed)
# Troubleshooting
Error: [Common error message]
Cause: [Why it happens]
Solution: [How to fix]
(Add more error cases as needed)
# Best Practices for Instructions
#### Be Specific and Actionable
# ✅ Good:
Run `python scripts/validate.py --input {filename}` to check data format.
If validation fails, common issues include:
- Missing required fields (add them to the CSV)
- Invalid date formats (use YYYY-MM-DD)
# ❌ Bad:
Validate the data before proceeding.
#### Include error handling
# Common Issues
### MCP Connection Failed
If you see "Connection refused":
- 1. Verify MCP server is running: Check Settings > Extensions
- 2. Confirm API key is valid
- 3. Try reconnecting: Settings > Extensions > [Your Service] > Reconnect
#### Reference bundled resources clearly
Before writing queries, consult `references/api-patterns.md` for:
- Rate limiting guidance
- Pagination patterns
- Error codes and handling
#### Use progressive disclosure
Keep SKILL.md focused on core instructions. Move detailed documentation to `references/` and link to it. (See [Core Design Principles](https://www.anthropic.com/engineering/equipping-agents-for-the-real-world-with-agent-skills) for how the threelevel system works.)
<span id="page-13-0"></span>
# Testing and iteration
# Testing and iteration
Skills can be tested at varying levels of rigor depending on your needs:
- Manual testing in Claude.ai Run queries directly and observe behavior. Fast iteration, no setup required.
- Scripted testing in Claude Code Automate test cases for repeatable validation across changes.
- Programmatic testing via skills API Build evaluation suites that run systematically against defined test sets.
Choose the approach that matches your quality requirements and the visibility of your skill. A skill used internally by a small team has different testing needs than one deployed to thousands of enterprise users.
Pro Tip: Iterate on a single task before expanding
We've found that the most effective skill creators iterate on a single challenging task until Claude succeeds, then extract the winning approach into a skill. This leverages Claude's in-context learning and provides faster signal than broad testing. Once you have a working foundation, expand to multiple test cases for coverage.
# Recommended Testing Approach
Based on early experience, effective skills testing typically covers three areas:
# 1. Triggering tests
Goal: Ensure your skill loads at the right times.
#### Test cases:
- ✅ Triggers on obvious tasks
- ✅ Triggers on paraphrased requests
- ❌ Doesn't trigger on unrelated topics
#### Example test suite:
#### Should trigger:
- "Help me set up a new ProjectHub workspace"
- "I need to create a project in ProjectHub"
- "Initialize a ProjectHub project for Q4 planning"
#### Should NOT trigger:
- "What's the weather in San Francisco?"
- "Help me write Python code"
- "Create a spreadsheet" (unless ProjectHub skill handles sheets)
### 2. Functional tests
Goal: Verify the skill produces correct outputs.
#### Test cases:
- Valid outputs generated
- API calls succeed
- Error handling works
- Edge cases covered
#### Example:
Test: Create project with 5 tasks
Given: Project name "Q4 Planning", 5 task descriptions
When: Skill executes workflow
Then:
- Project created in ProjectHub
- 5 tasks created with correct properties
- All tasks linked to project
- No API errors
# 3. Performance comparison
Goal: Prove the skill improves results vs. baseline.
Use the metrics from [Define Success Criteria](#page-8-0). Here's what a comparison might look like.
#### Baseline comparison:
#### Without skill:
- User provides instructions each time
- 15 back-and-forth messages
- 3 failed API calls requiring retry
- 12,000 tokens consumed
#### With skill:
- Automatic workflow execution
- 2 clarifying questions only
- 0 failed API calls
- 6,000 tokens consumed
# Using the skill-creator skill
The skill-creator skill - available in Claude.ai via plugin directory or download for Claude Code - can help you build and iterate on skills. If you have an MCP server and know your top 2–3 workflows, you can build and test a functional skill in a single sitting - often in 15–30 minutes.
#### Creating skills:
- Generate skills from natural language descriptions
- Produce properly formatted SKILL.md with frontmatter
- Suggest trigger phrases and structure
#### Reviewing skills:
- Flag common issues (vague descriptions, missing triggers, structural problems)
- Identify potential over/under-triggering risks
- Suggest test cases based on the skill's stated purpose
#### Iterative improvement:
- After using your skill and encountering edge cases or failures, bring those examples back to skill-creator
- Example: "Use the issues & solution identified in this chat to improve how the skill handles [specific edge case]"
#### To use:
"Use the skill-creator skill to help me build a skill for [your use case]"
*Note: skill-creator helps you design and refine skills but does not execute automated test suites or produce quantitative evaluation results.*
# Iteration based on feedback
Skills are living documents. Plan to iterate based on:
#### Undertriggering signals:
- Skill doesn't load when it should
- Users manually enabling it
- Support questions about when to use it
Solution: Add more detail and nuance to the description - this may include keywords particularly for technical terms
# Overtriggering signals:
- Skill loads for irrelevant queries
- Users disabling it
- Confusion about purpose
Solution: Add negative triggers, be more specific
### Execution issues:
- Inconsistent results
- API call failures
- User corrections needed
Solution: Improve instructions, add error handling
<span id="page-17-0"></span>
# Distribution and sharing
# Distribution and sharing
Skills make your MCP integration more complete. As users compare connectors, those with skills offer a faster path to value, giving you an edge over MCP-only alternatives.
# Current distribution model (January 2026)
# How individual users get skills:
- 1. Download the skill folder
- 2. Zip the folder (if needed)
- 3. Upload to Claude.ai via Settings > Capabilities > Skills
- 4. Or place in Claude Code skills directory
# Organization-level skills:
- Admins can deploy skills workspace-wide (shipped December 18, 2025)
- Automatic updates
- Centralized management
# An open standard
We've published [Agent Skills](https://agentskills.io/home) as an open standard. Like MCP, we believe skills should be portable across tools and platforms - the same skill should work whether you're using Claude or other AI platforms. That said, some skills are designed to take full advantage of a specific platform's capabilities; authors can note this in the skill's compatibility field. We've been collaborating with members of the ecosystem on the standard, and we're excited by early adoption.
# Using skills via API
For programmatic use cases - such as building applications, agents, or automated workflows that leverage skills - the API provides direct control over skill management and execution.
# Key capabilities:
- `/v1/skills` endpoint for listing and managing skills
- Add skills to Messages API requests via the `container.skills` parameter
- Version control and management through the Claude Console
- Works with the Claude Agent SDK for building custom agents
### When to use skills via the API vs. Claude.ai:
| Use Case | Best Surface |
|-------------------------------------------------|-------------------------|
| End users interacting with skills directly | Claude.ai / Claude Code |
| Manual testing and iteration during development | Claude.ai / Claude Code |
| Individual, ad-hoc workflows | Claude.ai / Claude Code |
| Applications using skills programmatically | API |
| Production deployments at scale | API |
| Automated pipelines and agent systems | API |
Note: Skills in the API require the Code Execution Tool beta, which provides the secure environment skills need to run.
For implementation details, see:
- [Skills API Quickstart](https://docs.claude.com/en/docs/agents-and-tools/agent-skills/quickstart)
- [Create Custom](https://docs.claude.com/en/api/skills/create-skill) skills
- [Skills in the Agent SDK](https://docs.claude.com/en/docs/agent-sdk/skills)
# Recommended approach today
Start by hosting your skill on GitHub with a public repo, clear README (for human visitors — this is separate from your skill folder, which should not contain a README.md), and example usage with screenshots. Then add a section to your MCP documentation that links to the skill, explains why using both together is valuable, and provides a quick-start guide.
# 1. Host on GitHub
- *–* Public repo for open-source skills
- *–* Clear README with installation instructions
- *–* Example usage and screenshots
# 2. Document in Your MCP Repo
- *–* Link to skills from MCP documentation
- *–* Explain the value of using both together
- *–* Provide quick-start guide
# 3. Create an Installation Guide
# Installing the [Your Service] skill
- 1. Download the skill:
- Clone repo: `git clone https: /github.com/yourcompany/ skills`
- Or download ZIP from Releases
- 2. Install in Claude:
- Open Claude.ai > Settings > skills
- Click "Upload skill"
- Select the skill folder (zipped)
- 3. Enable the skill:
- Toggle on the [Your Service] skill
- Ensure your MCP server is connected
- 4. Test:
- Ask Claude: "Set up a new project in [Your Service]"
# Positioning your skill
How you describe your skill determines whether users understand its value and actually try it. When writing about your skill—in your README, documentation, or marketing - keep these principles in mind.
# Focus on outcomes, not features:
# ✅ Good:
"The ProjectHub skill enables teams to set up complete project workspaces in seconds — including pages, databases, and templates — instead of spending 30 minutes on manual setup."
# ❌ Bad:
"The ProjectHub skill is a folder containing YAML frontmatter and Markdown instructions that calls our MCP server tools."
#### Highlight the MCP + skills story:
"Our MCP server gives Claude access to your Linear projects. Our skills teach Claude your team's sprint planning workflow. Together, they enable AI-powered project management."
<span id="page-20-0"></span>
# Patterns and troubleshooting
# Patterns and troubleshooting
These patterns emerged from skills created by early adopters and internal teams. They represent common approaches we've seen work well, not prescriptive templates.
# Choosing your approach: Problem-first vs. tool-first
Think of it like Home Depot. You might walk in with a problem - "I need to fix a kitchen cabinet" - and an employee points you to the right tools. Or you might pick out a new drill and ask how to use it for your specific job.
Skills work the same way:
- Problem-first: "I need to set up a project workspace" → Your skill orchestrates the right MCP calls in the right sequence. Users describe outcomes; the skill handles the tools.
- Tool-first: "I have Notion MCP connected" → Your skill teaches Claude the optimal workflows and best practices. Users have access; the skill provides expertise.
Most skills lean one direction. Knowing which framing fits your use case helps you choose the right pattern below.
# Pattern 1: Sequential workflow orchestration
Use when: Your users need multi-step processes in a specific order.
#### Example structure:
```
# Workflow: Onboard New Customer
### Step 1: Create Account
Call MCP tool: `create_customer`
Parameters: name, email, company
### Step 2: Setup Payment
Call MCP tool: `setup_payment_method`
Wait for: payment method verification
### Step 3: Create Subscription
Call MCP tool: `create_subscription`
Parameters: plan_id, customer_id (from Step 1)
### Step 4: Send Welcome Email
Call MCP tool: `send_email`
Template: welcome_email_template
```
- Explicit step ordering
- Dependencies between steps
- Validation at each stage
- Rollback instructions for failures
# Pattern 2: Multi-MCP coordination
Use when: Workflows span multiple services.
#### Example: Design-to-development handoff
```
### Phase 1: Design Export (Figma MCP)
1. Export design assets from Figma
2. Generate design specifications
3. Create asset manifest
### Phase 2: Asset Storage (Drive MCP)
1. Create project folder in Drive
2. Upload all assets
3. Generate shareable links
### Phase 3: Task Creation (Linear MCP)
1. Create development tasks
2. Attach asset links to tasks
3. Assign to engineering team
### Phase 4: Notification (Slack MCP)
1. Post handoff summary to #engineering
2. Include asset links and task references
```
#### Key techniques:
- Clear phase separation
- Data passing between MCPs
- Validation before moving to next phase
- Centralized error handling
# Pattern 3: Iterative refinement
Use when: Output quality improves with iteration.
#### Example: Report generation
```
# Iterative Report Creation
### Initial Draft
1. Fetch data via MCP
2. Generate first draft report
3. Save to temporary file
### Quality Check
1. Run validation script: `scripts/check_report.py`
2. Identify issues:
- Missing sections
- Inconsistent formatting
- Data validation errors
### Refinement Loop
1. Address each identified issue
2. Regenerate affected sections
3. Re-validate
4. Repeat until quality threshold met
### Finalization
1. Apply final formatting
2. Generate summary
3. Save final version
```
- Explicit quality criteria
- Iterative improvement
- Validation scripts
- Know when to stop iterating
# Pattern 4: Context-aware tool selection
Use when: Same outcome, different tools depending on context.
#### Example: File storage
```
# Smart File Storage
### Decision Tree
1. Check file type and size
2. Determine best storage location:
- Large files (>10MB): Use cloud storage MCP
- Collaborative docs: Use Notion/Docs MCP
- Code files: Use GitHub MCP
- Temporary files: Use local storage
### Execute Storage
Based on decision:
- Call appropriate MCP tool
- Apply service-specific metadata
- Generate access link
### Provide Context to User
Explain why that storage was chosen
```
# Key techniques:
- Clear decision criteria
- Fallback options
- Transparency about choices
# Pattern 5: Domain-specific intelligence
Use when: Your skill adds specialized knowledge beyond tool access.
#### Example: Financial compliance
# Payment Processing with Compliance ### Before Processing (Compliance Check) 1. Fetch transaction details via MCP 2. Apply compliance rules: - Check sanctions lists - Verify jurisdiction allowances - Assess risk level 3. Document compliance decision ### Processing IF compliance passed: - Call payment processing MCP tool - Apply appropriate fraud checks - Process transaction ELSE: - Flag for review - Create compliance case ### Audit Trail - Log all compliance checks - Record processing decisions - Generate audit report
- Domain expertise embedded in logic
- Compliance before action
- Comprehensive documentation
- Clear governance
# Troubleshooting
# Skill won't upload
#### Error: "Could not find SKILL.md in uploaded folder"
Cause: File not named exactly SKILL.md
#### Solution:
- Rename to SKILL.md (case-sensitive)
- Verify with: ls -la should show SKILL.md
#### Error: "Invalid frontmatter"
Cause: YAML formatting issue
Common mistakes:
```
# Wrong - missing delimiters
name: my-skill
description: Does things
# Wrong - unclosed quotes
name: my-skill
description: "Does things
# Correct
---
name: my-skill
description: Does things
---
```
#### Error: "Invalid skill name"
Cause: Name has spaces or capitals
```
# Wrong
```
name: My Cool Skill
# Correct
name: my-cool-skill
# Skill doesn't trigger
Symptom: Skill never loads automatically
#### Fix:
Revise your description field. See The Description Field for good/bad examples.
#### Quick checklist:
- Is it too generic? ("Helps with projects" won't work)
- Does it include trigger phrases users would actually say?
- Does it mention relevant file types if applicable?
### Debugging approach:
Ask Claude: "When would you use the [skill name] skill?" Claude will quote the description back. Adjust based on what's missing.
# Skill triggers too often
Symptom: Skill loads for unrelated queries
#### Solutions:
#### 1. Add negative triggers
description: Advanced data analysis for CSV files. Use for statistical modeling, regression, clustering. Do NOT use for simple data exploration (use data-viz skill instead).
#### 2. Be more specific
```
# Too broad
description: Processes documents
# More specific
description: Processes PDF legal documents for contract review
```
## 3. Clarify scope
description: PayFlow payment processing for e-commerce. Use specifically for online payment workflows, not for general financial queries.
# MCP connection issues
Symptom: Skill loads but MCP calls fail
#### Checklist:
# 1. Verify MCP server is connected
- *–* Claude.ai: Settings > Extensions > [Your Service]
- *–* Should show "Connected" status
#### 2. Check authentication
- *–* API keys valid and not expired
- *–* Proper permissions/scopes granted
- *–* OAuth tokens refreshed
# 3. Test MCP independently
- *–* Ask Claude to call MCP directly (without skill)
- *–* "Use [Service] MCP to fetch my projects"
- *–* If this fails, issue is MCP not skill
# 4. Verify tool names
- *–* Skill references correct MCP tool names
- *–* Check MCP server documentation
- *–* Tool names are case-sensitive
### Instructions not followed
Symptom: Skill loads but Claude doesn't follow instructions
#### Common causes:
#### 1. Instructions too verbose
- *–* Keep instructions concise
- *–* Use bullet points and numbered lists
- *–* Move detailed reference to separate files
#### 2. Instructions buried
- *–* Put critical instructions at the top
- *–* Use ## Important or ## Critical headers
- *–* Repeat key points if needed
#### 3. Ambiguous language
```
# Bad
Make sure to validate things properly
# Good
CRITICAL: Before calling create_project, verify:
- Project name is non-empty
- At least one team member assigned
- Start date is not in the past
```
Advanced technique: For critical validations, consider bundling a script that performs the checks programmatically rather than relying on language instructions. Code is deterministic; language interpretation isn't. See the [Office](https://github.com/anthropics/skills/tree/main/skills) [skills](https://github.com/anthropics/skills/tree/main/skills) for examples of this pattern.
4. Model "laziness" Add explicit encouragement:
```
# Performance Notes
- Take your time to do this thoroughly
```
- Quality is more important than speed
- Do not skip validation steps
Note: Adding this to user prompts is more effective than in SKILL.md
# Large context issues
Symptom: Skill seems slow or responses degraded
#### Causes:
- Skill content too large
- Too many skills enabled simultaneously
- All content loaded instead of progressive disclosure
#### Solutions:
#### 1. Optimize SKILL.md size
- *–* Move detailed docs to references/
- *–* Link to references instead of inline
- *–* Keep SKILL.md under 5,000 words
#### 2. Reduce enabled skills
- *–* Evaluate if you have more than 20 50 skills enabled simultaneously
- *–* Recommend selective enablement
- *–* Consider skill "packs" for related capabilities
<span id="page-27-0"></span>
# Resources and references
# Resources and references
If you're building your first skill, start with the Best Practices Guide, then reference the API docs as needed.
# Official Documentation
# Anthropic Resources:
- [Best Practices Guide](../04-API-Reference/Agents-Tools/agents-and-tools-agent-skills-best-practices-d1da876439.md)
- [Skills Documentation](../04-API-Reference/Agents-Tools/agents-and-tools-agent-skills-overview-a6ba167cbe.md)
- [API Reference](../04-API-Reference/Other/api-overview-606ecbff81.md)
- [MCP Documentation](https://modelcontextprotocol.io)
# Blog Posts:
- [Introducing Agent Skills](https://claude.com/blog/skills)
- [Engineering Blog: Equipping Agents for the Real World](https://www.anthropic.com/engineering/equipping-agents-for-the-real-world-with-agent-skills)
- [Skills Explained](https://www.claude.com/blog/skills-explained)
- [How to Create Skills for Claude](https://www.claude.com/blog/how-to-create-skills-key-steps-limitations-and-examples)
- [Building Skills for Claude Code](https://www.claude.com/blog/building-skills-for-claude-code)
- [Improving Frontend Design through Skills](https://www.claude.com/blog/improving-frontend-design-through-skills)
# Example skills
# Public skills repository:
- GitHub: [anthropics/skills](https://github.com/anthropics/skills)
- Contains Anthropic-created skills you can customize
# Tools and Utilities
# skill-creator skill:
- Built into Claude.ai and available for Claude Code
- Can generate skills from descriptions
- Reviews and provides recommendations
- Use: "Help me build a skill using skill-creator"
# Validation:
- skill-creator can assess your skills
- Ask: "Review this skill and suggest improvements"
# Getting Support
# For Technical Questions:
• General questions: Community forums at the [Claude Developers Discord](https://discord.com/invite/6PPFFzqPDZ)
# For Bug Reports:
- GitHub Issues: [anthropics/skills/issues](https://github.com/anthropics/skills/issues)
- Include: Skill name, error message, steps to reproduce
# Reference A: Quick checklist
Use this checklist to validate your skill before and after upload. If you want a faster start, use the skill-creator skill to generate your first draft, then run through this list to make sure you haven't missed anything.
| Before you start | | | |
|------------------|--|--|--|
|------------------|--|--|--|
| Identified 2-3 concrete use cases |
|------------------------------------------------|
| Tools identified (built-in or MCP) |
| Reviewed this guide and example skills |
| Planned folder structure |
| |
| During development |
| Folder named in kebab-case |
| SKILL.md file exists (exact spelling) |
| YAML frontmatter has delimiters |
| name field: kebab-case, no spaces, no capitals |
| description includes WHAT and WHEN |
| No XML tags (< >) anywhere |
| Instructions are clear and actionable |
| Error handling included |
| Examples provided |
| |
References clearly linked
# Before upload
| Tested triggering on obvious tasks |
|----------------------------------------------|
| Tested triggering on paraphrased requests |
| Verified doesn't trigger on unrelated topics |
| Functional tests pass |
| Tool integration works (if applicable) |
| Compressed as .zip file |
| |
| After upload |
| Test in real conversations |
| Monitor for under/over-triggering |
| Collect user feedback |
| Iterate on description and instructions |
| Update version in metadata |
# Reference B: YAML frontmatter
# Required fields
```
---
name: skill-name-in-kebab-case
description: What it does and when to use it. Include specific
trigger phrases.
---
```
# All optional fields
```
name: skill-name
description: [required description]
license: MIT # Optional: License for open-source
allowed-tools: "Bash(python:*) Bash(npm:*) WebFetch" # Optional:
Restrict tool access
metadata: # Optional: Custom fields
author: Company Name
version: 1.0.0
mcp-server: server-name
category: productivity
tags: [project-management, automation]
documentation: https: /example.com/docs
support: support@example.com
```
# Security notes
### Allowed:
- Any standard YAML types (strings, numbers, booleans, lists, objects)
- Custom metadata fields
- Long descriptions (up to 1024 characters)
### Forbidden:
- XML angle brackets (< >) security restriction
- Code execution in YAML (uses safe YAML parsing)
- Skills named with "claude" or "anthropic" prefix (reserved)
# Reference C: Complete skill examples
For full, production-ready skills demonstrating the patterns in this guide:
- Document Skills [PDF,](http://https://github.com/anthropics/skills/tree/main/skills/pdf) [DOCX,](https://github.com/anthropics/skills/tree/main/skills/docx) [PPTX,](https://github.com/anthropics/skills/tree/main/skills/pptx) [XLSX](https://github.com/anthropics/skills/tree/main/skills/xlsx) creation
- [Example Skills](https://github.com/anthropics/skills/tree/main/skills) Various workflow patterns
- [Partner Skills Directory](https://www.claude.com/connectors) View skills from various partners such as Asana, Atlassian, Canva, Figma, Sentry, Zapier, and more
These repositories stay up-to-date and include additional examples beyond what's covered here. Clone them, modify them for your use case, and use them as templates.

---
## conversation-analyzer.md
You are a conversation analysis specialist that identifies problematic behaviors in Claude Code sessions that could be prevented with hooks.
**Your Core Responsibilities:**
1. Read and analyze user messages to find frustration signals
2. Identify specific tool usage patterns that caused issues
3. Extract actionable patterns that can be matched with regex
4. Categorize issues by severity and type
5. Provide structured findings for hook rule generation
**Analysis Process:**
### 1. Search for User Messages Indicating Issues
Read through user messages in reverse chronological order (most recent first). Look for:
**Explicit correction requests:**
- "Don't use X"
- "Stop doing Y"
- "Please don't Z"
- "Avoid..."
- "Never..."
**Frustrated reactions:**
- "Why did you do X?"
- "I didn't ask for that"
- "That's not what I meant"
- "That was wrong"
**Corrections and reversions:**
- User reverting changes Claude made
- User fixing issues Claude created
- User providing step-by-step corrections
**Repeated issues:**
- Same type of mistake multiple times
- User having to remind multiple times
- Pattern of similar problems
### 2. Identify Tool Usage Patterns
For each issue, determine:
- **Which tool**: Bash, Edit, Write, MultiEdit
- **What action**: Specific command or code pattern
- **When it happened**: During what task/phase
- **Why problematic**: User's stated reason or implicit concern
**Extract concrete examples:**
- For Bash: Actual command that was problematic
- For Edit/Write: Code pattern that was added
- For Stop: What was missing before stopping
### 3. Create Regex Patterns
Convert behaviors into matchable patterns:
**Bash command patterns:**
- `rm\s+-rf` for dangerous deletes
- `sudo\s+` for privilege escalation
- `chmod\s+777` for permission issues
**Code patterns (Edit/Write):**
- `console\.log\(` for debug logging
- `eval\(|new Function\(` for dangerous eval
- `innerHTML\s*=` for XSS risks
**File path patterns:**
- `\.env$` for environment files
- `/node_modules/` for dependency files
- `dist/|build/` for generated files
### 4. Categorize Severity
**High severity (should block in future):**
- Dangerous commands (rm -rf, chmod 777)
- Security issues (hardcoded secrets, eval)
- Data loss risks
**Medium severity (warn):**
- Style violations (console.log in production)
- Wrong file types (editing generated files)
- Missing best practices
**Low severity (optional):**
- Preferences (coding style)
- Non-critical patterns
### 5. Output Format
Return your findings as structured text in this format:
```
## Hookify Analysis Results
### Issue 1: Dangerous rm Commands
**Severity**: High
**Tool**: Bash
**Pattern**: `rm\s+-rf`
**Occurrences**: 3 times
**Context**: Used rm -rf on /tmp directories without verification
**User Reaction**: "Please be more careful with rm commands"
**Suggested Rule:**
- Name: warn-dangerous-rm
- Event: bash
- Pattern: rm\s+-rf
- Message: "Dangerous rm command detected. Verify path before proceeding."
---
### Issue 2: Console.log in TypeScript
**Severity**: Medium
**Tool**: Edit/Write
**Pattern**: `console\.log\(`
**Occurrences**: 2 times
**Context**: Added console.log statements to production TypeScript files
**User Reaction**: "Don't use console.log in production code"
**Suggested Rule:**
- Name: warn-console-log
- Event: file
- Pattern: console\.log\(
- Message: "Console.log detected. Use proper logging library instead."
---
[Continue for each issue found...]
## Summary
Found {N} behaviors worth preventing:
- {N} high severity
- {N} medium severity
- {N} low severity
Recommend creating rules for high and medium severity issues.
```
**Quality Standards:**
- Be specific about patterns (don't be overly broad)
- Include actual examples from conversation
- Explain why each issue matters
- Provide ready-to-use regex patterns
- Don't false-positive on discussions about what NOT to do
**Edge Cases:**
**User discussing hypotheticals:**
- "What would happen if I used rm -rf?"
- Don't treat as problematic behavior
**Teaching moments:**
- "Here's what you shouldn't do: ..."
- Context indicates explanation, not actual problem
**One-time accidents:**
- Single occurrence, already fixed
- Mention but mark as low priority
**Subjective preferences:**
- "I prefer X over Y"
- Mark as low severity, let user decide
**Return Results:**
Provide your analysis in the structured format above. The /hookify command will use this to:
1. Present findings to user
2. Ask which rules to create
3. Generate .local.md configuration files
4. Save rules to .claude directory
---
## create-and-distribute-a-plugin-marketplace-claude-code-docs-34a8f3c5e8.md
# Create and distribute a plugin marketplace
Build and host plugin marketplaces to distribute Claude Code extensions across teams and communities.
> ## Documentation Index
>
> Fetch the complete documentation index at: <https://code.claude.com/docs/llms.txt>
>
> Use this file to discover all available pages before exploring further.
A **plugin marketplace** is a catalog that lets you distribute plugins to others. Marketplaces provide centralized discovery, version tracking, automatic updates, and support for multiple source types (git repositories, local paths, and more). This guide shows you how to create your own marketplace to share plugins with your team or community. Looking to install plugins from an existing marketplace? See [Discover and install prebuilt plugins](/docs/en/discover-plugins).
Overview
Creating and distributing a marketplace involves:
1. **Creating plugins**: build one or more plugins with skills, agents, hooks, MCP servers, or LSP servers. This guide assumes you already have plugins to distribute; see [Create plugins](/docs/en/plugins) for details on how to create them.
2. **Creating a marketplace file**: define a `marketplace.json` that lists your plugins and where to find them (see [Create the marketplace file](#create-the-marketplace-file)).
3. **Host the marketplace**: push to GitHub, GitLab, or another git host (see [Host and distribute marketplaces](#host-and-distribute-marketplaces)).
4. **Share with users**: users add your marketplace with `/plugin marketplace add` and install individual plugins (see [Discover and install plugins](/docs/en/discover-plugins)).
Once your marketplace is live, you can update it by pushing changes to your repository. Users refresh their local copy with `/plugin marketplace update`.
Walkthrough: create a local marketplace
This example creates a marketplace with one plugin: a `quality-review` skill for code reviews. You’ll create the directory structure, add a skill, create the plugin manifest and marketplace catalog, then install and test it.
1
Create the directory structure
```python
mkdir -p my-marketplace/.claude-plugin
mkdir -p my-marketplace/plugins/quality-review-plugin/.claude-plugin
mkdir -p my-marketplace/plugins/quality-review-plugin/skills/quality-review
```
2
Create the skill
Create a `SKILL.md` file that defines what the `quality-review` skill does.
my-marketplace/plugins/quality-review-plugin/skills/quality-review/SKILL.md
```python
---
description: Review code for bugs, security, and performance
disable-model-invocation: true
---
Review the code I've selected or the recent changes for:
- Potential bugs or edge cases
- Security concerns
- Performance issues
- Readability improvements
Be concise and actionable.
```
3
Create the plugin manifest
Create a `plugin.json` file that describes the plugin. The manifest goes in the `.claude-plugin/` directory.
my-marketplace/plugins/quality-review-plugin/.claude-plugin/plugin.json
```python
{
"name": "quality-review-plugin",
"description": "Adds a quality-review skill for quick code reviews",
"version": "1.0.0"
}
```
Setting `version` means users only receive updates when you change this field, so bump it on every release. If you omit `version` and host this marketplace in git, every commit automatically counts as a new version. See [Version resolution](#version-resolution-and-release-channels) to choose the right approach.
4
Create the marketplace file
Create the marketplace catalog that lists your plugin.
my-marketplace/.claude-plugin/marketplace.json
```python
{
"name": "my-plugins",
"owner": {
"name": "Your Name"
},
"plugins": [
{
"name": "quality-review-plugin",
"source": "./plugins/quality-review-plugin",
"description": "Adds a quality-review skill for quick code reviews"
}
]
}
```
5
Add and install
Add the marketplace and install the plugin.
```python
/plugin marketplace add ./my-marketplace
/plugin install quality-review-plugin@my-plugins
```
6
Try it out
Select some code in your editor and run your new skill. Plugin skills are namespaced with the plugin name.
```python
/quality-review-plugin:quality-review
```
To learn more about what plugins can do, including hooks, agents, MCP servers, and LSP servers, see [Plugins](/docs/en/plugins).
**How plugins are installed**: When users install a plugin, Claude Code copies the plugin directory to a cache location. This means plugins can’t reference files outside their directory using paths like `../shared-utils`, because those files won’t be copied.If you need to share files across plugins, use symlinks. See [Plugin caching and file resolution](/docs/en/plugins-reference#plugin-caching-and-file-resolution) for details.
Create the marketplace file
Create `.claude-plugin/marketplace.json` in your repository root. This file defines your marketplace’s name, owner information, and a list of plugins with their sources. Each plugin entry needs at minimum a `name` and `source` (where to fetch it from). See the [full schema](#marketplace-schema) below for all available fields.
```python
{
"name": "company-tools",
"owner": {
"name": "DevTools Team",
"email": "devtools@example.com"
},
"plugins": [
{
"name": "code-formatter",
"source": "./plugins/formatter",
"description": "Automatic code formatting on save",
"version": "2.1.0",
"author": {
"name": "DevTools Team"
}
},
{
"name": "deployment-tools",
"source": {
"source": "github",
"repo": "company/deploy-plugin"
},
"description": "Deployment automation tools"
}
]
}
```
Marketplace schema
Required fields
| Field | Type | Description | Example |
|:----------|:-------|:-----------------------------------------------------------------------------------------------------------------------------------------------------------------------|:---------------|
| `name` | string | Marketplace identifier (kebab-case, no spaces). This is public-facing: users see it when installing plugins (for example, `/plugin install my-tool@your-marketplace`). | `"acme-tools"` |
| `owner` | object | Marketplace maintainer information ([see fields below](#owner-fields)) | |
| `plugins` | array | List of available plugins | See below |
**Reserved names**: The following marketplace names are reserved for official Anthropic use and cannot be used by third-party marketplaces: `claude-code-marketplace`, `claude-code-plugins`, `claude-plugins-official`, `anthropic-marketplace`, `anthropic-plugins`, `agent-skills`, `anthropic-agent-skills`, `knowledge-work-plugins`, `life-sciences`. Names that impersonate official marketplaces, such as `official-claude-plugins` or `anthropic-tools-v2`, are also blocked.
Owner fields
| Field | Type | Required | Description |
|:--------|:-------|:---------|:---------------------------------|
| `name` | string | Yes | Name of the maintainer or team |
| `email` | string | No | Contact email for the maintainer |
Optional fields
| Field | Type | Description |
|:--------------------------------------|:-------|:------------------------------------------------------------------------------------------------------------------------------------------------------------------------------------------------------------------------------------------------------------------------|
| `$schema` | string | JSON Schema URL for editor autocomplete and validation. Claude Code ignores this field at load time. |
| `description` | string | Brief marketplace description |
| `version` | string | Marketplace manifest version |
| `metadata.pluginRoot` | string | Base directory prepended to relative plugin source paths (for example, `"./plugins"` lets you write `"source": "formatter"` instead of `"source": "./plugins/formatter"`) |
| `allowCrossMarketplaceDependenciesOn` | array | Other marketplaces that plugins in this marketplace may depend on. Dependencies from a marketplace not listed here are blocked at install. See [Depend on a plugin from another marketplace](/docs/en/plugin-dependencies#depend-on-a-plugin-from-another-marketplace). |
`description` and `version` are also accepted under `metadata` for backward compatibility.
Plugin entries
Each plugin entry in the `plugins` array describes a plugin and where to find it. You can include any field from the [plugin manifest schema](/docs/en/plugins-reference#plugin-manifest-schema) (like `description`, `version`, `author`, `commands`, `hooks`, etc.), plus these marketplace-specific fields: `source`, `category`, `tags`, and `strict`.
Required fields
| Field | Type | Description |
|:---------|:---------------|:-------------------------------------------------------------------------------------------------------------------------------------------------------|
| `name` | string | Plugin identifier (kebab-case, no spaces). This is public-facing: users see it when installing (for example, `/plugin install my-plugin@marketplace`). |
| `source` | string\|object | Where to fetch the plugin from (see [Plugin sources](#plugin-sources) below) |
Optional plugin fields
**Standard metadata fields:**
| Field | Type | Description |
|:--------------|:--------|:----------------------------------------------------------------------------------------------------------------------------------------------------------------------------------------------------------------------------------------------------|
| `displayName` | string | Human-readable name shown in UI surfaces. Falls back to `name` when omitted. May contain spaces and any casing. Not used for namespacing or lookup. Requires Claude Code v2.1.143 or later. |
| `description` | string | Brief plugin description |
| `version` | string | Plugin version. If set (here or in `plugin.json`), the plugin is pinned to this string and users only receive updates when it changes. Omit to fall back to the git commit SHA. See [Version resolution](#version-resolution-and-release-channels). |
| `author` | object | Plugin author information (`name` required, `email` optional) |
| `homepage` | string | Plugin homepage or documentation URL |
| `repository` | string | Source code repository URL |
| `license` | string | SPDX license identifier (for example, MIT, Apache-2.0) |
| `keywords` | array | Tags for plugin discovery and categorization |
| `category` | string | Plugin category for organization |
| `tags` | array | Tags for searchability |
| `strict` | boolean | Controls whether `plugin.json` is the authority for component definitions (default: true). See [Strict mode](#strict-mode) below. |
**Component configuration fields:**
| Field | Type | Description |
|:-------------|:---------------|:---------------------------------------------------------------|
| `skills` | string\|array | Custom paths to skill directories containing `<name>/SKILL.md` |
| `commands` | string\|array | Custom paths to flat `.md` skill files or directories |
| `agents` | string\|array | Custom paths to agent files |
| `hooks` | string\|object | Custom hooks configuration or path to hooks file |
| `mcpServers` | string\|object | MCP server configurations or path to MCP config |
| `lspServers` | string\|object | LSP server configurations or path to LSP config |
Plugin sources
Plugin sources tell Claude Code where to fetch each individual plugin listed in your marketplace. These are set in the `source` field of each plugin entry in `marketplace.json`. Once a plugin is cloned or copied into the local machine, it is copied into the local versioned plugin cache at `~/.claude/plugins/cache`.
| Source | Type | Fields | Notes |
|---------------|---------------------------------|------------------------------------|---------------------------------------------------------------------------------------------------------------------------------------------------|
| Relative path | `string` (e.g. `"./my-plugin"`) | none | Local directory within the marketplace repo. Must start with `./`. Resolved relative to the marketplace root, not the `.claude-plugin/` directory |
| `github` | object | `repo`, `ref?`, `sha?` | |
| `url` | object | `url`, `ref?`, `sha?` | Git URL source |
| `git-subdir` | object | `url`, `path`, `ref?`, `sha?` | Subdirectory within a git repo. Clones sparsely to minimize bandwidth for monorepos |
| `npm` | object | `package`, `version?`, `registry?` | Installed via `npm install` |
**Marketplace sources vs plugin sources**: These are different concepts that control different things.
- **Marketplace source** — where to fetch the `marketplace.json` catalog itself. Set when users run `/plugin marketplace add` or in `extraKnownMarketplaces` settings. Supports `ref` (branch/tag) but not `sha`.
- **Plugin source** — where to fetch an individual plugin listed in the marketplace. Set in the `source` field of each plugin entry inside `marketplace.json`. Supports both `ref` (branch/tag) and `sha` (exact commit).
For example, a marketplace hosted at `acme-corp/plugin-catalog` (marketplace source) can list a plugin fetched from `acme-corp/code-formatter` (plugin source). The marketplace source and plugin source point to different repositories and are pinned independently.
Relative paths
For plugins in the same repository, use a path starting with `./`:
```python
{
"name": "my-plugin",
"source": "./plugins/my-plugin"
}
```
Paths resolve relative to the marketplace root, which is the directory containing `.claude-plugin/`. In the example above, `./plugins/my-plugin` points to `<repo>/plugins/my-plugin`, even though `marketplace.json` lives at `<repo>/.claude-plugin/marketplace.json`. Do not use `../` to reference paths outside the marketplace root.
Relative paths only work when users add your marketplace via Git (GitHub, GitLab, or git URL). If users add your marketplace via a direct URL to the `marketplace.json` file, relative paths will not resolve correctly. For URL-based distribution, use GitHub, npm, or git URL sources instead. See [Troubleshooting](#plugins-with-relative-paths-fail-in-url-based-marketplaces) for details.
```python
{
"name": "github-plugin",
"source": {
"source": "github",
"repo": "owner/plugin-repo"
}
}
```
You can pin to a specific branch, tag, or commit:
```python
{
"name": "github-plugin",
"source": {
"source": "github",
"repo": "owner/plugin-repo",
"ref": "v2.0.0",
"sha": "a1b2c3d4e5f6a7b8c9d0e1f2a3b4c5d6e7f8a9b0"
}
}
```
| Field | Type | Description |
|:-------|:-------|:----------------------------------------------------------------------|
| `repo` | string | Required. GitHub repository in `owner/repo` format |
| `ref` | string | Optional. Git branch or tag (defaults to repository default branch) |
| `sha` | string | Optional. Full 40-character git commit SHA to pin to an exact version |
Git repositories
```python
{
"name": "git-plugin",
"source": {
"source": "url",
"url": "https://gitlab.com/team/plugin.git"
}
}
```
You can pin to a specific branch, tag, or commit:
```python
{
"name": "git-plugin",
"source": {
"source": "url",
"url": "https://gitlab.com/team/plugin.git",
"ref": "main",
"sha": "a1b2c3d4e5f6a7b8c9d0e1f2a3b4c5d6e7f8a9b0"
}
}
```
| Field | Type | Description |
|:------|:-------|:---------------------------------------------------------------------------------------------------------------------------------------------------------|
| `url` | string | Required. Full git repository URL (`https://` or `git@`). The `.git` suffix is optional, so Azure DevOps and AWS CodeCommit URLs without the suffix work |
| `ref` | string | Optional. Git branch or tag (defaults to repository default branch) |
| `sha` | string | Optional. Full 40-character git commit SHA to pin to an exact version |
Git subdirectories
Use `git-subdir` to point to a plugin that lives inside a subdirectory of a git repository. Claude Code uses a sparse, partial clone to fetch only the subdirectory, minimizing bandwidth for large monorepos.
```python
{
"name": "my-plugin",
"source": {
"source": "git-subdir",
"url": "https://github.com/acme-corp/monorepo.git",
"path": "tools/claude-plugin"
}
}
```
You can pin to a specific branch, tag, or commit:
```python
{
"name": "my-plugin",
"source": {
"source": "git-subdir",
"url": "https://github.com/acme-corp/monorepo.git",
"path": "tools/claude-plugin",
"ref": "v2.0.0",
"sha": "a1b2c3d4e5f6a7b8c9d0e1f2a3b4c5d6e7f8a9b0"
}
}
```
The `url` field also accepts a GitHub shorthand (`owner/repo`) or SSH URLs (`git@github.com:owner/repo.git`).
| Field | Type | Description |
|:-------|:-------|:---------------------------------------------------------------------------------------------------------|
| `url` | string | Required. Git repository URL, GitHub `owner/repo` shorthand, or SSH URL |
| `path` | string | Required. Subdirectory path within the repo containing the plugin (for example, `"tools/claude-plugin"`) |
| `ref` | string | Optional. Git branch or tag (defaults to repository default branch) |
| `sha` | string | Optional. Full 40-character git commit SHA to pin to an exact version |
npm packages
Plugins distributed as npm packages are installed using `npm install`. This works with any package on the public npm registry or a private registry your team hosts.
```python
{
"name": "my-npm-plugin",
"source": {
"source": "npm",
"package": "@acme/claude-plugin"
}
}
```
To pin to a specific version, add the `version` field:
```python
{
"name": "my-npm-plugin",
"source": {
"source": "npm",
"package": "@acme/claude-plugin",
"version": "2.1.0"
}
}
```
To install from a private or internal registry, add the `registry` field:
```python
{
"name": "my-npm-plugin",
"source": {
"source": "npm",
"package": "@acme/claude-plugin",
"version": "^2.0.0",
"registry": "https://npm.example.com"
}
}
```
| Field | Type | Description |
|:-----------|:-------|:---------------------------------------------------------------------------------------------|
| `package` | string | Required. Package name or scoped package (for example, `@org/plugin`) |
| `version` | string | Optional. Version or version range (for example, `2.1.0`, `^2.0.0`, `~1.5.0`) |
| `registry` | string | Optional. Custom npm registry URL. Defaults to the system npm registry (typically npmjs.org) |
Advanced plugin entries
This example shows a plugin entry using many of the optional fields, including custom paths for commands, agents, hooks, and MCP servers:
```python
{
"name": "enterprise-tools",
"source": {
"source": "github",
"repo": "company/enterprise-plugin"
},
"description": "Enterprise workflow automation tools",
"version": "2.1.0",
"author": {
"name": "Enterprise Team",
"email": "enterprise@example.com"
},
"homepage": "https://docs.example.com/plugins/enterprise-tools",
"repository": "https://github.com/company/enterprise-plugin",
"license": "MIT",
"keywords": ["enterprise", "workflow", "automation"],
"category": "productivity",
"commands": [
"./commands/core/",
"./commands/enterprise/",
"./commands/experimental/preview.md"
],
"agents": ["./agents/security-reviewer.md", "./agents/compliance-checker.md"],
"hooks": {
"PostToolUse": [
{
"matcher": "Write|Edit",
"hooks": [
{
"type": "command",
"command": "${CLAUDE_PLUGIN_ROOT}/scripts/validate.sh"
}
]
}
]
},
"mcpServers": {
"enterprise-db": {
"command": "${CLAUDE_PLUGIN_ROOT}/servers/db-server",
"args": ["--config", "${CLAUDE_PLUGIN_ROOT}/config.json"]
}
},
"strict": false
}
```
Key things to notice:
- **`commands` and `agents`**: You can specify multiple directories or individual files. Paths are relative to the plugin root.
- **`${CLAUDE_PLUGIN_ROOT}`**: use this variable in hooks and MCP server configs to reference files within the plugin’s installation directory. This is necessary because plugins are copied to a cache location when installed. For dependencies or state that should survive plugin updates, use [`${CLAUDE_PLUGIN_DATA}`](/docs/en/plugins-reference#persistent-data-directory) instead.
- **`strict: false`**: Since this is set to false, the plugin doesn’t need its own `plugin.json`. The marketplace entry defines everything. See [Strict mode](#strict-mode) below.
Strict mode
The `strict` field controls whether `plugin.json` is the authority for component definitions (skills, agents, hooks, MCP servers, output styles).
| Value | Behavior |
|:-----------------|:-----------------------------------------------------------------------------------------------------------------------------------------------------------------|
| `true` (default) | `plugin.json` is the authority. The marketplace entry can supplement it with additional components, and both sources are merged. |
| `false` | The marketplace entry is the entire definition. If the plugin also has a `plugin.json` that declares components, that’s a conflict and the plugin fails to load. |
**When to use each mode:**
- **`strict: true`**: the plugin has its own `plugin.json` and manages its own components. The marketplace entry can add extra skills or hooks on top. This is the default and works for most plugins.
- **`strict: false`**: the marketplace operator wants full control. The plugin repo provides raw files, and the marketplace entry defines which of those files are exposed as skills, agents, hooks, etc. Useful when the marketplace restructures or curates a plugin’s components differently than the plugin author intended.
Host and distribute marketplaces
Host on GitHub (recommended)
1. **Create a repository**: Set up a new repository for your marketplace
2. **Add marketplace file**: Create `.claude-plugin/marketplace.json` with your plugin definitions
3. **Share with teams**: Users add your marketplace with `/plugin marketplace add owner/repo`
**Benefits**: Built-in version control, issue tracking, and team collaboration features.
Host on other git services
Any git hosting service works, such as GitLab, Bitbucket, and self-hosted servers. Users add with the full repository URL:
```python
/plugin marketplace add https://gitlab.com/company/plugins.git
```
Private repositories
Claude Code supports installing plugins from private repositories. For manual installation and updates, Claude Code uses your existing git credential helpers, so HTTPS access via `gh auth login`, macOS Keychain, or `git-credential-store` works the same as in your terminal. SSH access works as long as the host is already in your `known_hosts` file and the key is loaded in `ssh-agent`, since Claude Code suppresses interactive SSH prompts for the host fingerprint and key passphrase. Background auto-updates run at startup without credential helpers, since interactive prompts would block Claude Code from starting. To enable auto-updates for private marketplaces, set the appropriate authentication token in your environment:
| Provider | Environment variables | Notes |
|:----------|:-----------------------------|:------------------------------------------|
| GitHub | `GITHUB_TOKEN` or `GH_TOKEN` | Personal access token or GitHub App token |
| GitLab | `GITLAB_TOKEN` or `GL_TOKEN` | Personal access token or project token |
| Bitbucket | `BITBUCKET_TOKEN` | App password or repository access token |
Set the token in your shell configuration (for example, `.bashrc`, `.zshrc`) or pass it when running Claude Code:
```python
export GITHUB_TOKEN=ghp_xxxxxxxxxxxxxxxxxxxx
```
For CI/CD environments, configure the token as a secret environment variable. GitHub Actions automatically provides `GITHUB_TOKEN` for repositories in the same organization.
Test locally before distribution
Test your marketplace locally before sharing:
```python
/plugin marketplace add ./my-local-marketplace
/plugin install test-plugin@my-local-marketplace
```
For the full range of add commands (GitHub, Git URLs, local paths, remote URLs), see [Add marketplaces](/docs/en/discover-plugins#add-marketplaces).
Require marketplaces for your team
You can configure your repository so team members are automatically prompted to install your marketplace when they trust the project folder. Add your marketplace to `.claude/settings.json`:
```python
{
"extraKnownMarketplaces": {
"company-tools": {
"source": {
"source": "github",
"repo": "your-org/claude-plugins"
}
}
}
}
```
You can also specify which plugins should be enabled by default:
```python
{
"enabledPlugins": {
"code-formatter@company-tools": true,
"deployment-tools@company-tools": true
}
}
```
For full configuration options, see [Plugin settings](/docs/en/settings#plugin-settings).
If you use a local `directory` or `file` source with a relative path, the path resolves against your repository’s main checkout. When you run Claude Code from a git worktree, the path still points at the main checkout, so all worktrees share the same marketplace location. Marketplace state is stored once per user in `~/.claude/plugins/known_marketplaces.json`, not per project.
Pre-populate plugins for containers
For container images and CI environments, you can pre-populate a plugins directory at build time so Claude Code starts with marketplaces and plugins already available, without cloning anything at runtime. Set the `CLAUDE_CODE_PLUGIN_SEED_DIR` environment variable to point at this directory. To layer multiple seed directories, separate paths with `:` on Unix or `;` on Windows. Claude Code searches each directory in order, and the first seed that contains a given marketplace or plugin cache wins. The seed directory mirrors the structure of `~/.claude/plugins`:
```python
$CLAUDE_CODE_PLUGIN_SEED_DIR/
known_marketplaces.json
marketplaces/<name>/...
cache/<marketplace>/<plugin>/<version>/...
```
To build a seed directory, run Claude Code once during image build, install the plugins you need, then copy the resulting `~/.claude/plugins` directory into your image and point `CLAUDE_CODE_PLUGIN_SEED_DIR` at it. To skip the copy step, set `CLAUDE_CODE_PLUGIN_CACHE_DIR` to your target seed path during the build so plugins install directly there:
```python
CLAUDE_CODE_PLUGIN_CACHE_DIR=/opt/claude-seed claude plugin marketplace add your-org/plugins
CLAUDE_CODE_PLUGIN_CACHE_DIR=/opt/claude-seed claude plugin install my-tool@your-plugins
```
Then set `CLAUDE_CODE_PLUGIN_SEED_DIR=/opt/claude-seed` in your container’s runtime environment so Claude Code reads from the seed on startup. At startup, Claude Code registers marketplaces found in the seed’s `known_marketplaces.json` into the primary configuration, and uses plugin caches found under `cache/` in place without re-cloning. This works in both interactive mode and non-interactive mode with the `-p` flag. Behavior details:
- **Read-only**: the seed directory is never written to. Auto-updates are disabled for seed marketplaces since git pull would fail on a read-only filesystem.
- **Seed entries take precedence**: marketplaces declared in the seed overwrite any matching entries in the user’s configuration on each startup. To opt out of a seed plugin, use `/plugin disable` rather than removing the marketplace.
- **Path resolution**: Claude Code locates marketplace content by probing `$CLAUDE_CODE_PLUGIN_SEED_DIR/marketplaces/<name>/` at runtime, not by trusting paths stored inside the seed’s JSON. This means the seed works correctly even when mounted at a different path than where it was built.
- **Mutation is blocked**: running `/plugin marketplace remove` or `/plugin marketplace update` against a seed-managed marketplace fails with guidance to ask your administrator to update the seed image.
- **Composes with settings**: if `extraKnownMarketplaces` or `enabledPlugins` declare a marketplace that already exists in the seed, Claude Code uses the seed copy instead of cloning.
Managed marketplace restrictions
For organizations requiring strict control over plugin sources, administrators can restrict which plugin marketplaces users are allowed to add using the [`strictKnownMarketplaces`](/docs/en/settings#strictknownmarketplaces) setting in managed settings. When `strictKnownMarketplaces` is configured in managed settings, the restriction behavior depends on the value:
| Value | Behavior |
|---------------------|------------------------------------------------------------------|
| Undefined (default) | No restrictions. Users can add any marketplace |
| Empty array `[]` | Complete lockdown. Users cannot add any new marketplaces |
| List of sources | Users can only add marketplaces that match the allowlist exactly |
Common configurations
Disable all marketplace additions:
```python
{
"strictKnownMarketplaces": []
}
```
Allow specific marketplaces only:
```python
{
"strictKnownMarketplaces": [
{
"source": "github",
"repo": "acme-corp/approved-plugins"
},
{
"source": "github",
"repo": "acme-corp/security-tools",
"ref": "v2.0"
},
{
"source": "url",
"url": "https://plugins.example.com/marketplace.json"
}
]
}
```
Allow all marketplaces from an internal git server using regex pattern matching on the host. This is the recommended approach for [GitHub Enterprise Server](/docs/en/github-enterprise-server#plugin-marketplaces-on-ghes) or self-hosted GitLab instances:
```python
{
"strictKnownMarketplaces": [
{
"source": "hostPattern",
"hostPattern": "^github\\.example\\.com$"
}
]
}
```
Allow filesystem-based marketplaces from a specific directory using regex pattern matching on the path:
```python
{
"strictKnownMarketplaces": [
{
"source": "pathPattern",
"pathPattern": "^/opt/approved/"
}
]
}
```
Use `".*"` as the `pathPattern` to allow any filesystem path while still controlling network sources with `hostPattern`.
`strictKnownMarketplaces` restricts what users can add, but does not register marketplaces on its own. To make allowed marketplaces available automatically without users running `/plugin marketplace add`, pair it with [`extraKnownMarketplaces`](/docs/en/settings#extraknownmarketplaces) in the same `managed-settings.json`. See [Using both together](/docs/en/settings#strictknownmarketplaces).
How restrictions work
Restrictions are checked before any network or filesystem operation. The check runs on marketplace add and on plugin install, update, refresh, and auto-update. If a marketplace was added before the policy was configured and its source no longer matches the allowlist, Claude Code refuses to install or update plugins from it. The same enforcement applies to `blockedMarketplaces`. The allowlist uses exact matching for most source types. For a marketplace to be allowed, all specified fields must match exactly:
- For GitHub sources: `repo` is required, and `ref` or `path` must also match if specified in the allowlist
- For URL sources: the full URL must match exactly
- For `hostPattern` sources: the marketplace host is matched against the regex pattern
- For `pathPattern` sources: the marketplace’s filesystem path is matched against the regex pattern
Exact matching does not normalize URLs: a trailing slash, `.git` suffix, or `ssh://` versus `https://` form are treated as different values. If your organization’s marketplace can be cloned by more than one URL form, prefer a `hostPattern` entry over a literal URL so all forms match. Because `strictKnownMarketplaces` is set in [managed settings](/docs/en/settings#settings-files), individual users and project configurations cannot override these restrictions. For complete configuration details including all supported source types and comparison with `extraKnownMarketplaces`, see the [strictKnownMarketplaces reference](/docs/en/settings#strictknownmarketplaces).
Version resolution and release channels
Plugin versions determine cache paths and update detection: if the resolved version matches what a user already has, `/plugin update` and auto-update skip the plugin. Claude Code resolves a plugin’s version from the first of these that is set:
1. `version` in the plugin’s `plugin.json`
2. `version` in the plugin’s marketplace entry
3. The git commit SHA of the plugin’s source
For the git-based source types `github`, `url`, `git-subdir`, and relative paths inside a git-hosted marketplace, you can omit `version` entirely and every new commit is treated as a new version. This is the simplest setup for internal or actively-developed plugins.
Setting `version` pins the plugin. If `plugin.json` declares `"version": "1.0.0"`, pushing new commits without changing that string does nothing for existing users, because Claude Code sees the same version and keeps the cached copy. Bump the field on every release, or omit it to use the commit SHA.Avoid setting `version` in both `plugin.json` and the marketplace entry. The `plugin.json` value always wins silently, so a stale manifest version can mask a version you set in `marketplace.json`.
Set up release channels
To support “stable” and “latest” release channels for your plugins, you can set up two marketplaces that point to different refs or SHAs of the same repo. You can then assign the two marketplaces to different user groups through [managed settings](/docs/en/settings#settings-files).
Each channel must resolve to a different version. If you use explicit versions, `plugin.json` must declare a different `version` at each pinned ref. If you omit `version`, the distinct commit SHAs already distinguish the channels. If two refs resolve to the same version string, Claude Code treats them as identical and skips the update.
##### Example
```python
{
"name": "stable-tools",
"plugins": [
{
"name": "code-formatter",
"source": {
"source": "github",
"repo": "acme-corp/code-formatter",
"ref": "stable"
}
}
]
}
```
```python
{
"name": "latest-tools",
"plugins": [
{
"name": "code-formatter",
"source": {
"source": "github",
"repo": "acme-corp/code-formatter",
"ref": "latest"
}
}
]
}
```
##### Assign channels to user groups
Assign each marketplace to the appropriate user group through managed settings. For example, the stable group receives:
```python
{
"extraKnownMarketplaces": {
"stable-tools": {
"source": {
"source": "github",
"repo": "acme-corp/stable-tools"
}
}
}
}
```
The early-access group receives `latest-tools` instead:
```python
{
"extraKnownMarketplaces": {
"latest-tools": {
"source": {
"source": "github",
"repo": "acme-corp/latest-tools"
}
}
}
}
```
Pin dependency versions
A plugin can constrain its dependencies to a semver range so that updates to a dependency do not break the dependent plugin. See [Constrain plugin dependency versions](/docs/en/plugin-dependencies) for the `{plugin-name}--v{version}` git-tag convention, range syntax, and how multiple constraints on the same dependency are combined.
Validation and testing
Test your marketplace before sharing. Validate your marketplace JSON syntax:
```python
claude plugin validate .
```
Or from within Claude Code:
```python
/plugin validate .
```
Add the marketplace for testing:
```python
/plugin marketplace add ./path/to/marketplace
```
Install a test plugin to verify everything works:
```python
/plugin install test-plugin@marketplace-name
```
For complete plugin testing workflows, see [Test your plugins locally](/docs/en/plugins#test-your-plugins-locally). For technical troubleshooting, see [Plugins reference](/docs/en/plugins-reference).
Manage marketplaces from the CLI
Claude Code provides non-interactive `claude plugin marketplace` subcommands for scripting and automation. These are equivalent to the `/plugin marketplace` commands available inside an interactive session.
Plugin marketplace add
Add a marketplace from a GitHub repository, git URL, remote URL, or local path.
```python
claude plugin marketplace add <source> [options]
```
**Arguments:**
- `<source>`: GitHub `owner/repo` shorthand, git URL, remote URL to a `marketplace.json` file, or local directory path. To pin to a branch or tag, append `@ref` to the GitHub shorthand or `#ref` to a git URL
**Options:**
| Option | Description | Default |
|:----------------------|:---------------------------------------------------------------------------------------------------------------------------------------------------------|:--------|
| `--scope <scope>` | Where to declare the marketplace: `user`, `project`, or `local`. See [Plugin installation scopes](/docs/en/plugins-reference#plugin-installation-scopes) | `user` |
| `--sparse <paths...>` | Limit checkout to specific directories via git sparse-checkout. Useful for monorepos | |
Add a marketplace from GitHub using `owner/repo` shorthand:
```python
claude plugin marketplace add acme-corp/claude-plugins
```
Pin to a specific branch or tag with `@ref`:
```python
claude plugin marketplace add acme-corp/claude-plugins@v2.0
```
Add from a git URL on a non-GitHub host:
```python
claude plugin marketplace add https://gitlab.example.com/team/plugins.git
```
Add from a remote URL that serves the `marketplace.json` file directly:
```python
claude plugin marketplace add https://example.com/marketplace.json
```
Add from a local directory for testing:
```python
claude plugin marketplace add ./my-marketplace
```
Declare the marketplace at project scope so it is shared with your team via `.claude/settings.json`:
```python
claude plugin marketplace add acme-corp/claude-plugins --scope project
```
For a monorepo, limit the checkout to the directories that contain plugin content:
```python
claude plugin marketplace add acme-corp/monorepo --sparse .claude-plugin plugins
```
Plugin marketplace list
List all configured marketplaces.
```python
claude plugin marketplace list [options]
```
**Options:**
| Option | Description |
|:---------|:---------------|
| `--json` | Output as JSON |
Plugin marketplace remove
Remove a configured marketplace. The alias `rm` is also accepted.
```python
claude plugin marketplace remove <name>
```
**Arguments:**
- `<name>`: marketplace name to remove, as shown by `claude plugin marketplace list`. This is the `name` from `marketplace.json`, not the source you passed to `add`
Removing a marketplace also uninstalls any plugins you installed from it. To refresh a marketplace without losing installed plugins, use `claude plugin marketplace update` instead.
Plugin marketplace update
Refresh marketplaces from their sources to retrieve new plugins and version changes.
```python
claude plugin marketplace update [name]
```
**Arguments:**
- `[name]`: marketplace name to update, as shown by `claude plugin marketplace list`. Updates all marketplaces if omitted
Both `remove` and `update` fail when run against a seed-managed marketplace, which is read-only. When updating all marketplaces, seed-managed entries are skipped and other marketplaces still update. To change seed-provided plugins, ask your administrator to update the seed image. See [Pre-populate plugins for containers](#pre-populate-plugins-for-containers).
Troubleshooting
Marketplace not loading
**Symptoms**: Can’t add marketplace or see plugins from it **Solutions**:
- Verify the marketplace URL is accessible
- Check that `.claude-plugin/marketplace.json` exists at the specified path
- Ensure JSON syntax is valid and frontmatter is well-formed using `claude plugin validate` or `/plugin validate`
- For private repositories, confirm you have access permissions
Marketplace validation errors
Run `claude plugin validate .` or `/plugin validate .` from your marketplace directory to check for issues. The validator checks `plugin.json`, skill/agent/command frontmatter, and `hooks/hooks.json` for syntax and schema errors. Common errors:
| Error | Cause | Solution |
|:--------------------------------------------------|:------------------------------------------------|:-----------------------------------------------------------------------------------------------|
| `File not found: .claude-plugin/marketplace.json` | Missing manifest | Create `.claude-plugin/marketplace.json` with required fields |
| `Invalid JSON syntax: Unexpected token...` | JSON syntax error in marketplace.json | Check for missing commas, extra commas, or unquoted strings |
| `Duplicate plugin name "x" found in marketplace` | Two plugins share the same name | Give each plugin a unique `name` value |
| `plugins[0].source: Path contains ".."` | Source path contains `..` | Use paths relative to the marketplace root without `..`. See [Relative paths](#relative-paths) |
| `YAML frontmatter failed to parse: ...` | Invalid YAML in a skill, agent, or command file | Fix the YAML syntax in the frontmatter block. At runtime this file loads with no metadata. |
| `Invalid JSON syntax: ...` (hooks.json) | Malformed `hooks/hooks.json` | Fix JSON syntax. A malformed `hooks/hooks.json` prevents the entire plugin from loading. |
**Warnings** (non-blocking):
- `Marketplace has no plugins defined`: add at least one plugin to the `plugins` array
- `No marketplace description provided`: add a top-level `description` to help users understand your marketplace
- `Plugin name "x" is not kebab-case`: the plugin name contains uppercase letters, spaces, or special characters. Rename to lowercase letters, digits, and hyphens only (for example, `my-plugin`). Claude Code accepts other forms, but the Claude.ai marketplace sync rejects them.
Plugin installation failures
**Symptoms**: Marketplace appears but plugin installation fails **Solutions**:
- Verify plugin source URLs are accessible
- Check that plugin directories contain required files
- For GitHub sources, ensure repositories are public or you have access
- Test plugin sources manually by cloning/downloading
Private repository authentication fails
**Symptoms**: Authentication errors when installing plugins from private repositories **Solutions**: For manual installation and updates:
- Verify you’re authenticated with your git provider (for example, run `gh auth status` for GitHub)
- Check that your credential helper is configured correctly: `git config --global credential.helper`
- Try cloning the repository manually to verify your credentials work
For background auto-updates:
- Set the appropriate token in your environment: `echo $GITHUB_TOKEN`
- Check that the token has the required permissions (read access to the repository)
- For GitHub, ensure the token has the `repo` scope for private repositories
- For GitLab, ensure the token has at least `read_repository` scope
- Verify the token hasn’t expired
Marketplace updates fail in offline environments
**Symptoms**: Marketplace `git pull` fails and Claude Code wipes the existing cache, causing plugins to become unavailable. **Cause**: By default, when a `git pull` fails, Claude Code removes the stale clone and attempts to re-clone. In offline or airgapped environments, re-cloning fails the same way, leaving the marketplace directory empty. **Solution**: Set `CLAUDE_CODE_PLUGIN_KEEP_MARKETPLACE_ON_FAILURE=1` to keep the existing cache when the pull fails instead of wiping it:
```python
export CLAUDE_CODE_PLUGIN_KEEP_MARKETPLACE_ON_FAILURE=1
```
With this variable set, Claude Code retains the stale marketplace clone on `git pull` failure and continues using the last-known-good state. For fully offline deployments where the repository will never be reachable, use [`CLAUDE_CODE_PLUGIN_SEED_DIR`](#pre-populate-plugins-for-containers) to pre-populate the plugins directory at build time instead.
Git operations time out
**Symptoms**: Plugin installation or marketplace updates fail with a timeout error like “Git clone timed out after 120s” or “Git pull timed out after 120s”. **Cause**: Claude Code uses a 120-second timeout for all git operations, including cloning plugin repositories and pulling marketplace updates. Large repositories or slow network connections may exceed this limit. **Solution**: Increase the timeout using the `CLAUDE_CODE_PLUGIN_GIT_TIMEOUT_MS` environment variable. The value is in milliseconds:
```python
export CLAUDE_CODE_PLUGIN_GIT_TIMEOUT_MS=300000 # 5 minutes
```
Plugins with relative paths fail in URL-based marketplaces
**Symptoms**: Added a marketplace via URL (such as `https://example.com/marketplace.json`), but plugins with relative path sources like `"./plugins/my-plugin"` fail to install with “path not found” errors. **Cause**: URL-based marketplaces only download the `marketplace.json` file itself. They do not download plugin files from the server. Relative paths in the marketplace entry reference files on the remote server that were not downloaded. **Solutions**:
- **Use external sources**: Change plugin entries to use GitHub, npm, or git URL sources instead of relative paths:
``` shiki
{ "name": "my-plugin", "source": { "source": "github", "repo": "owner/repo" } }
```
- **Use a Git-based marketplace**: Host your marketplace in a Git repository and add it with the git URL. Git-based marketplaces clone the entire repository, making relative paths work correctly.
Files not found after installation
**Symptoms**: Plugin installs but references to files fail, especially files outside the plugin directory **Cause**: Plugins are copied to a cache directory rather than used in-place. Paths that reference files outside the plugin’s directory (such as `../shared-utils`) won’t work because those files aren’t copied. **Solutions**: See [Plugin caching and file resolution](/docs/en/plugins-reference#plugin-caching-and-file-resolution) for workarounds including symlinks and directory restructuring. For additional debugging tools and common issues, see [Debugging and development tools](/docs/en/plugins-reference#debugging-and-development-tools).
See also
- [Discover and install prebuilt plugins](/docs/en/discover-plugins) - Installing plugins from existing marketplaces
- [Plugins](/docs/en/plugins) - Creating your own plugins
- [Plugins reference](/docs/en/plugins-reference) - Complete technical specifications and schemas
- [Plugin settings](/docs/en/settings#plugin-settings) - Plugin configuration options
- [strictKnownMarketplaces reference](/docs/en/settings#strictknownmarketplaces) - Managed marketplace restrictions
---
## create-plugin.md
# Plugin Creation Workflow
Guide the user through creating a complete, high-quality Claude Code plugin from initial concept to tested implementation. Follow a systematic approach: understand requirements, design components, clarify details, implement following best practices, validate, and test.
## Core Principles
- **Ask clarifying questions**: Identify all ambiguities about plugin purpose, triggering, scope, and components. Ask specific, concrete questions rather than making assumptions. Wait for user answers before proceeding with implementation.
- **Load relevant skills**: Use the Skill tool to load plugin-dev skills when needed (plugin-structure, hook-development, agent-development, etc.)
- **Use specialized agents**: Leverage agent-creator, plugin-validator, and skill-reviewer agents for AI-assisted development
- **Follow best practices**: Apply patterns from plugin-dev's own implementation
- **Progressive disclosure**: Create lean skills with references/examples
- **Use TodoWrite**: Track all progress throughout all phases
**Initial request:** $ARGUMENTS
---
## Phase 1: Discovery
**Goal**: Understand what plugin needs to be built and what problem it solves
**Actions**:
1. Create todo list with all 7 phases
2. If plugin purpose is clear from arguments:
- Summarize understanding
- Identify plugin type (integration, workflow, analysis, toolkit, etc.)
3. If plugin purpose is unclear, ask user:
- What problem does this plugin solve?
- Who will use it and when?
- What should it do?
- Any similar plugins to reference?
4. Summarize understanding and confirm with user before proceeding
**Output**: Clear statement of plugin purpose and target users
---
## Phase 2: Component Planning
**Goal**: Determine what plugin components are needed
**MUST load plugin-structure skill** using Skill tool before this phase.
**Actions**:
1. Load plugin-structure skill to understand component types
2. Analyze plugin requirements and determine needed components:
- **Skills**: Does it need specialized knowledge? (hooks API, MCP patterns, etc.)
- **Commands**: User-initiated actions? (deploy, configure, analyze)
- **Agents**: Autonomous tasks? (validation, generation, analysis)
- **Hooks**: Event-driven automation? (validation, notifications)
- **MCP**: External service integration? (databases, APIs)
- **Settings**: User configuration? (.local.md files)
3. For each component type needed, identify:
- How many of each type
- What each one does
- Rough triggering/usage patterns
4. Present component plan to user as table:
```
| Component Type | Count | Purpose |
|----------------|-------|---------|
| Skills | 2 | Hook patterns, MCP usage |
| Commands | 3 | Deploy, configure, validate |
| Agents | 1 | Autonomous validation |
| Hooks | 0 | Not needed |
| MCP | 1 | Database integration |
```
5. Get user confirmation or adjustments
**Output**: Confirmed list of components to create
---
## Phase 3: Detailed Design & Clarifying Questions
**Goal**: Specify each component in detail and resolve all ambiguities
**CRITICAL**: This is one of the most important phases. DO NOT SKIP.
**Actions**:
1. For each component in the plan, identify underspecified aspects:
- **Skills**: What triggers them? What knowledge do they provide? How detailed?
- **Commands**: What arguments? What tools? Interactive or automated?
- **Agents**: When to trigger (proactive/reactive)? What tools? Output format?
- **Hooks**: Which events? Prompt or command based? Validation criteria?
- **MCP**: What server type? Authentication? Which tools?
- **Settings**: What fields? Required vs optional? Defaults?
2. **Present all questions to user in organized sections** (one section per component type)
3. **Wait for answers before proceeding to implementation**
4. If user says "whatever you think is best", provide specific recommendations and get explicit confirmation
**Example questions for a skill**:
- What specific user queries should trigger this skill?
- Should it include utility scripts? What functionality?
- How detailed should the core SKILL.md be vs references/?
- Any real-world examples to include?
**Example questions for an agent**:
- Should this agent trigger proactively after certain actions, or only when explicitly requested?
- What tools does it need (Read, Write, Bash, etc.)?
- What should the output format be?
- Any specific quality standards to enforce?
**Output**: Detailed specification for each component
---
## Phase 4: Plugin Structure Creation
**Goal**: Create plugin directory structure and manifest
**Actions**:
1. Determine plugin name (kebab-case, descriptive)
2. Choose plugin location:
- Ask user: "Where should I create the plugin?"
- Offer options: current directory, ../new-plugin-name, custom path
3. Create directory structure using bash:
```bash
mkdir -p plugin-name/.claude-plugin
mkdir -p plugin-name/skills # if needed
mkdir -p plugin-name/commands # if needed
mkdir -p plugin-name/agents # if needed
mkdir -p plugin-name/hooks # if needed
```
4. Create plugin.json manifest using Write tool:
```json
{
"name": "plugin-name",
"version": "0.1.0",
"description": "[brief description]",
"author": {
"name": "[author from user or default]",
"email": "[email or default]"
}
}
```
5. Create README.md template
6. Create .gitignore if needed (for .claude/*.local.md, etc.)
7. Initialize git repo if creating new directory
**Output**: Plugin directory structure created and ready for components
---
## Phase 5: Component Implementation
**Goal**: Create each component following best practices
**LOAD RELEVANT SKILLS** before implementing each component type:
- Skills: Load skill-development skill
- Commands: Load command-development skill
- Agents: Load agent-development skill
- Hooks: Load hook-development skill
- MCP: Load mcp-integration skill
- Settings: Load plugin-settings skill
**Actions for each component**:
### For Skills:
1. Load skill-development skill using Skill tool
2. For each skill:
- Ask user for concrete usage examples (or use from Phase 3)
- Plan resources (scripts/, references/, examples/)
- Create skill directory structure
- Write SKILL.md with:
- Third-person description with specific trigger phrases
- Lean body (1,500-2,000 words) in imperative form
- References to supporting files
- Create reference files for detailed content
- Create example files for working code
- Create utility scripts if needed
3. Use skill-reviewer agent to validate each skill
### For Commands:
1. Load command-development skill using Skill tool
2. For each command:
- Write command markdown with frontmatter
- Include clear description and argument-hint
- Specify allowed-tools (minimal necessary)
- Write instructions FOR Claude (not TO user)
- Provide usage examples and tips
- Reference relevant skills if applicable
### For Agents:
1. Load agent-development skill using Skill tool
2. For each agent, use agent-creator agent:
- Provide description of what agent should do
- Agent-creator generates: identifier, whenToUse with examples, systemPrompt
- Create agent markdown file with frontmatter and system prompt
- Add appropriate model, color, and tools
- Validate with validate-agent.sh script
### For Hooks:
1. Load hook-development skill using Skill tool
2. For each hook:
- Create hooks/hooks.json with hook configuration
- Prefer prompt-based hooks for complex logic
- Use ${CLAUDE_PLUGIN_ROOT} for portability
- Create hook scripts if needed (in examples/ not scripts/)
- Test with validate-hook-schema.sh and test-hook.sh utilities
### For MCP:
1. Load mcp-integration skill using Skill tool
2. Create .mcp.json configuration with:
- Server type (stdio for local, SSE for hosted)
- Command and args (with ${CLAUDE_PLUGIN_ROOT})
- extensionToLanguage mapping if LSP
- Environment variables as needed
3. Document required env vars in README
4. Provide setup instructions
### For Settings:
1. Load plugin-settings skill using Skill tool
2. Create settings template in README
3. Create example .claude/plugin-name.local.md file (as documentation)
4. Implement settings reading in hooks/commands as needed
5. Add to .gitignore: `.claude/*.local.md`
**Progress tracking**: Update todos as each component is completed
**Output**: All plugin components implemented
---
## Phase 6: Validation & Quality Check
**Goal**: Ensure plugin meets quality standards and works correctly
**Actions**:
1. **Run plugin-validator agent**:
- Use plugin-validator agent to comprehensively validate plugin
- Check: manifest, structure, naming, components, security
- Review validation report
2. **Fix critical issues**:
- Address any critical errors from validation
- Fix any warnings that indicate real problems
3. **Review with skill-reviewer** (if plugin has skills):
- For each skill, use skill-reviewer agent
- Check description quality, progressive disclosure, writing style
- Apply recommendations
4. **Test agent triggering** (if plugin has agents):
- For each agent, verify <example> blocks are clear
- Check triggering conditions are specific
- Run validate-agent.sh on agent files
5. **Test hook configuration** (if plugin has hooks):
- Run validate-hook-schema.sh on hooks/hooks.json
- Test hook scripts with test-hook.sh
- Verify ${CLAUDE_PLUGIN_ROOT} usage
6. **Present findings**:
- Summary of validation results
- Any remaining issues
- Overall quality assessment
7. **Ask user**: "Validation complete. Issues found: [count critical], [count warnings]. Would you like me to fix them now, or proceed to testing?"
**Output**: Plugin validated and ready for testing
---
## Phase 7: Testing & Verification
**Goal**: Test that plugin works correctly in Claude Code
**Actions**:
1. **Installation instructions**:
- Show user how to test locally:
```bash
cc --plugin-dir /path/to/plugin-name
```
- Or copy to `.claude-plugin/` for project testing
2. **Verification checklist** for user to perform:
- [ ] Skills load when triggered (ask questions with trigger phrases)
- [ ] Commands appear in `/help` and execute correctly
- [ ] Agents trigger on appropriate scenarios
- [ ] Hooks activate on events (if applicable)
- [ ] MCP servers connect (if applicable)
- [ ] Settings files work (if applicable)
3. **Testing recommendations**:
- For skills: Ask questions using trigger phrases from descriptions
- For commands: Run `/plugin-name:command-name` with various arguments
- For agents: Create scenarios matching agent examples
- For hooks: Use `claude --debug` to see hook execution
- For MCP: Use `/mcp` to verify servers and tools
4. **Ask user**: "I've prepared the plugin for testing. Would you like me to guide you through testing each component, or do you want to test it yourself?"
5. **If user wants guidance**, walk through testing each component with specific test cases
**Output**: Plugin tested and verified working
---
## Phase 8: Documentation & Next Steps
**Goal**: Ensure plugin is well-documented and ready for distribution
**Actions**:
1. **Verify README completeness**:
- Check README has: overview, features, installation, prerequisites, usage
- For MCP plugins: Document required environment variables
- For hook plugins: Explain hook activation
- For settings: Provide configuration templates
2. **Add marketplace entry** (if publishing):
- Show user how to add to marketplace.json
- Help draft marketplace description
- Suggest category and tags
3. **Create summary**:
- Mark all todos complete
- List what was created:
- Plugin name and purpose
- Components created (X skills, Y commands, Z agents, etc.)
- Key files and their purposes
- Total file count and structure
- Next steps:
- Testing recommendations
- Publishing to marketplace (if desired)
- Iteration based on usage
4. **Suggest improvements** (optional):
- Additional components that could enhance plugin
- Integration opportunities
- Testing strategies
**Output**: Complete, documented plugin ready for use or publication
---
## Important Notes
### Throughout All Phases
- **Use TodoWrite** to track progress at every phase
- **Load skills with Skill tool** when working on specific component types
- **Use specialized agents** (agent-creator, plugin-validator, skill-reviewer)
- **Ask for user confirmation** at key decision points
- **Follow plugin-dev's own patterns** as reference examples
- **Apply best practices**:
- Third-person descriptions for skills
- Imperative form in skill bodies
- Commands written FOR Claude
- Strong trigger phrases
- ${CLAUDE_PLUGIN_ROOT} for portability
- Progressive disclosure
- Security-first (HTTPS, no hardcoded credentials)
### Key Decision Points (Wait for User)
1. After Phase 1: Confirm plugin purpose
2. After Phase 2: Approve component plan
3. After Phase 3: Proceed to implementation
4. After Phase 6: Fix issues or proceed
5. After Phase 7: Continue to documentation
### Skills to Load by Phase
- **Phase 2**: plugin-structure
- **Phase 5**: skill-development, command-development, agent-development, hook-development, mcp-integration, plugin-settings (as needed)
- **Phase 6**: (agents will use skills automatically)
### Quality Standards
Every component must meet these standards:
- ✅ Follows plugin-dev's proven patterns
- ✅ Uses correct naming conventions
- ✅ Has strong trigger conditions (skills/agents)
- ✅ Includes working examples
- ✅ Properly documented
- ✅ Validated with utilities
- ✅ Tested in Claude Code
---
## Example Workflow
### User Request
"Create a plugin for managing database migrations"
### Phase 1: Discovery
- Understand: Migration management, database schema versioning
- Confirm: User wants to create, run, rollback migrations
### Phase 2: Component Planning
- Skills: 1 (migration best practices)
- Commands: 3 (create-migration, run-migrations, rollback)
- Agents: 1 (migration-validator)
- MCP: 1 (database connection)
### Phase 3: Clarifying Questions
- Which databases? (PostgreSQL, MySQL, etc.)
- Migration file format? (SQL, code-based?)
- Should agent validate before applying?
- What MCP tools needed? (query, execute, schema)
### Phase 4-8: Implementation, Validation, Testing, Documentation
---
**Begin with Phase 1: Discovery**
---
## create-plugins-claude-code-docs-fc9dd52a14.md
# Create plugins
Create custom plugins to extend Claude Code with skills, agents, hooks, and MCP servers.
> ## Documentation Index
>
> Fetch the complete documentation index at: <https://code.claude.com/docs/llms.txt>
>
> Use this file to discover all available pages before exploring further.
Plugins let you extend Claude Code with custom functionality that can be shared across projects and teams. This guide covers creating your own plugins with skills, agents, hooks, and MCP servers. Looking to install existing plugins? See [Discover and install plugins](/docs/en/discover-plugins). For complete technical specifications, see [Plugins reference](/docs/en/plugins-reference).
When to use plugins vs standalone configuration
Claude Code supports two ways to add custom skills, agents, and hooks:
| Approach | Skill names | Best for |
|:------------------------------------------------------------|:---------------------|:------------------------------------------------------------------------------------------------|
| **Standalone** (`.claude/` directory) | `/hello` | Personal workflows, project-specific customizations, quick experiments |
| **Plugins** (directories with `.claude-plugin/plugin.json`) | `/plugin-name:hello` | Sharing with teammates, distributing to community, versioned releases, reusable across projects |
**Use standalone configuration when**:
- You’re customizing Claude Code for a single project
- The configuration is personal and doesn’t need to be shared
- You’re experimenting with skills or hooks before packaging them
- You want short skill names like `/hello` or `/deploy`
**Use plugins when**:
- You want to share functionality with your team or community
- You need the same skills/agents across multiple projects
- You want version control and easy updates for your extensions
- You’re distributing through a marketplace
- You’re okay with namespaced skills like `/my-plugin:hello` (namespacing prevents conflicts between plugins)
Start with standalone configuration in `.claude/` for quick iteration, then [convert to a plugin](#convert-existing-configurations-to-plugins) when you’re ready to share.
Quickstart
This quickstart walks you through creating a plugin with a custom skill. You’ll create a manifest (the configuration file that defines your plugin), add a skill, and test it locally using the `--plugin-dir` flag.
Prerequisites
- Claude Code [installed and authenticated](/docs/en/quickstart#step-1-install-claude-code)
If you don’t see the `/plugin` command, update Claude Code to the latest version. See [Troubleshooting](/docs/en/troubleshooting) for upgrade instructions.
Create your first plugin
1
Create the plugin directory
Every plugin lives in its own directory containing a manifest and your skills, agents, or hooks. Create one now:
```python
mkdir my-first-plugin
```
2
Create the plugin manifest
The manifest file at `.claude-plugin/plugin.json` defines your plugin’s identity: its name, description, and version. Claude Code uses this metadata to display your plugin in the plugin manager.Create the `.claude-plugin` directory inside your plugin folder:
```python
mkdir my-first-plugin/.claude-plugin
```
Then create `my-first-plugin/.claude-plugin/plugin.json` with this content:
my-first-plugin/.claude-plugin/plugin.json
```python
{
"name": "my-first-plugin",
"description": "A greeting plugin to learn the basics",
"version": "1.0.0",
"author": {
"name": "Your Name"
}
}
```
| Field | Purpose |
|:--------------|:--------------------------------------------------------------------------------------------------------------------------------------------------------------------------------------------------------------------------------------------------------------------|
| `name` | Unique identifier and skill namespace. Skills are prefixed with this (e.g., `/my-first-plugin:hello`). |
| `description` | Shown in the plugin manager when browsing or installing plugins. |
| `version` | Optional. If set, users only receive updates when you bump this field. If omitted and your plugin is distributed via git, the commit SHA is used and every commit counts as a new version. See [version management](/docs/en/plugins-reference#version-management). |
| `author` | Optional. Helpful for attribution. |
For additional fields like `homepage`, `repository`, and `license`, see the [full manifest schema](/docs/en/plugins-reference#plugin-manifest-schema).
3
Add a skill
Skills live in the `skills/` directory. Each skill is a folder containing a `SKILL.md` file. The folder name becomes the skill name, prefixed with the plugin’s namespace (`hello/` in a plugin named `my-first-plugin` creates `/my-first-plugin:hello`).Create a skill directory in your plugin folder:
```python
mkdir -p my-first-plugin/skills/hello
```
Then create `my-first-plugin/skills/hello/SKILL.md` with this content:
my-first-plugin/skills/hello/SKILL.md
```python
---
description: Greet the user with a friendly message
disable-model-invocation: true
---
Greet the user warmly and ask how you can help them today.
```
4
Test your plugin
Run Claude Code with the `--plugin-dir` flag to load your plugin:
```python
claude --plugin-dir ./my-first-plugin
```
Once Claude Code starts, try your new skill:
```python
/my-first-plugin:hello
```
You’ll see Claude respond with a greeting. Run `/help` to see your skill listed under the plugin namespace.
**Why namespacing?** Plugin skills are always namespaced (like `/my-first-plugin:hello`) to prevent conflicts when multiple plugins have skills with the same name.To change the namespace prefix, update the `name` field in `plugin.json`.
5
Add skill arguments
Make your skill dynamic by accepting user input. The `$ARGUMENTS` placeholder captures any text the user provides after the skill name.Update your `SKILL.md` file:
my-first-plugin/skills/hello/SKILL.md
```python
---
description: Greet the user with a personalized message
---
# Hello Skill
Greet the user named "$ARGUMENTS" warmly and ask how you can help them today. Make the greeting personal and encouraging.
```
Run `/reload-plugins` to pick up the changes, then try the skill with your name:
```python
/my-first-plugin:hello Alex
```
Claude will greet you by name. For more on passing arguments to skills, see [Skills](/docs/en/skills#pass-arguments-to-skills).
You’ve successfully created and tested a plugin with these key components:
- **Plugin manifest** (`.claude-plugin/plugin.json`): describes your plugin’s metadata
- **Skills directory** (`skills/`): contains your custom skills
- **Skill arguments** (`$ARGUMENTS`): captures user input for dynamic behavior
The `--plugin-dir` flag is useful for development and testing. When you’re ready to share your plugin with others, see [Create and distribute a plugin marketplace](/docs/en/plugin-marketplaces).
Plugin structure overview
You’ve created a plugin with a skill, but plugins can include much more: custom agents, hooks, MCP servers, LSP servers, and background monitors.
**Common mistake**: Don’t put `commands/`, `agents/`, `skills/`, or `hooks/` inside the `.claude-plugin/` directory. Only `plugin.json` goes inside `.claude-plugin/`. All other directories must be at the plugin root level.
| Directory | Location | Purpose |
|:------------------|:------------|:-------------------------------------------------------------------------------|
| `.claude-plugin/` | Plugin root | Contains `plugin.json` manifest (optional if components use default locations) |
| `skills/` | Plugin root | Skills as `<name>/SKILL.md` directories |
| `commands/` | Plugin root | Skills as flat Markdown files. Use `skills/` for new plugins |
| `agents/` | Plugin root | Custom agent definitions |
| `hooks/` | Plugin root | Event handlers in `hooks.json` |
| `.mcp.json` | Plugin root | MCP server configurations |
| `.lsp.json` | Plugin root | LSP server configurations for code intelligence |
| `monitors/` | Plugin root | Background monitor configurations in `monitors.json` |
| `bin/` | Plugin root | Executables added to the Bash tool’s `PATH` while the plugin is enabled |
| `settings.json` | Plugin root | Default [settings](/docs/en/settings) applied when the plugin is enabled |
**Next steps**: Ready to add more features? Jump to [Develop more complex plugins](#develop-more-complex-plugins) to add agents, hooks, MCP servers, and LSP servers. For complete technical specifications of all plugin components, see [Plugins reference](/docs/en/plugins-reference).
Develop more complex plugins
Once you’re comfortable with basic plugins, you can create more sophisticated extensions.
Add Skills to your plugin
Plugins can include [Agent Skills](/docs/en/skills) to extend Claude’s capabilities. Skills are model-invoked: Claude automatically uses them based on the task context. Add a `skills/` directory at your plugin root with Skill folders containing `SKILL.md` files:
```python
my-plugin/
├── .claude-plugin/
│ └── plugin.json
└── skills/
└── code-review/
└── SKILL.md
```
Each `SKILL.md` contains YAML frontmatter and instructions. Include a `description` so Claude knows when to use the skill:
```python
---
description: Reviews code for best practices and potential issues. Use when reviewing code, checking PRs, or analyzing code quality.
---
When reviewing code, check for:
1. Code organization and structure
2. Error handling
3. Security concerns
4. Test coverage
```
After installing the plugin, run `/reload-plugins` to load the Skills. For complete Skill authoring guidance including progressive disclosure and tool restrictions, see [Agent Skills](/docs/en/skills).
Add LSP servers to your plugin
For common languages like TypeScript, Python, and Rust, install the pre-built LSP plugins from the official marketplace. Create custom LSP plugins only when you need support for languages not already covered.
LSP (Language Server Protocol) plugins give Claude real-time code intelligence. If you need to support a language that doesn’t have an official LSP plugin, you can create your own by adding an `.lsp.json` file to your plugin:
.lsp.json
```python
{
"go": {
"command": "gopls",
"args": ["serve"],
"extensionToLanguage": {
".go": "go"
}
}
}
```
Users installing your plugin must have the language server binary installed on their machine. For complete LSP configuration options, see [LSP servers](/docs/en/plugins-reference#lsp-servers).
Add background monitors to your plugin
Background monitors let your plugin watch logs, files, or external status in the background and notify Claude as events arrive. Claude Code starts each monitor automatically when the plugin is active, so you don’t need to instruct Claude to start the watch. Add a `monitors/monitors.json` file at the plugin root with an array of monitor entries:
monitors/monitors.json
```python
[
{
"name": "error-log",
"command": "tail -F ./logs/error.log",
"description": "Application error log"
}
]
```
Each stdout line from `command` is delivered to Claude as a notification during the session. For the full schema, including the `when` trigger and variable substitution, see [Monitors](/docs/en/plugins-reference#monitors).
Ship default settings with your plugin
Plugins can include a `settings.json` file at the plugin root to apply default configuration when the plugin is enabled. Currently, only the `agent` and `subagentStatusLine` keys are supported. Setting `agent` activates one of the plugin’s [custom agents](/docs/en/sub-agents) as the main thread, applying its system prompt, tool restrictions, and model. This lets a plugin change how Claude Code behaves by default when enabled.
settings.json
```python
{
"agent": "security-reviewer"
}
```
This example activates the `security-reviewer` agent defined in the plugin’s `agents/` directory. Settings from `settings.json` take priority over `settings` declared in `plugin.json`. Unknown keys are silently ignored.
Organize complex plugins
For plugins with many components, organize your directory structure by functionality. For complete directory layouts and organization patterns, see [Plugin directory structure](/docs/en/plugins-reference#plugin-directory-structure).
Test your plugins locally
Use the `--plugin-dir` flag to test plugins during development. This loads your plugin directly without requiring installation.
```python
claude --plugin-dir ./my-plugin
```
The flag also accepts a `.zip` archive of the plugin directory, which requires Claude Code v2.1.128 or later.
```python
claude --plugin-dir ./my-plugin.zip
```
When a `--plugin-dir` plugin has the same name as an installed marketplace plugin, the local copy takes precedence for that session. This lets you test changes to a plugin you already have installed without uninstalling it first. The exception is plugins that managed settings force-enable or force-disable: `--plugin-dir` cannot override those. As you make changes to your plugin, run `/reload-plugins` to pick up the updates without restarting. This reloads plugins, skills, agents, hooks, plugin MCP servers, and plugin LSP servers. Test your plugin components:
- Try your skills with `/plugin-name:skill-name`
- Check that agents appear in `/agents`
- Verify hooks work as expected
You can load multiple plugins at once by specifying the flag multiple times:
```python
claude --plugin-dir ./plugin-one --plugin-dir ./plugin-two
```
To test a plugin that is already packaged as a `.zip` archive and hosted at a URL, such as a CI build artifact, use `--plugin-url` instead. Claude Code fetches the archive at startup and loads it for that session only. If the fetch fails or the archive is invalid, Claude Code reports a plugin load error and starts without it. The same [trust considerations](/docs/en/discover-plugins#security) apply as for any plugin source: only point this flag at archives you control or trust. To load multiple plugins, repeat the flag for each URL:
```python
claude --plugin-url https://example.com/my-plugin.zip --plugin-url https://example.com/other.zip
```
Or pass space-separated URLs as one quoted argument:
```python
claude --plugin-url "https://example.com/my-plugin.zip https://example.com/other.zip"
```
Debug plugin issues
If your plugin isn’t working as expected:
1. **Check the structure**: Ensure your directories are at the plugin root, not inside `.claude-plugin/`
2. **Test components individually**: Check each skill, agent, and hook separately
3. **Use validation and debugging tools**: See [Debugging and development tools](/docs/en/plugins-reference#debugging-and-development-tools) for CLI commands and troubleshooting techniques
Share your plugins
When your plugin is ready to share:
1. **Add documentation**: Include a `README.md` with installation and usage instructions
2. **Choose a versioning strategy**: Decide whether to set an explicit `version` or rely on the git commit SHA. See [version management](/docs/en/plugins-reference#version-management)
3. **Create or use a marketplace**: Distribute through [plugin marketplaces](/docs/en/plugin-marketplaces) for installation
4. **Test with others**: Have team members test the plugin before wider distribution
Once your plugin is in a marketplace, others can install it using the instructions in [Discover and install plugins](/docs/en/discover-plugins). To keep a plugin internal to your team, host the marketplace in a [private repository](/docs/en/plugin-marketplaces#private-repositories).
Submit your plugin to the community marketplace
Anthropic maintains two public marketplaces for Claude Code plugins:
- **`claude-plugins-official`**: a curated set of plugins maintained by Anthropic. Available automatically in every Claude Code installation.
- **`claude-community`**: the public community marketplace where third-party submissions land after review. Users add it with `/plugin marketplace add anthropics/claude-plugins-community` and install from it as `@claude-community`.
To submit your plugin for community-marketplace review, use one of the in-app forms:
- **Claude.ai**: [claude.ai/settings/plugins/submit](https://claude.ai/settings/plugins/submit)
- **Console**: [platform.claude.com/plugins/submit](https://platform.claude.com/plugins/submit)
Run `claude plugin validate` locally before you submit. The review pipeline runs the same check on every submission, along with automated safety screening. Approved plugins are pinned to a specific commit SHA in the [`anthropics/claude-plugins-community`](https://github.com/anthropics/claude-plugins-community) catalog, and CI bumps the pin automatically as you push new commits to your repository. The public catalog syncs nightly from the review pipeline, so there can be a delay between approval and your plugin appearing in `marketplace.json`. To check whether your plugin is installable yet, search for its name in the [community catalog](https://github.com/anthropics/claude-plugins-community/blob/main/.claude-plugin/marketplace.json). The official marketplace, `claude-plugins-official`, is curated separately. Anthropic decides which plugins to include at its discretion. There is no application process, and the submission form does not add plugins to the official marketplace. If Anthropic lists your plugin in the official marketplace, your CLI can prompt Claude Code users to install it. See [Recommend your plugin from your CLI](/docs/en/plugin-hints).
For complete technical specifications, debugging techniques, and distribution strategies, see [Plugins reference](/docs/en/plugins-reference).
Convert existing configurations to plugins
If you already have skills or hooks in your `.claude/` directory, you can convert them into a plugin for easier sharing and distribution.
Migration steps
1
Create the plugin structure
Create a new plugin directory:
```python
mkdir -p my-plugin/.claude-plugin
```
Create the manifest file at `my-plugin/.claude-plugin/plugin.json`:
my-plugin/.claude-plugin/plugin.json
```python
{
"name": "my-plugin",
"description": "Migrated from standalone configuration",
"version": "1.0.0"
}
```
2
Copy your existing files
Copy your existing configurations to the plugin directory:
```python
# Copy commands
cp -r .claude/commands my-plugin/
# Copy agents (if any)
cp -r .claude/agents my-plugin/
# Copy skills (if any)
cp -r .claude/skills my-plugin/
```
3
Migrate hooks
If you have hooks in your settings, create a hooks directory:
```python
mkdir my-plugin/hooks
```
Create `my-plugin/hooks/hooks.json` with your hooks configuration. Copy the `hooks` object from your `.claude/settings.json` or `settings.local.json`, since the format is the same. The command receives hook input as JSON on stdin, so use `jq` to extract the file path:
my-plugin/hooks/hooks.json
```python
{
"hooks": {
"PostToolUse": [
{
"matcher": "Write|Edit",
"hooks": [{ "type": "command", "command": "jq -r '.tool_input.file_path' | xargs npm run lint:fix" }]
}
]
}
}
```
4
Test your migrated plugin
Load your plugin to verify everything works:
```python
claude --plugin-dir ./my-plugin
```
Test each component: run your commands, check agents appear in `/agents`, and verify hooks trigger correctly.
What changes when migrating
| Standalone (`.claude/`) | Plugin |
|:------------------------------|:---------------------------------|
| Only available in one project | Can be shared via marketplaces |
| Files in `.claude/commands/` | Files in `plugin-name/commands/` |
| Hooks in `settings.json` | Hooks in `hooks/hooks.json` |
| Must manually copy to share | Install with `/plugin install` |
After migrating, you can remove the original files from `.claude/` to avoid duplicates. The plugin version will take precedence when loaded.
Next steps
Now that you understand Claude Code’s plugin system, here are suggested paths for different goals:
For plugin users
- [Discover and install plugins](/docs/en/discover-plugins): browse marketplaces and install plugins
- [Configure team marketplaces](/docs/en/discover-plugins#configure-team-marketplaces): set up repository-level plugins for your team
For plugin developers
- [Create and distribute a marketplace](/docs/en/plugin-marketplaces): package and share your plugins
- [Plugins reference](/docs/en/plugins-reference): complete technical specifications
- Dive deeper into specific plugin components:
- [Skills](/docs/en/skills): skill development details
- [Subagents](/docs/en/sub-agents): agent configuration and capabilities
- [Hooks](/docs/en/hooks): event handling and automation
- [MCP](/docs/en/mcp): external tool integration
---
## create-plugins-claude-code-docs.md
# Create plugins
Create custom plugins to extend Claude Code with skills, agents, hooks, and MCP servers.
Plugins let you extend Claude Code with custom functionality that can be shared across projects and teams. This guide covers creating your own plugins with skills, agents, hooks, and MCP servers. Looking to install existing plugins? See [Discover and install plugins](/docs/en/discover-plugins). For complete technical specifications, see [Plugins reference](/docs/en/plugins-reference).
When to use plugins vs standalone configuration
Claude Code supports two ways to add custom skills, agents, and hooks:
| Approach | Skill names | Best for |
|:---|:---|:---|
| **Standalone** (`.claude/` directory) | `/hello` | Personal workflows, project-specific customizations, quick experiments |
| **Plugins** (directories with `.claude-plugin/plugin.json`) | `/plugin-name:hello` | Sharing with teammates, distributing to community, versioned releases, reusable across projects |
**Use standalone configuration when**:
- You’re customizing Claude Code for a single project
- The configuration is personal and doesn’t need to be shared
- You’re experimenting with skills or hooks before packaging them
- You want short skill names like `/hello` or `/deploy`
**Use plugins when**:
- You want to share functionality with your team or community
- You need the same skills/agents across multiple projects
- You want version control and easy updates for your extensions
- You’re distributing through a marketplace
- You’re okay with namespaced skills like `/my-plugin:hello` (namespacing prevents conflicts between plugins)
Start with standalone configuration in `.claude/` for quick iteration, then [convert to a plugin](#convert-existing-configurations-to-plugins) when you’re ready to share.
Quickstart
This quickstart walks you through creating a plugin with a custom skill. You’ll create a manifest (the configuration file that defines your plugin), add a skill, and test it locally using the `--plugin-dir` flag.
Prerequisites
- Claude Code [installed and authenticated](/docs/en/quickstart#step-1-install-claude-code)
If you don’t see the `/plugin` command, update Claude Code to the latest version. See [Troubleshooting](/docs/en/troubleshooting) for upgrade instructions.
Create your first plugin
1
Create the plugin directory
Every plugin lives in its own directory containing a manifest and your skills, agents, or hooks. Create one now:
```python
mkdir my-first-plugin
```
2
Create the plugin manifest
The manifest file at `.claude-plugin/plugin.json` defines your plugin’s identity: its name, description, and version. Claude Code uses this metadata to display your plugin in the plugin manager.Create the `.claude-plugin` directory inside your plugin folder:
```python
mkdir my-first-plugin/.claude-plugin
```
Then create `my-first-plugin/.claude-plugin/plugin.json` with this content:
my-first-plugin/.claude-plugin/plugin.json
```python
{
"name": "my-first-plugin",
"description": "A greeting plugin to learn the basics",
"version": "1.0.0",
"author": {
"name": "Your Name"
}
}
```
| Field | Purpose |
|:---|:---|
| `name` | Unique identifier and skill namespace. Skills are prefixed with this (e.g., `/my-first-plugin:hello`). |
| `description` | Shown in the plugin manager when browsing or installing plugins. |
| `version` | Optional. If set, users only receive updates when you bump this field. If omitted and your plugin is distributed via git, the commit SHA is used and every commit counts as a new version. See [version management](/docs/en/plugins-reference#version-management). |
| `author` | Optional. Helpful for attribution. |
For additional fields like `homepage`, `repository`, and `license`, see the [full manifest schema](/docs/en/plugins-reference#plugin-manifest-schema).
3
Add a skill
Skills live in the `skills/` directory. Each skill is a folder containing a `SKILL.md` file. The folder name becomes the skill name, prefixed with the plugin’s namespace (`hello/` in a plugin named `my-first-plugin` creates `/my-first-plugin:hello`).Create a skill directory in your plugin folder:
```python
mkdir -p my-first-plugin/skills/hello
```
Then create `my-first-plugin/skills/hello/SKILL.md` with this content:
my-first-plugin/skills/hello/SKILL.md
```python
---
description: Greet the user with a friendly message
disable-model-invocation: true
---
Greet the user warmly and ask how you can help them today.
```
4
Test your plugin
Run Claude Code with the `--plugin-dir` flag to load your plugin:
```python
claude --plugin-dir ./my-first-plugin
```
Once Claude Code starts, try your new skill:
```python
/my-first-plugin:hello
```
You’ll see Claude respond with a greeting. Run `/help` to see your skill listed under the plugin namespace.
**Why namespacing?** Plugin skills are always namespaced (like `/my-first-plugin:hello`) to prevent conflicts when multiple plugins have skills with the same name.To change the namespace prefix, update the `name` field in `plugin.json`.
5
Add skill arguments
Make your skill dynamic by accepting user input. The `$ARGUMENTS` placeholder captures any text the user provides after the skill name.Update your `SKILL.md` file:
my-first-plugin/skills/hello/SKILL.md
```python
---
description: Greet the user with a personalized message
---
# Hello Skill
Greet the user named "$ARGUMENTS" warmly and ask how you can help them today. Make the greeting personal and encouraging.
```
Run `/reload-plugins` to pick up the changes, then try the skill with your name:
```python
/my-first-plugin:hello Alex
```
Claude will greet you by name. For more on passing arguments to skills, see [Skills](/docs/en/skills#pass-arguments-to-skills).
You’ve successfully created and tested a plugin with these key components:
- **Plugin manifest** (`.claude-plugin/plugin.json`): describes your plugin’s metadata
- **Skills directory** (`skills/`): contains your custom skills
- **Skill arguments** (`$ARGUMENTS`): captures user input for dynamic behavior
The `--plugin-dir` flag is useful for development and testing. When you’re ready to share your plugin with others, see [Create and distribute a plugin marketplace](/docs/en/plugin-marketplaces).
Plugin structure overview
You’ve created a plugin with a skill, but plugins can include much more: custom agents, hooks, MCP servers, LSP servers, and background monitors.
**Common mistake**: Don’t put `commands/`, `agents/`, `skills/`, or `hooks/` inside the `.claude-plugin/` directory. Only `plugin.json` goes inside `.claude-plugin/`. All other directories must be at the plugin root level.
| Directory | Location | Purpose |
|:---|:---|:---|
| `.claude-plugin/` | Plugin root | Contains `plugin.json` manifest (optional if components use default locations) |
| `skills/` | Plugin root | Skills as `<name>/SKILL.md` directories |
| `commands/` | Plugin root | Skills as flat Markdown files. Use `skills/` for new plugins |
| `agents/` | Plugin root | Custom agent definitions |
| `hooks/` | Plugin root | Event handlers in `hooks.json` |
| `.mcp.json` | Plugin root | MCP server configurations |
| `.lsp.json` | Plugin root | LSP server configurations for code intelligence |
| `monitors/` | Plugin root | Background monitor configurations in `monitors.json` |
| `bin/` | Plugin root | Executables added to the Bash tool’s `PATH` while the plugin is enabled |
| `settings.json` | Plugin root | Default [settings](/docs/en/settings) applied when the plugin is enabled |
**Next steps**: Ready to add more features? Jump to [Develop more complex plugins](#develop-more-complex-plugins) to add agents, hooks, MCP servers, and LSP servers. For complete technical specifications of all plugin components, see [Plugins reference](/docs/en/plugins-reference).
Develop more complex plugins
Once you’re comfortable with basic plugins, you can create more sophisticated extensions.
Add Skills to your plugin
Plugins can include [Agent Skills](/docs/en/skills) to extend Claude’s capabilities. Skills are model-invoked: Claude automatically uses them based on the task context. Add a `skills/` directory at your plugin root with Skill folders containing `SKILL.md` files:
```python
my-plugin/
├── .claude-plugin/
│ └── plugin.json
└── skills/
└── code-review/
└── SKILL.md
```
Each `SKILL.md` contains YAML frontmatter and instructions. Include a `description` so Claude knows when to use the skill:
```python
---
description: Reviews code for best practices and potential issues. Use when reviewing code, checking PRs, or analyzing code quality.
---
When reviewing code, check for:
1. Code organization and structure
2. Error handling
3. Security concerns
4. Test coverage
```
After installing the plugin, run `/reload-plugins` to load the Skills. For complete Skill authoring guidance including progressive disclosure and tool restrictions, see [Agent Skills](/docs/en/skills).
Add LSP servers to your plugin
For common languages like TypeScript, Python, and Rust, install the pre-built LSP plugins from the official marketplace. Create custom LSP plugins only when you need support for languages not already covered.
LSP (Language Server Protocol) plugins give Claude real-time code intelligence. If you need to support a language that doesn’t have an official LSP plugin, you can create your own by adding an `.lsp.json` file to your plugin:
.lsp.json
```python
{
"go": {
"command": "gopls",
"args": ["serve"],
"extensionToLanguage": {
".go": "go"
}
}
}
```
Users installing your plugin must have the language server binary installed on their machine. For complete LSP configuration options, see [LSP servers](/docs/en/plugins-reference#lsp-servers).
Add background monitors to your plugin
Background monitors let your plugin watch logs, files, or external status in the background and notify Claude as events arrive. Claude Code starts each monitor automatically when the plugin is active, so you don’t need to instruct Claude to start the watch. Add a `monitors/monitors.json` file at the plugin root with an array of monitor entries:
monitors/monitors.json
```python
[
{
"name": "error-log",
"command": "tail -F ./logs/error.log",
"description": "Application error log"
}
]
```
Each stdout line from `command` is delivered to Claude as a notification during the session. For the full schema, including the `when` trigger and variable substitution, see [Monitors](/docs/en/plugins-reference#monitors).
Ship default settings with your plugin
Plugins can include a `settings.json` file at the plugin root to apply default configuration when the plugin is enabled. Currently, only the `agent` and `subagentStatusLine` keys are supported. Setting `agent` activates one of the plugin’s [custom agents](/docs/en/sub-agents) as the main thread, applying its system prompt, tool restrictions, and model. This lets a plugin change how Claude Code behaves by default when enabled.
settings.json
```python
{
"agent": "security-reviewer"
}
```
This example activates the `security-reviewer` agent defined in the plugin’s `agents/` directory. Settings from `settings.json` take priority over `settings` declared in `plugin.json`. Unknown keys are silently ignored.
Organize complex plugins
For plugins with many components, organize your directory structure by functionality. For complete directory layouts and organization patterns, see [Plugin directory structure](/docs/en/plugins-reference#plugin-directory-structure).
Test your plugins locally
Use the `--plugin-dir` flag to test plugins during development. This loads your plugin directly without requiring installation.
```python
claude --plugin-dir ./my-plugin
```
When a `--plugin-dir` plugin has the same name as an installed marketplace plugin, the local copy takes precedence for that session. This lets you test changes to a plugin you already have installed without uninstalling it first. Marketplace plugins force-enabled by managed settings are the only exception and cannot be overridden. As you make changes to your plugin, run `/reload-plugins` to pick up the updates without restarting. This reloads plugins, skills, agents, hooks, plugin MCP servers, and plugin LSP servers. Test your plugin components:
- Try your skills with `/plugin-name:skill-name`
- Check that agents appear in `/agents`
- Verify hooks work as expected
You can load multiple plugins at once by specifying the flag multiple times:
```python
claude --plugin-dir ./plugin-one --plugin-dir ./plugin-two
```
Debug plugin issues
If your plugin isn’t working as expected:
1. **Check the structure**: Ensure your directories are at the plugin root, not inside `.claude-plugin/`
2. **Test components individually**: Check each skill, agent, and hook separately
3. **Use validation and debugging tools**: See [Debugging and development tools](/docs/en/plugins-reference#debugging-and-development-tools) for CLI commands and troubleshooting techniques
Share your plugins
When your plugin is ready to share:
1. **Add documentation**: Include a `README.md` with installation and usage instructions
2. **Choose a versioning strategy**: Decide whether to set an explicit `version` or rely on the git commit SHA. See [version management](/docs/en/plugins-reference#version-management)
3. **Create or use a marketplace**: Distribute through [plugin marketplaces](/docs/en/plugin-marketplaces) for installation
4. **Test with others**: Have team members test the plugin before wider distribution
Once your plugin is in a marketplace, others can install it using the instructions in [Discover and install plugins](/docs/en/discover-plugins).
Submit your plugin to the official marketplace
To submit a plugin to the official Anthropic marketplace, use one of the in-app submission forms:
- **Claude.ai**: [claude.ai/settings/plugins/submit](https://claude.ai/settings/plugins/submit)
- **Console**: [platform.claude.com/plugins/submit](https://platform.claude.com/plugins/submit)
Once your plugin is listed, you can have your own CLI prompt Claude Code users to install it. See [Recommend your plugin from your CLI](/docs/en/plugin-hints).
For complete technical specifications, debugging techniques, and distribution strategies, see [Plugins reference](/docs/en/plugins-reference).
Convert existing configurations to plugins
If you already have skills or hooks in your `.claude/` directory, you can convert them into a plugin for easier sharing and distribution.
Migration steps
1
Create the plugin structure
Create a new plugin directory:
```python
mkdir -p my-plugin/.claude-plugin
```
Create the manifest file at `my-plugin/.claude-plugin/plugin.json`:
my-plugin/.claude-plugin/plugin.json
```python
{
"name": "my-plugin",
"description": "Migrated from standalone configuration",
"version": "1.0.0"
}
```
2
Copy your existing files
Copy your existing configurations to the plugin directory:
```python
# Copy commands
cp -r .claude/commands my-plugin/
# Copy agents (if any)
cp -r .claude/agents my-plugin/
# Copy skills (if any)
cp -r .claude/skills my-plugin/
```
3
Migrate hooks
If you have hooks in your settings, create a hooks directory:
```python
mkdir my-plugin/hooks
```
Create `my-plugin/hooks/hooks.json` with your hooks configuration. Copy the `hooks` object from your `.claude/settings.json` or `settings.local.json`, since the format is the same. The command receives hook input as JSON on stdin, so use `jq` to extract the file path:
my-plugin/hooks/hooks.json
```python
{
"hooks": {
"PostToolUse": [
{
"matcher": "Write|Edit",
"hooks": [{ "type": "command", "command": "jq -r '.tool_input.file_path' | xargs npm run lint:fix" }]
}
]
}
}
```
4
Test your migrated plugin
Load your plugin to verify everything works:
```python
claude --plugin-dir ./my-plugin
```
Test each component: run your commands, check agents appear in `/agents`, and verify hooks trigger correctly.
What changes when migrating
| Standalone (`.claude/`) | Plugin |
|:------------------------------|:---------------------------------|
| Only available in one project | Can be shared via marketplaces |
| Files in `.claude/commands/` | Files in `plugin-name/commands/` |
| Hooks in `settings.json` | Hooks in `hooks/hooks.json` |
| Must manually copy to share | Install with `/plugin install` |
After migrating, you can remove the original files from `.claude/` to avoid duplicates. The plugin version will take precedence when loaded.
Next steps
Now that you understand Claude Code’s plugin system, here are suggested paths for different goals:
For plugin users
- [Discover and install plugins](/docs/en/discover-plugins): browse marketplaces and install plugins
- [Configure team marketplaces](/docs/en/discover-plugins#configure-team-marketplaces): set up repository-level plugins for your team
For plugin developers
- [Create and distribute a marketplace](/docs/en/plugin-marketplaces): package and share your plugins
- [Plugins reference](/docs/en/plugins-reference): complete technical specifications
- Dive deeper into specific plugin components:
- [Skills](/docs/en/skills): skill development details
- [Subagents](/docs/en/sub-agents): agent configuration and capabilities
- [Hooks](/docs/en/hooks): event handling and automation
- [MCP](/docs/en/mcp): external tool integration
---
## create-settings-command.md
# Create Plugin Settings
This command helps users create a `.claude/my-plugin.local.md` settings file.
## Steps
### Step 1: Ask User for Preferences
Use AskUserQuestion to gather configuration:
```json
{
"questions": [
{
"question": "Enable plugin for this project?",
"header": "Enable Plugin",
"multiSelect": false,
"options": [
{
"label": "Yes",
"description": "Plugin will be active"
},
{
"label": "No",
"description": "Plugin will be disabled"
}
]
},
{
"question": "Validation mode?",
"header": "Mode",
"multiSelect": false,
"options": [
{
"label": "Strict",
"description": "Maximum validation and security checks"
},
{
"label": "Standard",
"description": "Balanced validation (recommended)"
},
{
"label": "Lenient",
"description": "Minimal validation only"
}
]
}
]
}
```
### Step 2: Parse Answers
Extract answers from AskUserQuestion result:
- answers["0"]: enabled (Yes/No)
- answers["1"]: mode (Strict/Standard/Lenient)
### Step 3: Create Settings File
Use Write tool to create `.claude/my-plugin.local.md`:
```markdown
---
enabled: <true if Yes, false if No>
validation_mode: <strict, standard, or lenient>
max_file_size: 1000000
notify_on_errors: true
---
# Plugin Configuration
Your plugin is configured with <mode> validation mode.
To modify settings, edit this file and restart Claude Code.
```
### Step 4: Inform User
Tell the user:
- Settings file created at `.claude/my-plugin.local.md`
- Current configuration summary
- How to edit manually if needed
- Reminder: Restart Claude Code for changes to take effect
- Settings file is gitignored (won't be committed)
## Implementation Notes
Always validate user input before writing:
- Check mode is valid
- Validate numeric fields are numbers
- Ensure paths don't have traversal attempts
- Sanitize any free-text fields
---
## discover-and-install-prebuilt-plugins-through-marketplaces-claude-code-docs-fe3568ee5c.md
# Discover and install prebuilt plugins through marketplaces
Find and install plugins from marketplaces to extend Claude Code with new skills, agents, and capabilities.
> ## Documentation Index
>
> Fetch the complete documentation index at: <https://code.claude.com/docs/llms.txt>
>
> Use this file to discover all available pages before exploring further.
Plugins extend Claude Code with skills, agents, hooks, and MCP servers. Plugin marketplaces are catalogs that help you discover and install these extensions without building them yourself. Looking to create and distribute your own marketplace? See [Create and distribute a plugin marketplace](/docs/en/plugin-marketplaces).
How marketplaces work
A marketplace is a catalog of plugins that someone else has created and shared. Using a marketplace is a two-step process:
1
Add the marketplace
This registers the catalog with Claude Code so you can browse what’s available. No plugins are installed yet.
2
Install individual plugins
Browse the catalog and install the plugins you want.
Think of it like adding an app store: adding the store gives you access to browse its collection, but you still choose which apps to download individually.
Official Anthropic marketplace
The official Anthropic marketplace (`claude-plugins-official`) is automatically available when you start Claude Code. Run `/plugin` and go to the **Discover** tab to browse what’s available, or view the catalog at [claude.com/plugins](https://claude.com/plugins). To install a plugin from the official marketplace, use `/plugin install <name>@claude-plugins-official`. For example, to install the GitHub integration:
```python
/plugin install github@claude-plugins-official
```
If Claude Code reports that the plugin is not found in any marketplace, your marketplace is either missing or outdated. Run `/plugin marketplace update claude-plugins-official` to refresh it, or `/plugin marketplace add anthropics/claude-plugins-official` if you haven’t added it before. Then retry the install.
The official marketplace is curated by Anthropic, and inclusion is at Anthropic’s discretion. The in-app submission forms add plugins to the [community marketplace](#community-marketplace), not the official one. To distribute plugins independently, [create your own marketplace](/docs/en/plugin-marketplaces) and share it with users.
The official marketplace includes several categories of plugins:
Code intelligence
Code intelligence plugins enable Claude Code’s built-in LSP tool, giving Claude the ability to jump to definitions, find references, and see type errors immediately after edits. These plugins configure [Language Server Protocol](https://microsoft.github.io/language-server-protocol/) connections, the same technology that powers VS Code’s code intelligence. These plugins require the language server binary to be installed on your system. If you already have a language server installed, Claude may prompt you to install the corresponding plugin when you open a project.
| Language | Plugin | Binary required |
|:-----------|:--------------------|:-----------------------------|
| C/C++ | `clangd-lsp` | `clangd` |
| C# | `csharp-lsp` | `csharp-ls` |
| Go | `gopls-lsp` | `gopls` |
| Java | `jdtls-lsp` | `jdtls` |
| Kotlin | `kotlin-lsp` | `kotlin-language-server` |
| Lua | `lua-lsp` | `lua-language-server` |
| PHP | `php-lsp` | `intelephense` |
| Python | `pyright-lsp` | `pyright-langserver` |
| Rust | `rust-analyzer-lsp` | `rust-analyzer` |
| Swift | `swift-lsp` | `sourcekit-lsp` |
| TypeScript | `typescript-lsp` | `typescript-language-server` |
You can also [create your own LSP plugin](/docs/en/plugins-reference#lsp-servers) for other languages.
If you see `Executable not found in $PATH` in the `/plugin` Errors tab after installing a plugin, install the required binary from the table above.
What Claude gains from code intelligence plugins
Once a code intelligence plugin is installed and its language server binary is available, Claude gains two capabilities:
- **Automatic diagnostics**: after every file edit Claude makes, the language server analyzes the changes and reports errors and warnings back automatically. Claude sees type errors, missing imports, and syntax issues without needing to run a compiler or linter. If Claude introduces an error, it notices and fixes the issue in the same turn. This requires no configuration beyond installing the plugin. You can see diagnostics inline by pressing **Ctrl+O** when the “diagnostics found” indicator appears.
- **Code navigation**: Claude can use the language server to jump to definitions, find references, get type info on hover, list symbols, find implementations, and trace call hierarchies. These operations give Claude more precise navigation than grep-based search, though availability may vary by language and environment.
If you run into issues, see [Code intelligence troubleshooting](#code-intelligence-issues).
External integrations
These plugins bundle pre-configured [MCP servers](/docs/en/mcp) so you can connect Claude to external services without manual setup:
- **Source control**: `github`, `gitlab`
- **Project management**: `atlassian` (Jira/Confluence), `asana`, `linear`, `notion`
- **Design**: `figma`
- **Infrastructure**: `vercel`, `firebase`, `supabase`
- **Communication**: `slack`
- **Monitoring**: `sentry`
Development workflows
Plugins that add skills and agents for common development tasks:
- **commit-commands**: Git commit workflows including commit, push, and PR creation
- **pr-review-toolkit**: Specialized agents for reviewing pull requests
- **agent-sdk-dev**: Tools for building with the Claude Agent SDK
- **plugin-dev**: Toolkit for creating your own plugins
Output styles
Customize how Claude responds:
- **explanatory-output-style**: Educational insights about implementation choices
- **learning-output-style**: Interactive learning mode for skill building
Community marketplace
The community marketplace at [`anthropics/claude-plugins-community`](https://github.com/anthropics/claude-plugins-community) hosts third-party plugins that have passed Anthropic’s automated validation and safety screening. Each plugin is pinned to a specific commit SHA in the catalog. Unlike the official marketplace, you add it manually:
```python
/plugin marketplace add anthropics/claude-plugins-community
```
Then install plugins from it using the `claude-community` marketplace name:
```python
/plugin install <plugin-name>@claude-community
```
To submit your own plugin to the community marketplace, see [Submit your plugin to the community marketplace](/docs/en/plugins#submit-your-plugin-to-the-community-marketplace) in the create-plugins guide.
Try it: add the demo marketplace
Anthropic also maintains a [demo plugins marketplace](https://github.com/anthropics/claude-code/tree/main/plugins) (`claude-code-plugins`) with example plugins that show what’s possible with the plugin system. Unlike the official marketplace, you need to add this one manually.
1
Add the marketplace
From within Claude Code, run the `plugin marketplace add` command for the `anthropics/claude-code` marketplace:
```python
/plugin marketplace add anthropics/claude-code
```
This downloads the marketplace catalog and makes its plugins available to you.
2
Browse available plugins
Run `/plugin` to open the plugin manager. This opens a tabbed interface with four tabs you can cycle through using **Tab** (or **Shift+Tab** to go backward):
- **Discover**: browse available plugins from all your marketplaces
- **Installed**: view and manage your installed plugins
- **Marketplaces**: add, remove, or update your added marketplaces
- **Errors**: view any plugin loading errors
Go to the **Discover** tab to see plugins from the marketplace you just added.
3
Install a plugin
Select a plugin to view its details. On Claude Code v2.1.143 and later, the details pane includes a **Context cost** estimate so you can see how many tokens the plugin will add to your [context window](/docs/en/features-overview#understand-context-costs) every turn before you install it. On v2.1.144 and later, the pane also shows the plugin’s **Last updated** date.Choose an installation scope:
- **User scope**: install for yourself across all projects
- **Project scope**: install for all collaborators on this repository
- **Local scope**: install for yourself in this repository only
For example, select **commit-commands** (a plugin that adds git workflow skills) and install it to your user scope.You can also install directly from the command line:
```python
/plugin install commit-commands@anthropics-claude-code
```
See [Configuration scopes](/docs/en/settings#configuration-scopes) to learn more about scopes.
4
Use your new plugin
After installing, run `/reload-plugins` to activate the plugin. Plugin skills are namespaced by the plugin name, so **commit-commands** provides skills like `/commit-commands:commit`.Try it out by making a change to a file and running:
```python
/commit-commands:commit
```
This stages your changes, generates a commit message, and creates the commit.Each plugin works differently. Check the plugin’s description in the **Discover** tab or its homepage to learn what skills and capabilities it provides.
The rest of this guide covers all the ways you can add marketplaces, install plugins, and manage your configuration.
Add marketplaces
Use the `/plugin marketplace add` command to add marketplaces from different sources.
**Shortcuts**: You can use `/plugin market` instead of `/plugin marketplace`, and `rm` instead of `remove`.
- **GitHub repositories**: `owner/repo` format (for example, `anthropics/claude-code`)
- **Git URLs**: any git repository URL (GitLab, Bitbucket, self-hosted)
- **Local paths**: directories or direct paths to `marketplace.json` files
- **Remote URLs**: direct URLs to hosted `marketplace.json` files
Add from GitHub
Add a GitHub repository that contains a `.claude-plugin/marketplace.json` file using the `owner/repo` format—where `owner` is the GitHub username or organization and `repo` is the repository name. For example, `anthropics/claude-code` refers to the `claude-code` repository owned by `anthropics`:
```python
/plugin marketplace add anthropics/claude-code
```
Add from other Git hosts
Add any git repository by providing the full URL. This works with any Git host, including GitLab, Bitbucket, and self-hosted servers. Include the `.git` suffix so Claude Code clones the repository rather than treating the URL as a direct link to a hosted `marketplace.json` file. Using HTTPS:
```python
/plugin marketplace add https://gitlab.com/company/plugins.git
```
Using SSH:
```python
/plugin marketplace add git@gitlab.com:company/plugins.git
```
To add a specific branch or tag, append `#` followed by the ref:
```python
/plugin marketplace add https://gitlab.com/company/plugins.git#v1.0.0
```
Add from local paths
Add a local directory that contains a `.claude-plugin/marketplace.json` file:
```python
/plugin marketplace add ./my-marketplace
```
You can also add a direct path to a `marketplace.json` file:
```python
/plugin marketplace add ./path/to/marketplace.json
```
Add from remote URLs
Add a remote `marketplace.json` file via URL:
```python
/plugin marketplace add https://example.com/marketplace.json
```
URL-based marketplaces have some limitations compared to Git-based marketplaces. If you encounter “path not found” errors when installing plugins, see [Troubleshooting](/docs/en/plugin-marketplaces#plugins-with-relative-paths-fail-in-url-based-marketplaces).
Install plugins
Once you’ve added marketplaces, you can install plugins directly (installs to user scope by default):
```python
/plugin install plugin-name@marketplace-name
```
To choose a different [installation scope](/docs/en/settings#configuration-scopes), use the interactive UI: run `/plugin`, go to the **Discover** tab, and press **Enter** on a plugin. You’ll see options for:
- **User scope** (default): install for yourself across all projects
- **Project scope**: install for all collaborators on this repository (adds to `.claude/settings.json`)
- **Local scope**: install for yourself in this repository only (not shared with collaborators)
You may also see plugins with **managed** scope—these are installed by administrators via [managed settings](/docs/en/settings#settings-files) and cannot be modified.
Make sure you trust a plugin before installing it. Anthropic does not control what MCP servers, files, or other software are included in plugins and cannot verify that they work as intended. Check each plugin’s homepage for more information.
Manage installed plugins
Run `/plugin` and go to the **Installed** tab to view, enable, disable, or uninstall your plugins. The list is grouped by scope and sorted so you see problems first: plugins with load errors or unresolved dependencies appear at the top, followed by your favorites, with disabled plugins folded behind a collapsed header at the bottom. From the list you can:
- press `f` to favorite or unfavorite the selected plugin
- type to filter by plugin name or description
- press Enter to open a plugin’s detail view and enable, disable, or uninstall it
When you install a plugin that declares dependencies, the install output lists which dependencies were auto-installed alongside it. You can also manage plugins with direct commands. Disable a plugin without uninstalling:
```python
/plugin disable plugin-name@marketplace-name
```
Re-enable a disabled plugin:
```python
/plugin enable plugin-name@marketplace-name
```
Completely remove a plugin:
```python
/plugin uninstall plugin-name@marketplace-name
```
The `--scope` option lets you target a specific scope with CLI commands:
```python
claude plugin install formatter@your-org --scope project
claude plugin uninstall formatter@your-org --scope project
```
Apply plugin changes without restarting
When you install, enable, or disable plugins during a session, run `/reload-plugins` to pick up all changes without restarting:
```python
/reload-plugins
```
Claude Code reloads all active plugins and shows counts for plugins, skills, agents, hooks, plugin MCP servers, and plugin LSP servers.
Manage marketplaces
You can manage marketplaces through the interactive `/plugin` interface or with CLI commands.
Use the interactive interface
Run `/plugin` and go to the **Marketplaces** tab to:
- View all your added marketplaces with their sources and status
- Add new marketplaces
- Update marketplace listings to fetch the latest plugins
- Remove marketplaces you no longer need
Use CLI commands
You can also manage marketplaces with direct commands. List all configured marketplaces:
```python
/plugin marketplace list
```
Refresh plugin listings from a marketplace:
```python
/plugin marketplace update marketplace-name
```
Remove a marketplace:
```python
/plugin marketplace remove marketplace-name
```
Removing a marketplace will uninstall any plugins you installed from it.
Configure auto-updates
Claude Code can automatically update marketplaces and their installed plugins at startup. When auto-update is enabled for a marketplace, Claude Code refreshes the marketplace data and updates installed plugins to their latest versions. If any plugins were updated, you’ll see a notification prompting you to run `/reload-plugins`. Toggle auto-update for individual marketplaces through the UI:
1. Run `/plugin` to open the plugin manager
2. Select **Marketplaces**
3. Choose a marketplace from the list
4. Select **Enable auto-update** or **Disable auto-update**
Official Anthropic marketplaces have auto-update enabled by default. Third-party and local development marketplaces have auto-update disabled by default. Administrators can also set `"autoUpdate": true` on each [`extraKnownMarketplaces`](/docs/en/settings#extraknownmarketplaces) entry in managed settings to enable auto-update for an organization marketplace without requiring each user to toggle it. To disable all automatic updates entirely for both Claude Code and all plugins, set the `DISABLE_AUTOUPDATER` environment variable. See [Auto updates](/docs/en/setup#auto-updates) for details. To keep plugin auto-updates enabled while disabling Claude Code auto-updates, set `FORCE_AUTOUPDATE_PLUGINS=1` along with `DISABLE_AUTOUPDATER`:
```python
export DISABLE_AUTOUPDATER=1
export FORCE_AUTOUPDATE_PLUGINS=1
```
This is useful when you want to manage Claude Code updates manually but still receive automatic plugin updates.
Configure team marketplaces
Team admins can set up automatic marketplace installation for projects by adding marketplace configuration to `.claude/settings.json`. When team members trust the repository folder, Claude Code prompts them to install these marketplaces and plugins. Add `extraKnownMarketplaces` to your project’s `.claude/settings.json`:
```python
{
"extraKnownMarketplaces": {
"my-team-tools": {
"source": {
"source": "github",
"repo": "your-org/claude-plugins"
}
}
}
}
```
For full configuration options including `extraKnownMarketplaces` and `enabledPlugins`, see [Plugin settings](/docs/en/settings#plugin-settings).
Security
Plugins and marketplaces are highly trusted components that can execute arbitrary code on your machine with your user privileges. Only install plugins and add marketplaces from sources you trust. Organizations can restrict which marketplaces users are allowed to add using [managed marketplace restrictions](/docs/en/plugin-marketplaces#managed-marketplace-restrictions).
Troubleshooting
/plugin command not recognized
If you see “unknown command” or the `/plugin` command doesn’t appear:
1. **Check your version**: Run `claude --version` to see what’s installed.
2. **Update Claude Code**:
- **Homebrew**: `brew upgrade claude-code` (or `brew upgrade claude-code@latest` if you installed that cask)
- **npm**: `npm install -g @anthropic-ai/claude-code@latest`
- **Native installer**: Re-run the install command from [Setup](/docs/en/setup)
3. **Restart Claude Code**: After updating, restart your terminal and run `claude` again.
Common issues
- **Marketplace not loading**: Verify the URL is accessible and that `.claude-plugin/marketplace.json` exists at the path
- **Plugin installation failures**: Check that plugin source URLs are accessible and repositories are public (or you have access)
- **Files not found after installation**: Plugins are copied to a cache, so paths referencing files outside the plugin directory won’t work
- **Plugin skills not appearing**: Clear the cache with `rm -rf ~/.claude/plugins/cache`, restart Claude Code, and reinstall the plugin.
For detailed troubleshooting with solutions, see [Troubleshooting](/docs/en/plugin-marketplaces#troubleshooting) in the marketplace guide. For debugging tools, see [Debugging and development tools](/docs/en/plugins-reference#debugging-and-development-tools).
Code intelligence issues
- **Language server not starting**: verify the binary is installed and available in your `$PATH`. Check the `/plugin` Errors tab for details.
- **High memory usage**: language servers like `rust-analyzer` and `pyright` can consume significant memory on large projects. If you experience memory issues, disable the plugin with `/plugin disable <plugin-name>` and rely on Claude’s built-in search tools instead.
- **False positive diagnostics in monorepos**: language servers may report unresolved import errors for internal packages if the workspace isn’t configured correctly. These don’t affect Claude’s ability to edit code.
Next steps
- **Build your own plugins**: See [Plugins](/docs/en/plugins) to create skills, agents, and hooks
- **Create a marketplace**: See [Create a plugin marketplace](/docs/en/plugin-marketplaces) to distribute plugins to your team or community
- **Technical reference**: See [Plugins reference](/docs/en/plugins-reference) for complete specifications
---
## equipping-agents-for-the-real-world-with-agent-skills-anthropic-claude.md
_Update: We've published_ [_Agent Skills_](https://agentskills.io/) _as an open standard for cross-platform portability. (December 18, 2025)_
As model capabilities improve, we can now build general-purpose agents that interact with full-fledged computing environments. [Claude Code](https://claude.com/product/claude-code), for example, can accomplish complex tasks across domains using local code execution and filesystems. But as these agents become more powerful, we need more composable, scalable, and portable ways to equip them with domain-specific expertise.
This led us to create [**Agent Skills**](https://www.anthropic.com/news/skills): organized folders of instructions, scripts, and resources that agents can discover and load dynamically to perform better at specific tasks. Skills extend Claude’s capabilities by packaging your expertise into composable resources for Claude, transforming general-purpose agents into specialized agents that fit your needs.
Building a skill for an agent is like putting together an onboarding guide for a new hire. Instead of building fragmented, custom-designed agents for each use case, anyone can now specialize their agents with composable capabilities by capturing and sharing their procedural knowledge. In this article, we explain what Skills are, show how they work, and share best practices for building your own.
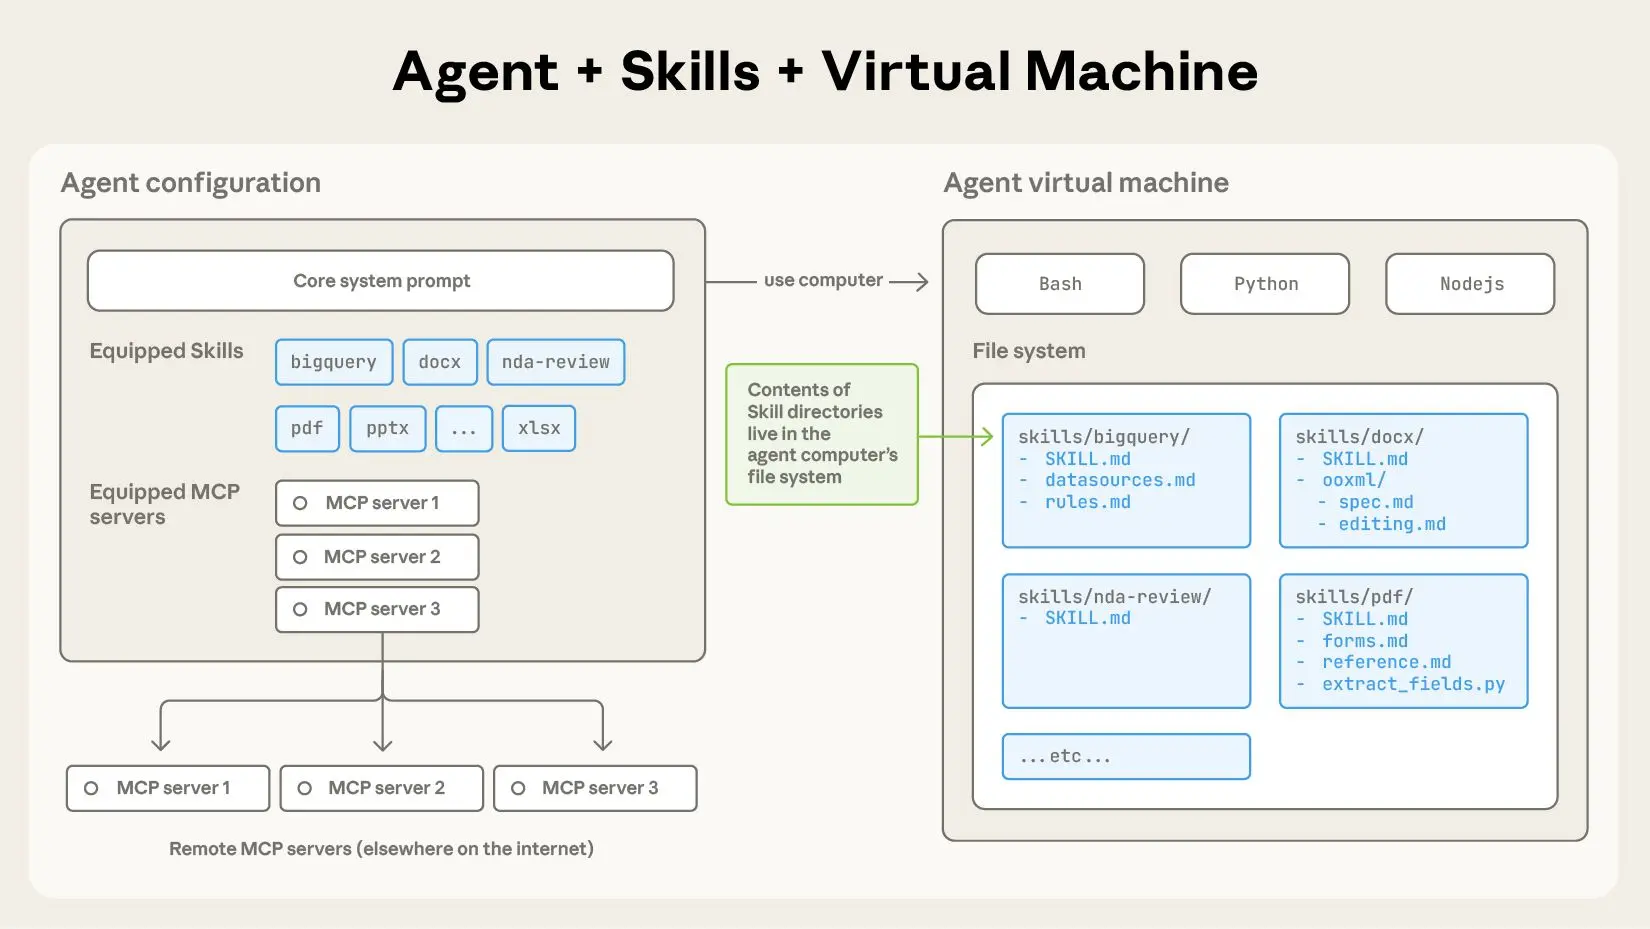
A skill is a directory containing a SKILL.md file that contains organized folders of instructions, scripts, and resources that give agents additional capabilities.
## The anatomy of a skill
To see Skills in action, let’s walk through a real example: one of the skills that powers [Claude’s recently launched document editing abilities](../19-Reference/claude-can-now-create-and-edit-files-claude.md). Claude already knows a lot about understanding PDFs, but is limited in its ability to manipulate them directly (e.g. to fill out a form). This [PDF skill](https://github.com/anthropics/skills/tree/main/document-skills/pdf) lets us give Claude these new abilities.
At its simplest, a skill is a directory that contains a `SKILL.md file`. This file must start with YAML frontmatter that contains some required metadata: `name` and `description`. At startup, the agent pre-loads the `name` and `description` of every installed skill into its system prompt.
This metadata is the **first level** of _progressive disclosure_: it provides just enough information for Claude to know when each skill should be used without loading all of it into context. The actual body of this file is the **second level** of detail. If Claude thinks the skill is relevant to the current task, it will load the skill by reading its full `SKILL.md` into context.
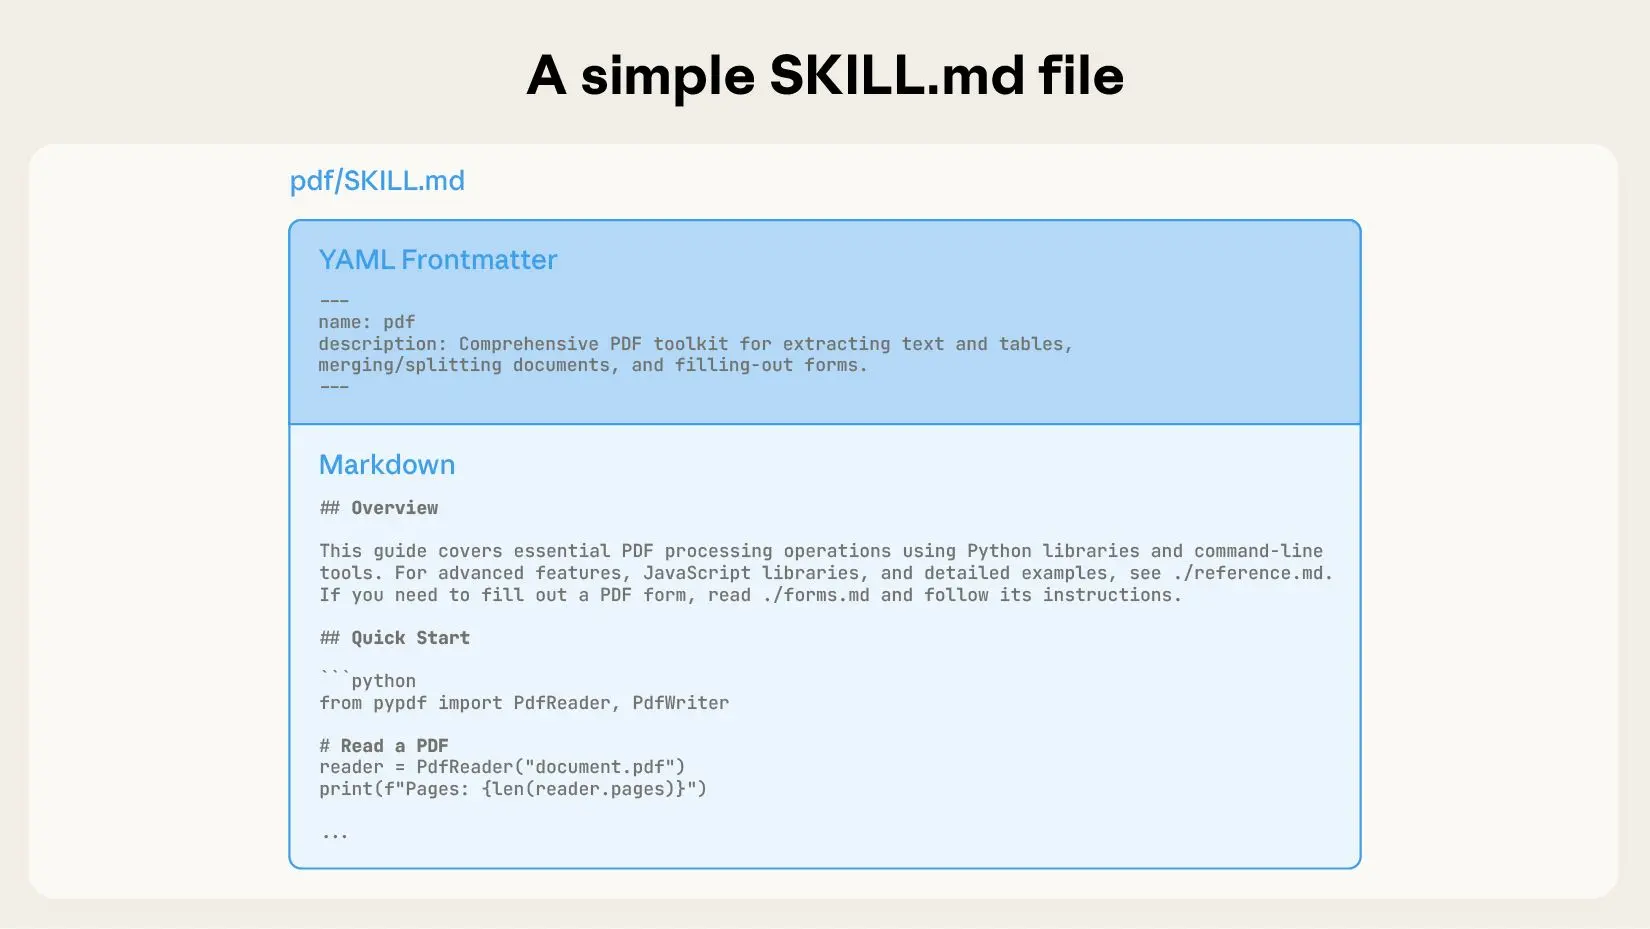
A SKILL.md file must begin with YAML Frontmatter that contains a file name and description, which is loaded into its system prompt at startup.
As skills grow in complexity, they may contain too much context to fit into a single `SKILL.md`, or context that’s relevant only in specific scenarios. In these cases, skills can bundle additional files within the skill directory and reference them by name from `SKILL.md`. These additional linked files are the **third level** (and beyond) of detail, which Claude can choose to navigate and discover only as needed.
In the PDF skill shown below, the `SKILL.md` refers to two additional files (`reference.md` and `forms.md`) that the skill author chooses to bundle alongside the core `SKILL.md`. By moving the form-filling instructions to a separate file (`forms.md`), the skill author is able to keep the core of the skill lean, trusting that Claude will read `forms.md` only when filling out a form.
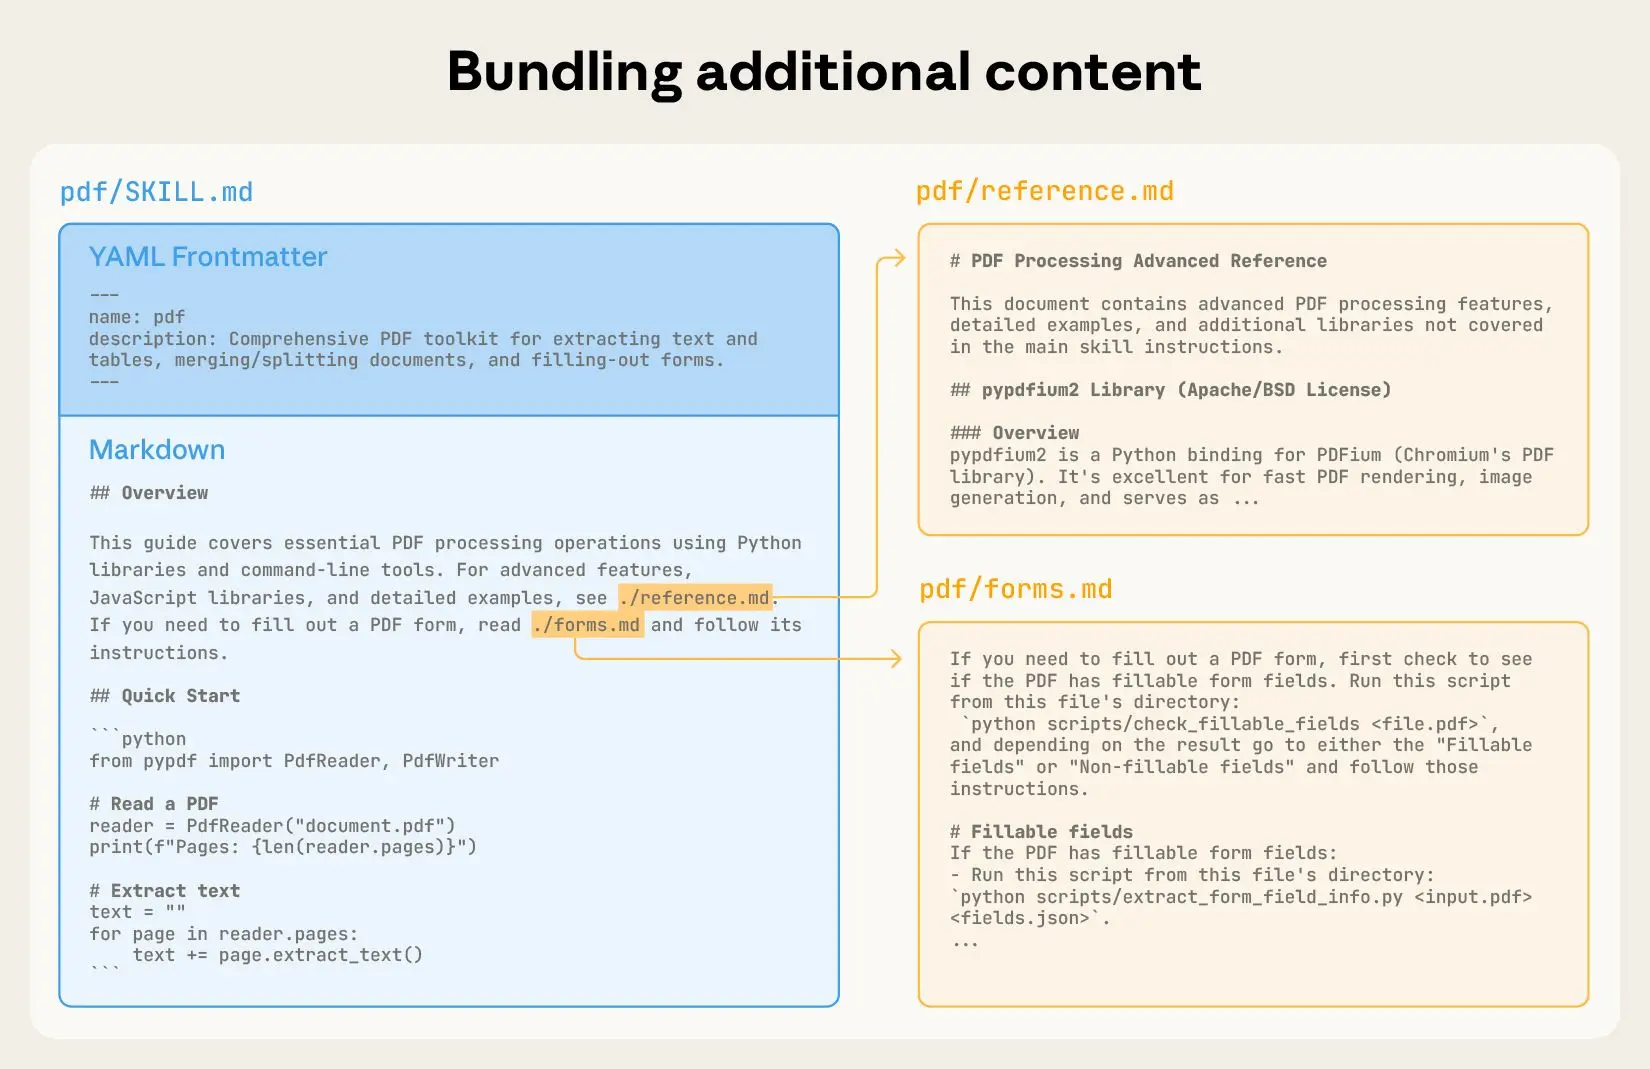
You can incorporate more context (via additional files) into your skill that can then be triggered by Claude based on the system prompt.
Progressive disclosure is the core design principle that makes Agent Skills flexible and scalable. Like a well-organized manual that starts with a table of contents, then specific chapters, and finally a detailed appendix, skills let Claude load information only as needed:
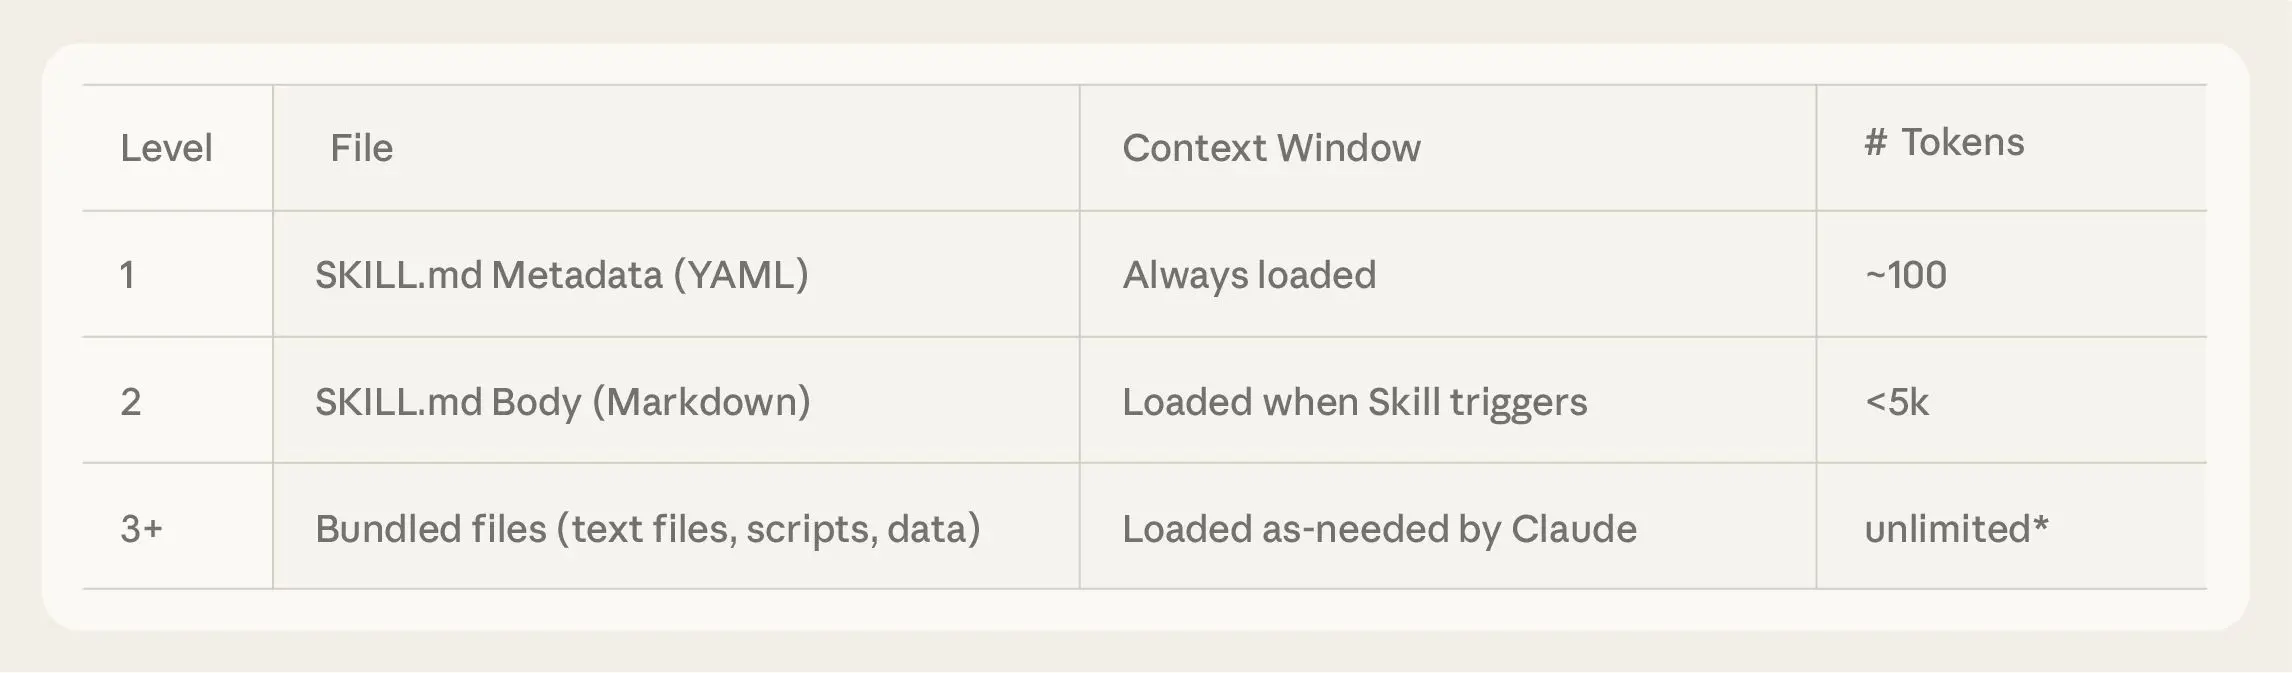
Agents with a filesystem and code execution tools don’t need to read the entirety of a skill into their context window when working on a particular task. This means that the amount of context that can be bundled into a skill is effectively unbounded.
### Skills and the context window
The following diagram shows how the context window changes when a skill is triggered by a user’s message.
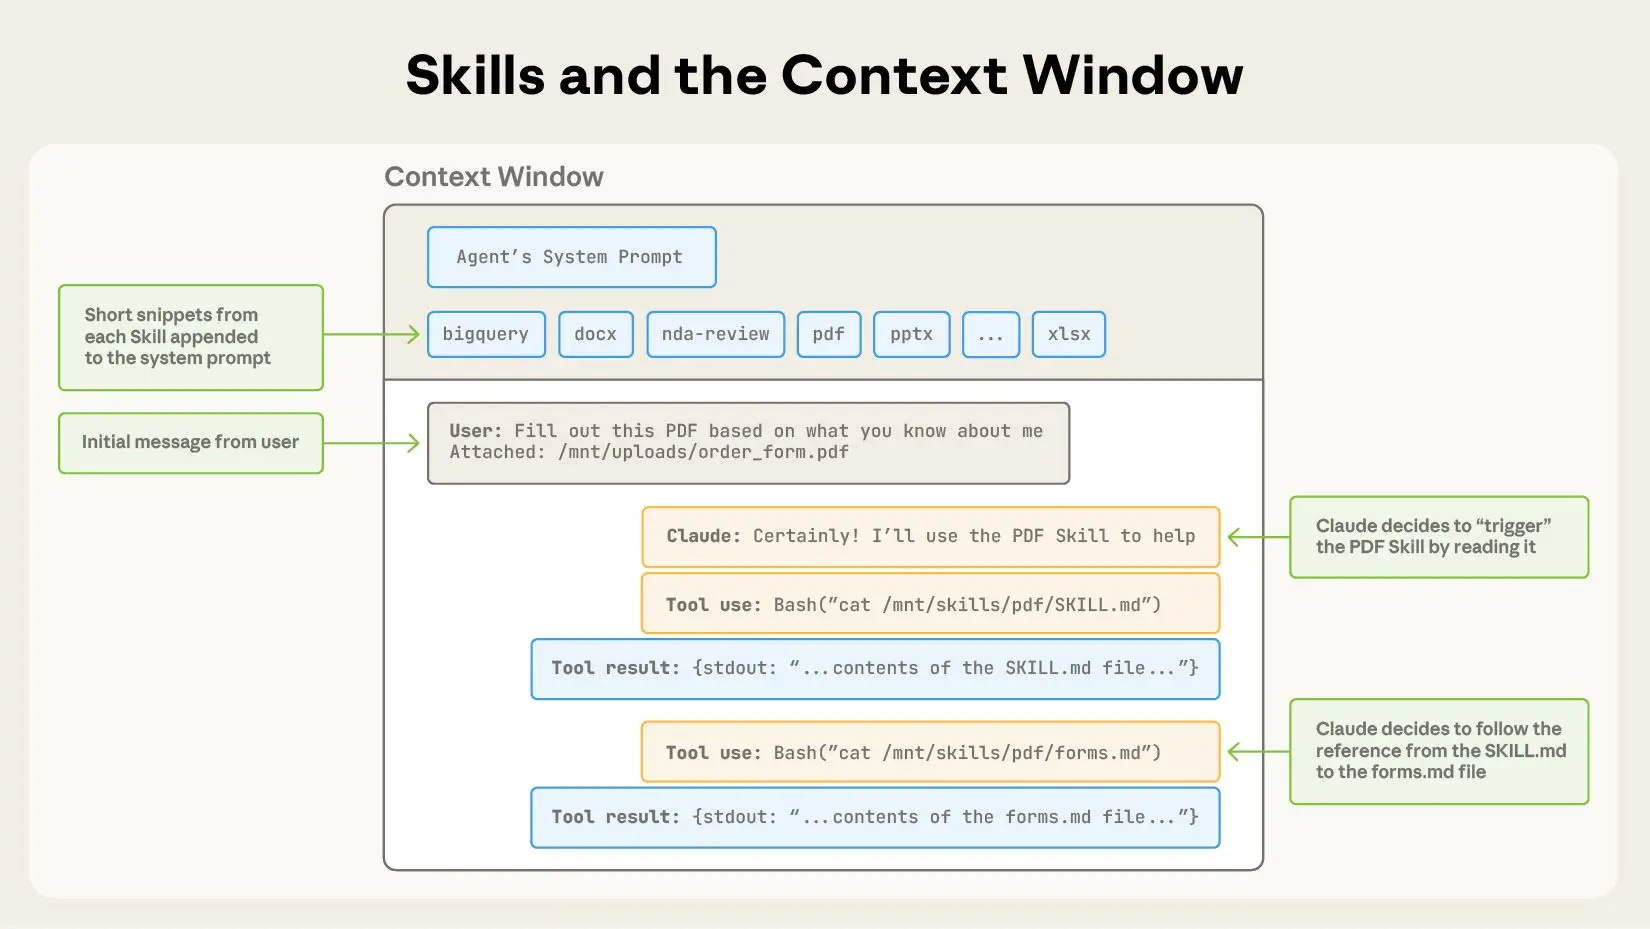
Skills are triggered in the context window via your system prompt.
The sequence of operations shown:
1. To start, the context window has the core system prompt and the metadata for each of the installed skills, along with the user’s initial message;
2. Claude triggers the PDF skill by invoking a Bash tool to read the contents of `pdf/SKILL.md`;
3. Claude chooses to read the `forms.md` file bundled with the skill;
4. Finally, Claude proceeds with the user’s task now that it has loaded relevant instructions from the PDF skill.
### Skills and code execution
Skills can also include code for Claude to execute as tools at its discretion.
Large language models excel at many tasks, but certain operations are better suited for traditional code execution. For example, sorting a list via token generation is far more expensive than simply running a sorting algorithm. Beyond efficiency concerns, many applications require the deterministic reliability that only code can provide.
In our example, the PDF skill includes a pre-written Python script that reads a PDF and extracts all form fields. Claude can run this script without loading either the script or the PDF into context. And because code is deterministic, this workflow is consistent and repeatable.
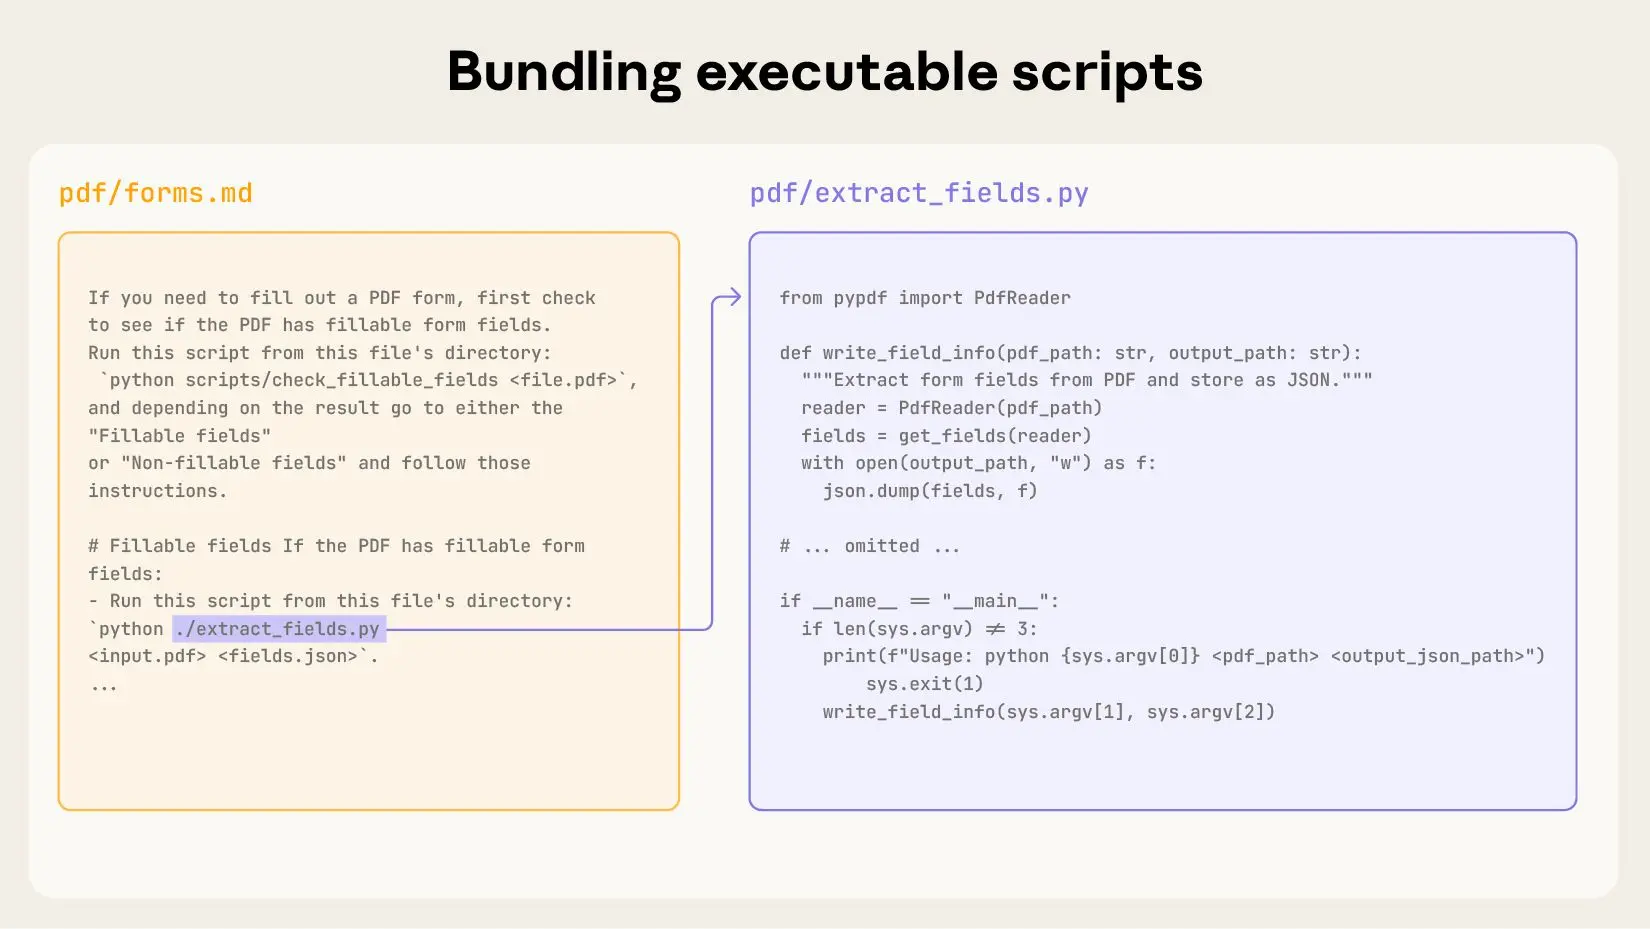
Skills can also include code for Claude to execute as tools at its discretion based on the nature of the task.
## Developing and evaluating skills
Here are some helpful guidelines for getting started with authoring and testing skills:
- **Start with evaluation:** Identify specific gaps in your agents’ capabilities by running them on representative tasks and observing where they struggle or require additional context. Then build skills incrementally to address these shortcomings.
- **Structure for scale:** When the `SKILL.md` file becomes unwieldy, split its content into separate files and reference them. If certain contexts are mutually exclusive or rarely used together, keeping the paths separate will reduce the token usage. Finally, code can serve as both executable tools and as documentation. It should be clear whether Claude should run scripts directly or read them into context as reference.
- **Think from Claude’s perspective:** Monitor how Claude uses your skill in real scenarios and iterate based on observations: watch for unexpected trajectories or overreliance on certain contexts. Pay special attention to the `name` and `description` of your skill. Claude will use these when deciding whether to trigger the skill in response to its current task.
- **Iterate with Claude:** As you work on a task with Claude, ask Claude to capture its successful approaches and common mistakes into reusable context and code within a skill. If it goes off track when using a skill to complete a task, ask it to self-reflect on what went wrong. This process will help you discover what context Claude actually needs, instead of trying to anticipate it upfront.
### Security considerations when using Skills
Skills provide Claude with new capabilities through instructions and code. While this makes them powerful, it also means that malicious skills may introduce vulnerabilities in the environment where they’re used or direct Claude to exfiltrate data and take unintended actions.
We recommend installing skills only from trusted sources. When installing a skill from a less-trusted source, thoroughly audit it before use. Start by reading the contents of the files bundled in the skill to understand what it does, paying particular attention to code dependencies and bundled resources like images or scripts. Similarly, pay attention to instructions or code within the skill that instruct Claude to connect to potentially untrusted external network sources.
## The future of Skills
Agent Skills are [supported today](https://www.anthropic.com/news/skills) across [Claude.ai](http://claude.ai/redirect/website.v1.bdb29daa-1a07-41ec-87f6-579dc33634bd), Claude Code, the Claude Agent SDK, and the Claude Developer Platform.
In the coming weeks, we’ll continue to add features that support the full lifecycle of creating, editing, discovering, sharing, and using Skills. We’re especially excited about the opportunity for Skills to help organizations and individuals share their context and workflows with Claude. We’ll also explore how Skills can complement [Model Context Protocol](https://modelcontextprotocol.io/) (MCP) servers by teaching agents more complex workflows that involve external tools and software.
Looking further ahead, we hope to enable agents to create, edit, and evaluate Skills on their own, letting them codify their own patterns of behavior into reusable capabilities.
Skills are a simple concept with a correspondingly simple format. This simplicity makes it easier for organizations, developers, and end users to build customized agents and give them new capabilities.
We’re excited to see what people build with Skills. Get started today by checking out our Skills [docs](https://docs.claude.com/en/docs/agents-and-tools/agent-skills/overview) and [cookbook](https://github.com/anthropics/claude-cookbooks/tree/main/skills).
## Acknowledgements
Written by Barry Zhang, Keith Lazuka, and Mahesh Murag, who all really like folders. Special thanks to the many others across Anthropic who championed, supported, and built Skills.
---
## evaluating-skill-output-quality-agent-skills-4f9e42d107.md
# Evaluating skill output quality
How to test whether your skill produces good outputs using eval-driven iteration.
You wrote a skill, tried it on a prompt, and it seemed to work. But does it work reliably — across varied prompts, in edge cases, better than no skill at all? Running structured evaluations (evals) answers these questions and gives you a feedback loop for improving the skill systematically.
Designing test cases
A test case has three parts:
- **Prompt**: a realistic user message — the kind of thing someone would actually type.
- **Expected output**: a human-readable description of what success looks like.
- **Input files** (optional): files the skill needs to work with.
Store test cases in `evals/evals.json` inside your skill directory:
evals/evals.json
Report incorrect code
Copy
```python
{
"skill_name": "csv-analyzer",
"evals": [
{
"id": 1,
"prompt": "I have a CSV of monthly sales data in data/sales_2025.csv. Can you find the top 3 months by revenue and make a bar chart?",
"expected_output": "A bar chart image showing the top 3 months by revenue, with labeled axes and values.",
"files": ["evals/files/sales_2025.csv"]
},
{
"id": 2,
"prompt": "there's a csv in my downloads called customers.csv, some rows have missing emails — can you clean it up and tell me how many were missing?",
"expected_output": "A cleaned CSV with missing emails handled, plus a count of how many were missing.",
"files": ["evals/files/customers.csv"]
}
]
}
```
**Tips for writing good test prompts:**
- **Start with 2-3 test cases.** Don’t over-invest before you’ve seen your first round of results. You can expand the set later.
- **Vary the prompts.** Use different phrasings, levels of detail, and formality. Some prompts should be casual (“hey can you clean up this csv”), others precise (“Parse the CSV at data/input.csv, drop rows where column B is null, and write the result to data/output.csv”).
- **Cover edge cases.** Include at least one prompt that tests a boundary condition — a malformed input, an unusual request, or a case where the skill’s instructions might be ambiguous.
- **Use realistic context.** Real users mention file paths, column names, and personal context. Prompts like “process this data” are too vague to test anything useful.
Don’t worry about defining specific pass/fail checks yet — just the prompts and expected outputs. You’ll add detailed checks (called assertions) after you see what the first run produces.
Running evals
The core pattern is to run each test case twice: once **with the skill** and once **without it** (or with a previous version). This gives you a baseline to compare against.
Workspace structure
Organize eval results in a workspace directory alongside your skill directory. Each pass through the full eval loop gets its own `iteration-N/` directory. Within that, each test case gets an eval directory with `with_skill/` and `without_skill/` subdirectories:
Report incorrect code
Copy
```python
csv-analyzer/
├── SKILL.md
└── evals/
└── evals.json
csv-analyzer-workspace/
└── iteration-1/
├── eval-top-months-chart/
│ ├── with_skill/
│ │ ├── outputs/ # Files produced by the run
│ │ ├── timing.json # Tokens and duration
│ │ └── grading.json # Assertion results
│ └── without_skill/
│ ├── outputs/
│ ├── timing.json
│ └── grading.json
├── eval-clean-missing-emails/
│ ├── with_skill/
│ │ ├── outputs/
│ │ ├── timing.json
│ │ └── grading.json
│ └── without_skill/
│ ├── outputs/
│ ├── timing.json
│ └── grading.json
└── benchmark.json # Aggregated statistics
```
The main file you author by hand is `evals/evals.json`. The other JSON files (`grading.json`, `timing.json`, `benchmark.json`) are produced during the eval process — by the agent, by scripts, or by you.
Spawning runs
Each eval run should start with a clean context — no leftover state from previous runs or from the skill development process. This ensures the agent follows only what the `SKILL.md` tells it. In environments that support subagents (Claude Code, for example), this isolation comes naturally: each child task starts fresh. Without subagents, use a separate session for each run. For each run, provide:
- The skill path (or no skill for the baseline)
- The test prompt
- Any input files
- The output directory
Here’s an example of the instructions you’d give the agent for a single with-skill run:
Report incorrect code
Copy
```python
Execute this task:
- Skill path: /path/to/csv-analyzer
- Task: I have a CSV of monthly sales data in data/sales_2025.csv.
Can you find the top 3 months by revenue and make a bar chart?
- Input files: evals/files/sales_2025.csv
- Save outputs to: csv-analyzer-workspace/iteration-1/eval-top-months-chart/with_skill/outputs/
```
For the baseline, use the same prompt but without the skill path, saving to `without_skill/outputs/`. When improving an existing skill, use the previous version as your baseline. Snapshot it before editing (`cp -r <skill-path> <workspace>/skill-snapshot/`), point the baseline run at the snapshot, and save to `old_skill/outputs/` instead of `without_skill/`.
Capturing timing data
Timing data lets you compare how much time and tokens the skill costs relative to the baseline — a skill that dramatically improves output quality but triples token usage is a different trade-off than one that’s both better and cheaper. When each run completes, record the token count and duration:
timing.json
Report incorrect code
Copy
```python
{
"total_tokens": 84852,
"duration_ms": 23332
}
```
In Claude Code, when a subagent task finishes, the [task completion notification](../05-Agent-SDK/agent-sdk-typescript.md#sdk-task-notification-message) includes `total_tokens` and `duration_ms`. Save these values immediately — they aren’t persisted anywhere else.
Writing assertions
Assertions are verifiable statements about what the output should contain or achieve. Add them after you see your first round of outputs — you often don’t know what “good” looks like until the skill has run. Good assertions:
- `"The output file is valid JSON"` — programmatically verifiable.
- `"The bar chart has labeled axes"` — specific and observable.
- `"The report includes at least 3 recommendations"` — countable.
Weak assertions:
- `"The output is good"` — too vague to grade.
- `"The output uses exactly the phrase 'Total Revenue: $X'"` — too brittle; correct output with different wording would fail.
Not everything needs an assertion. Some qualities — writing style, visual design, whether the output “feels right” — are hard to decompose into pass/fail checks. These are better caught during [human review](#reviewing-results-with-a-human). Reserve assertions for things that can be checked objectively. Add assertions to each test case in `evals/evals.json`:
evals/evals.json
Report incorrect code
Copy
```python
{
"skill_name": "csv-analyzer",
"evals": [
{
"id": 1,
"prompt": "I have a CSV of monthly sales data in data/sales_2025.csv. Can you find the top 3 months by revenue and make a bar chart?",
"expected_output": "A bar chart image showing the top 3 months by revenue, with labeled axes and values.",
"files": ["evals/files/sales_2025.csv"],
"assertions": [
"The output includes a bar chart image file",
"The chart shows exactly 3 months",
"Both axes are labeled",
"The chart title or caption mentions revenue"
]
}
]
}
```
Grading outputs
Grading means evaluating each assertion against the actual outputs and recording **PASS** or **FAIL** with specific evidence. The evidence should quote or reference the output, not just state an opinion. The simplest approach is to give the outputs and assertions to an LLM and ask it to evaluate each one. For assertions that can be checked by code (valid JSON, correct row count, file exists with expected dimensions), use a verification script — scripts are more reliable than LLM judgment for mechanical checks and reusable across iterations.
grading.json
Report incorrect code
Copy
```python
{
"assertion_results": [
{
"text": "The output includes a bar chart image file",
"passed": true,
"evidence": "Found chart.png (45KB) in outputs directory"
},
{
"text": "The chart shows exactly 3 months",
"passed": true,
"evidence": "Chart displays bars for March, July, and November"
},
{
"text": "Both axes are labeled",
"passed": false,
"evidence": "Y-axis is labeled 'Revenue ($)' but X-axis has no label"
},
{
"text": "The chart title or caption mentions revenue",
"passed": true,
"evidence": "Chart title reads 'Top 3 Months by Revenue'"
}
],
"summary": {
"passed": 3,
"failed": 1,
"total": 4,
"pass_rate": 0.75
}
}
```
Grading principles
- **Require concrete evidence for a PASS.** Don’t give the benefit of the doubt. If an assertion says “includes a summary” and the output has a section titled “Summary” with one vague sentence, that’s a FAIL — the label is there but the substance isn’t.
- **Review the assertions themselves, not just the results.** While grading, notice when assertions are too easy (always pass regardless of skill quality), too hard (always fail even when the output is good), or unverifiable (can’t be checked from the output alone). Fix these for the next iteration.
For comparing two skill versions, try **blind comparison**: present both outputs to an LLM judge without revealing which came from which version. The judge scores holistic qualities — organization, formatting, usability, polish — on its own rubric, free from bias about which version “should” be better. This complements assertion grading: two outputs might both pass all assertions but differ significantly in overall quality.
Aggregating results
Once every run in the iteration is graded, compute summary statistics per configuration and save them to `benchmark.json` alongside the eval directories (e.g., `csv-analyzer-workspace/iteration-1/benchmark.json`):
benchmark.json
Report incorrect code
Copy
```python
{
"run_summary": {
"with_skill": {
"pass_rate": { "mean": 0.83, "stddev": 0.06 },
"time_seconds": { "mean": 45.0, "stddev": 12.0 },
"tokens": { "mean": 3800, "stddev": 400 }
},
"without_skill": {
"pass_rate": { "mean": 0.33, "stddev": 0.10 },
"time_seconds": { "mean": 32.0, "stddev": 8.0 },
"tokens": { "mean": 2100, "stddev": 300 }
},
"delta": {
"pass_rate": 0.50,
"time_seconds": 13.0,
"tokens": 1700
}
}
}
```
The `delta` tells you what the skill costs (more time, more tokens) and what it buys (higher pass rate). A skill that adds 13 seconds but improves pass rate by 50 percentage points is probably worth it. A skill that doubles token usage for a 2-point improvement might not be.
Standard deviation (`stddev`) is only meaningful with multiple runs per eval. In early iterations with just 2-3 test cases and single runs, focus on the raw pass counts and the delta — the statistical measures become useful as you expand the test set and run each eval multiple times.
Analyzing patterns
Aggregate statistics can hide important patterns. After computing the benchmarks:
- **Remove or replace assertions that always pass in both configurations.** These don’t tell you anything useful — the model handles them fine without the skill. They inflate the with-skill pass rate without reflecting actual skill value.
- **Investigate assertions that always fail in both configurations.** Either the assertion is broken (asking for something the model can’t do), the test case is too hard, or the assertion is checking for the wrong thing. Fix these before the next iteration.
- **Study assertions that pass with the skill but fail without.** This is where the skill is clearly adding value. Understand *why* — which instructions or scripts made the difference?
- **Tighten instructions when results are inconsistent across runs.** If the same eval passes sometimes and fails others (reflected as high `stddev` in the benchmark), the eval may be flaky (sensitive to model randomness), or the skill’s instructions may be ambiguous enough that the model interprets them differently each time. Add examples or more specific guidance to reduce ambiguity.
- **Check time and token outliers.** If one eval takes 3x longer than the others, read its execution transcript (the full log of what the model did during the run) to find the bottleneck.
Reviewing results with a human
Assertion grading and pattern analysis catch a lot, but they only check what you thought to write assertions for. A human reviewer brings a fresh perspective — catching issues you didn’t anticipate, noticing when the output is technically correct but misses the point, or spotting problems that are hard to express as pass/fail checks. For each test case, review the actual outputs alongside the grades. Record specific feedback for each test case and save it in the workspace (e.g., as a `feedback.json` alongside the eval directories):
feedback.json
Report incorrect code
Copy
```python
{
"eval-top-months-chart": "The chart is missing axis labels and the months are in alphabetical order instead of chronological.",
"eval-clean-missing-emails": ""
}
```
“The chart is missing axis labels” is actionable; “looks bad” is not. Empty feedback means the output looked fine — that test case passed your review. During the [iteration step](#iterating-on-the-skill), focus your improvements on the test cases where you had specific complaints.
Iterating on the skill
After grading and reviewing, you have three sources of signal:
- **Failed assertions** point to specific gaps — a missing step, an unclear instruction, or a case the skill doesn’t handle.
- **Human feedback** points to broader quality issues — the approach was wrong, the output was poorly structured, or the skill produced a technically correct but unhelpful result.
- **Execution transcripts** reveal *why* things went wrong. If the agent ignored an instruction, the instruction may be ambiguous. If the agent spent time on unproductive steps, those instructions may need to be simplified or removed.
The most effective way to turn these signals into skill improvements is to give all three — along with the current `SKILL.md` — to an LLM and ask it to propose changes. The LLM can synthesize patterns across failed assertions, reviewer complaints, and transcript behavior that would be tedious to connect manually. When prompting the LLM, include these guidelines:
- **Generalize from feedback.** The skill will be used across many different prompts, not just the test cases. Fixes should address underlying issues broadly rather than adding narrow patches for specific examples.
- **Keep the skill lean.** Fewer, better instructions often outperform exhaustive rules. If transcripts show wasted work (unnecessary validation, unneeded intermediate outputs), remove those instructions. If pass rates plateau despite adding more rules, the skill may be over-constrained — try removing instructions and see if results hold or improve.
- **Explain the why.** Reasoning-based instructions (“Do X because Y tends to cause Z”) work better than rigid directives (“ALWAYS do X, NEVER do Y”). Models follow instructions more reliably when they understand the purpose.
- **Bundle repeated work.** If every test run independently wrote a similar helper script (a chart builder, a data parser), that’s a signal to bundle the script into the skill’s `scripts/` directory. See [Using scripts](/skill-creation/using-scripts) for how to do this.
The loop
1. Give the eval signals and current `SKILL.md` to an LLM and ask it to propose improvements.
2. Review and apply the changes.
3. Rerun all test cases in a new `iteration-<N+1>/` directory.
4. Grade and aggregate the new results.
5. Review with a human. Repeat.
Stop when you’re satisfied with the results, feedback is consistently empty, or you’re no longer seeing meaningful improvement between iterations.
The [`skill-creator`](https://github.com/anthropics/skills/tree/main/skills/skill-creator) Skill automates much of this workflow — running evals, grading assertions, aggregating benchmarks, and presenting results for human review.
[Optimizing descriptions](/skill-creation/optimizing-descriptions)[Using scripts](/skill-creation/using-scripts)
---
## examples.md
# Example Servers
> A list of example servers and implementations
This page showcases various Model Context Protocol (MCP) servers that demonstrate the protocol's capabilities and versatility. These servers enable Large Language Models (LLMs) to securely access tools and data sources.
## Reference implementations
These official reference servers demonstrate core MCP features and SDK usage:
### Current reference servers
* **[Everything](https://github.com/modelcontextprotocol/servers/tree/main/src/everything)** - Reference / test server with prompts, resources, and tools
* **[Fetch](https://github.com/modelcontextprotocol/servers/tree/main/src/fetch)** - Web content fetching and conversion for efficient LLM usage
* **[Filesystem](https://github.com/modelcontextprotocol/servers/tree/main/src/filesystem)** - Secure file operations with configurable access controls
* **[Git](https://github.com/modelcontextprotocol/servers/tree/main/src/git)** - Tools to read, search, and manipulate Git repositories
* **[Memory](https://github.com/modelcontextprotocol/servers/tree/main/src/memory)** - Knowledge graph-based persistent memory system
* **[Sequential Thinking](https://github.com/modelcontextprotocol/servers/tree/main/src/sequentialthinking)** - Dynamic and reflective problem-solving through thought sequences
* **[Time](https://github.com/modelcontextprotocol/servers/tree/main/src/time)** - Time and timezone conversion capabilities
### Additional example servers (archived)
Visit the [servers-archived repository](https://github.com/modelcontextprotocol/servers-archived) to get access to archived example servers that are no longer actively maintained.
They are provided for historical reference only.
## Official integrations
Visit the [MCP Servers Repository (Official Integrations section)](https://github.com/modelcontextprotocol/servers?tab=readme-ov-file#%EF%B8%8F-official-integrations) for a list of MCP servers maintained by companies for their platforms.
## Community implementations
Visit the [MCP Servers Repository (Community section)](https://github.com/modelcontextprotocol/servers?tab=readme-ov-file#-community-servers) for a list of MCP servers maintained by community members.
## Getting started
### Using reference servers
TypeScript-based servers can be used directly with `npx`:
```bash theme={null}
npx -y @modelcontextprotocol/server-memory
```
Python-based servers can be used with `uvx` (recommended) or `pip`:
```bash theme={null}
# Using uvx
uvx mcp-server-git
# Using pip
pip install mcp-server-git
python -m mcp_server_git
```
### Configuring with Claude
To use an MCP server with Claude, add it to your configuration:
```json theme={null}
{
"mcpServers": {
"memory": {
"command": "npx",
"args": ["-y", "@modelcontextprotocol/server-memory"]
},
"filesystem": {
"command": "npx",
"args": [
"-y",
"@modelcontextprotocol/server-filesystem",
"/path/to/allowed/files"
]
},
"github": {
"command": "npx",
"args": ["-y", "@modelcontextprotocol/server-github"],
"env": {
"GITHUB_PERSONAL_ACCESS_TOKEN": "<YOUR_TOKEN>"
}
}
}
}
```
## Additional resources
Visit the [MCP Servers Repository (Resources section)](https://github.com/modelcontextprotocol/servers?tab=readme-ov-file#-resources) for a collection of other resources and projects related to MCP.
Visit our [GitHub Discussions](https://github.com/orgs/modelcontextprotocol/discussions) to engage with the MCP community.
---
## explanatory-output-style-plugin.md
# Explanatory Output Style Plugin
This plugin recreates the deprecated Explanatory output style as a SessionStart
hook.
WARNING: Do not install this plugin unless you are fine with incurring the token
cost of this plugin's additional instructions and output.
## What it does
When enabled, this plugin automatically adds instructions at the start of each
session that encourage Claude to:
1. Provide educational insights about implementation choices
2. Explain codebase patterns and decisions
3. Balance task completion with learning opportunities
## How it works
The plugin uses a SessionStart hook to inject additional context into every
session. This context instructs Claude to provide brief educational explanations
before and after writing code, formatted as:
```
`★ Insight ─────────────────────────────────────`
[2-3 key educational points]
`─────────────────────────────────────────────────`
```
## Usage
Once installed, the plugin activates automatically at the start of every
session. No additional configuration is needed.
The insights focus on:
- Specific implementation choices for your codebase
- Patterns and conventions in your code
- Trade-offs and design decisions
- Codebase-specific details rather than general programming concepts
## Migration from Output Styles
This plugin replaces the deprecated "Explanatory" output style setting. If you
previously used:
```json
{
"outputStyle": "Explanatory"
}
```
You can now achieve the same behavior by installing this plugin instead.
More generally, this SessionStart hook pattern is roughly equivalent to
CLAUDE.md, but it is more flexible and allows for distribution through plugins.
Note: Output styles that involve tasks besides software development, are better
expressed as
[subagents](https://docs.claude.com/en/docs/claude-code/sub-agents), not as
SessionStart hooks. Subagents change the system prompt while SessionStart hooks
add to the default system prompt.
## Managing changes
- Disable the plugin - keep the code installed on your device
- Uninstall the plugin - remove the code from your device
- Update the plugin - create a local copy of this plugin to personalize this
plugin
- Hint: Ask Claude to read
https://docs.claude.com/en/docs/claude-code/plugins.md and set it up for
you!
---
## extend-claude-with-skills-claude-code-docs-542f21c108.md
# Extend Claude with skills
Create, manage, and share skills to extend Claude’s capabilities in Claude Code. Includes custom commands and bundled skills.
> ## Documentation Index
>
> Fetch the complete documentation index at: <https://code.claude.com/docs/llms.txt>
>
> Use this file to discover all available pages before exploring further.
Skills extend what Claude can do. Create a `SKILL.md` file with instructions, and Claude adds it to its toolkit. Claude uses skills when relevant, or you can invoke one directly with `/skill-name`. Create a skill when you keep pasting the same instructions, checklist, or multi-step procedure into chat, or when a section of CLAUDE.md has grown into a procedure rather than a fact. Unlike CLAUDE.md content, a skill’s body loads only when it’s used, so long reference material costs almost nothing until you need it.
For built-in commands like `/help` and `/compact`, and bundled skills like `/debug` and `/simplify`, see the [commands reference](/docs/en/commands).**Custom commands have been merged into skills.** A file at `.claude/commands/deploy.md` and a skill at `.claude/skills/deploy/SKILL.md` both create `/deploy` and work the same way. Your existing `.claude/commands/` files keep working. Skills add optional features: a directory for supporting files, frontmatter to [control whether you or Claude invokes them](#control-who-invokes-a-skill), and the ability for Claude to load them automatically when relevant.
Claude Code skills follow the [Agent Skills](https://agentskills.io) open standard, which works across multiple AI tools. Claude Code extends the standard with additional features like [invocation control](#control-who-invokes-a-skill), [subagent execution](#run-skills-in-a-subagent), and [dynamic context injection](#inject-dynamic-context).
Bundled skills
Claude Code includes a set of bundled skills that are available in every session, including `/simplify`, `/batch`, `/debug`, `/loop`, and `/claude-api`. Unlike most built-in commands, which execute fixed logic directly, bundled skills are prompt-based: they give Claude detailed instructions and let it orchestrate the work using its tools. You invoke them the same way as any other skill, by typing `/` followed by the skill name. Bundled skills are listed alongside built-in commands in the [commands reference](/docs/en/commands), marked **Skill** in the Purpose column.
Getting started
Create your first skill
This example creates a skill that summarizes the uncommitted changes in your git repository and flags anything risky. It pulls the live diff into the prompt before Claude reads it, so the response is grounded in your actual working tree rather than what Claude can guess from open files. Claude loads the skill automatically when you ask about your changes, or you can invoke it directly with `/summarize-changes`.
1
Create the skill directory
Create a directory for the skill in your personal skills folder. Personal skills are available across all your projects.
```python
mkdir -p ~/.claude/skills/summarize-changes
```
2
Write SKILL.md
Every skill needs a `SKILL.md` file with two parts: YAML frontmatter between `---` markers that tells Claude when to use the skill, and markdown content with the instructions Claude follows when the skill runs. The directory name becomes the command you type, and the `description` helps Claude decide when to load the skill automatically.Save this to `~/.claude/skills/summarize-changes/SKILL.md`:
```python
---
description: Summarizes uncommitted changes and flags anything risky. Use when the user asks what changed, wants a commit message, or asks to review their diff.
---
## Current changes
!`git diff HEAD`
## Instructions
Summarize the changes above in two or three bullet points, then list any risks you notice such as missing error handling, hardcoded values, or tests that need updating. If the diff is empty, say there are no uncommitted changes.
```
The `` !`git diff HEAD` `` line uses [dynamic context injection](#inject-dynamic-context): Claude Code runs the command and replaces the line with its output before Claude sees the skill content, so the instructions arrive with the current diff already inlined.
3
Test the skill
Open a git project, make a small edit to any file, and start Claude Code by running `claude`. You can test the skill two ways.**Let Claude invoke it automatically** by asking something that matches the description:
```python
What did I change?
```
**Or invoke it directly** with the skill name:
```python
/summarize-changes
```
Either way, Claude should respond with a short summary of your edit and a list of risks.
Where skills live
Where you store a skill determines who can use it:
| Location | Path | Applies to |
|:-----------|:---------------------------------------------------------|:-------------------------------|
| Enterprise | See [managed settings](/docs/en/settings#settings-files) | All users in your organization |
| Personal | `~/.claude/skills/<skill-name>/SKILL.md` | All your projects |
| Project | `.claude/skills/<skill-name>/SKILL.md` | This project only |
| Plugin | `<plugin>/skills/<skill-name>/SKILL.md` | Where plugin is enabled |
When skills share the same name across levels, enterprise overrides personal, and personal overrides project. Plugin skills use a `plugin-name:skill-name` namespace, so they cannot conflict with other levels. If you have files in `.claude/commands/`, those work the same way, but if a skill and a command share the same name, the skill takes precedence.
Live change detection
Claude Code watches skill directories for file changes. Adding, editing, or removing a skill under `~/.claude/skills/`, the project `.claude/skills/`, or a `.claude/skills/` inside an `--add-dir` directory takes effect within the current session without restarting. Creating a top-level skills directory that did not exist when the session started requires restarting Claude Code so the new directory can be watched.
Automatic discovery from parent and nested directories
Project skills load from `.claude/skills/` in your starting directory and in every parent directory up to the repository root, so starting Claude in a subdirectory still picks up skills defined at the root. When you work with files in subdirectories below your starting directory, Claude Code also discovers skills from nested `.claude/skills/` directories on demand. For example, if you’re editing a file in `packages/frontend/`, Claude Code also looks for skills in `packages/frontend/.claude/skills/`. This supports monorepo setups where packages have their own skills. Each skill is a directory with `SKILL.md` as the entrypoint:
```python
my-skill/
├── SKILL.md # Main instructions (required)
├── template.md # Template for Claude to fill in
├── examples/
│ └── sample.md # Example output showing expected format
└── scripts/
└── validate.sh # Script Claude can execute
```
The `SKILL.md` contains the main instructions and is required. Other files are optional and let you build more powerful skills: templates for Claude to fill in, example outputs showing the expected format, scripts Claude can execute, or detailed reference documentation. Reference these files from your `SKILL.md` so Claude knows what they contain and when to load them. See [Add supporting files](#add-supporting-files) for more details.
Files in `.claude/commands/` still work and support the same [frontmatter](#frontmatter-reference). Skills are recommended since they support additional features like supporting files.
Skills from additional directories
The `--add-dir` flag [grants file access](/docs/en/permissions#additional-directories-grant-file-access-not-configuration) rather than configuration discovery, but skills are an exception: `.claude/skills/` within an added directory is loaded automatically. See [Live change detection](#live-change-detection) for how edits are picked up during a session. Other `.claude/` configuration such as subagents, commands, and output styles is not loaded from additional directories. See the [exceptions table](/docs/en/permissions#additional-directories-grant-file-access-not-configuration) for the complete list of what is and isn’t loaded, and the recommended ways to share configuration across projects.
CLAUDE.md files from `--add-dir` directories are not loaded by default. To load them, set `CLAUDE_CODE_ADDITIONAL_DIRECTORIES_CLAUDE_MD=1`. See [Load from additional directories](/docs/en/memory#load-from-additional-directories).
Configure skills
Skills are configured through YAML frontmatter at the top of `SKILL.md` and the markdown content that follows.
Types of skill content
Skill files can contain any instructions, but thinking about how you want to invoke them helps guide what to include: **Reference content** adds knowledge Claude applies to your current work. Conventions, patterns, style guides, domain knowledge. This content runs inline so Claude can use it alongside your conversation context.
```python
---
name: api-conventions
description: API design patterns for this codebase
---
When writing API endpoints:
- Use RESTful naming conventions
- Return consistent error formats
- Include request validation
```
**Task content** gives Claude step-by-step instructions for a specific action, like deployments, commits, or code generation. These are often actions you want to invoke directly with `/skill-name` rather than letting Claude decide when to run them. Add `disable-model-invocation: true` to prevent Claude from triggering it automatically.
```python
---
name: deploy
description: Deploy the application to production
context: fork
disable-model-invocation: true
---
Deploy the application:
1. Run the test suite
2. Build the application
3. Push to the deployment target
```
Your `SKILL.md` can contain anything, but thinking through how you want the skill invoked (by you, by Claude, or both) and where you want it to run (inline or in a subagent) helps guide what to include. For complex skills, you can also [add supporting files](#add-supporting-files) to keep the main skill focused. Keep the body itself concise. Once a skill loads, its content [stays in context across turns](#skill-content-lifecycle), so every line is a recurring token cost. State what to do rather than narrating how or why, and apply the same conciseness test you would for [CLAUDE.md content](/docs/en/best-practices#write-an-effective-claude-md).
Frontmatter reference
Beyond the markdown content, you can configure skill behavior using YAML frontmatter fields between `---` markers at the top of your `SKILL.md` file:
```python
---
name: my-skill
description: What this skill does
disable-model-invocation: true
allowed-tools: Read Grep
---
Your skill instructions here...
```
All fields are optional. Only `description` is recommended so Claude knows when to use the skill.
| Field | Required | Description |
|:---------------------------|:------------|:-------------------------------------------------------------------------------------------------------------------------------------------------------------------------------------------------------------------------------------------------------------------------------------------------------------------|
| `name` | No | Display name for the skill. If omitted, uses the directory name. Lowercase letters, numbers, and hyphens only (max 64 characters). |
| `description` | Recommended | What the skill does and when to use it. Claude uses this to decide when to apply the skill. If omitted, uses the first paragraph of markdown content. Put the key use case first: the combined `description` and `when_to_use` text is truncated at 1,536 characters in the skill listing to reduce context usage. |
| `when_to_use` | No | Additional context for when Claude should invoke the skill, such as trigger phrases or example requests. Appended to `description` in the skill listing and counts toward the 1,536-character cap. |
| `argument-hint` | No | Hint shown during autocomplete to indicate expected arguments. Example: `[issue-number]` or `[filename] [format]`. |
| `arguments` | No | Named positional arguments for [`$name` substitution](#available-string-substitutions) in the skill content. Accepts a space-separated string or a YAML list. Names map to argument positions in order. |
| `disable-model-invocation` | No | Set to `true` to prevent Claude from automatically loading this skill. Use for workflows you want to trigger manually with `/name`. Also prevents the skill from being [preloaded into subagents](/docs/en/sub-agents#preload-skills-into-subagents). Default: `false`. |
| `user-invocable` | No | Set to `false` to hide from the `/` menu. Use for background knowledge users shouldn’t invoke directly. Default: `true`. |
| `allowed-tools` | No | Tools Claude can use without asking permission when this skill is active. Accepts a space-separated string or a YAML list. |
| `model` | No | Model to use when this skill is active. The override applies for the rest of the current turn and is not saved to settings; the session model resumes on your next prompt. Accepts the same values as [`/model`](/docs/en/model-config), or `inherit` to keep the active model. |
| `effort` | No | [Effort level](/docs/en/model-config#adjust-effort-level) when this skill is active. Overrides the session effort level. Default: inherits from session. Options: `low`, `medium`, `high`, `xhigh`, `max`; available levels depend on the model. |
| `context` | No | Set to `fork` to run in a forked subagent context. |
| `agent` | No | Which subagent type to use when `context: fork` is set. |
| `hooks` | No | Hooks scoped to this skill’s lifecycle. See [Hooks in skills and agents](/docs/en/hooks#hooks-in-skills-and-agents) for configuration format. |
| `paths` | No | Glob patterns that limit when this skill is activated. Accepts a comma-separated string or a YAML list. When set, Claude loads the skill automatically only when working with files matching the patterns. Uses the same format as [path-specific rules](/docs/en/memory#path-specific-rules). |
| `shell` | No | Shell to use for `` !`command` `` and ```` ```! ```` blocks in this skill. Accepts `bash` (default) or `powershell`. Setting `powershell` runs inline shell commands via PowerShell on Windows. Requires `CLAUDE_CODE_USE_POWERSHELL_TOOL=1`. |
Available string substitutions
Skills support string substitution for dynamic values in the skill content:
| Variable | Description |
|:-----------------------|:-----------------------------------------------------------------------------------------------------------------------------------------------------------------------------------------------------------------------------------------------------------------------------------------|
| `$ARGUMENTS` | All arguments passed when invoking the skill. If `$ARGUMENTS` is not present in the content, arguments are appended as `ARGUMENTS: <value>`. |
| `$ARGUMENTS[N]` | Access a specific argument by 0-based index, such as `$ARGUMENTS[0]` for the first argument. |
| `$N` | Shorthand for `$ARGUMENTS[N]`, such as `$0` for the first argument or `$1` for the second. |
| `$name` | Named argument declared in the [`arguments`](#frontmatter-reference) frontmatter list. Names map to positions in order, so with `arguments: [issue, branch]` the placeholder `$issue` expands to the first argument and `$branch` to the second. |
| `${CLAUDE_SESSION_ID}` | The current session ID. Useful for logging, creating session-specific files, or correlating skill output with sessions. |
| `${CLAUDE_EFFORT}` | The current effort level: `low`, `medium`, `high`, `xhigh`, or `max`. Use this to adapt skill instructions to the active effort setting. |
| `${CLAUDE_SKILL_DIR}` | The directory containing the skill’s `SKILL.md` file. For plugin skills, this is the skill’s subdirectory within the plugin, not the plugin root. Use this in bash injection commands to reference scripts or files bundled with the skill, regardless of the current working directory. |
Indexed arguments use shell-style quoting, so wrap multi-word values in quotes to pass them as a single argument. For example, `/my-skill "hello world" second` makes `$0` expand to `hello world` and `$1` to `second`. The `$ARGUMENTS` placeholder always expands to the full argument string as typed. **Example using substitutions:**
```python
---
name: session-logger
description: Log activity for this session
---
Log the following to logs/${CLAUDE_SESSION_ID}.log:
$ARGUMENTS
```
Add supporting files
Skills can include multiple files in their directory. This keeps `SKILL.md` focused on the essentials while letting Claude access detailed reference material only when needed. Large reference docs, API specifications, or example collections don’t need to load into context every time the skill runs.
```python
my-skill/
├── SKILL.md (required - overview and navigation)
├── reference.md (detailed API docs - loaded when needed)
├── examples.md (usage examples - loaded when needed)
└── scripts/
└── helper.py (utility script - executed, not loaded)
```
Reference supporting files from `SKILL.md` so Claude knows what each file contains and when to load it:
```python
## Additional resources
- For complete API details, see [reference.md](reference.md)
- For usage examples, see [examples.md](examples.md)
```
Keep `SKILL.md` under 500 lines. Move detailed reference material to separate files.
Control who invokes a skill
By default, both you and Claude can invoke any skill. You can type `/skill-name` to invoke it directly, and Claude can load it automatically when relevant to your conversation. Two frontmatter fields let you restrict this:
- **`disable-model-invocation: true`**: Only you can invoke the skill. Use this for workflows with side effects or that you want to control timing, like `/commit`, `/deploy`, or `/send-slack-message`. You don’t want Claude deciding to deploy because your code looks ready.
- **`user-invocable: false`**: Only Claude can invoke the skill. Use this for background knowledge that isn’t actionable as a command. A `legacy-system-context` skill explains how an old system works. Claude should know this when relevant, but `/legacy-system-context` isn’t a meaningful action for users to take.
This example creates a deploy skill that only you can trigger. The `disable-model-invocation: true` field prevents Claude from running it automatically:
```python
---
name: deploy
description: Deploy the application to production
disable-model-invocation: true
---
Deploy $ARGUMENTS to production:
1. Run the test suite
2. Build the application
3. Push to the deployment target
4. Verify the deployment succeeded
```
Here’s how the two fields affect invocation and context loading:
| Frontmatter | You can invoke | Claude can invoke | When loaded into context |
|:---------------------------------|:---------------|:------------------|:-------------------------------------------------------------|
| (default) | Yes | Yes | Description always in context, full skill loads when invoked |
| `disable-model-invocation: true` | Yes | No | Description not in context, full skill loads when you invoke |
| `user-invocable: false` | No | Yes | Description always in context, full skill loads when invoked |
In a regular session, skill descriptions are loaded into context so Claude knows what’s available, but full skill content only loads when invoked. [Subagents with preloaded skills](/docs/en/sub-agents#preload-skills-into-subagents) work differently: the full skill content is injected at startup.
Skill content lifecycle
When you or Claude invoke a skill, the rendered `SKILL.md` content enters the conversation as a single message and stays there for the rest of the session. Claude Code does not re-read the skill file on later turns, so write guidance that should apply throughout a task as standing instructions rather than one-time steps. [Auto-compaction](/docs/en/how-claude-code-works#when-context-fills-up) carries invoked skills forward within a token budget. When the conversation is summarized to free context, Claude Code re-attaches the most recent invocation of each skill after the summary, keeping the first 5,000 tokens of each. Re-attached skills share a combined budget of 25,000 tokens. Claude Code fills this budget starting from the most recently invoked skill, so older skills can be dropped entirely after compaction if you have invoked many in one session. If a skill seems to stop influencing behavior after the first response, the content is usually still present and the model is choosing other tools or approaches. Strengthen the skill’s `description` and instructions so the model keeps preferring it, or use [hooks](/docs/en/hooks) to enforce behavior deterministically. If the skill is large or you invoked several others after it, re-invoke it after compaction to restore the full content.
Pre-approve tools for a skill
The `allowed-tools` field grants permission for the listed tools while the skill is active, so Claude can use them without prompting you for approval. It does not restrict which tools are available: every tool remains callable, and your [permission settings](/docs/en/permissions) still govern tools that are not listed. For skills checked into a project’s `.claude/skills/` directory, `allowed-tools` takes effect after you accept the workspace trust dialog for that folder, the same as permission rules in `.claude/settings.json`. Review project skills before trusting a repository, since a skill can grant itself broad tool access. This skill lets Claude run git commands without per-use approval whenever you invoke it:
```python
---
name: commit
description: Stage and commit the current changes
disable-model-invocation: true
allowed-tools: Bash(git add *) Bash(git commit *) Bash(git status *)
---
```
To block a skill from using certain tools, add deny rules in your [permission settings](/docs/en/permissions) instead.
Pass arguments to skills
Both you and Claude can pass arguments when invoking a skill. Arguments are available via the `$ARGUMENTS` placeholder. This skill fixes a GitHub issue by number. The `$ARGUMENTS` placeholder gets replaced with whatever follows the skill name:
```python
---
name: fix-issue
description: Fix a GitHub issue
disable-model-invocation: true
---
Fix GitHub issue $ARGUMENTS following our coding standards.
1. Read the issue description
2. Understand the requirements
3. Implement the fix
4. Write tests
5. Create a commit
```
When you run `/fix-issue 123`, Claude receives “Fix GitHub issue 123 following our coding standards…” If you invoke a skill with arguments but the skill doesn’t include `$ARGUMENTS`, Claude Code appends `ARGUMENTS: <your input>` to the end of the skill content so Claude still sees what you typed. To access individual arguments by position, use `$ARGUMENTS[N]` or the shorter `$N`:
```python
---
name: migrate-component
description: Migrate a component from one framework to another
---
Migrate the $ARGUMENTS[0] component from $ARGUMENTS[1] to $ARGUMENTS[2].
Preserve all existing behavior and tests.
```
Running `/migrate-component SearchBar React Vue` replaces `$ARGUMENTS[0]` with `SearchBar`, `$ARGUMENTS[1]` with `React`, and `$ARGUMENTS[2]` with `Vue`. The same skill using the `$N` shorthand:
```python
---
name: migrate-component
description: Migrate a component from one framework to another
---
Migrate the $0 component from $1 to $2.
Preserve all existing behavior and tests.
```
Advanced patterns
Inject dynamic context
The `` !`<command>` `` syntax runs shell commands before the skill content is sent to Claude. The command output replaces the placeholder, so Claude receives actual data, not the command itself. This skill summarizes a pull request by fetching live PR data with the GitHub CLI. The `` !`gh pr diff` `` and other commands run first, and their output gets inserted into the prompt:
```python
---
name: pr-summary
description: Summarize changes in a pull request
context: fork
agent: Explore
allowed-tools: Bash(gh *)
---
## Pull request context
- PR diff: !`gh pr diff`
- PR comments: !`gh pr view --comments`
- Changed files: !`gh pr diff --name-only`
## Your task
Summarize this pull request...
```
When this skill runs:
1. Each `` !`<command>` `` executes immediately (before Claude sees anything)
2. The output replaces the placeholder in the skill content
3. Claude receives the fully-rendered prompt with actual PR data
This is preprocessing, not something Claude executes. Claude only sees the final result. Substitution runs once over the original file. Command output is inserted as plain text and is not re-scanned for further `` !`<command>` `` placeholders, so a command cannot emit a placeholder for a later pass to expand. For multi-line commands, use a fenced code block opened with ```` ```! ```` instead of the inline form:
```` shiki
## Environment
```!
node --version
npm --version
git status --short
```
````
To disable this behavior for skills and custom commands from user, project, plugin, or [additional-directory](#skills-from-additional-directories) sources, set `"disableSkillShellExecution": true` in [settings](/docs/en/settings). Each command is replaced with `[shell command execution disabled by policy]` instead of being run. Bundled and managed skills are not affected. This setting is most useful in [managed settings](/docs/en/permissions#managed-settings), where users cannot override it.
To request deeper reasoning when a skill runs, include `ultrathink` anywhere in the skill content. See [Use ultrathink for one-off deep reasoning](/docs/en/model-config#use-ultrathink-for-one-off-deep-reasoning).
Run skills in a subagent
Add `context: fork` to your frontmatter when you want a skill to run in isolation. The skill content becomes the prompt that drives the subagent. It won’t have access to your conversation history.
`context: fork` only makes sense for skills with explicit instructions. If your skill contains guidelines like “use these API conventions” without a task, the subagent receives the guidelines but no actionable prompt, and returns without meaningful output.
Skills and [subagents](/docs/en/sub-agents) work together in two directions:
| Approach | System prompt | Task | Also loads |
|:-----------------------------|:-------------------------|:----------------------------|:----------------------------------------------------|
| Skill with `context: fork` | From agent type | SKILL.md content | CLAUDE.md, except when the agent is Explore or Plan |
| Subagent with `skills` field | Subagent’s markdown body | Claude’s delegation message | Preloaded skills + CLAUDE.md |
With `context: fork`, you write the task in your skill and pick an agent type to execute it. The built-in Explore and Plan agents [skip CLAUDE.md and git status](/docs/en/sub-agents#what-loads-at-startup) to keep their context small, so a forked skill using `agent: Explore` sees only the SKILL.md content and the agent’s own system prompt. For the inverse, where you define a custom subagent that uses skills as reference material, see [Subagents](/docs/en/sub-agents#preload-skills-into-subagents).
Example: Research skill using Explore agent
This skill runs research in a forked Explore agent. The skill content becomes the task, and the agent provides read-only tools optimized for codebase exploration:
```python
---
name: deep-research
description: Research a topic thoroughly
context: fork
agent: Explore
---
Research $ARGUMENTS thoroughly:
1. Find relevant files using Glob and Grep
2. Read and analyze the code
3. Summarize findings with specific file references
```
When this skill runs:
1. A new isolated context is created
2. The subagent receives the skill content as its prompt (“Research \$ARGUMENTS thoroughly…”)
3. The `agent` field determines the execution environment (model, tools, and permissions)
4. Results are summarized and returned to your main conversation
The `agent` field specifies which subagent configuration to use. Options include built-in agents (`Explore`, `Plan`, `general-purpose`) or any custom subagent from `.claude/agents/`. If omitted, uses `general-purpose`.
Restrict Claude’s skill access
By default, Claude can invoke any skill that doesn’t have `disable-model-invocation: true` set. Skills that define `allowed-tools` grant Claude access to those tools without per-use approval when the skill is active. Your [permission settings](/docs/en/permissions) still govern baseline approval behavior for all other tools. A few built-in commands are also available through the Skill tool, including `/init`, `/review`, and `/security-review`. Other built-in commands such as `/compact` are not. Three ways to control which skills Claude can invoke: **Disable all skills** by denying the Skill tool in `/permissions`:
```python
# Add to deny rules:
Skill
```
**Allow or deny specific skills** using [permission rules](/docs/en/permissions):
```python
# Allow only specific skills
Skill(commit)
Skill(review-pr *)
# Deny specific skills
Skill(deploy *)
```
Permission syntax: `Skill(name)` for exact match, `Skill(name *)` for prefix match with any arguments. **Hide individual skills** by adding `disable-model-invocation: true` to their frontmatter. This removes the skill from Claude’s context entirely.
The `user-invocable` field only controls menu visibility, not Skill tool access. Use `disable-model-invocation: true` to block programmatic invocation.
Override skill visibility from settings
The `skillOverrides` setting controls skill visibility from your [settings](/docs/en/settings) instead of the skill’s own frontmatter. Use it for skills whose SKILL.md you don’t want to edit, such as ones checked into a shared project repo or provided by an MCP server. The `/skills` menu writes it for you: highlight a skill and press `Space` to cycle states, then `Enter` to save to `.claude/settings.local.json`. Each key is a skill name and each value is one of four states:
| Value | Listed to Claude | In `/` menu |
|:------------------------|:---------------------|:------------|
| `"on"` | Name and description | Yes |
| `"name-only"` | Name only | Yes |
| `"user-invocable-only"` | Hidden | Yes |
| `"off"` | Hidden | Hidden |
A skill that is absent from `skillOverrides` is treated as `"on"`. The example below collapses one skill to its name and turns another off entirely:
```python
{
"skillOverrides": {
"legacy-context": "name-only",
"deploy": "off"
}
}
```
Plugin skills are not affected by `skillOverrides`. Manage those through `/plugin` instead.
Share skills
Skills can be distributed at different scopes depending on your audience:
- **Project skills**: Commit `.claude/skills/` to version control
- **Plugins**: Create a `skills/` directory in your [plugin](/docs/en/plugins)
- **Managed**: Deploy organization-wide through [managed settings](/docs/en/settings#settings-files)
Generate visual output
Skills can bundle and run scripts in any language, giving Claude capabilities beyond what’s possible in a single prompt. One powerful pattern is generating visual output: interactive HTML files that open in your browser for exploring data, debugging, or creating reports. This example creates a codebase explorer: an interactive tree view where you can expand and collapse directories, see file sizes at a glance, and identify file types by color. Create the Skill directory:
```python
mkdir -p ~/.claude/skills/codebase-visualizer/scripts
```
Save this to `~/.claude/skills/codebase-visualizer/SKILL.md`. The description tells Claude when to activate this Skill, and the instructions tell Claude to run the bundled script. The script path uses [`${CLAUDE_SKILL_DIR}`](#available-string-substitutions) so it resolves correctly whether the skill is installed at the personal, project, or plugin level:
```` shiki
---
name: codebase-visualizer
description: Generate an interactive collapsible tree visualization of your codebase. Use when exploring a new repo, understanding project structure, or identifying large files.
allowed-tools: Bash(python3 *)
---
# Codebase Visualizer
Generate an interactive HTML tree view that shows your project's file structure with collapsible directories.
## Usage
Run the visualization script from your project root:
```bash
python3 ${CLAUDE_SKILL_DIR}/scripts/visualize.py .
```
This creates `codebase-map.html` in the current directory and opens it in your default browser.
## What the visualization shows
- **Collapsible directories**: Click folders to expand/collapse
- **File sizes**: Displayed next to each file
- **Colors**: Different colors for different file types
- **Directory totals**: Shows aggregate size of each folder
````
Save this to `~/.claude/skills/codebase-visualizer/scripts/visualize.py`. This script scans a directory tree and generates a self-contained HTML file with:
- A **summary sidebar** showing file count, directory count, total size, and number of file types
- A **bar chart** breaking down the codebase by file type (top 8 by size)
- A **collapsible tree** where you can expand and collapse directories, with color-coded file type indicators
The script requires Python 3 but uses only built-in libraries, so there are no packages to install:
```python
#!/usr/bin/env python3
"""Generate an interactive collapsible tree visualization of a codebase."""
import json
import sys
import webbrowser
from html import escape
from pathlib import Path
from collections import Counter
IGNORE = {'.git', 'node_modules', '__pycache__', '.venv', 'venv', 'dist', 'build'}
def scan(path: Path, stats: dict) -> dict:
result = {"name": path.name, "children": [], "size": 0}
try:
for item in sorted(path.iterdir()):
if item.name in IGNORE or item.name.startswith('.'):
continue
if item.is_file():
size = item.stat().st_size
ext = item.suffix.lower() or '(no ext)'
result["children"].append({"name": item.name, "size": size, "ext": ext})
result["size"] += size
stats["files"] += 1
stats["extensions"][ext] += 1
stats["ext_sizes"][ext] += size
elif item.is_dir():
stats["dirs"] += 1
child = scan(item, stats)
if child["children"]:
result["children"].append(child)
result["size"] += child["size"]
except PermissionError:
pass
return result
def generate_html(data: dict, stats: dict, output: Path) -> None:
ext_sizes = stats["ext_sizes"]
total_size = sum(ext_sizes.values()) or 1
sorted_exts = sorted(ext_sizes.items(), key=lambda x: -x[1])[:8]
colors = {
'.js': '#f7df1e', '.ts': '#3178c6', '.py': '#3776ab', '.go': '#00add8',
'.rs': '#dea584', '.rb': '#cc342d', '.css': '#264de4', '.html': '#e34c26',
'.json': '#6b7280', '.md': '#083fa1', '.yaml': '#cb171e', '.yml': '#cb171e',
'.mdx': '#083fa1', '.tsx': '#3178c6', '.jsx': '#61dafb', '.sh': '#4eaa25',
}
lang_bars = "".join(
f'<div class="bar-row"><span class="bar-label">{ext}</span>'
f'<div class="bar" style="width:{(size/total_size)*100}%;background:{colors.get(ext,"#6b7280")}"></div>'
f'<span class="bar-pct">{(size/total_size)*100:.1f}%</span></div>'
for ext, size in sorted_exts
)
def fmt(b):
if b < 1024: return f"{b} B"
if b < 1048576: return f"{b/1024:.1f} KB"
return f"{b/1048576:.1f} MB"
html = f'''<!DOCTYPE html>
<html><head>
<meta charset="utf-8"><title>Codebase Explorer</title>
<style>
body {{ font: 14px/1.5 system-ui, sans-serif; margin: 0; background: #1a1a2e; color: #eee; }}
.container {{ display: flex; height: 100vh; }}
.sidebar {{ width: 280px; background: #252542; padding: 20px; border-right: 1px solid #3d3d5c; overflow-y: auto; flex-shrink: 0; }}
.main {{ flex: 1; padding: 20px; overflow-y: auto; }}
h1 {{ margin: 0 0 10px 0; font-size: 18px; }}
h2 {{ margin: 20px 0 10px 0; font-size: 14px; color: #888; text-transform: uppercase; }}
.stat {{ display: flex; justify-content: space-between; padding: 8px 0; border-bottom: 1px solid #3d3d5c; }}
.stat-value {{ font-weight: bold; }}
.bar-row {{ display: flex; align-items: center; margin: 6px 0; }}
.bar-label {{ width: 55px; font-size: 12px; color: #aaa; }}
.bar {{ height: 18px; border-radius: 3px; }}
.bar-pct {{ margin-left: 8px; font-size: 12px; color: #666; }}
.tree {{ list-style: none; padding-left: 20px; }}
details {{ cursor: pointer; }}
summary {{ padding: 4px 8px; border-radius: 4px; }}
summary:hover {{ background: #2d2d44; }}
.folder {{ color: #ffd700; }}
.file {{ display: flex; align-items: center; padding: 4px 8px; border-radius: 4px; }}
.file:hover {{ background: #2d2d44; }}
.size {{ color: #888; margin-left: auto; font-size: 12px; }}
.dot {{ width: 8px; height: 8px; border-radius: 50%; margin-right: 8px; }}
</style>
</head><body>
<div class="container">
<div class="sidebar">
<h1>📊 Summary</h1>
<div class="stat"><span>Files</span><span class="stat-value">{stats["files"]:,}</span></div>
<div class="stat"><span>Directories</span><span class="stat-value">{stats["dirs"]:,}</span></div>
<div class="stat"><span>Total size</span><span class="stat-value">{fmt(data["size"])}</span></div>
<div class="stat"><span>File types</span><span class="stat-value">{len(stats["extensions"])}</span></div>
<h2>By file type</h2>
{lang_bars}
</div>
<div class="main">
<h1>📁 {escape(data["name"])}</h1>
<ul class="tree" id="root"></ul>
</div>
</div>
<script>
const data = {json.dumps(data)};
const colors = {json.dumps(colors)};
function fmt(b) {{ if (b < 1024) return b + ' B'; if (b < 1048576) return (b/1024).toFixed(1) + ' KB'; return (b/1048576).toFixed(1) + ' MB'; }}
function esc(s) {{ return s.replace(/[&<>"']/g, c => ({{"&":"&","<":"<",">":">",'"':""","'":"'"}}[c])); }}
function render(node, parent) {{
if (node.children) {{
const det = document.createElement('details');
det.open = parent === document.getElementById('root');
det.innerHTML = `<summary><span class="folder">📁 ${{esc(node.name)}}</span><span class="size">${{fmt(node.size)}}</span></summary>`;
const ul = document.createElement('ul'); ul.className = 'tree';
node.children.sort((a,b) => (b.children?1:0)-(a.children?1:0) || a.name.localeCompare(b.name));
node.children.forEach(c => render(c, ul));
det.appendChild(ul);
const li = document.createElement('li'); li.appendChild(det); parent.appendChild(li);
}} else {{
const li = document.createElement('li'); li.className = 'file';
li.innerHTML = `<span class="dot" style="background:${{colors[node.ext]||'#6b7280'}}"></span>${{esc(node.name)}}<span class="size">${{fmt(node.size)}}</span>`;
parent.appendChild(li);
}}
}}
data.children.forEach(c => render(c, document.getElementById('root')));
</script>
</body></html>'''
output.write_text(html)
if __name__ == '__main__':
target = Path(sys.argv[1] if len(sys.argv) > 1 else '.').resolve()
stats = {"files": 0, "dirs": 0, "extensions": Counter(), "ext_sizes": Counter()}
data = scan(target, stats)
out = Path('codebase-map.html')
generate_html(data, stats, out)
print(f'Generated {out.absolute()}')
webbrowser.open(f'file://{out.absolute()}')
```
See all 133 lines
To test, open Claude Code in any project and ask “Visualize this codebase.” Claude runs the script, generates `codebase-map.html`, and opens it in your browser. This pattern works for any visual output: dependency graphs, test coverage reports, API documentation, or database schema visualizations. The bundled script does the work while Claude handles orchestration.
Troubleshooting
Skill not triggering
If Claude doesn’t use your skill when expected:
1. Check the description includes keywords users would naturally say
2. Verify the skill appears in `What skills are available?`
3. Try rephrasing your request to match the description more closely
4. Invoke it directly with `/skill-name` if the skill is user-invocable
Skill triggers too often
If Claude uses your skill when you don’t want it:
1. Make the description more specific
2. Add `disable-model-invocation: true` if you only want manual invocation
Skill descriptions are cut short
Skill descriptions are loaded into context so Claude knows what’s available. All skill names are always included, but if you have many skills, descriptions are shortened to fit the character budget, which can strip the keywords Claude needs to match your request. The budget scales at 1% of the model’s context window. When it overflows, descriptions for the skills you invoke least are dropped first, so the skills you actually use keep their full text. Run `/doctor` to see whether the budget is overflowing and which skills are affected. To raise the budget, set the [`skillListingBudgetFraction`](/docs/en/settings#available-settings) setting (e.g. `0.02` = 2%) or the `SLASH_COMMAND_TOOL_CHAR_BUDGET` environment variable to a fixed character count. To free budget for other skills, set low-priority entries to `"name-only"` in [`skillOverrides`](#override-skill-visibility-from-settings) so they list without a description. You can also trim the `description` and `when_to_use` text at the source: put the key use case first, since each entry’s combined text is capped at 1,536 characters regardless of budget. The cap is configurable with [`maxSkillDescriptionChars`](/docs/en/settings#available-settings).
Related resources
- **[Debug your configuration](/docs/en/debug-your-config)**: diagnose why a skill isn’t appearing or triggering
- **[Subagents](/docs/en/sub-agents)**: delegate tasks to specialized agents
- **[Plugins](/docs/en/plugins)**: package and distribute skills with other extensions
- **[Hooks](/docs/en/hooks)**: automate workflows around tool events
- **[Memory](/docs/en/memory)**: manage CLAUDE.md files for persistent context
- **[Commands](/docs/en/commands)**: reference for built-in commands and bundled skills
- **[Permissions](/docs/en/permissions)**: control tool and skill access
---
## extend-claude-with-skills-claude-code-docs.md
# Extend Claude with skills
Create, manage, and share skills to extend Claude’s capabilities in Claude Code. Includes custom commands and bundled skills.
Skills extend what Claude can do. Create a `SKILL.md` file with instructions, and Claude adds it to its toolkit. Claude uses skills when relevant, or you can invoke one directly with `/skill-name`. Create a skill when you keep pasting the same playbook, checklist, or multi-step procedure into chat, or when a section of CLAUDE.md has grown into a procedure rather than a fact. Unlike CLAUDE.md content, a skill’s body loads only when it’s used, so long reference material costs almost nothing until you need it.
For built-in commands like `/help` and `/compact`, and bundled skills like `/debug` and `/simplify`, see the [commands reference](/docs/en/commands).**Custom commands have been merged into skills.** A file at `.claude/commands/deploy.md` and a skill at `.claude/skills/deploy/SKILL.md` both create `/deploy` and work the same way. Your existing `.claude/commands/` files keep working. Skills add optional features: a directory for supporting files, frontmatter to [control whether you or Claude invokes them](#control-who-invokes-a-skill), and the ability for Claude to load them automatically when relevant.
Claude Code skills follow the [Agent Skills](https://agentskills.io) open standard, which works across multiple AI tools. Claude Code extends the standard with additional features like [invocation control](#control-who-invokes-a-skill), [subagent execution](#run-skills-in-a-subagent), and [dynamic context injection](#inject-dynamic-context).
Bundled skills
Claude Code includes a set of bundled skills that are available in every session, including `/simplify`, `/batch`, `/debug`, `/loop`, and `/claude-api`. Unlike most built-in commands, which execute fixed logic directly, bundled skills are prompt-based: they give Claude a detailed playbook and let it orchestrate the work using its tools. You invoke them the same way as any other skill, by typing `/` followed by the skill name. Bundled skills are listed alongside built-in commands in the [commands reference](/docs/en/commands), marked **Skill** in the Purpose column.
Getting started
Create your first skill
This example creates a skill that teaches Claude to explain code using visual diagrams and analogies. Since it uses default frontmatter, Claude can load it automatically when you ask how something works, or you can invoke it directly with `/explain-code`.
1
Create the skill directory
Create a directory for the skill in your personal skills folder. Personal skills are available across all your projects.
```python
mkdir -p ~/.claude/skills/explain-code
```
2
Write SKILL.md
Every skill needs a `SKILL.md` file with two parts: YAML frontmatter (between `---` markers) that tells Claude when to use the skill, and markdown content with instructions Claude follows when the skill is invoked. The `name` field becomes the `/slash-command`, and the `description` helps Claude decide when to load it automatically.Create `~/.claude/skills/explain-code/SKILL.md`:
```python
---
name: explain-code
description: Explains code with visual diagrams and analogies. Use when explaining how code works, teaching about a codebase, or when the user asks "how does this work?"
---
When explaining code, always include:
1. **Start with an analogy**: Compare the code to something from everyday life
2. **Draw a diagram**: Use ASCII art to show the flow, structure, or relationships
3. **Walk through the code**: Explain step-by-step what happens
4. **Highlight a gotcha**: What's a common mistake or misconception?
Keep explanations conversational. For complex concepts, use multiple analogies.
```
3
Test the skill
You can test it two ways:**Let Claude invoke it automatically** by asking something that matches the description:
```python
How does this code work?
```
**Or invoke it directly** with the skill name:
```python
/explain-code src/auth/login.ts
```
Either way, Claude should include an analogy and ASCII diagram in its explanation.
Where skills live
Where you store a skill determines who can use it:
| Location | Path | Applies to |
|:---|:---|:---|
| Enterprise | See [managed settings](/docs/en/settings#settings-files) | All users in your organization |
| Personal | `~/.claude/skills/<skill-name>/SKILL.md` | All your projects |
| Project | `.claude/skills/<skill-name>/SKILL.md` | This project only |
| Plugin | `<plugin>/skills/<skill-name>/SKILL.md` | Where plugin is enabled |
When skills share the same name across levels, enterprise overrides personal, and personal overrides project. Plugin skills use a `plugin-name:skill-name` namespace, so they cannot conflict with other levels. If you have files in `.claude/commands/`, those work the same way, but if a skill and a command share the same name, the skill takes precedence.
Live change detection
Claude Code watches skill directories for file changes. Adding, editing, or removing a skill under `~/.claude/skills/`, the project `.claude/skills/`, or a `.claude/skills/` inside an `--add-dir` directory takes effect within the current session without restarting. Creating a top-level skills directory that did not exist when the session started requires restarting Claude Code so the new directory can be watched.
Automatic discovery from nested directories
When you work with files in subdirectories, Claude Code automatically discovers skills from nested `.claude/skills/` directories. For example, if you’re editing a file in `packages/frontend/`, Claude Code also looks for skills in `packages/frontend/.claude/skills/`. This supports monorepo setups where packages have their own skills. Each skill is a directory with `SKILL.md` as the entrypoint:
```python
my-skill/
├── SKILL.md # Main instructions (required)
├── template.md # Template for Claude to fill in
├── examples/
│ └── sample.md # Example output showing expected format
└── scripts/
└── validate.sh # Script Claude can execute
```
The `SKILL.md` contains the main instructions and is required. Other files are optional and let you build more powerful skills: templates for Claude to fill in, example outputs showing the expected format, scripts Claude can execute, or detailed reference documentation. Reference these files from your `SKILL.md` so Claude knows what they contain and when to load them. See [Add supporting files](#add-supporting-files) for more details.
Files in `.claude/commands/` still work and support the same [frontmatter](#frontmatter-reference). Skills are recommended since they support additional features like supporting files.
Skills from additional directories
The `--add-dir` flag [grants file access](/docs/en/permissions#additional-directories-grant-file-access-not-configuration) rather than configuration discovery, but skills are an exception: `.claude/skills/` within an added directory is loaded automatically. See [Live change detection](#live-change-detection) for how edits are picked up during a session. Other `.claude/` configuration such as subagents, commands, and output styles is not loaded from additional directories. See the [exceptions table](/docs/en/permissions#additional-directories-grant-file-access-not-configuration) for the complete list of what is and isn’t loaded, and the recommended ways to share configuration across projects.
CLAUDE.md files from `--add-dir` directories are not loaded by default. To load them, set `CLAUDE_CODE_ADDITIONAL_DIRECTORIES_CLAUDE_MD=1`. See [Load from additional directories](/docs/en/memory#load-from-additional-directories).
Configure skills
Skills are configured through YAML frontmatter at the top of `SKILL.md` and the markdown content that follows.
Types of skill content
Skill files can contain any instructions, but thinking about how you want to invoke them helps guide what to include: **Reference content** adds knowledge Claude applies to your current work. Conventions, patterns, style guides, domain knowledge. This content runs inline so Claude can use it alongside your conversation context.
```python
---
name: api-conventions
description: API design patterns for this codebase
---
When writing API endpoints:
- Use RESTful naming conventions
- Return consistent error formats
- Include request validation
```
**Task content** gives Claude step-by-step instructions for a specific action, like deployments, commits, or code generation. These are often actions you want to invoke directly with `/skill-name` rather than letting Claude decide when to run them. Add `disable-model-invocation: true` to prevent Claude from triggering it automatically.
```python
---
name: deploy
description: Deploy the application to production
context: fork
disable-model-invocation: true
---
Deploy the application:
1. Run the test suite
2. Build the application
3. Push to the deployment target
```
Your `SKILL.md` can contain anything, but thinking through how you want the skill invoked (by you, by Claude, or both) and where you want it to run (inline or in a subagent) helps guide what to include. For complex skills, you can also [add supporting files](#add-supporting-files) to keep the main skill focused.
Frontmatter reference
Beyond the markdown content, you can configure skill behavior using YAML frontmatter fields between `---` markers at the top of your `SKILL.md` file:
```python
---
name: my-skill
description: What this skill does
disable-model-invocation: true
allowed-tools: Read Grep
---
Your skill instructions here...
```
All fields are optional. Only `description` is recommended so Claude knows when to use the skill.
| Field | Required | Description |
|:---|:---|:---|
| `name` | No | Display name for the skill. If omitted, uses the directory name. Lowercase letters, numbers, and hyphens only (max 64 characters). |
| `description` | Recommended | What the skill does and when to use it. Claude uses this to decide when to apply the skill. If omitted, uses the first paragraph of markdown content. Front-load the key use case: the combined `description` and `when_to_use` text is truncated at 1,536 characters in the skill listing to reduce context usage. |
| `when_to_use` | No | Additional context for when Claude should invoke the skill, such as trigger phrases or example requests. Appended to `description` in the skill listing and counts toward the 1,536-character cap. |
| `argument-hint` | No | Hint shown during autocomplete to indicate expected arguments. Example: `[issue-number]` or `[filename] [format]`. |
| `arguments` | No | Named positional arguments for [`$name` substitution](#available-string-substitutions) in the skill content. Accepts a space-separated string or a YAML list. Names map to argument positions in order. |
| `disable-model-invocation` | No | Set to `true` to prevent Claude from automatically loading this skill. Use for workflows you want to trigger manually with `/name`. Also prevents the skill from being [preloaded into subagents](/docs/en/sub-agents#preload-skills-into-subagents). Default: `false`. |
| `user-invocable` | No | Set to `false` to hide from the `/` menu. Use for background knowledge users shouldn’t invoke directly. Default: `true`. |
| `allowed-tools` | No | Tools Claude can use without asking permission when this skill is active. Accepts a space-separated string or a YAML list. |
| `model` | No | Model to use when this skill is active. The override applies for the rest of the current turn and is not saved to settings; the session model resumes on your next prompt. Accepts the same values as [`/model`](/docs/en/model-config), or `inherit` to keep the active model. |
| `effort` | No | [Effort level](/docs/en/model-config#adjust-effort-level) when this skill is active. Overrides the session effort level. Default: inherits from session. Options: `low`, `medium`, `high`, `xhigh`, `max`; available levels depend on the model. |
| `context` | No | Set to `fork` to run in a forked subagent context. |
| `agent` | No | Which subagent type to use when `context: fork` is set. |
| `hooks` | No | Hooks scoped to this skill’s lifecycle. See [Hooks in skills and agents](/docs/en/hooks#hooks-in-skills-and-agents) for configuration format. |
| `paths` | No | Glob patterns that limit when this skill is activated. Accepts a comma-separated string or a YAML list. When set, Claude loads the skill automatically only when working with files matching the patterns. Uses the same format as [path-specific rules](/docs/en/memory#path-specific-rules). |
| `shell` | No | Shell to use for `` !`command` `` and ```` ```! ```` blocks in this skill. Accepts `bash` (default) or `powershell`. Setting `powershell` runs inline shell commands via PowerShell on Windows. Requires `CLAUDE_CODE_USE_POWERSHELL_TOOL=1`. |
Available string substitutions
Skills support string substitution for dynamic values in the skill content:
| Variable | Description |
|:---|:---|
| `$ARGUMENTS` | All arguments passed when invoking the skill. If `$ARGUMENTS` is not present in the content, arguments are appended as `ARGUMENTS: <value>`. |
| `$ARGUMENTS[N]` | Access a specific argument by 0-based index, such as `$ARGUMENTS[0]` for the first argument. |
| `$N` | Shorthand for `$ARGUMENTS[N]`, such as `$0` for the first argument or `$1` for the second. |
| `$name` | Named argument declared in the [`arguments`](#frontmatter-reference) frontmatter list. Names map to positions in order, so with `arguments: [issue, branch]` the placeholder `$issue` expands to the first argument and `$branch` to the second. |
| `${CLAUDE_SESSION_ID}` | The current session ID. Useful for logging, creating session-specific files, or correlating skill output with sessions. |
| `${CLAUDE_SKILL_DIR}` | The directory containing the skill’s `SKILL.md` file. For plugin skills, this is the skill’s subdirectory within the plugin, not the plugin root. Use this in bash injection commands to reference scripts or files bundled with the skill, regardless of the current working directory. |
Indexed arguments use shell-style quoting, so wrap multi-word values in quotes to pass them as a single argument. For example, `/my-skill "hello world" second` makes `$0` expand to `hello world` and `$1` to `second`. The `$ARGUMENTS` placeholder always expands to the full argument string as typed. **Example using substitutions:**
```python
---
name: session-logger
description: Log activity for this session
---
Log the following to logs/${CLAUDE_SESSION_ID}.log:
$ARGUMENTS
```
Add supporting files
Skills can include multiple files in their directory. This keeps `SKILL.md` focused on the essentials while letting Claude access detailed reference material only when needed. Large reference docs, API specifications, or example collections don’t need to load into context every time the skill runs.
```python
my-skill/
├── SKILL.md (required - overview and navigation)
├── reference.md (detailed API docs - loaded when needed)
├── examples.md (usage examples - loaded when needed)
└── scripts/
└── helper.py (utility script - executed, not loaded)
```
Reference supporting files from `SKILL.md` so Claude knows what each file contains and when to load it:
```python
## Additional resources
- For complete API details, see [reference.md](reference.md)
- For usage examples, see [examples.md](examples.md)
```
Keep `SKILL.md` under 500 lines. Move detailed reference material to separate files.
Control who invokes a skill
By default, both you and Claude can invoke any skill. You can type `/skill-name` to invoke it directly, and Claude can load it automatically when relevant to your conversation. Two frontmatter fields let you restrict this:
- **`disable-model-invocation: true`**: Only you can invoke the skill. Use this for workflows with side effects or that you want to control timing, like `/commit`, `/deploy`, or `/send-slack-message`. You don’t want Claude deciding to deploy because your code looks ready.
- **`user-invocable: false`**: Only Claude can invoke the skill. Use this for background knowledge that isn’t actionable as a command. A `legacy-system-context` skill explains how an old system works. Claude should know this when relevant, but `/legacy-system-context` isn’t a meaningful action for users to take.
This example creates a deploy skill that only you can trigger. The `disable-model-invocation: true` field prevents Claude from running it automatically:
```python
---
name: deploy
description: Deploy the application to production
disable-model-invocation: true
---
Deploy $ARGUMENTS to production:
1. Run the test suite
2. Build the application
3. Push to the deployment target
4. Verify the deployment succeeded
```
Here’s how the two fields affect invocation and context loading:
| Frontmatter | You can invoke | Claude can invoke | When loaded into context |
|:---|:---|:---|:---|
| (default) | Yes | Yes | Description always in context, full skill loads when invoked |
| `disable-model-invocation: true` | Yes | No | Description not in context, full skill loads when you invoke |
| `user-invocable: false` | No | Yes | Description always in context, full skill loads when invoked |
In a regular session, skill descriptions are loaded into context so Claude knows what’s available, but full skill content only loads when invoked. [Subagents with preloaded skills](/docs/en/sub-agents#preload-skills-into-subagents) work differently: the full skill content is injected at startup.
Skill content lifecycle
When you or Claude invoke a skill, the rendered `SKILL.md` content enters the conversation as a single message and stays there for the rest of the session. Claude Code does not re-read the skill file on later turns, so write guidance that should apply throughout a task as standing instructions rather than one-time steps. [Auto-compaction](/docs/en/how-claude-code-works#when-context-fills-up) carries invoked skills forward within a token budget. When the conversation is summarized to free context, Claude Code re-attaches the most recent invocation of each skill after the summary, keeping the first 5,000 tokens of each. Re-attached skills share a combined budget of 25,000 tokens. Claude Code fills this budget starting from the most recently invoked skill, so older skills can be dropped entirely after compaction if you have invoked many in one session. If a skill seems to stop influencing behavior after the first response, the content is usually still present and the model is choosing other tools or approaches. Strengthen the skill’s `description` and instructions so the model keeps preferring it, or use [hooks](/docs/en/hooks) to enforce behavior deterministically. If the skill is large or you invoked several others after it, re-invoke it after compaction to restore the full content.
Pre-approve tools for a skill
The `allowed-tools` field grants permission for the listed tools while the skill is active, so Claude can use them without prompting you for approval. It does not restrict which tools are available: every tool remains callable, and your [permission settings](/docs/en/permissions) still govern tools that are not listed. This skill lets Claude run git commands without per-use approval whenever you invoke it:
```python
---
name: commit
description: Stage and commit the current changes
disable-model-invocation: true
allowed-tools: Bash(git add *) Bash(git commit *) Bash(git status *)
---
```
To block a skill from using certain tools, add deny rules in your [permission settings](/docs/en/permissions) instead.
Pass arguments to skills
Both you and Claude can pass arguments when invoking a skill. Arguments are available via the `$ARGUMENTS` placeholder. This skill fixes a GitHub issue by number. The `$ARGUMENTS` placeholder gets replaced with whatever follows the skill name:
```python
---
name: fix-issue
description: Fix a GitHub issue
disable-model-invocation: true
---
Fix GitHub issue $ARGUMENTS following our coding standards.
1. Read the issue description
2. Understand the requirements
3. Implement the fix
4. Write tests
5. Create a commit
```
When you run `/fix-issue 123`, Claude receives “Fix GitHub issue 123 following our coding standards…” If you invoke a skill with arguments but the skill doesn’t include `$ARGUMENTS`, Claude Code appends `ARGUMENTS: <your input>` to the end of the skill content so Claude still sees what you typed. To access individual arguments by position, use `$ARGUMENTS[N]` or the shorter `$N`:
```python
---
name: migrate-component
description: Migrate a component from one framework to another
---
Migrate the $ARGUMENTS[0] component from $ARGUMENTS[1] to $ARGUMENTS[2].
Preserve all existing behavior and tests.
```
Running `/migrate-component SearchBar React Vue` replaces `$ARGUMENTS[0]` with `SearchBar`, `$ARGUMENTS[1]` with `React`, and `$ARGUMENTS[2]` with `Vue`. The same skill using the `$N` shorthand:
```python
---
name: migrate-component
description: Migrate a component from one framework to another
---
Migrate the $0 component from $1 to $2.
Preserve all existing behavior and tests.
```
Advanced patterns
Inject dynamic context
The `` !`<command>` `` syntax runs shell commands before the skill content is sent to Claude. The command output replaces the placeholder, so Claude receives actual data, not the command itself. This skill summarizes a pull request by fetching live PR data with the GitHub CLI. The `` !`gh pr diff` `` and other commands run first, and their output gets inserted into the prompt:
```python
---
name: pr-summary
description: Summarize changes in a pull request
context: fork
agent: Explore
allowed-tools: Bash(gh *)
---
## Pull request context
- PR diff: !`gh pr diff`
- PR comments: !`gh pr view --comments`
- Changed files: !`gh pr diff --name-only`
## Your task
Summarize this pull request...
```
When this skill runs:
1. Each `` !`<command>` `` executes immediately (before Claude sees anything)
2. The output replaces the placeholder in the skill content
3. Claude receives the fully-rendered prompt with actual PR data
This is preprocessing, not something Claude executes. Claude only sees the final result. For multi-line commands, use a fenced code block opened with ```` ```! ```` instead of the inline form:
```` shiki
## Environment
```!
node --version
npm --version
git status --short
```
````
To disable this behavior for skills and custom commands from user, project, plugin, or [additional-directory](#skills-from-additional-directories) sources, set `"disableSkillShellExecution": true` in [settings](/docs/en/settings). Each command is replaced with `[shell command execution disabled by policy]` instead of being run. Bundled and managed skills are not affected. This setting is most useful in [managed settings](/docs/en/permissions#managed-settings), where users cannot override it.
To enable [extended thinking](/docs/en/common-workflows#use-extended-thinking-thinking-mode) in a skill, include the word “ultrathink” anywhere in your skill content.
Run skills in a subagent
Add `context: fork` to your frontmatter when you want a skill to run in isolation. The skill content becomes the prompt that drives the subagent. It won’t have access to your conversation history.
`context: fork` only makes sense for skills with explicit instructions. If your skill contains guidelines like “use these API conventions” without a task, the subagent receives the guidelines but no actionable prompt, and returns without meaningful output.
Skills and [subagents](/docs/en/sub-agents) work together in two directions:
| Approach | System prompt | Task | Also loads |
|:---|:---|:---|:---|
| Skill with `context: fork` | From agent type (`Explore`, `Plan`, etc.) | SKILL.md content | CLAUDE.md |
| Subagent with `skills` field | Subagent’s markdown body | Claude’s delegation message | Preloaded skills + CLAUDE.md |
With `context: fork`, you write the task in your skill and pick an agent type to execute it. For the inverse (defining a custom subagent that uses skills as reference material), see [Subagents](/docs/en/sub-agents#preload-skills-into-subagents).
Example: Research skill using Explore agent
This skill runs research in a forked Explore agent. The skill content becomes the task, and the agent provides read-only tools optimized for codebase exploration:
```python
---
name: deep-research
description: Research a topic thoroughly
context: fork
agent: Explore
---
Research $ARGUMENTS thoroughly:
1. Find relevant files using Glob and Grep
2. Read and analyze the code
3. Summarize findings with specific file references
```
When this skill runs:
1. A new isolated context is created
2. The subagent receives the skill content as its prompt (“Research \$ARGUMENTS thoroughly…”)
3. The `agent` field determines the execution environment (model, tools, and permissions)
4. Results are summarized and returned to your main conversation
The `agent` field specifies which subagent configuration to use. Options include built-in agents (`Explore`, `Plan`, `general-purpose`) or any custom subagent from `.claude/agents/`. If omitted, uses `general-purpose`.
Restrict Claude’s skill access
By default, Claude can invoke any skill that doesn’t have `disable-model-invocation: true` set. Skills that define `allowed-tools` grant Claude access to those tools without per-use approval when the skill is active. Your [permission settings](/docs/en/permissions) still govern baseline approval behavior for all other tools. A few built-in commands are also available through the Skill tool, including `/init`, `/review`, and `/security-review`. Other built-in commands such as `/compact` are not. Three ways to control which skills Claude can invoke: **Disable all skills** by denying the Skill tool in `/permissions`:
```python
# Add to deny rules:
Skill
```
**Allow or deny specific skills** using [permission rules](/docs/en/permissions):
```python
# Allow only specific skills
Skill(commit)
Skill(review-pr *)
# Deny specific skills
Skill(deploy *)
```
Permission syntax: `Skill(name)` for exact match, `Skill(name *)` for prefix match with any arguments. **Hide individual skills** by adding `disable-model-invocation: true` to their frontmatter. This removes the skill from Claude’s context entirely.
The `user-invocable` field only controls menu visibility, not Skill tool access. Use `disable-model-invocation: true` to block programmatic invocation.
Share skills
Skills can be distributed at different scopes depending on your audience:
- **Project skills**: Commit `.claude/skills/` to version control
- **Plugins**: Create a `skills/` directory in your [plugin](/docs/en/plugins)
- **Managed**: Deploy organization-wide through [managed settings](/docs/en/settings#settings-files)
Generate visual output
Skills can bundle and run scripts in any language, giving Claude capabilities beyond what’s possible in a single prompt. One powerful pattern is generating visual output: interactive HTML files that open in your browser for exploring data, debugging, or creating reports. This example creates a codebase explorer: an interactive tree view where you can expand and collapse directories, see file sizes at a glance, and identify file types by color. Create the Skill directory:
```python
mkdir -p ~/.claude/skills/codebase-visualizer/scripts
```
Create `~/.claude/skills/codebase-visualizer/SKILL.md`. The description tells Claude when to activate this Skill, and the instructions tell Claude to run the bundled script:
```` shiki
---
name: codebase-visualizer
description: Generate an interactive collapsible tree visualization of your codebase. Use when exploring a new repo, understanding project structure, or identifying large files.
allowed-tools: Bash(python *)
---
# Codebase Visualizer
Generate an interactive HTML tree view that shows your project's file structure with collapsible directories.
## Usage
Run the visualization script from your project root:
```bash
python ~/.claude/skills/codebase-visualizer/scripts/visualize.py .
```
This creates `codebase-map.html` in the current directory and opens it in your default browser.
## What the visualization shows
- **Collapsible directories**: Click folders to expand/collapse
- **File sizes**: Displayed next to each file
- **Colors**: Different colors for different file types
- **Directory totals**: Shows aggregate size of each folder
````
Create `~/.claude/skills/codebase-visualizer/scripts/visualize.py`. This script scans a directory tree and generates a self-contained HTML file with:
- A **summary sidebar** showing file count, directory count, total size, and number of file types
- A **bar chart** breaking down the codebase by file type (top 8 by size)
- A **collapsible tree** where you can expand and collapse directories, with color-coded file type indicators
The script requires Python but uses only built-in libraries, so there are no packages to install:
```python
#!/usr/bin/env python3
"""Generate an interactive collapsible tree visualization of a codebase."""
import json
import sys
import webbrowser
from pathlib import Path
from collections import Counter
IGNORE = {'.git', 'node_modules', '__pycache__', '.venv', 'venv', 'dist', 'build'}
def scan(path: Path, stats: dict) -> dict:
result = {"name": path.name, "children": [], "size": 0}
try:
for item in sorted(path.iterdir()):
if item.name in IGNORE or item.name.startswith('.'):
continue
if item.is_file():
size = item.stat().st_size
ext = item.suffix.lower() or '(no ext)'
result["children"].append({"name": item.name, "size": size, "ext": ext})
result["size"] += size
stats["files"] += 1
stats["extensions"][ext] += 1
stats["ext_sizes"][ext] += size
elif item.is_dir():
stats["dirs"] += 1
child = scan(item, stats)
if child["children"]:
result["children"].append(child)
result["size"] += child["size"]
except PermissionError:
pass
return result
def generate_html(data: dict, stats: dict, output: Path) -> None:
ext_sizes = stats["ext_sizes"]
total_size = sum(ext_sizes.values()) or 1
sorted_exts = sorted(ext_sizes.items(), key=lambda x: -x[1])[:8]
colors = {
'.js': '#f7df1e', '.ts': '#3178c6', '.py': '#3776ab', '.go': '#00add8',
'.rs': '#dea584', '.rb': '#cc342d', '.css': '#264de4', '.html': '#e34c26',
'.json': '#6b7280', '.md': '#083fa1', '.yaml': '#cb171e', '.yml': '#cb171e',
'.mdx': '#083fa1', '.tsx': '#3178c6', '.jsx': '#61dafb', '.sh': '#4eaa25',
}
lang_bars = "".join(
f'<div class="bar-row"><span class="bar-label">{ext}</span>'
f'<div class="bar" style="width:{(size/total_size)*100}%;background:{colors.get(ext,"#6b7280")}"></div>'
f'<span class="bar-pct">{(size/total_size)*100:.1f}%</span></div>'
for ext, size in sorted_exts
)
def fmt(b):
if b < 1024: return f"{b} B"
if b < 1048576: return f"{b/1024:.1f} KB"
return f"{b/1048576:.1f} MB"
html = f'''<!DOCTYPE html>
<html><head>
<meta charset="utf-8"><title>Codebase Explorer</title>
<style>
body {{ font: 14px/1.5 system-ui, sans-serif; margin: 0; background: #1a1a2e; color: #eee; }}
.container {{ display: flex; height: 100vh; }}
.sidebar {{ width: 280px; background: #252542; padding: 20px; border-right: 1px solid #3d3d5c; overflow-y: auto; flex-shrink: 0; }}
.main {{ flex: 1; padding: 20px; overflow-y: auto; }}
h1 {{ margin: 0 0 10px 0; font-size: 18px; }}
h2 {{ margin: 20px 0 10px 0; font-size: 14px; color: #888; text-transform: uppercase; }}
.stat {{ display: flex; justify-content: space-between; padding: 8px 0; border-bottom: 1px solid #3d3d5c; }}
.stat-value {{ font-weight: bold; }}
.bar-row {{ display: flex; align-items: center; margin: 6px 0; }}
.bar-label {{ width: 55px; font-size: 12px; color: #aaa; }}
.bar {{ height: 18px; border-radius: 3px; }}
.bar-pct {{ margin-left: 8px; font-size: 12px; color: #666; }}
.tree {{ list-style: none; padding-left: 20px; }}
details {{ cursor: pointer; }}
summary {{ padding: 4px 8px; border-radius: 4px; }}
summary:hover {{ background: #2d2d44; }}
.folder {{ color: #ffd700; }}
.file {{ display: flex; align-items: center; padding: 4px 8px; border-radius: 4px; }}
.file:hover {{ background: #2d2d44; }}
.size {{ color: #888; margin-left: auto; font-size: 12px; }}
.dot {{ width: 8px; height: 8px; border-radius: 50%; margin-right: 8px; }}
</style>
</head><body>
<div class="container">
<div class="sidebar">
<h1>📊 Summary</h1>
<div class="stat"><span>Files</span><span class="stat-value">{stats["files"]:,}</span></div>
<div class="stat"><span>Directories</span><span class="stat-value">{stats["dirs"]:,}</span></div>
<div class="stat"><span>Total size</span><span class="stat-value">{fmt(data["size"])}</span></div>
<div class="stat"><span>File types</span><span class="stat-value">{len(stats["extensions"])}</span></div>
<h2>By file type</h2>
{lang_bars}
</div>
<div class="main">
<h1>📁 {data["name"]}</h1>
<ul class="tree" id="root"></ul>
</div>
</div>
<script>
const data = {json.dumps(data)};
const colors = {json.dumps(colors)};
function fmt(b) {{ if (b < 1024) return b + ' B'; if (b < 1048576) return (b/1024).toFixed(1) + ' KB'; return (b/1048576).toFixed(1) + ' MB'; }}
function render(node, parent) {{
if (node.children) {{
const det = document.createElement('details');
det.open = parent === document.getElementById('root');
det.innerHTML = `<summary><span class="folder">📁 ${{node.name}}</span><span class="size">${{fmt(node.size)}}</span></summary>`;
const ul = document.createElement('ul'); ul.className = 'tree';
node.children.sort((a,b) => (b.children?1:0)-(a.children?1:0) || a.name.localeCompare(b.name));
node.children.forEach(c => render(c, ul));
det.appendChild(ul);
const li = document.createElement('li'); li.appendChild(det); parent.appendChild(li);
}} else {{
const li = document.createElement('li'); li.className = 'file';
li.innerHTML = `<span class="dot" style="background:${{colors[node.ext]||'#6b7280'}}"></span>${{node.name}}<span class="size">${{fmt(node.size)}}</span>`;
parent.appendChild(li);
}}
}}
data.children.forEach(c => render(c, document.getElementById('root')));
</script>
</body></html>'''
output.write_text(html)
if __name__ == '__main__':
target = Path(sys.argv[1] if len(sys.argv) > 1 else '.').resolve()
stats = {"files": 0, "dirs": 0, "extensions": Counter(), "ext_sizes": Counter()}
data = scan(target, stats)
out = Path('codebase-map.html')
generate_html(data, stats, out)
print(f'Generated {out.absolute()}')
webbrowser.open(f'file://{out.absolute()}')
```
See all 131 lines
To test, open Claude Code in any project and ask “Visualize this codebase.” Claude runs the script, generates `codebase-map.html`, and opens it in your browser. This pattern works for any visual output: dependency graphs, test coverage reports, API documentation, or database schema visualizations. The bundled script does the heavy lifting while Claude handles orchestration.
Troubleshooting
Skill not triggering
If Claude doesn’t use your skill when expected:
1. Check the description includes keywords users would naturally say
2. Verify the skill appears in `What skills are available?`
3. Try rephrasing your request to match the description more closely
4. Invoke it directly with `/skill-name` if the skill is user-invocable
Skill triggers too often
If Claude uses your skill when you don’t want it:
1. Make the description more specific
2. Add `disable-model-invocation: true` if you only want manual invocation
Skill descriptions are cut short
Skill descriptions are loaded into context so Claude knows what’s available. All skill names are always included, but if you have many skills, descriptions are shortened to fit the character budget, which can strip the keywords Claude needs to match your request. The budget scales dynamically at 1% of the context window, with a fallback of 8,000 characters. To raise the limit, set the `SLASH_COMMAND_TOOL_CHAR_BUDGET` environment variable. Or trim the `description` and `when_to_use` text at the source: front-load the key use case, since each entry’s combined text is capped at 1,536 characters regardless of budget.
Related resources
- **[Debug your configuration](/docs/en/debug-your-config)**: diagnose why a skill isn’t appearing or triggering
- **[Subagents](/docs/en/sub-agents)**: delegate tasks to specialized agents
- **[Plugins](/docs/en/plugins)**: package and distribute skills with other extensions
- **[Hooks](/docs/en/hooks)**: automate workflows around tool events
- **[Memory](/docs/en/memory)**: manage CLAUDE.md files for persistent context
- **[Commands](/docs/en/commands)**: reference for built-in commands and bundled skills
- **[Permissions](/docs/en/permissions)**: control tool and skill access
---
## extensions.md
# Extensions
> Optional extensions to the Model Context Protocol
# MCP Extensions
MCP extensions are optional additions to the specification that define capabilities beyond the core protocol. Extensions enable functionality that may be modular (e.g., distinct features like authentication), specialized (e.g., industry-specific logic), or experimental (e.g., features being incubated for potential core inclusion).
Extensions are identified using a unique *extension identifier* with the format: `{vendor-prefix}/{extension-name}`, e.g. `io.modelcontextprotocol/oauth-client-credentials`. Official extensions use the `io.modelcontextprotocol` vendor prefix.
## Official Extension Repositories
Official extensions live inside the [MCP GitHub org](https://github.com/modelcontextprotocol/) in repositories with the `ext-` prefix.
### ext-auth
**Repository:** [github.com/modelcontextprotocol/ext-auth](https://github.com/modelcontextprotocol/ext-auth)
Extensions for supplementary authorization mechanisms beyond the core specification.
| Extension | Description | Specification |
| -------------------------------- | -------------------------------------------------------------------------- | --------------------------------------------------------------------------------------------------------------------------- |
| OAuth Client Credentials | OAuth 2.0 client credentials flow for machine-to-machine authentication | [Link](https://github.com/modelcontextprotocol/ext-auth/blob/main/specification/draft/oauth-client-credentials.mdx) |
| Enterprise-Managed Authorization | Framework for enterprise environments requiring centralized access control | [Link](https://github.com/modelcontextprotocol/ext-auth/blob/main/specification/draft/enterprise-managed-authorization.mdx) |
### ext-apps
**Repository:** [github.com/modelcontextprotocol/ext-apps](https://github.com/modelcontextprotocol/ext-apps)
Extensions for interactive UI elements in conversational MCP clients.
| Extension | Description | Specification |
| --------- | ---------------------------------------------------------------------------------------------------------------- | ---------------------------------------------------------------------------------------------------- |
| MCP Apps | Allows MCP Servers to display interactive UI elements (charts, forms, video players) inline within conversations | [Link](https://github.com/modelcontextprotocol/ext-apps/blob/main/specification/2026-01-26/apps.mdx) |
## Creating Extensions
The lifecycle for official extensions is similar to a SEP, but delegated to extension repository maintainers:
1. **Propose**: Author creates a SEP in the main MCP repository using the [standard SEP guidelines](/community/sep-guidelines) with type **Extensions Track**.
2. **Review**: Extension SEPs are reviewed by the relevant extension repository maintainers.
3. **Implement**: Extension SEPs **MUST** have at least one reference implementation in an official SDK before being accepted.
4. **Publish**: Once approved, the author produces a PR that introduces the extension to the extension repository.
5. **Adopt**: Approved extensions **MAY** be implemented in additional clients, servers, and SDKs.
### Requirements
* Extension specifications **MUST** use RFC 2119 language (MUST, SHOULD, MAY)
* Extensions **SHOULD** have an associated working group or interest group
### SDK Implementation
SDKs **MAY** implement extensions. Where implemented:
* Extensions **MUST** be disabled by default and require explicit opt-in
* SDK documentation **SHOULD** list supported extensions
* SDK maintainers have full autonomy over which extensions they support
* Extension support is not required for protocol conformance
### Evolution
Extensions evolve independently of the core protocol. Updates to extensions are managed by the extension repository maintainers and do not require core maintainer review.
Extensions **MUST** consider backwards compatibility in their design:
* Extensions **SHOULD** maintain backwards compatibility through capability flags or versioning within the extension settings object, rather than creating a new extension identifier
* When backwards-incompatible changes are unavoidable, a new extension identifier **MUST** be used (e.g., `io.modelcontextprotocol/my-extension-v2`)
---
## feature-dev.md
# Feature Development
You are helping a developer implement a new feature. Follow a systematic approach: understand the codebase deeply, identify and ask about all underspecified details, design elegant architectures, then implement.
## Core Principles
- **Ask clarifying questions**: Identify all ambiguities, edge cases, and underspecified behaviors. Ask specific, concrete questions rather than making assumptions. Wait for user answers before proceeding with implementation. Ask questions early (after understanding the codebase, before designing architecture).
- **Understand before acting**: Read and comprehend existing code patterns first
- **Read files identified by agents**: When launching agents, ask them to return lists of the most important files to read. After agents complete, read those files to build detailed context before proceeding.
- **Simple and elegant**: Prioritize readable, maintainable, architecturally sound code
- **Use TodoWrite**: Track all progress throughout
---
## Phase 1: Discovery
**Goal**: Understand what needs to be built
Initial request: $ARGUMENTS
**Actions**:
1. Create todo list with all phases
2. If feature unclear, ask user for:
- What problem are they solving?
- What should the feature do?
- Any constraints or requirements?
3. Summarize understanding and confirm with user
---
## Phase 2: Codebase Exploration
**Goal**: Understand relevant existing code and patterns at both high and low levels
**Actions**:
1. Launch 2-3 code-explorer agents in parallel. Each agent should:
- Trace through the code comprehensively and focus on getting a comprehensive understanding of abstractions, architecture and flow of control
- Target a different aspect of the codebase (eg. similar features, high level understanding, architectural understanding, user experience, etc)
- Include a list of 5-10 key files to read
**Example agent prompts**:
- "Find features similar to [feature] and trace through their implementation comprehensively"
- "Map the architecture and abstractions for [feature area], tracing through the code comprehensively"
- "Analyze the current implementation of [existing feature/area], tracing through the code comprehensively"
- "Identify UI patterns, testing approaches, or extension points relevant to [feature]"
2. Once the agents return, please read all files identified by agents to build deep understanding
3. Present comprehensive summary of findings and patterns discovered
---
## Phase 3: Clarifying Questions
**Goal**: Fill in gaps and resolve all ambiguities before designing
**CRITICAL**: This is one of the most important phases. DO NOT SKIP.
**Actions**:
1. Review the codebase findings and original feature request
2. Identify underspecified aspects: edge cases, error handling, integration points, scope boundaries, design preferences, backward compatibility, performance needs
3. **Present all questions to the user in a clear, organized list**
4. **Wait for answers before proceeding to architecture design**
If the user says "whatever you think is best", provide your recommendation and get explicit confirmation.
---
## Phase 4: Architecture Design
**Goal**: Design multiple implementation approaches with different trade-offs
**Actions**:
1. Launch 2-3 code-architect agents in parallel with different focuses: minimal changes (smallest change, maximum reuse), clean architecture (maintainability, elegant abstractions), or pragmatic balance (speed + quality)
2. Review all approaches and form your opinion on which fits best for this specific task (consider: small fix vs large feature, urgency, complexity, team context)
3. Present to user: brief summary of each approach, trade-offs comparison, **your recommendation with reasoning**, concrete implementation differences
4. **Ask user which approach they prefer**
---
## Phase 5: Implementation
**Goal**: Build the feature
**DO NOT START WITHOUT USER APPROVAL**
**Actions**:
1. Wait for explicit user approval
2. Read all relevant files identified in previous phases
3. Implement following chosen architecture
4. Follow codebase conventions strictly
5. Write clean, well-documented code
6. Update todos as you progress
---
## Phase 6: Quality Review
**Goal**: Ensure code is simple, DRY, elegant, easy to read, and functionally correct
**Actions**:
1. Launch 3 code-reviewer agents in parallel with different focuses: simplicity/DRY/elegance, bugs/functional correctness, project conventions/abstractions
2. Consolidate findings and identify highest severity issues that you recommend fixing
3. **Present findings to user and ask what they want to do** (fix now, fix later, or proceed as-is)
4. Address issues based on user decision
---
## Phase 7: Summary
**Goal**: Document what was accomplished
**Actions**:
1. Mark all todos complete
2. Summarize:
- What was built
- Key decisions made
- Files modified
- Suggested next steps
---
---
## feature-development-plugin.md
# Feature Development Plugin
A comprehensive, structured workflow for feature development with specialized agents for codebase exploration, architecture design, and quality review.
## Overview
The Feature Development Plugin provides a systematic 7-phase approach to building new features. Instead of jumping straight into code, it guides you through understanding the codebase, asking clarifying questions, designing architecture, and ensuring quality—resulting in better-designed features that integrate seamlessly with your existing code.
## Philosophy
Building features requires more than just writing code. You need to:
- **Understand the codebase** before making changes
- **Ask questions** to clarify ambiguous requirements
- **Design thoughtfully** before implementing
- **Review for quality** after building
This plugin embeds these practices into a structured workflow that runs automatically when you use the `/feature-dev` command.
## Command: `/feature-dev`
Launches a guided feature development workflow with 7 distinct phases.
**Usage:**
```bash
/feature-dev Add user authentication with OAuth
```
Or simply:
```bash
/feature-dev
```
The command will guide you through the entire process interactively.
## The 7-Phase Workflow
### Phase 1: Discovery
**Goal**: Understand what needs to be built
**What happens:**
- Clarifies the feature request if it's unclear
- Asks what problem you're solving
- Identifies constraints and requirements
- Summarizes understanding and confirms with you
**Example:**
```
You: /feature-dev Add caching
Claude: Let me understand what you need...
- What should be cached? (API responses, computed values, etc.)
- What are your performance requirements?
- Do you have a preferred caching solution?
```
### Phase 2: Codebase Exploration
**Goal**: Understand relevant existing code and patterns
**What happens:**
- Launches 2-3 `code-explorer` agents in parallel
- Each agent explores different aspects (similar features, architecture, UI patterns)
- Agents return comprehensive analyses with key files to read
- Claude reads all identified files to build deep understanding
- Presents comprehensive summary of findings
**Agents launched:**
- "Find features similar to [feature] and trace implementation"
- "Map the architecture and abstractions for [area]"
- "Analyze current implementation of [related feature]"
**Example output:**
```
Found similar features:
- User authentication (src/auth/): Uses JWT tokens, middleware pattern
- Session management (src/session/): Redis-backed, 24hr expiry
- API security (src/api/middleware/): Rate limiting, CORS
Key files to understand:
- src/auth/AuthService.ts:45 - Core authentication logic
- src/middleware/authMiddleware.ts:12 - Request authentication
- src/config/security.ts:8 - Security configuration
```
### Phase 3: Clarifying Questions
**Goal**: Fill in gaps and resolve all ambiguities
**What happens:**
- Reviews codebase findings and feature request
- Identifies underspecified aspects:
- Edge cases
- Error handling
- Integration points
- Backward compatibility
- Performance needs
- Presents all questions in an organized list
- **Waits for your answers before proceeding**
**Example:**
```
Before designing the architecture, I need to clarify:
1. OAuth provider: Which OAuth providers? (Google, GitHub, custom?)
2. User data: Store OAuth tokens or just user profile?
3. Existing auth: Replace current auth or add alongside?
4. Sessions: Integrate with existing session management?
5. Error handling: How to handle OAuth failures?
```
**Critical**: This phase ensures nothing is ambiguous before design begins.
### Phase 4: Architecture Design
**Goal**: Design multiple implementation approaches
**What happens:**
- Launches 2-3 `code-architect` agents with different focuses:
- **Minimal changes**: Smallest change, maximum reuse
- **Clean architecture**: Maintainability, elegant abstractions
- **Pragmatic balance**: Speed + quality
- Reviews all approaches
- Forms opinion on which fits best for this task
- Presents comparison with trade-offs and recommendation
- **Asks which approach you prefer**
**Example output:**
```
I've designed 3 approaches:
Approach 1: Minimal Changes
- Extend existing AuthService with OAuth methods
- Add new OAuth routes to existing auth router
- Minimal refactoring required
Pros: Fast, low risk
Cons: Couples OAuth to existing auth, harder to test
Approach 2: Clean Architecture
- New OAuthService with dedicated interface
- Separate OAuth router and middleware
- Refactor AuthService to use common interface
Pros: Clean separation, testable, maintainable
Cons: More files, more refactoring
Approach 3: Pragmatic Balance
- New OAuthProvider abstraction
- Integrate into existing AuthService
- Minimal refactoring, good boundaries
Pros: Balanced complexity and cleanliness
Cons: Some coupling remains
Recommendation: Approach 3 - gives you clean boundaries without
excessive refactoring, and fits your existing architecture well.
Which approach would you like to use?
```
### Phase 5: Implementation
**Goal**: Build the feature
**What happens:**
- **Waits for explicit approval** before starting
- Reads all relevant files identified in previous phases
- Implements following chosen architecture
- Follows codebase conventions strictly
- Writes clean, well-documented code
- Updates todos as progress is made
**Notes:**
- Implementation only starts after you approve
- Follows patterns discovered in Phase 2
- Uses architecture designed in Phase 4
- Continuously tracks progress
### Phase 6: Quality Review
**Goal**: Ensure code is simple, DRY, elegant, and functionally correct
**What happens:**
- Launches 3 `code-reviewer` agents in parallel with different focuses:
- **Simplicity/DRY/Elegance**: Code quality and maintainability
- **Bugs/Correctness**: Functional correctness and logic errors
- **Conventions/Abstractions**: Project standards and patterns
- Consolidates findings
- Identifies highest severity issues
- **Presents findings and asks what you want to do**:
- Fix now
- Fix later
- Proceed as-is
- Addresses issues based on your decision
**Example output:**
```
Code Review Results:
High Priority Issues:
1. Missing error handling in OAuth callback (src/auth/oauth.ts:67)
2. Memory leak: OAuth state not cleaned up (src/auth/oauth.ts:89)
Medium Priority:
1. Could simplify token refresh logic (src/auth/oauth.ts:120)
2. Consider extracting OAuth config validation
All tests pass. Code follows project conventions.
What would you like to do?
```
### Phase 7: Summary
**Goal**: Document what was accomplished
**What happens:**
- Marks all todos complete
- Summarizes:
- What was built
- Key decisions made
- Files modified
- Suggested next steps
**Example:**
```
Feature Complete: OAuth Authentication
What was built:
- OAuth provider abstraction supporting Google and GitHub
- OAuth routes and middleware integrated with existing auth
- Token refresh and session integration
- Error handling for all OAuth flows
Key decisions:
- Used pragmatic approach with OAuthProvider abstraction
- Integrated with existing session management
- Added OAuth state to prevent CSRF
Files modified:
- src/auth/OAuthProvider.ts (new)
- src/auth/AuthService.ts
- src/routes/auth.ts
- src/middleware/authMiddleware.ts
Suggested next steps:
- Add tests for OAuth flows
- Add more OAuth providers (Microsoft, Apple)
- Update documentation
```
## Agents
### `code-explorer`
**Purpose**: Deeply analyzes existing codebase features by tracing execution paths
**Focus areas:**
- Entry points and call chains
- Data flow and transformations
- Architecture layers and patterns
- Dependencies and integrations
- Implementation details
**When triggered:**
- Automatically in Phase 2
- Can be invoked manually when exploring code
**Output:**
- Entry points with file:line references
- Step-by-step execution flow
- Key components and responsibilities
- Architecture insights
- List of essential files to read
### `code-architect`
**Purpose**: Designs feature architectures and implementation blueprints
**Focus areas:**
- Codebase pattern analysis
- Architecture decisions
- Component design
- Implementation roadmap
- Data flow and build sequence
**When triggered:**
- Automatically in Phase 4
- Can be invoked manually for architecture design
**Output:**
- Patterns and conventions found
- Architecture decision with rationale
- Complete component design
- Implementation map with specific files
- Build sequence with phases
### `code-reviewer`
**Purpose**: Reviews code for bugs, quality issues, and project conventions
**Focus areas:**
- Project guideline compliance (CLAUDE.md)
- Bug detection
- Code quality issues
- Confidence-based filtering (only reports high-confidence issues ≥80)
**When triggered:**
- Automatically in Phase 6
- Can be invoked manually after writing code
**Output:**
- Critical issues (confidence 75-100)
- Important issues (confidence 50-74)
- Specific fixes with file:line references
- Project guideline references
## Usage Patterns
### Full workflow (recommended for new features):
```bash
/feature-dev Add rate limiting to API endpoints
```
Let the workflow guide you through all 7 phases.
### Manual agent invocation:
**Explore a feature:**
```
"Launch code-explorer to trace how authentication works"
```
**Design architecture:**
```
"Launch code-architect to design the caching layer"
```
**Review code:**
```
"Launch code-reviewer to check my recent changes"
```
## Best Practices
1. **Use the full workflow for complex features**: The 7 phases ensure thorough planning
2. **Answer clarifying questions thoughtfully**: Phase 3 prevents future confusion
3. **Choose architecture deliberately**: Phase 4 gives you options for a reason
4. **Don't skip code review**: Phase 6 catches issues before they reach production
5. **Read the suggested files**: Phase 2 identifies key files—read them to understand context
## When to Use This Plugin
**Use for:**
- New features that touch multiple files
- Features requiring architectural decisions
- Complex integrations with existing code
- Features where requirements are somewhat unclear
**Don't use for:**
- Single-line bug fixes
- Trivial changes
- Well-defined, simple tasks
- Urgent hotfixes
## Requirements
- Claude Code installed
- Git repository (for code review)
- Project with existing codebase (workflow assumes existing code to learn from)
## Troubleshooting
### Agents take too long
**Issue**: Code exploration or architecture agents are slow
**Solution**:
- This is normal for large codebases
- Agents run in parallel when possible
- The thoroughness pays off in better understanding
### Too many clarifying questions
**Issue**: Phase 3 asks too many questions
**Solution**:
- Be more specific in your initial feature request
- Provide context about constraints upfront
- Say "whatever you think is best" if truly no preference
### Architecture options overwhelming
**Issue**: Too many architecture options in Phase 4
**Solution**:
- Trust the recommendation—it's based on codebase analysis
- If still unsure, ask for more explanation
- Pick the pragmatic option when in doubt
## Tips
- **Be specific in your feature request**: More detail = fewer clarifying questions
- **Trust the process**: Each phase builds on the previous one
- **Review agent outputs**: Agents provide valuable insights about your codebase
- **Don't skip phases**: Each phase serves a purpose
- **Use for learning**: The exploration phase teaches you about your own codebase
## Author
Sid Bidasaria (sbidasaria@anthropic.com)
## Version
1.0.0
---
## frontend-design-plugin.md
# Frontend Design Plugin
Generates distinctive, production-grade frontend interfaces that avoid generic AI aesthetics.
## What It Does
Claude automatically uses this skill for frontend work. Creates production-ready code with:
- Bold aesthetic choices
- Distinctive typography and color palettes
- High-impact animations and visual details
- Context-aware implementation
## Usage
```
"Create a dashboard for a music streaming app"
"Build a landing page for an AI security startup"
"Design a settings panel with dark mode"
```
Claude will choose a clear aesthetic direction and implement production code with meticulous attention to detail.
## Learn More
See the [Frontend Aesthetics Cookbook](https://github.com/anthropics/claude-cookbooks/blob/main/coding/prompting_for_frontend_aesthetics.ipynb) for detailed guidance on prompting for high-quality frontend design.
## Authors
Prithvi Rajasekaran (prithvi@anthropic.com)
Alexander Bricken (alexander@anthropic.com)
---
## frontmatter-reference.md
# Command Frontmatter Reference
Complete reference for YAML frontmatter fields in slash commands.
## Frontmatter Overview
YAML frontmatter is optional metadata at the start of command files:
```markdown
---
description: Brief description
allowed-tools: Read, Write
model: sonnet
argument-hint: [arg1] [arg2]
---
Command prompt content here...
```
All fields are optional. Commands work without any frontmatter.
## Field Specifications
### description
**Type:** String
**Required:** No
**Default:** First line of command prompt
**Max Length:** ~60 characters recommended for `/help` display
**Purpose:** Describes what the command does, shown in `/help` output
**Examples:**
```yaml
description: Review code for security issues
```
```yaml
description: Deploy to staging environment
```
```yaml
description: Generate API documentation
```
**Best practices:**
- Keep under 60 characters for clean display
- Start with verb (Review, Deploy, Generate)
- Be specific about what command does
- Avoid redundant "command" or "slash command"
**Good:**
- ✅ "Review PR for code quality and security"
- ✅ "Deploy application to specified environment"
- ✅ "Generate comprehensive API documentation"
**Bad:**
- ❌ "This command reviews PRs" (unnecessary "This command")
- ❌ "Review" (too vague)
- ❌ "A command that reviews pull requests for code quality, security issues, and best practices" (too long)
### allowed-tools
**Type:** String or Array of strings
**Required:** No
**Default:** Inherits from conversation permissions
**Purpose:** Restrict or specify which tools command can use
**Formats:**
**Single tool:**
```yaml
allowed-tools: Read
```
**Multiple tools (comma-separated):**
```yaml
allowed-tools: Read, Write, Edit
```
**Multiple tools (array):**
```yaml
allowed-tools:
- Read
- Write
- Bash(git:*)
```
**Tool Patterns:**
**Specific tools:**
```yaml
allowed-tools: Read, Grep, Edit
```
**Bash with command filter:**
```yaml
allowed-tools: Bash(git:*) # Only git commands
allowed-tools: Bash(npm:*) # Only npm commands
allowed-tools: Bash(docker:*) # Only docker commands
```
**All tools (not recommended):**
```yaml
allowed-tools: "*"
```
**When to use:**
1. **Security:** Restrict command to safe operations
```yaml
allowed-tools: Read, Grep # Read-only command
```
2. **Clarity:** Document required tools
```yaml
allowed-tools: Bash(git:*), Read
```
3. **Bash execution:** Enable bash command output
```yaml
allowed-tools: Bash(git status:*), Bash(git diff:*)
```
**Best practices:**
- Be as restrictive as possible
- Use command filters for Bash (e.g., `git:*` not `*`)
- Only specify when different from conversation permissions
- Document why specific tools are needed
### model
**Type:** String
**Required:** No
**Default:** Inherits from conversation
**Values:** `sonnet`, `opus`, `haiku`
**Purpose:** Specify which Claude model executes the command
**Examples:**
```yaml
model: haiku # Fast, efficient for simple tasks
```
```yaml
model: sonnet # Balanced performance (default)
```
```yaml
model: opus # Maximum capability for complex tasks
```
**When to use:**
**Use `haiku` for:**
- Simple, formulaic commands
- Fast execution needed
- Low complexity tasks
- Frequent invocations
```yaml
---
description: Format code file
model: haiku
---
```
**Use `sonnet` for:**
- Standard commands (default)
- Balanced speed/quality
- Most common use cases
```yaml
---
description: Review code changes
model: sonnet
---
```
**Use `opus` for:**
- Complex analysis
- Architectural decisions
- Deep code understanding
- Critical tasks
```yaml
---
description: Analyze system architecture
model: opus
---
```
**Best practices:**
- Omit unless specific need
- Use `haiku` for speed when possible
- Reserve `opus` for genuinely complex tasks
- Test with different models to find right balance
### argument-hint
**Type:** String
**Required:** No
**Default:** None
**Purpose:** Document expected arguments for users and autocomplete
**Format:**
```yaml
argument-hint: [arg1] [arg2] [optional-arg]
```
**Examples:**
**Single argument:**
```yaml
argument-hint: [pr-number]
```
**Multiple required arguments:**
```yaml
argument-hint: [environment] [version]
```
**Optional arguments:**
```yaml
argument-hint: [file-path] [options]
```
**Descriptive names:**
```yaml
argument-hint: [source-branch] [target-branch] [commit-message]
```
**Best practices:**
- Use square brackets `[]` for each argument
- Use descriptive names (not `arg1`, `arg2`)
- Indicate optional vs required in description
- Match order to positional arguments in command
- Keep concise but clear
**Examples by pattern:**
**Simple command:**
```yaml
---
description: Fix issue by number
argument-hint: [issue-number]
---
Fix issue #$1...
```
**Multi-argument:**
```yaml
---
description: Deploy to environment
argument-hint: [app-name] [environment] [version]
---
Deploy $1 to $2 using version $3...
```
**With options:**
```yaml
---
description: Run tests with options
argument-hint: [test-pattern] [options]
---
Run tests matching $1 with options: $2
```
### disable-model-invocation
**Type:** Boolean
**Required:** No
**Default:** false
**Purpose:** Prevent SlashCommand tool from programmatically invoking command
**Examples:**
```yaml
disable-model-invocation: true
```
**When to use:**
1. **Manual-only commands:** Commands requiring user judgment
```yaml
---
description: Approve deployment to production
disable-model-invocation: true
---
```
2. **Destructive operations:** Commands with irreversible effects
```yaml
---
description: Delete all test data
disable-model-invocation: true
---
```
3. **Interactive workflows:** Commands needing user input
```yaml
---
description: Walk through setup wizard
disable-model-invocation: true
---
```
**Default behavior (false):**
- Command available to SlashCommand tool
- Claude can invoke programmatically
- Still available for manual invocation
**When true:**
- Command only invokable by user typing `/command`
- Not available to SlashCommand tool
- Safer for sensitive operations
**Best practices:**
- Use sparingly (limits Claude's autonomy)
- Document why in command comments
- Consider if command should exist if always manual
## Complete Examples
### Minimal Command
No frontmatter needed:
```markdown
Review this code for common issues and suggest improvements.
```
### Simple Command
Just description:
```markdown
---
description: Review code for issues
---
Review this code for common issues and suggest improvements.
```
### Standard Command
Description and tools:
```markdown
---
description: Review Git changes
allowed-tools: Bash(git:*), Read
---
Current changes: !`git diff --name-only`
Review each changed file for:
- Code quality
- Potential bugs
- Best practices
```
### Complex Command
All common fields:
```markdown
---
description: Deploy application to environment
argument-hint: [app-name] [environment] [version]
allowed-tools: Bash(kubectl:*), Bash(helm:*), Read
model: sonnet
---
Deploy $1 to $2 environment using version $3
Pre-deployment checks:
- Verify $2 configuration
- Check cluster status: !`kubectl cluster-info`
- Validate version $3 exists
Proceed with deployment following deployment runbook.
```
### Manual-Only Command
Restricted invocation:
```markdown
---
description: Approve production deployment
argument-hint: [deployment-id]
disable-model-invocation: true
allowed-tools: Bash(gh:*)
---
<!--
MANUAL APPROVAL REQUIRED
This command requires human judgment and cannot be automated.
-->
Review deployment $1 for production approval:
Deployment details: !`gh api /deployments/$1`
Verify:
- All tests passed
- Security scan clean
- Stakeholder approval
- Rollback plan ready
Type "APPROVED" to confirm deployment.
```
## Validation
### Common Errors
**Invalid YAML syntax:**
```yaml
---
description: Missing quote
allowed-tools: Read, Write
model: sonnet
--- # ❌ Missing closing quote above
```
**Fix:** Validate YAML syntax
**Incorrect tool specification:**
```yaml
allowed-tools: Bash # ❌ Missing command filter
```
**Fix:** Use `Bash(git:*)` format
**Invalid model name:**
```yaml
model: gpt4 # ❌ Not a valid Claude model
```
**Fix:** Use `sonnet`, `opus`, or `haiku`
### Validation Checklist
Before committing command:
- [ ] YAML syntax valid (no errors)
- [ ] Description under 60 characters
- [ ] allowed-tools uses proper format
- [ ] model is valid value if specified
- [ ] argument-hint matches positional arguments
- [ ] disable-model-invocation used appropriately
## Best Practices Summary
1. **Start minimal:** Add frontmatter only when needed
2. **Document arguments:** Always use argument-hint with arguments
3. **Restrict tools:** Use most restrictive allowed-tools that works
4. **Choose right model:** Use haiku for speed, opus for complexity
5. **Manual-only sparingly:** Only use disable-model-invocation when necessary
6. **Clear descriptions:** Make commands discoverable in `/help`
7. **Test thoroughly:** Verify frontmatter works as expected
---
## help2.md
# Ralph Wiggum Plugin Help
Please explain the following to the user:
## What is the Ralph Wiggum Technique?
The Ralph Wiggum technique is an iterative development methodology based on continuous AI loops, pioneered by Geoffrey Huntley.
**Core concept:**
```bash
while :; do
cat PROMPT.md | claude-code --continue
done
```
The same prompt is fed to Claude repeatedly. The "self-referential" aspect comes from Claude seeing its own previous work in the files and git history, not from feeding output back as input.
**Each iteration:**
1. Claude receives the SAME prompt
2. Works on the task, modifying files
3. Tries to exit
4. Stop hook intercepts and feeds the same prompt again
5. Claude sees its previous work in the files
6. Iteratively improves until completion
The technique is described as "deterministically bad in an undeterministic world" - failures are predictable, enabling systematic improvement through prompt tuning.
## Available Commands
### /ralph-loop <PROMPT> [OPTIONS]
Start a Ralph loop in your current session.
**Usage:**
```
/ralph-loop "Refactor the cache layer" --max-iterations 20
/ralph-loop "Add tests" --completion-promise "TESTS COMPLETE"
```
**Options:**
- `--max-iterations <n>` - Max iterations before auto-stop
- `--completion-promise <text>` - Promise phrase to signal completion
**How it works:**
1. Creates `.claude/.ralph-loop.local.md` state file
2. You work on the task
3. When you try to exit, stop hook intercepts
4. Same prompt fed back
5. You see your previous work
6. Continues until promise detected or max iterations
---
### /cancel-ralph
Cancel an active Ralph loop (removes the loop state file).
**Usage:**
```
/cancel-ralph
```
**How it works:**
- Checks for active loop state file
- Removes `.claude/.ralph-loop.local.md`
- Reports cancellation with iteration count
---
## Key Concepts
### Completion Promises
To signal completion, Claude must output a `<promise>` tag:
```
<promise>TASK COMPLETE</promise>
```
The stop hook looks for this specific tag. Without it (or `--max-iterations`), Ralph runs infinitely.
### Self-Reference Mechanism
The "loop" doesn't mean Claude talks to itself. It means:
- Same prompt repeated
- Claude's work persists in files
- Each iteration sees previous attempts
- Builds incrementally toward goal
## Example
### Interactive Bug Fix
```
/ralph-loop "Fix the token refresh logic in auth.ts. Output <promise>FIXED</promise> when all tests pass." --completion-promise "FIXED" --max-iterations 10
```
You'll see Ralph:
- Attempt fixes
- Run tests
- See failures
- Iterate on solution
- In your current session
## When to Use Ralph
**Good for:**
- Well-defined tasks with clear success criteria
- Tasks requiring iteration and refinement
- Iterative development with self-correction
- Greenfield projects
**Not good for:**
- Tasks requiring human judgment or design decisions
- One-shot operations
- Tasks with unclear success criteria
- Debugging production issues (use targeted debugging instead)
## Learn More
- Original technique: https://ghuntley.com/ralph/
- Ralph Orchestrator: https://github.com/mikeyobrien/ralph-orchestrator
---
## how-to-add-skills-support-to-your-agent-agent-skills-3ed1034f30.md
# How to add skills support to your agent
A guide for adding Agent Skills support to an AI agent or development tool.
This guide walks through how to add Agent Skills support to an AI agent or development tool. It covers the full lifecycle: discovering skills, telling the model about them, loading their content into context, and keeping that content effective over time. The core integration is the same regardless of your agent’s architecture. The implementation details vary based on two factors:
- **Where do skills live?** A locally-running agent can scan the user’s filesystem for skill directories. A cloud-hosted or sandboxed agent will need an alternative discovery mechanism — an API, a remote registry, or bundled assets.
- **How does the model access skill content?** If the model has file-reading capabilities, it can read `SKILL.md` files directly. Otherwise, you’ll provide a dedicated tool or inject skill content into the prompt programmatically.
The guide notes where these differences matter. You don’t need to support every scenario — follow the path that fits your agent. **Prerequisites**: Familiarity with the [Agent Skills specification](/specification), which defines the `SKILL.md` file format, frontmatter fields, and directory conventions.
The core principle: progressive disclosure
Every skills-compatible agent follows the same three-tier loading strategy:
| Tier | What’s loaded | When | Token cost |
|----|----|----|----|
| 1\. Catalog | Name + description | Session start | ~50-100 tokens per skill |
| 2\. Instructions | Full `SKILL.md` body | When the skill is activated | \<5000 tokens (recommended) |
| 3\. Resources | Scripts, references, assets | When the instructions reference them | Varies |
The model sees the catalog from the start, so it knows what skills are available. When it decides a skill is relevant, it loads the full instructions. If those instructions reference supporting files, the model loads them individually as needed. This keeps the base context small while giving the model access to specialized knowledge on demand. An agent with 20 installed skills doesn’t pay the token cost of 20 full instruction sets upfront — only the ones actually used in a given conversation.
Step 1: Discover skills
At session startup, find all available skills and load their metadata.
Where to scan
Which directories you scan depends on your agent’s environment. Most locally-running agents scan at least two scopes:
- **Project-level** (relative to the working directory): Skills specific to a project or repository.
- **User-level** (relative to the home directory): Skills available across all projects for a given user.
Other scopes are possible too — for example, organization-wide skills deployed by an admin, or skills bundled with the agent itself. The right set of scopes depends on your agent’s deployment model. Within each scope, consider scanning both a **client-specific directory** and the **`.agents/skills/` convention**:
| Scope | Path | Purpose |
|---------|------------------------------------|-------------------------------|
| Project | `<project>/.<your-client>/skills/` | Your client’s native location |
| Project | `<project>/.agents/skills/` | Cross-client interoperability |
| User | `~/.<your-client>/skills/` | Your client’s native location |
| User | `~/.agents/skills/` | Cross-client interoperability |
The `.agents/skills/` paths have emerged as a widely-adopted convention for cross-client skill sharing. While the Agent Skills specification does not mandate where skill directories live (it only defines what goes inside them), scanning `.agents/skills/` means skills installed by other compliant clients are automatically visible to yours, and vice versa.
Some implementations also scan `.claude/skills/` (both project-level and user-level) for pragmatic compatibility, since many existing skills are installed there. Other additional locations include ancestor directories up to the git root (useful for monorepos), [XDG](https://specifications.freedesktop.org/basedir-spec/latest/) config directories, and user-configured paths.
What to scan for
Within each skills directory, look for **subdirectories containing a file named exactly `SKILL.md`**:
Report incorrect code
Copy
```python
~/.agents/skills/
├── pdf-processing/
│ ├── SKILL.md ← discovered
│ └── scripts/
│ └── extract.py
├── data-analysis/
│ └── SKILL.md ← discovered
└── README.md ← ignored (not a skill directory)
```
Practical scanning rules:
- Skip directories that won’t contain skills, such as `.git/` and `node_modules/`
- Optionally respect `.gitignore` to avoid scanning build artifacts
- Set reasonable bounds (e.g., max depth of 4-6 levels, max 2000 directories) to prevent runaway scanning in large directory trees
Handling name collisions
When two skills share the same `name`, apply a deterministic precedence rule. The universal convention across existing implementations: **project-level skills override user-level skills.** Within the same scope (e.g., two skills named `code-review` found under both `<project>/.agents/skills/` and `<project>/.<your-client>/skills/`), either first-found or last-found is acceptable — pick one and be consistent. Log a warning when a collision occurs so the user knows a skill was shadowed.
Trust considerations
Project-level skills come from the repository being worked on, which may be untrusted (e.g., a freshly cloned open-source project). Consider gating project-level skill loading on a trust check — only load them if the user has marked the project folder as trusted. This prevents untrusted repositories from silently injecting instructions into the agent’s context.
Cloud-hosted and sandboxed agents
If your agent runs in a container or on a remote server, it won’t have access to the user’s local filesystem. Discovery needs to work differently depending on the skill scope:
- **Project-level skills** are often the easiest case. If the agent operates on a cloned repository (even inside a sandbox), project-level skills travel with the code and can be scanned from the repo’s directory tree.
- **User-level and organization-level skills** don’t exist in the sandbox. You’ll need to provision them from an external source — for example, cloning a configuration repository, accepting skill URLs or packages through your agent’s settings, or letting users upload skill directories through a web UI.
- **Built-in skills** can be packaged as static assets within the agent’s deployment artifact, making them available in every session without external fetching.
Once skills are available to the agent, the rest of the lifecycle — parsing, disclosure, activation — works the same.
Step 2: Parse `SKILL.md` files
For each discovered `SKILL.md`, extract the metadata and body content.
Frontmatter extraction
A `SKILL.md` file has two parts: YAML frontmatter between `---` delimiters, and a markdown body after the closing delimiter. To parse:
1. Find the opening `---` at the start of the file and the closing `---` after it.
2. Parse the YAML block between them. Extract `name` and `description` (required), plus any optional fields.
3. Everything after the closing `---`, trimmed, is the skill’s body content.
See the [specification](/specification) for the full set of frontmatter fields and their constraints.
Handling malformed YAML
Skill files authored for other clients may contain technically invalid YAML that their parsers happen to accept. The most common issue is unquoted values containing colons:
Report incorrect code
Copy
```python
# Technically invalid YAML — the colon breaks parsing
description: Use this skill when: the user asks about PDFs
```
Consider a fallback that wraps such values in quotes or converts them to YAML block scalars before retrying. This improves cross-client compatibility at minimal cost.
Lenient validation
Warn on issues but still load the skill when possible:
- Name doesn’t match the parent directory name → warn, load anyway
- Name exceeds 64 characters → warn, load anyway
- Description is missing or empty → skip the skill (a description is essential for disclosure), log the error
- YAML is completely unparseable → skip the skill, log the error
Record diagnostics so they can be surfaced to the user (in a debug command, log file, or UI), but don’t block skill loading on cosmetic issues.
The [specification](/specification) defines strict constraints on the `name` field (matching the parent directory, character set, max length). The lenient approach above deliberately relaxes these to improve compatibility with skills authored for other clients.
What to store
At minimum, each skill record needs three fields:
| Field | Description |
|---------------|--------------------------------------|
| `name` | From frontmatter |
| `description` | From frontmatter |
| `location` | Absolute path to the `SKILL.md` file |
Store these in an in-memory map keyed by `name` for fast lookup during activation. You can also store the **body** (the markdown content after the frontmatter) at discovery time, or read it from `location` at activation time. Storing it makes activation faster; reading it at activation time uses less memory in aggregate and picks up changes to skill files between activations. The skill’s **base directory** (the parent directory of `location`) is needed later to resolve relative paths and enumerate bundled resources — derive it from `location` when needed.
Step 3: Disclose available skills to the model
Tell the model what skills exist without loading their full content. This is [tier 1 of progressive disclosure](#the-core-principle-progressive-disclosure).
Building the skill catalog
For each discovered skill, include `name`, `description`, and optionally `location` (the path to the `SKILL.md` file) in whatever structured format suits your stack — XML, JSON, or a bulleted list all work:
Report incorrect code
Copy
```python
<available_skills>
<skill>
<name>pdf-processing</name>
<description>Extract PDF text, fill forms, merge files. Use when handling PDFs.</description>
<location>/home/user/.agents/skills/pdf-processing/SKILL.md</location>
</skill>
<skill>
<name>data-analysis</name>
<description>Analyze datasets, generate charts, and create summary reports.</description>
<location>/home/user/project/.agents/skills/data-analysis/SKILL.md</location>
</skill>
</available_skills>
```
The `location` field serves two purposes: it enables file-read activation (see [Step 4](#step-4-activate-skills)), and it gives the model a base path for resolving relative references in the skill body (like `scripts/evaluate.py`). If your dedicated activation tool provides the skill directory path in its result (see [Structured wrapping](#structured-wrapping) in Step 4), you can omit `location` from the catalog. Otherwise, include it. Each skill adds roughly 50-100 tokens to the catalog. Even with dozens of skills installed, the catalog remains compact.
Where to place the catalog
Two approaches are common: **System prompt section**: Add the catalog as a labeled section in the system prompt, preceded by brief instructions on how to use skills. This is the simplest approach and works with any model that has access to a file-reading tool. **Tool description**: Embed the catalog in the description of a dedicated skill-activation tool (see [Step 4](#step-4-activate-skills)). This keeps the system prompt clean and naturally couples discovery with activation. Both work. System prompt placement is simpler and more broadly compatible; tool description embedding is cleaner when you have a dedicated activation tool.
Behavioral instructions
Include a short instruction block alongside the catalog telling the model how and when to use skills. The wording depends on which activation mechanism you support (see [Step 4](#step-4-activate-skills)): **If the model activates skills by reading files:**
Report incorrect code
Copy
```python
The following skills provide specialized instructions for specific tasks.
When a task matches a skill's description, use your file-read tool to load
the SKILL.md at the listed location before proceeding.
When a skill references relative paths, resolve them against the skill's
directory (the parent of SKILL.md) and use absolute paths in tool calls.
```
**If the model activates skills via a dedicated tool:**
Report incorrect code
Copy
```python
The following skills provide specialized instructions for specific tasks.
When a task matches a skill's description, call the activate_skill tool
with the skill's name to load its full instructions.
```
Keep these instructions concise. The goal is to tell the model that skills exist and how to load them — the skill content itself provides the detailed instructions once loaded.
Filtering
Some skills should be excluded from the catalog. Common reasons:
- The user has disabled the skill in settings
- A permission system denies access to the skill
- The skill has opted out of model-driven activation (e.g., via a `disable-model-invocation` flag)
**Hide filtered skills entirely** from the catalog rather than listing them and blocking at activation time. This prevents the model from wasting turns attempting to load skills it can’t use.
When no skills are available
If no skills are discovered, omit the catalog and behavioral instructions entirely. Don’t show an empty `<available_skills/>` block or register a skill tool with no valid options — this would confuse the model.
Step 4: Activate skills
When the model or user selects a skill, deliver the full instructions into the conversation context. This is [tier 2 of progressive disclosure](#the-core-principle-progressive-disclosure).
Model-driven activation
Most implementations rely on the model’s own judgment as the activation mechanism, rather than implementing harness-side trigger matching or keyword detection. The model reads the catalog (from [Step 3](#step-3-disclose-available-skills-to-the-model)), decides a skill is relevant to the current task, and loads it. Two implementation patterns: **File-read activation**: The model calls its standard file-read tool with the `SKILL.md` path from the catalog. No special infrastructure needed — the agent’s existing file-reading capability is sufficient. The model receives the file content as a tool result. This is the simplest approach when the model has file access. **Dedicated tool activation**: Register a tool (e.g., `activate_skill`) that takes a skill name and returns the content. This is required when the model can’t read files directly, and optional (but useful) even when it can. Advantages over raw file reads:
- Control what content is returned — e.g., strip YAML frontmatter or preserve it (see [What the model receives](#what-the-model-receives) below)
- Wrap content in structured tags for identification during context management
- List bundled resources (e.g., `references/*`) alongside the instructions
- Enforce permissions or prompt for user consent
- Track activation for analytics
If you use a dedicated activation tool, constrain the `name` parameter to the set of valid skill names (e.g., as an enum in the tool schema). This prevents the model from hallucinating nonexistent skill names. If no skills are available, don’t register the tool at all.
User-explicit activation
Users should also be able to activate skills directly, without waiting for the model to decide. The most common pattern is a **slash command or mention syntax** (`/skill-name` or `$skill-name`) that the harness intercepts. The specific syntax is up to you — the key idea is that the harness handles the lookup and injection, so the model receives skill content without needing to take an activation action itself. An autocomplete widget (listing available skills as the user types) can also make this discoverable.
What the model receives
When a skill is activated, the model receives the skill’s instructions. Two options for what exactly that content looks like: **Full file**: The model sees the entire `SKILL.md` including YAML frontmatter. This is the natural outcome with file-read activation, where the model reads the raw file. It’s also a valid choice for dedicated tools. The frontmatter may contain fields useful at activation time — for example, [`compatibility`](/specification#compatibility-field) notes environment requirements that could inform how the model executes the skill’s instructions. **Body only (frontmatter stripped)**: The harness parses and removes the YAML frontmatter, returning only the markdown instructions. Among existing implementations with dedicated activation tools, most take this approach — stripping the frontmatter after extracting `name` and `description` during discovery. Both approaches work in practice.
Structured wrapping
If you use a dedicated activation tool, consider wrapping skill content in identifying tags. For example:
Report incorrect code
Copy
```python
<skill_content name="pdf-processing">
# PDF Processing
## When to use this skill
Use this skill when the user needs to work with PDF files...
[rest of SKILL.md body]
Skill directory: /home/user/.agents/skills/pdf-processing
Relative paths in this skill are relative to the skill directory.
<skill_resources>
<file>scripts/extract.py</file>
<file>scripts/merge.py</file>
<file>references/pdf-spec-summary.md</file>
</skill_resources>
</skill_content>
```
This has practical benefits:
- The model can clearly distinguish skill instructions from other conversation content
- The harness can identify skill content during context compaction ([Step 5](#step-5-manage-skill-context-over-time))
- Bundled resources are surfaced to the model without being eagerly loaded
Listing bundled resources
When a dedicated activation tool returns skill content, it can also enumerate supporting files (scripts, references, assets) in the skill directory — but it should **not eagerly read them**. The model loads specific files on demand using its file-read tools when the skill’s instructions reference them. For large skill directories, consider capping the listing and noting that it may be incomplete.
Permission allowlisting
If your agent has a permission system that gates file access, **allowlist skill directories** so the model can read bundled resources without triggering user confirmation prompts. Without this, every reference to a bundled script or reference file results in a permission dialog, breaking the flow for skills that include resources beyond the `SKILL.md` itself.
Step 5: Manage skill context over time
Once skill instructions are in the conversation context, keep them effective for the duration of the session.
Protect skill content from context compaction
If your agent truncates or summarizes older messages when the context window fills up, **exempt skill content from pruning**. Skill instructions are durable behavioral guidance — losing them mid-conversation silently degrades the agent’s performance without any visible error. The model continues operating but without the specialized instructions the skill provided. Common approaches:
- Flag skill tool outputs as protected so the pruning algorithm skips them
- Use the [structured tags](#structured-wrapping) from Step 4 to identify skill content and preserve it during compaction
Deduplicate activations
Consider tracking which skills have been activated in the current session. If the model (or user) attempts to load a skill that’s already in context, you can skip the re-injection to avoid the same instructions appearing multiple times in the conversation.
Subagent delegation (optional)
This is an advanced pattern only supported by some clients. Instead of injecting skill instructions into the main conversation, the skill is run in a **separate subagent session**. The subagent receives the skill instructions, performs the task, and returns a summary of its work to the main conversation. This pattern is useful when a skill’s workflow is complex enough to benefit from a dedicated, focused session.
[Using scripts](/skill-creation/using-scripts)
---
## how-to-create-a-skill-with-claude-through-conversation-claude-help-center.md
With Skills, you are able to teach Claude specific workflows, tools, and processes. By creating a skill, you're giving Claude a playbook it can reference whenever you need a particular type of help—whether that's generating reports in your company's format, cleaning and using data the way you normally do, or pulling and analyzing CRM data your way.
This guide focuses on the other path: creating skills through conversation with Claude. You describe your process naturally, and Claude handles the formatting and structure. This approach makes Skills accessible to anyone, regardless of technical background.
<iframe src="https://www.youtube.com/embed/kS1MJFZWMq4" frameborder="0" allowfullscreen="allowfullscreen" referrerpolicy="strict-origin-when-cross-origin"></iframe>
## **Creating a skill through conversation**
Creating a skill with Claude means having a conversation where you explain your approach and share any materials you want included. Claude translates this into a properly formatted skill that can work in future chats.
### 1\. Start a conversation
Open a new chat and say something like "I want to create a skill for quarterly business reviews" or "I need a skill that knows how to analyze customer feedback."
If you have materials that show your approach—templates you use, examples of work you're proud of, brand guidelines you follow, data files you reference—upload them. You can also mention any connected tools Claude should use. If you are unsure of what else to include, ask Claude for guidance.
### 2\. Answer Claude's questions
Claude will ask about your process. Provide enough detail that someone capable but unfamiliar could follow your approach.
You'll get questions about concrete usage ("Can you give examples of when you'd use this skill?") or about your process ("What makes output good for this type of work?").
### 3\. Claude builds the Skill
In Claude's thinking, you will see it read a _skill-creator_ skill to follow best practices in creating a properly structured skill_._ Claude will create a SKILL.md file (the instruction file every skill needs), organize any materials you've provided, and generate code for operations you've described that need to happen consistently. Claude then packages everything into a skill file.
### 4\. Activate and test the skill
Save the the skill file that Claude creates. In [Settings > Capabilities > Skills](https://claude.ai/settings/capabilities), you can view your library of skills and turn them on or off as needed.
Try using your skill by describing a task the skill should address. See if Claude recognizes the situation (you'll see "Using \[skill name\]" in Claude's thinking) and whether it produces the expected outcome. If something's off, ask Claude to update the skill with your desired changes. Repeat this process until your skill works effectively.
## **Skills you can build**
You can build skills for a range of tasks. Skills can capture how your organization works, enable specialized expertise you don't personally have, or work together to handle complex workflows.
## **What you can include within a skill**
Skills bundle three types of content together—instructions, reference materials, and scripts. Knowing these components helps you articulate what you need when creating a skill with Claude.
[](https://downloads.intercomcdn.com/i/o/lupk8zyo/1781727755/40d01224cb2a1653189d5211e731/380d5eae-c159-4643-80e3-ce1be19b6d57?expires=1769938200&signature=603cfdc4a4840cc814ab019ca29db3c885afc4993316416ea3acd2d8fc877e15&req=dScvF858moZaXPMW1HO4zRjaAoeXjgWff1HwTII0D0GXuU%2B0FlxyWFfSyonq%0A0co8vQJXVUOC4D1kog4%3D%0A)
**Instructions —** Every skill needs a SKILL.md file that explains your process. When asking Claude to create a skill, describe your process for Claude to structure it into proper instructions. At the top of your [SKILL.md](http://skill.md/) file, will be the skill's name and what it does. Claude scans this information first to decide whether or not to load and use the full skill during your conversations. Below that are clear instructions on how to do the task.
**Reference materials and assets —** Sometimes instructions alone aren't enough and Claude needs actual files to reference or use in the output. To include these, upload any relevant files or information when creating your Skill. Claude determines whether to embed guidance in the SKILL.md instructions or bundle it as a reference file.
**Scripts —** These are executable code files that Claude can run to handle complex operations more reliably than instructions alone. You don't need to write these yourself. When you describe tasks that need scripts, Claude recognizes them and creates the code automatically. Examples include:
## **Additional Resources**
#### Getting started
#### Going deeper
___
Related Articles
[
What are Skills?
](../02-Claude-Code-CLI/what-are-skills.md)[
Using Skills in Claude
](https://support.claude.com/en/articles/12512180-using-skills-in-claude)[
How to create custom Skills
](../02-Claude-Code-CLI/how-to-create-custom-skills.md)[
Teach Claude your way of working using skills
](https://support.claude.com/en/articles/12580051-teach-claude-your-way-of-working-using-skills)[
Claude for Financial Services Skills
](../02-Claude-Code-CLI/claude-for-financial-services-skills.md)
---
## how-to-create-custom-skills-claude-help-center.md
Custom Skills let you enhance Claude with specialized knowledge and workflows specific to your organization or personal work style. This article explains how to create, structure, and test your own Skills.
Skills can be as simple as a few lines of instructions or as complex as multi-file packages with executable code. The best Skills:
## Creating a Skill.md File
Every Skill consists of a directory containing at minimum a Skill.md file, which is the core of the Skill. This file must start with a YAML frontmatter to hold name and description fields, which are required metadata. It can also contain additional metadata, instructions for Claude or reference files, executable scripts, or tools.
### Required metadata fields
**name:** A human-friendly name for your Skill (64 characters maximum)
**description:** A clear description of what the Skill does and when to use it.
### Optional Metadata Fields
**dependencies:** Software packages required by your Skill.
The metadata in the Skill.md file serves as the first level of a progressive disclosure system, providing just enough information for Claude to know when the Skill should be used without having to load all of the content.
### Markdown Body
The Markdown body is the second level of detail after the metadata, so Claude will access this if needed after reading the metadata. Depending on your task, Claude can access the Skill.md file and use the Skill.
### Example Skill.md
**Brand Guidelines Skill**
## Adding Resources
If you have too much information to add to a single [Skill.md](http://skill.md/) file (e.g., sections that only apply to specific scenarios), you can add more content by adding files within your Skill directory. For example, add a REFERENCE.md file containing supplemental and reference information to your Skill directory. Referencing it in [Skill.md](http://skill.md/) will help Claude decide if it needs to access that resource when executing the Skill.
## Adding Scripts
For more advanced Skills, attach executable code files to [Skill.md](http://skill.md/), allowing Claude to run code. For example, our document skills use the following programming languages and packages:
## Packaging Your Skill
Once your Skill folder is complete:
**Correct structure:**
my-Skill.zip
└── my-Skill/
├── Skill.md
└── resources/
**Incorrect structure:**
my-Skill.zip
└── (files directly in ZIP root)
## Testing Your Skill
### Before Uploading
1\. Review your Skill.md for clarity
2\. Check that the description accurately reflects when Claude should use the Skill
3\. Verify all referenced files exist in the correct locations
4\. Test with example prompts to ensure Claude invokes it appropriately
### After Uploading to Claude
2\. Try several different prompts that should trigger it
3\. Review Claude's thinking to confirm it's loading the Skill
4\. Iterate on the description if Claude isn't using it when expected
## Best Practices
**Keep it focused:** Create separate Skills for different workflows. Multiple focused Skills compose better than one large Skill.
**Write clear descriptions:** Claude uses descriptions to decide when to invoke your Skill. Be specific about when it applies.
**Start simple:** Begin with basic instructions in Markdown before adding complex scripts. You can always expand on the Skill later.
**Use examples:** Include example inputs and outputs in your Skill.md file to help Claude understand what success looks like.
**Test incrementally:** Test after each significant change rather than building a complex Skill all at once.
**Skills can build on each other:** While Skills can't explicitly reference other Skills, Claude can use multiple Skills together automatically. This composability is one of the most powerful parts of the Skills feature.
**Review the open Agent Skills specification:** Follow the guidelines at [agentskills.io](http://agentskills.io/), so skills you create can work across platforms that adopt the standard.
## Security Considerations
## Example Skills to Reference
___
Related Articles
[
What are Skills?
](../02-Claude-Code-CLI/what-are-skills.md)[
Using Skills in Claude
](https://support.claude.com/en/articles/12512180-using-skills-in-claude)[
Teach Claude your way of working using skills
](https://support.claude.com/en/articles/12580051-teach-claude-your-way-of-working-using-skills)[
How to create a skill with Claude through conversation
](https://support.claude.com/en/articles/12599426-how-to-create-a-skill-with-claude-through-conversation)[
Claude for Financial Services Skills
](../02-Claude-Code-CLI/claude-for-financial-services-skills.md)
---
## how-to-create-skills-for-claude-steps-and-examples-claude.md
When you create a skill via a [SKILL.md](http://skill.md/) file, you're teaching Claude how to handle specific scenarios more effectively. The power of skills lies in their ability to encode institutional knowledge, standardize outputs, and handle complex multi-step workflows that would otherwise require repeated explanation or investment in building a custom agent.
Learn how to create skills that transform Claude from general-purpose assistant into specialized expert for your specific workflows either with our [skill creator](https://github.com/anthropics/skills/tree/main/skill-creator) template or manually. (Pro-tip: to make it easy, we recommend building your [SKILL.md](http://skill.md/) file with this template and tailoring from there).
## **Creating a skill in 5 steps**
Follow this structured approach to build skills that trigger more reliably.
### **1\. Understand the core requirements**
Before writing anything, clarify what problem your skill solves. Strong skills address concrete needs with measurable outcomes. "Extract financial data from PDFs and format as CSV" beats "Help with my finance stuff" because it specifies the input format, the operation, and the expected output.
Start by asking yourself: What specific task does this skill accomplish? What triggers should activate it? What does success look like? What are the edge cases or limitations?
### **2\. Write the name**
Your skill needs three core components: **name** (clear identifier), **description** (when to activate), and **instructions** (how to execute). In fact, the name and description are the only parts of the [SKILL.md](http://skill.md/) file that influence triggering, in other words, the ability for Claude to call a skill for specialized knowledge or workflows.
The name should be straightforward and descriptive. Use lowercase with hyphens (e.g., pdf-editor, brand-guidelines). Keep it short and clear.
### **3\. Write the description field**
The description determines when your skill activates, making it the most critical component. Write it from Claude's perspective, focusing on triggers, capabilities, and use cases.
A strong description balances several elements: specific capabilities, clear triggers, relevant context, and boundaries.
**Weak description**:
```
This skill helps with PDFs and documents.
```
**Strong description**:
```
Comprehensive PDF manipulation toolkit for extracting text and tables, creating new PDFs, merging/splitting documents, and handling forms. When Claude needs to fill in a PDF form or programmatically process, generate, or analyze PDF documents at scale. Use for document workflows and batch operations. Not for simple PDF viewing or basic conversions.
```
The stronger version gives Claude multiple data points: specific verbs (extract, create, merge), concrete use cases (form filling, batch operations), and clear boundaries (not for simple viewing).
### **4\. Write the main instructions**
Your instructions should be structured, scannable, and actionable. Use markdown headers, bullet points for options, and code blocks for examples.
Structure with clear hierarchy: overview, prerequisites, execution steps, examples, error handling, and limitations. Break complex workflows into discrete phases with clear inputs and outputs.
Include concrete examples showing correct usage. Specify what the skill cannot do to prevent misuse and manage expectations. Your [SKILL.md](http://skill.md/) file can also include additional reference files and assets to provide even more clarity and guidance around what you’re asking the agent to do when the skill is triggered.
### **5\. Upload your skill**
Depending on what Claude surface you’re building on, here’s how to upload your skill for use:
- [Claude.ai](http://claude.ai/) (Claude apps): Go to **Settings** and add your custom skill there. Custom skills require a Pro, Max, Team, or Enterprise plan with code execution enabled. Skills uploaded here are individual to each user—they are not shared organization-wide and cannot be centrally managed by admins.
- [Claude Code](https://www.claude.com/product/claude-code): Create a skills/ directory in your plugin or project root and add skill folders containing SKILL.md files. Claude discovers and uses them automatically when the plugin is installed. Example structure:
```
my-project/
├── skills/
│ └── my-skill/
│ └── SKILL.md
```
- [Claude Developer Platform](https://www.claude.com/platform/api): Upload skills via the Skills API (/v1/skills endpoints). Use a POST request with the required beta headers:
```
curl -X POST "https://api.anthropic.com/v1/skills" \
-H "x-api-key: $ANTHROPIC_API_KEY" \
-H "anthropic-version: 2023-06-01" \
-H "anthropic-beta: skills-2025-10-02" \
-F "display_title=My Skill Name" \
-F "files[]=@my-skill/SKILL.md;filename=my-skill/SKILL.md"
```
### **4\. Testing and validation**
Test your skill with realistic scenarios before deploying it. Systematic testing reveals gaps in instructions, ambiguities in descriptions, and unexpected edge cases that only surface during actual use.
Create a test matrix covering three scenarios:
- **Normal operations**: Test the skill with typical requests it should handle perfectly. If you built a financial analysis skill, try "analyze Microsoft's latest earnings" or "build a datapack for this 10-K filing." These baseline tests confirm your instructions work as intended.
- **Edge cases**: Test with incomplete or unusual inputs. What happens when data is missing? When file formats are unexpected? When users provide ambiguous instructions? Your skill should handle these gracefully—either producing degraded but useful output or explaining what's needed to proceed.
- **Out-of-scope requests**: Test with tasks that seem related but shouldn't trigger your skill. If you built an NDA review skill, try requesting "review this employment agreement" or "analyze this lease." The skill should stay dormant, letting other skills or general Claude capabilities handle the request.
Consider implementing the following tests for even deeper validation:
- **Triggering tests:** Does the skill activate when expected? Test with both explicit requests ("use the financial datapack skill to analyze this company") and natural requests ("help me understand this company's financials"). Does it stay inactive when irrelevant? A well-scoped skill knows when not to activate. Test similar but distinct requests to verify boundaries.
- **Functional tests:** These include output consistency (do multiple runs with similar inputs produce comparable results?), usability (can someone unfamiliar with the domain use it successfully?), and documentation accuracy (do your examples match actual behavior?).
### **5\. Iterate based on usage**
Monitor how your skill performs in real-world usage. Refine descriptions if triggering is inconsistent. Clarify instructions if outputs vary unexpectedly. As with prompts, the best skills evolve through practical application.
## **General best practices for creating skills**
These principles help you create skills that are maintainable, reusable, and genuinely useful rather than theoretical.
### **Start with use cases**
Don't write skills speculatively. Build them when you have real, repeated tasks. The best skills solve problems you encounter regularly.
Before creating a skill, ask: Have I done this task at least five times? Will I do it at least ten more times? If yes, a skill makes sense.
### **Define success criteria—and include it in the skill**
Tell Claude what a good out looks like. If you're creating financial reports, specify required sections, formatting standards, validation checks, and quality thresholds. Include these criteria in your instructions so Claude can self-check.
### **Use the Skill-Creator skill**
The [skill-creator skill](https://github.com/anthropics/skills/tree/main/skill-creator) guides you through creating well-structured skills. It asks clarifying questions, suggests description improvements, and helps format instructions properly. Available in the [Skills repository on GitHub](https://github.com/anthropics/skills) and directly via [Claude.ai](http://claude.ai/), it's particularly valuable for your first few skills.
## **Skill limitations and considerations**
Understanding how skills work—and their boundaries—helps you design more effective skills and set appropriate expectations.
### **Skill triggering**
Claude evaluates skill descriptions against your request to determine relevance. This isn't keyword matching—Claude understands semantic relationships. However, vague descriptions reduce triggering accuracy.
Multiple skills can activate simultaneously if they address different aspects of a complex task. Overly generic descriptions cause inappropriate activation, while missing use cases cause missed activations.
### **Appropriate file sizes**
When writing skills, avoid bloating the context window with unnecessary content. Consider whether each piece of information needs to be loaded every time, or only conditionally.
Use a "menu" approach: if your skill covers multiple distinct processes or options, the SKILL.md should describe what's available and use relative paths to reference separate files for each. Claude then reads only the file relevant to the user's task, leaving the others untouched for that conversation.
These separate files don't need to represent mutually exclusive paths. The key principle is breaking content into reasonable chunks and letting Claude select what's needed based on the task at hand.
## **Real-world skills examples**
### **Skill example #1:** [**docx creation skill**](https://github.com/anthropics/skills/tree/main/document-skills/docx)
````
#---
name: docx
description: "Comprehensive document creation, editing, and analysis with support for tracked changes, comments, formatting preservation, and text extraction. When Claude needs to work with professional documents (.docx files) for: (1) Creating new documents, (2) Modifying or editing content, (3) Working with tracked changes, (4) Adding comments, or any other document tasks"
license: Proprietary. LICENSE.txt has complete terms
---
# DOCX creation, editing, and analysis
## Overview
A user may ask you to create, edit, or analyze the contents of a .docx file. A .docx file is essentially a ZIP archive containing XML files and other resources that you can read or edit. You have different tools and workflows available for different tasks.
## Workflow Decision Tree
### Reading/Analyzing Content
Use "Text extraction" or "Raw XML access" sections below
### Creating New Document
Use "Creating a new Word document" workflow
### Editing Existing Document
- **Your own document + simple changes**
Use "Basic OOXML editing" workflow
- **Someone else's document**
Use **"Redlining workflow"** (recommended default)
- **Legal, academic, business, or government docs**
Use **"Redlining workflow"** (required)
## Reading and analyzing content
### Text extraction
If you just need to read the text contents of a document, you should convert the document to markdown using pandoc. Pandoc provides excellent support for preserving document structure and can show tracked changes:
```bash
# Convert document to markdown with tracked changes
pandoc --track-changes=all path-to-file.docx -o output.md
# Options: --track-changes=accept/reject/all
```
### Raw XML access
You need raw XML access for: comments, complex formatting, document structure, embedded media, and metadata. For any of these features, you'll need to unpack a document and read its raw XML contents.
#### Unpacking a file
`python ooxml/scripts/unpack.py <office_file> <output_directory>`
#### Key file structures
* `word/document.xml` - Main document contents
* `word/comments.xml` - Comments referenced in document.xml
* `word/media/` - Embedded images and media files
* Tracked changes use `<w:ins>` (insertions) and `<w:del>` (deletions) tags
## Creating a new Word document
When creating a new Word document from scratch, use **docx-js**, which allows you to create Word documents using JavaScript/TypeScript.
### Workflow
1. **MANDATORY - READ ENTIRE FILE**: Read [`docx-js.md`](docx-js.md) (~500 lines) completely from start to finish. **NEVER set any range limits when reading this file.** Read the full file content for detailed syntax, critical formatting rules, and best practices before proceeding with document creation.
2. Create a JavaScript/TypeScript file using Document, Paragraph, TextRun components (You can assume all dependencies are installed, but if not, refer to the dependencies section below)
3. Export as .docx using Packer.toBuffer()
## Editing an existing Word document
When editing an existing Word document, use the **Document library** (a Python library for OOXML manipulation). The library automatically handles infrastructure setup and provides methods for document manipulation. For complex scenarios, you can access the underlying DOM directly through the library.
### Workflow
1. **MANDATORY - READ ENTIRE FILE**: Read [`ooxml.md`](ooxml.md) (~600 lines) completely from start to finish. **NEVER set any range limits when reading this file.** Read the full file content for the Document library API and XML patterns for directly editing document files.
2. Unpack the document: `python ooxml/scripts/unpack.py <office_file> <output_directory>`
3. Create and run a Python script using the Document library (see "Document Library" section in ooxml.md)
4. Pack the final document: `python ooxml/scripts/pack.py <input_directory> <office_file>`
The Document library provides both high-level methods for common operations and direct DOM access for complex scenarios.
## Redlining workflow for document review
This workflow allows you to plan comprehensive tracked changes using markdown before implementing them in OOXML. **CRITICAL**: For complete tracked changes, you must implement ALL changes systematically.
**Batching Strategy**: Group related changes into batches of 3-10 changes. This makes debugging manageable while maintaining efficiency. Test each batch before moving to the next.
**Principle: Minimal, Precise Edits**
When implementing tracked changes, only mark text that actually changes. Repeating unchanged text makes edits harder to review and appears unprofessional. Break replacements into: [unchanged text] + [deletion] + [insertion] + [unchanged text]. Preserve the original run's RSID for unchanged text by extracting the `<w:r>` element from the original and reusing it.
Example - Changing "30 days" to "60 days" in a sentence:
```python
# BAD - Replaces entire sentence
'<w:del><w:r><w:delText>The term is 30 days.</w:delText></w:r></w:del><w:ins><w:r><w:t>The term is 60 days.</w:t></w:r></w:ins>'
# GOOD - Only marks what changed, preserves original <w:r> for unchanged text
'<w:r w:rsidR="00AB12CD"><w:t>The term is </w:t></w:r><w:del><w:r><w:delText>30</w:delText></w:r></w:del><w:ins><w:r><w:t>60</w:t></w:r></w:ins><w:r w:rsidR="00AB12CD"><w:t> days.</w:t></w:r>'
```
### Tracked changes workflow
1. **Get markdown representation**: Convert document to markdown with tracked changes preserved:
```bash
pandoc --track-changes=all path-to-file.docx -o current.md
```
2. **Identify and group changes**: Review the document and identify ALL changes needed, organizing them into logical batches:
**Location methods** (for finding changes in XML):
- Section/heading numbers (e.g., "Section 3.2", "Article IV")
- Paragraph identifiers if numbered
- Grep patterns with unique surrounding text
- Document structure (e.g., "first paragraph", "signature block")
- **DO NOT use markdown line numbers** - they don't map to XML structure
**Batch organization** (group 3-10 related changes per batch):
- By section: "Batch 1: Section 2 amendments", "Batch 2: Section 5 updates"
- By type: "Batch 1: Date corrections", "Batch 2: Party name changes"
- By complexity: Start with simple text replacements, then tackle complex structural changes
- Sequential: "Batch 1: Pages 1-3", "Batch 2: Pages 4-6"
3. **Read documentation and unpack**:
- **MANDATORY - READ ENTIRE FILE**: Read [`ooxml.md`](ooxml.md) (~600 lines) completely from start to finish. **NEVER set any range limits when reading this file.** Pay special attention to the "Document Library" and "Tracked Change Patterns" sections.
- **Unpack the document**: `python ooxml/scripts/unpack.py <file.docx> <dir>`
- **Note the suggested RSID**: The unpack script will suggest an RSID to use for your tracked changes. Copy this RSID for use in step 4b.
4. **Implement changes in batches**: Group changes logically (by section, by type, or by proximity) and implement them together in a single script. This approach:
- Makes debugging easier (smaller batch = easier to isolate errors)
- Allows incremental progress
- Maintains efficiency (batch size of 3-10 changes works well)
**Suggested batch groupings:**
- By document section (e.g., "Section 3 changes", "Definitions", "Termination clause")
- By change type (e.g., "Date changes", "Party name updates", "Legal term replacements")
- By proximity (e.g., "Changes on pages 1-3", "Changes in first half of document")
For each batch of related changes:
**a. Map text to XML**: Grep for text in `word/document.xml` to verify how text is split across `<w:r>` elements.
**b. Create and run script**: Use `get_node` to find nodes, implement changes, then `doc.save()`. See **"Document Library"** section in ooxml.md for patterns.
**Note**: Always grep `word/document.xml` immediately before writing a script to get current line numbers and verify text content. Line numbers change after each script run.
5. **Pack the document**: After all batches are complete, convert the unpacked directory back to .docx:
```bash
python ooxml/scripts/pack.py unpacked reviewed-document.docx
```
6. **Final verification**: Do a comprehensive check of the complete document:
- Convert final document to markdown:
```bash
pandoc --track-changes=all reviewed-document.docx -o verification.md
```
- Verify ALL changes were applied correctly:
```bash
grep "original phrase" verification.md # Should NOT find it
grep "replacement phrase" verification.md # Should find it
```
- Check that no unintended changes were introduced
## Converting Documents to Images
To visually analyze Word documents, convert them to images using a two-step process:
1. **Convert DOCX to PDF**:
```bash
soffice --headless --convert-to pdf document.docx
```
2. **Convert PDF pages to JPEG images**:
```bash
pdftoppm -jpeg -r 150 document.pdf page
```
This creates files like `page-1.jpg`, `page-2.jpg`, etc.
Options:
- `-r 150`: Sets resolution to 150 DPI (adjust for quality/size balance)
- `-jpeg`: Output JPEG format (use `-png` for PNG if preferred)
- `-f N`: First page to convert (e.g., `-f 2` starts from page 2)
- `-l N`: Last page to convert (e.g., `-l 5` stops at page 5)
- `page`: Prefix for output files
Example for specific range:
```bash
pdftoppm -jpeg -r 150 -f 2 -l 5 document.pdf page # Converts only pages 2-5
```
## Code Style Guidelines
**IMPORTANT**: When generating code for DOCX operations:
- Write concise code
- Avoid verbose variable names and redundant operations
- Avoid unnecessary print statements
## Dependencies
Required dependencies (install if not available):
- **pandoc**: `sudo apt-get install pandoc` (for text extraction)
- **docx**: `npm install -g docx` (for creating new documents)
- **LibreOffice**: `sudo apt-get install libreoffice` (for PDF conversion)
- **Poppler**: `sudo apt-get install poppler-utils` (for pdftoppm to convert PDF to images)
- **defusedxml**: `pip install defusedxml` (for secure XML parsing)
````
**What makes it strong**: Provides a clear decision tree that routes Claude to the right workflow based on task type, uses progressive disclosure to keep the main file lean while referencing detailed implementation files only when needed, and includes concrete good/bad examples that show exactly how to implement complex patterns like tracked changes.
### **Skill example #2:** [**Brand guidelines**](https://github.com/anthropics/skills/blob/main/brand-guidelines/SKILL.md?plain=1)
```
#name: brand-guidelines
description: Applies Anthropic's official brand colors and typography to any sort of artifact that may benefit from having Anthropic's look-and-feel. Use it when brand colors or style guidelines, visual formatting, or company design standards apply.
license: Complete terms in LICENSE.txt
---
# Anthropic Brand Styling
## Overview
To access Anthropic's official brand identity and style resources, use this skill.
**Keywords**: branding, corporate identity, visual identity, post-processing, styling, brand colors, typography, Anthropic brand, visual formatting, visual design
## Brand Guidelines
### Colors
**Main Colors:**
- Dark: `#141413` - Primary text and dark backgrounds
- Light: `#faf9f5` - Light backgrounds and text on dark
- Mid Gray: `#b0aea5` - Secondary elements
- Light Gray: `#e8e6dc` - Subtle backgrounds
**Accent Colors:**
- Orange: `#d97757` - Primary accent
- Blue: `#6a9bcc` - Secondary accent
- Green: `#788c5d` - Tertiary accent
### Typography
- **Headings**: Poppins (with Arial fallback)
- **Body Text**: Lora (with Georgia fallback)
- **Note**: Fonts should be pre-installed in your environment for best results
## Features
### Smart Font Application
- Applies Poppins font to headings (24pt and larger)
- Applies Lora font to body text
- Automatically falls back to Arial/Georgia if custom fonts unavailable
- Preserves readability across all systems
### Text Styling
- Headings (24pt+): Poppins font
- Body text: Lora font
- Smart color selection based on background
- Preserves text hierarchy and formatting
### Shape and Accent Colors
- Non-text shapes use accent colors
- Cycles through orange, blue, and green accents
- Maintains visual interest while staying on-brand
## Technical Details
### Font Management
- Uses system-installed Poppins and Lora fonts when available
- Provides automatic fallback to Arial (headings) and Georgia (body)
- No font installation required - works with existing system fonts
- For best results, pre-install Poppins and Lora fonts in your environment
### Color Application
- Uses RGB color values for precise brand matching
- Applied via python-pptx's RGBColor class
- Maintains color fidelity across different systems
```
**What makes it strong**: Provides precise, actionable information Claude doesn't inherently have (exact hex codes, font names, size thresholds) with a clear description that tells Claude both what it does and when to trigger it.
**What makes it strong**: Creative capability with clear boundaries, copyright protection built in, technical scaffolding for non-musicians, quality standards.
### **Skill example #3:** [**frontend design skill**](https://www.claude.com/blog/improving-frontend-design-through-skills)
```
name: frontend-design
description: Create distinctive, production-grade frontend interfaces with high design quality. Use this skill when the user asks to build web components, pages, or applications. Generates creative, polished code that avoids generic AI aesthetics.
license: Complete terms in LICENSE.txt
---
This skill guides creation of distinctive, production-grade frontend interfaces that avoid generic "AI slop" aesthetics. Implement real working code with exceptional attention to aesthetic details and creative choices.
The user provides frontend requirements: a component, page, application, or interface to build. They may include context about the purpose, audience, or technical constraints.
## Design Thinking
Before coding, understand the context and commit to a BOLD aesthetic direction:
- **Purpose**: What problem does this interface solve? Who uses it?
- **Tone**: Pick an extreme: brutally minimal, maximalist chaos, retro-futuristic, organic/natural, luxury/refined, playful/toy-like, editorial/magazine, brutalist/raw, art deco/geometric, soft/pastel, industrial/utilitarian, etc. There are so many flavors to choose from. Use these for inspiration but design one that is true to the aesthetic direction.
- **Constraints**: Technical requirements (framework, performance, accessibility).
- **Differentiation**: What makes this UNFORGETTABLE? What's the one thing someone will remember?
**CRITICAL**: Choose a clear conceptual direction and execute it with precision. Bold maximalism and refined minimalism both work - the key is intentionality, not intensity.
Then implement working code (HTML/CSS/JS, React, Vue, etc.) that is:
- Production-grade and functional
- Visually striking and memorable
- Cohesive with a clear aesthetic point-of-view
- Meticulously refined in every detail
## Frontend Aesthetics Guidelines
Focus on:
- **Typography**: Choose fonts that are beautiful, unique, and interesting. Avoid generic fonts like Arial and Inter; opt instead for distinctive choices that elevate the frontend's aesthetics; unexpected, characterful font choices. Pair a distinctive display font with a refined body font.
- **Color & Theme**: Commit to a cohesive aesthetic. Use CSS variables for consistency. Dominant colors with sharp accents outperform timid, evenly-distributed palettes.
- **Motion**: Use animations for effects and micro-interactions. Prioritize CSS-only solutions for HTML. Use Motion library for React when available. Focus on high-impact moments: one well-orchestrated page load with staggered reveals (animation-delay) creates more delight than scattered micro-interactions. Use scroll-triggering and hover states that surprise.
- **Spatial Composition**: Unexpected layouts. Asymmetry. Overlap. Diagonal flow. Grid-breaking elements. Generous negative space OR controlled density.
- **Backgrounds & Visual Details**: Create atmosphere and depth rather than defaulting to solid colors. Add contextual effects and textures that match the overall aesthetic. Apply creative forms like gradient meshes, noise textures, geometric patterns, layered transparencies, dramatic shadows, decorative borders, custom cursors, and grain overlays.
NEVER use generic AI-generated aesthetics like overused font families (Inter, Roboto, Arial, system fonts), cliched color schemes (particularly purple gradients on white backgrounds), predictable layouts and component patterns, and cookie-cutter design that lacks context-specific character.
Interpret creatively and make unexpected choices that feel genuinely designed for the context. No design should be the same. Vary between light and dark themes, different fonts, different aesthetics. NEVER converge on common choices (Space Grotesk, for example) across generations.
**IMPORTANT**: Match implementation complexity to the aesthetic vision. Maximalist designs need elaborate code with extensive animations and effects. Minimalist or refined designs need restraint, precision, and careful attention to spacing, typography, and subtle details. Elegance comes from executing the vision well.
Remember: Claude is capable of extraordinary creative work. Don't hold back, show what can truly be created when thinking outside the box and committing fully to a distinctive vision.
```
**What makes it strong**: Creative capability with clear boundaries, copyright protection built in, technical scaffolding for non-musicians, quality standards.
## **Common questions**
### **How do I write descriptions that actually trigger?**
Focus on capabilities and scenarios, not generic keywords. Include action verbs, specific file types, and clear use cases. Instead of "document processing skill," write "extract tables from PDFs and convert to CSV format for data analysis workflows."
### **How does Claude decide which skills to invoke?**
Claude evaluates your request against skill descriptions using semantic understanding. It's not keyword matching—Claude determines contextual relevance. Multiple skills can activate if they address different aspects of your request.
### **What's the right granularity for my descriptions?**
Aim for single-purpose skills. "SEO optimization for blog posts" is focused enough for specific instructions while broad enough for reusability. Too broad: "Content marketing helper." Too narrow: "Add meta descriptions."
### **How do I share Skills across my organization?**
Regardless of your team size, we suggest creating a shared document repository with skill specifications.
**For smaller teams**, use a template format with name, description, instructions, and version info.
**For medium to large teams**, establish a skills governance process:
- Designate skill owners for each domain (finance, legal, marketing)
- Maintain a central wiki or shared drive as your skill library
- Include usage examples and common troubleshooting for each skill
- Version your skills and document changes in a changelog
- Schedule quarterly reviews to update or retire outdated skills
**Best practices for all team sizes**:
- Document the business purpose for each skill
- Assign clear ownership for maintenance and updates
- Create onboarding materials showing new team members how to implement shared skills
- Track which skills deliver the most value to prioritize maintenance efforts
- Use consistent naming conventions so skills are easy to find
Enterprise customers can work with Anthropic's customer success team to explore additional deployment options and governance frameworks.
### **How do I debug skills?**
Test triggering and execution separately. If skills don't activate, broaden your description and add use cases. If results are inconsistent, add specificity to instructions and include validation steps. Create a test case library covering normal usage, edge cases, and out-of-scope requests.
### **How do I share Skills across my organization?**
****In [Claude.ai](http://claude.ai/), Skills are currently individual to each user, though org-wide management and sharing capabilities are coming soon. In the meantime, regardless of your team size, we suggest creating a shared document repository with skill specifications. This prepares your organization for upcoming features while establishing good governance practices today.
## **Get started**
Ready to build with Skills? Here's how to start:
[Claude.ai](https://claude.ai/) users:
- Enable Skills in Settings → Features
- Create your first project at claude.ai/projects
- Try combining project knowledge with Skills for your next analysis task
API developers:
- Explore the Skills endpoint in [documentation](https://docs.anthropic.com/)
- Check out our [skills cookbook](https://platform.claude.com/cookbook/skills-notebooks-01-skills-introduction)
Claude Code users:
- Install Skills via [plugin marketplaces](create-and-distribute-a-plugin-marketplace-claude-code-docs-34a8f3c5e8.md)
- Check out our [skills cookbook](https://platform.claude.com/cookbook/skills-notebooks-01-skills-introduction)
---
## how-to-use-the-single-cell-rna-qc-skill-with-claude-claude-help-center.md
## What is the single-cell-rna-qc skill?
The single-cell-rna-qc skill gives Claude the ability to perform quality control on single-cell RNA-seq data using scverse best practices with MAD-based filtering and comprehensive visualizations for .h5a and .h5ad files.
## Who should use the single-cell-rna-qc skill?
This skill is designed for bioinformaticians, computational biologists, single-cell genomics researchers, and data scientists working with single-cell RNA-seq data who need to quickly assess data quality, identify and filter low-quality cells, and generate standard QC visualizations without writing code from scratch.
## How to access the skill in Claude Code
Command
`/plugin marketplace add anthropics/life-sciences`
`/plugin install single-cell-rna-qc@life-sciences`
## How to access the skill in [Claude.ai](http://claude.ai/)
**For Individual Claude Users**
___
Related Articles
[
Using Skills in Claude
](https://support.claude.com/en/articles/12512180-using-skills-in-claude)[
Getting Started with Claude for Life Sciences
](../01-Getting-Started/getting-started-with-claude-for-life-sciences.md)[
Using the BioRender Connector in Claude
](../14-Connectors/using-the-biorender-connector-in-claude.md)[
Using the Synapse.org Connector in Claude
](../14-Connectors/using-the-synapse-org-connector-in-claude.md)[
Using the 10x Genomics Extension in Claude
](../15-Claude-AI-Features/using-the-10x-genomics-extension-in-claude.md)
---
## improving-frontend-design-through-skills-claude.md
You might notice that when you ask an LLM to build a landing page without guidance, it will almost always conform to Inter fonts, purple gradients on white backgrounds, and minimal animations.
The issue? [Distributional convergence.](https://en.wikipedia.org/wiki/Convergence_of_random_variables) During sampling, models predict tokens based on statistical patterns in training data. Safe design choices–those that work universally and offend no one–dominate web training data. Without direction, Claude samples from this high-probability center.
For developers building customer-facing products, this generic aesthetic undermines brand identity and makes AI-generated interfaces immediately recognizable—and dismissible.
### The steerability challenge
The good news is that Claude is highly steerable with the right prompting. Tell Claude to "avoid Inter and Roboto" or "use atmospheric backgrounds instead of solid colors," and results improve immediately. This sensitivity to guidance is a feature; it means Claude can adapt to different design contexts, constraints, and aesthetic preferences.
But this creates a practical challenge: the more specialized the task, the more context you need to provide. For frontend design, effective guidance spans typography principles, color theory, animation patterns, and background treatment. You need to specify which defaults to avoid and which alternatives to prefer across multiple dimensions.
You could pack all this into a system prompt, but then every request–debugging Python, analyzing data, writing emails–carries frontend design context. The question becomes: how do you provide Claude with domain-specific guidance exactly when needed, without permanent context overhead for unrelated tasks?
## **Skills: dynamic context loading**
This is precisely what [Skills](https://www.anthropic.com/news/skills) were designed for: delivering specialized context on demand without permanent overhead. A skill is a document (often markdown) containing instructions, constraints, and domain knowledge, stored in a designated directory that Claude can access through simple file-reading tools. Claude can leverage these skills to dynamically load in information it needs at runtime, progressively enhancing its context instead of loading everything upfront.
When equipped with these skills and the necessary tools to read them, Claude can autonomously identify and load relevant skills based on the task at hand. For instance, when asked to build a landing page or create a React component, Claude can load a frontend design skill and apply its instructions just-in-time. This is the essential mental model: skills are prompts and contextual resources that activate on demand, providing specialized guidance for specific task types without incurring permanent context overhead.
This allows developers to reap the benefits of Claude’s steerability without overloading the context window by stuffing disparate instructions across many tasks into the system prompt. As we’ve [previously explained,](https://www.anthropic.com/engineering/effective-context-engineering-for-ai-agents) too many tokens in the context window can result in degradation of performance, so keeping the contents of the context window lean and focused is extremely important for eliciting the best performance from the model. Skills solve for this by making effective prompts reusable and contextual.
## **Prompting for better frontend output**
We can unlock significantly better UI generations from Claude, without permanent context overhead, by creating a frontend design skill. The core insight is to think about frontend design the way a frontend engineer would. The more you can map aesthetic improvements to implementable frontend code, the better Claude can execute.
Leveraging this insight, we identified several areas where targeted prompting works well: typography, animations, background effects, and themes. These all translate cleanly to code that Claude can write. Implementing this in your prompts does not require detailed technical instructions, just using targeted language that engages the model to think more critically about these design axes is enough to elicit stronger outputs. This maps closely with the guidance we provided in our [context engineering](https://www.anthropic.com/engineering/effective-context-engineering-for-ai-agents) blog article, about prompting the model at the right altitude, avoiding the two extremes of low-altitude hardcoded logic like specifying exact hex codes and vague high-altitude guidance that assumes shared context.
### **Typography**
To see this in action, let's start by viewing typography as one dimension we can influence via prompting. The prompt below specifically steers Claude to use more interesting fonts:
```
<use_interesting_fonts>
Typography instantly signals quality. Avoid using boring, generic fonts.
Never use: Inter, Roboto, Open Sans, Lato, default system fonts
Here are some examples of good, impactful choices:
- Code aesthetic: JetBrains Mono, Fira Code, Space Grotesk
- Editorial: Playfair Display, Crimson Pro
- Technical: IBM Plex family, Source Sans 3
- Distinctive: Bricolage Grotesque, Newsreader
Pairing principle: High contrast = interesting. Display + monospace, serif + geometric sans, variable font across weights.
Use extremes: 100/200 weight vs 800/900, not 400 vs 600. Size jumps of 3x+, not 1.5x.
Pick one distinctive font, use it decisively. Load from Google Fonts.
</use_interesting_fonts>
```
**Output generated with base prompt:**

**Output generated with base prompt and typography section**
Interestingly, the mandate to use more interesting fonts seems to encourage the model to improve other aspects of the design as well.
Typography alone leads to significant improvement, but fonts are just one dimension. What about cohesive aesthetics across the entire interface?
### **Themes**
Another dimension we can prompt for is designs inspired by well-known themes and aesthetics. Claude has a rich understanding of popular themes; we can use this to communicate the specific aesthetics we want our frontend to embody. Here’s an example:
```
<always_use_rpg_theme>
Always design with RPG aesthetic:
- Fantasy-inspired color palettes with rich, dramatic tones
- Ornate borders and decorative frame elements
- Parchment textures, leather-bound styling, and weathered materials
- Epic, adventurous atmosphere with dramatic lighting
- Medieval-inspired serif typography with embellished headers
</always_use_rpg_theme>
```
This produces the following RPG-themed UI:
Typography and themes show targeted prompting works. But manually specifying each dimension is tedious. What if we could combine all these improvements into one reusable asset?
### **A general-purpose prompt**
The same principle extends to other design dimensions: prompting for motion (animations and micro-interactions) adds polish that static designs lack, while guiding the model toward more interesting background choices creates depth and visual interest. This is where a comprehensive skill shines.
Bringing this all together, we developed a ~400 token prompt – compact enough to load without bloating context (even when loaded as a skill) – that dramatically improves frontend output across typography, color, motion, and backgrounds:
```
<frontend_aesthetics>
You tend to converge toward generic, "on distribution" outputs. In frontend design,this creates what users call the "AI slop" aesthetic. Avoid this: make creative,distinctive frontends that surprise and delight.
Focus on:
- Typography: Choose fonts that are beautiful, unique, and interesting. Avoid generic fonts like Arial and Inter; opt instead for distinctive choices that elevate the frontend's aesthetics.
- Color & Theme: Commit to a cohesive aesthetic. Use CSS variables for consistency. Dominant colors with sharp accents outperform timid, evenly-distributed palettes. Draw from IDE themes and cultural aesthetics for inspiration.
- Motion: Use animations for effects and micro-interactions. Prioritize CSS-only solutions for HTML. Use Motion library for React when available. Focus on high-impact moments: one well-orchestrated page load with staggered reveals (animation-delay) creates more delight than scattered micro-interactions.
- Backgrounds: Create atmosphere and depth rather than defaulting to solid colors. Layer CSS gradients, use geometric patterns, or add contextual effects that match the overall aesthetic.
Avoid generic AI-generated aesthetics:
- Overused font families (Inter, Roboto, Arial, system fonts)
- Clichéd color schemes (particularly purple gradients on white backgrounds)
- Predictable layouts and component patterns
- Cookie-cutter design that lacks context-specific character
Interpret creatively and make unexpected choices that feel genuinely designed for the context. Vary between light and dark themes, different fonts, different aesthetics. You still tend to converge on common choices (Space Grotesk, for example) across generations. Avoid this: it is critical that you think outside the box!
</frontend_aesthetics>
```
In the example above, we start by giving Claude general context on the problem and what we're trying to solve for. We've found that giving the model this type of high-level context is a helpful prompting tactic to calibrate outputs. We then identify the vectors of improved design we discussed before and give targeted advice to encourage the model to think more creatively across all of these dimensions.
We also include additional guidance at the end to prevent Claude from converging to a different local maximum. Even with explicit instructions to avoid certain patterns, the model can default to other common choices (like Space Grotesk for typography). The final reminder to "think outside the box" reinforces creative variation.
### **Impact on frontend design**
With this skill active, Claude's output improves across several types of frontend designs, including:
**Example 1: SaaS landing page**
**Caption:** AI-generated SaaS landing page with generic Inter font, purple gradient, and standard layout. No skills were used.
**Caption:** AI-generated frontend generated using the same prompt as the rendering above in addition to the frontend skill, now with distinctive typography, cohesive color scheme, and layered backgrounds.
**Example 2: Blog layout**
AI-generated blog layout with default system fonts and flat white background. No skills were used.

AI-generated blog layout using the same prompt as well as the frontend skill, featuring editorial typeface with atmospheric depth and refined spacing.
**Example 3: Admin dashboard**
AI-generated admin dashboard with standard UI components with minimal visual hierarchy. No skills were used.
AI-generated admin dashboard with bold typography, cohesive dark theme, and purposeful motion, using the same prompt in addition to the frontend skill.
## **Improving artifact quality in** [**claude.ai**](http://claude.ai/) **with Skills**
Design taste isn't the only limitation. Claude also faces architectural constraints when building artifacts. [Artifacts](https://support.claude.com/en/articles/9487310-what-are-artifacts-and-how-do-i-use-them) are interactive, editable content (like code or documents) that Claude creates and displays alongside your chat.
In addition to the issue with design taste explored above, Claude has another default behavior that limits its ability to generate fantastic frontend artifacts in [claude.ai](http://claude.ai/). Currently, when asked to create a frontend, Claude just builds a single HTML file with CSS and JS. This is because Claude understands that frontends must be single HTML files to be properly rendered as artifacts.
In the same way you’d expect a human developer to only be able to create very basic frontends if they could only write HTML/CSS/JS in a single file, we hypothesized that Claude would be able to generate more impressive frontend artifacts if we gave it instructions to use richer tooling.
This led us to create a [web-artifacts-builder skill](https://github.com/anthropics/skills/blob/main/web-artifacts-builder/SKILL.md) which leverages Claude’s ability to [use a computer](https://www.claude.com/blog/create-files) and guides Claude to build artifacts using multiple files and modern web technologies like [React](https://react.dev/), [Tailwind CSS](https://tailwindcss.com/) and [shadcn/ui](https://ui.shadcn.com/). Under the hood, the skill exposes scripts that (1) help Claude efficiently set up a basic React repo and (2) bundle everything into a single file using [Parcel](https://parceljs.org/) to meet the single-HTML-file requirement after it is done editing. This is one of the core benefits of skills - by giving Claude access to scripts to execute boilerplate actions, Claude is able to minimize token usage while increasing reliability and performance.
With the web-artifacts-builder skill, Claude could leverage shadcn/ui's form components and Tailwind's responsive grid system to create a more comprehensive artifact.
**Example 1: Whiteboard app**
For example, when prompted to create a whiteboard app without the web-artifacts-builder skill, Claude outputted a very basic interface:
On the other hand, when using the new web-artifacts-builder skill, Claude generated a much cleaner and more featureful application out-of-the-box that included drawing different shapes and text:

**Example 2: Task Manager App**
Similarly, when asked to create a task management app, without the skill, Claude generated a functional but very minimal application:
With the skill, Claude generated an app that was more featureful out of the box. For example, Claude included a “Create New Task” form component that allows users to set an associated Category and Due Date on tasks:

To try out this new skill in [Claude.ai](http://claude.ai/), simply enable the skill and then ask Claude to “use the web-artifacts-builder skill” when building artifacts.
## **Optimizing Claude’s frontend design capabilities with Skills**
This frontend design skill demonstrates a broader principle about language model capabilities: models often have the ability to do more than they express by default. Claude has strong design understanding, but distributional convergence obscures it without guidance. While you could add these instructions to your system prompt, this entails that every request carries frontend design context, even when this knowledge isn’t relevant to the task at hand. Instead, using Skills transforms Claude from a tool that needs constant guidance into one that brings domain expertise to every task.
Skills are also highly customizable – you can create your own tailored to your specific needs. This allows you to define the exact primitives you want to bake into the skill, whether that's your company's design system, specific component patterns, or industry-specific UI conventions. By encoding these decisions into a Skill, you transform component parts of an agent’s thinking into a reusable asset that your entire development team can leverage. The skill becomes organizational knowledge that persists and scales, ensuring consistent quality across projects.
This pattern extends beyond frontend work. Any domain where Claude produces generic outputs despite having more expansive understanding is a candidate for Skill development. The method is consistent: identify convergent defaults, provide concrete alternatives, structure guidance at the right altitude, and make it reusable through Skills.
For frontend development, this means Claude can generate distinctive interfaces without per-request prompt engineering. To get started, explore our [frontend design cookbook](https://github.com/anthropics/claude-cookbooks/blob/main/coding/prompting_for_frontend_aesthetics.ipynb) or try out our [new frontend design plugin in Claude Code](https://github.com/anthropics/claude-code/tree/main/plugins/frontend-design).
**Feeling inspired? To create your own frontend skills, check out our** [**skill-creator**](https://github.com/anthropics/skills/tree/main/skill-creator)**.**
**Acknowledgements**
Written by Anthropic's Applied AI team: Prithvi Rajasekaran, Justin Wei, and Alexander Bricken, alongside our marketing partners Molly Vorwerck and Ryan Whitehead.
---
## introducing-agent-skills-claude.md

- Product
Claude Developer Platform
- Share
[Copy link](https://claude.com/blog/skills#)
https://claude.com/blog/skills
**_Update:_** _We've added_ [_organization-wide management for skills_](https://claude.com/blog/organization-skills-and-directory)_, a_ [_directory_](https://claude.com/connectors) _featuring partner-built skills, and published_ [_Agent Skills_](https://agentskills.io/) _as an open standard for cross-platform portability. (December 18, 2025)_
Claude can now use _Skills_ to improve how it performs specific tasks. Skills are folders that include instructions, scripts, and resources that Claude can load when needed.
Claude will only access a skill when it's relevant to the task at hand. When used, skills make Claude better at specialized tasks like working with Excel or following your organization's brand guidelines.
<iframe src="https://www.youtube-nocookie.com/embed/IoqpBKrNaZI?autoplay=0&mute=0&controls=1&origin=https%3A%2F%2Fwww.anthropic.com&playsinline=1&showinfo=0&rel=0&iv_load_policy=3&modestbranding=1&enablejsapi=1&widgetid=1&forigin=https%3A%2F%2Fwww.anthropic.com%2Fnews%2Fskills&aoriginsup=1&vf=1" frameborder="0" allowfullscreen=""></iframe>
You've already seen Skills at work in Claude apps, where Claude uses them to create files like spreadsheets and presentations. Now, you can build your own skills and use them across Claude apps, Claude Code, and our API.
## How Skills work
While working on tasks, Claude scans available skills to find relevant matches. When one matches, it loads only the minimal information and files needed—keeping Claude fast while accessing specialized expertise.
Skills are:
- **Composable**: Skills stack together. Claude automatically identifies which skills are needed and coordinates their use.
- **Portable**: Skills use the same format everywhere. Build once, use across Claude apps, Claude Code, and API.
- **Efficient**: Only loads what's needed, when it's needed.
- **Powerful**: Skills can include executable code for tasks where traditional programming is more reliable than token generation.
Think of Skills as custom onboarding materials that let you package expertise, making Claude a specialist on what matters most to you. For a technical deep-dive on the Agent Skills design pattern, architecture, and development best practices, read our [engineering blog.](https://www.anthropic.com/engineering/equipping-agents-for-the-real-world-with-agent-skills)
## Skills work with every Claude product
### **Claude apps**
Skills are available to Pro, Max, Team and Enterprise users. We provide skills for common tasks like document creation, examples you can customize, and the ability to create your own custom skills.
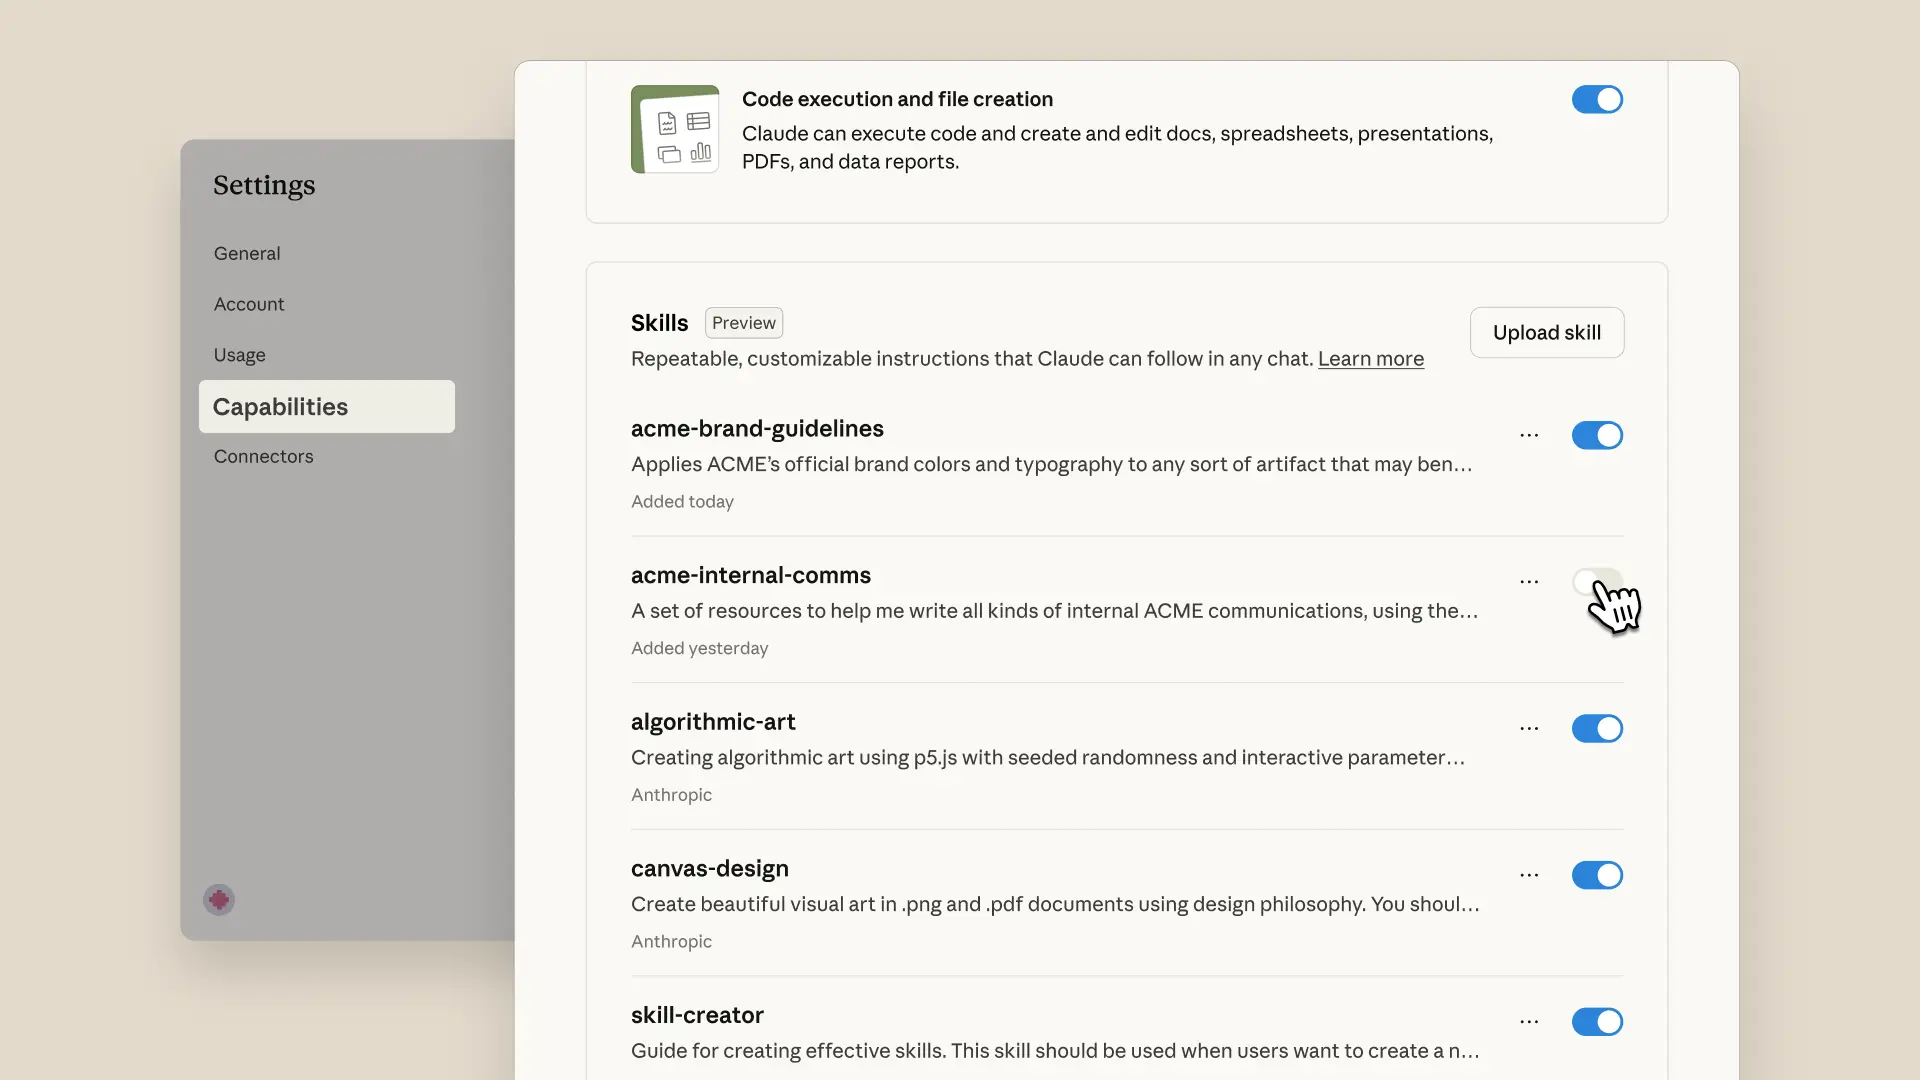
Claude automatically invokes relevant skills based on your task—no manual selection needed. You'll even see skills in Claude's chain of thought as it works.
Creating skills is simple. The "skill-creator" skill provides interactive guidance: Claude asks about your workflow, generates the folder structure, formats the SKILL.md file, and bundles the resources you need. No manual file editing required.
<iframe src="https://www.youtube-nocookie.com/embed/kS1MJFZWMq4?autoplay=0&mute=0&controls=1&origin=https%3A%2F%2Fwww.anthropic.com&playsinline=1&showinfo=0&rel=0&iv_load_policy=3&modestbranding=1&enablejsapi=1&widgetid=3&forigin=https%3A%2F%2Fwww.anthropic.com%2Fnews%2Fskills&aoriginsup=1&vf=1" frameborder="0" allowfullscreen=""></iframe>
Enable Skills in [Settings](https://claude.ai/redirect/website.v1.51f73c97-b077-44e7-85ba-8b27a025dfdf/settings/features). For Team and Enterprise users, admins must first enable Skills organization-wide.
### **Claude Developer Platform (API)**
Agent Skills, which we often refer to simply as Skills, can now be added to Messages API requests and the new `/v1/skills` endpoint gives developers programmatic control over custom skill versioning and management. Skills require the [Code Execution Tool](https://docs.claude.com/en/docs/agents-and-tools/tool-use/code-execution-tool) beta, which provides the secure environment they need to run.
Use Anthropic-created skills to have Claude read and generate professional Excel spreadsheets with formulas, PowerPoint presentations, Word documents, and fillable PDFs. Developers can create custom Skills to extend Claude's capabilities for their specific use cases.
Developers can also easily create, view, and upgrade skill versions through the Claude Console.
Explore the [documentation](https://docs.claude.com/en/docs/agents-and-tools/agent-skills/overview) , our [skills cookbook](https://platform.claude.com/cookbook/skills-notebooks-01-skills-introduction), or [Anthropic Academy](https://www.anthropic.com/learn/build-with-claude) to learn more.

Skills streamline our management accounting and finance workflows. Claude processes multiple spreadsheets, catches critical anomalies, and generates reports using our procedures. What once took a day, we can now accomplish in an hour.
Yusuke Kaji, General Manager AI

Skills teaches Claude how to work with Box content. Users can transform stored files into PowerPoint presentations, Excel spreadsheets, and Word documents that follow their organization's standards—saving hours of effort.
Yashodha Bhavnani, Head of AI

Canva plans to leverage Skills to customize agents and expand what they can do. This unlocks new ways to bring Canva deeper into agentic workflows—helping teams capture their unique context and create stunning, high-quality designs effortlessly.
Anwar Haneef, GM & Head of Ecosystem

With Skills, Claude works seamlessly with Notion - taking users from questions to action faster. Less prompt wrangling on complex tasks, more predictable results.
MJ Felix, Product Manager

Skills streamline our management accounting and finance workflows. Claude processes multiple spreadsheets, catches critical anomalies, and generates reports using our procedures. What once took a day, we can now accomplish in an hour.
Yusuke Kaji, General Manager AI

Skills teaches Claude how to work with Box content. Users can transform stored files into PowerPoint presentations, Excel spreadsheets, and Word documents that follow their organization's standards—saving hours of effort.
Yashodha Bhavnani, Head of AI

Canva plans to leverage Skills to customize agents and expand what they can do. This unlocks new ways to bring Canva deeper into agentic workflows—helping teams capture their unique context and create stunning, high-quality designs effortlessly.
Anwar Haneef, GM & Head of Ecosystem

With Skills, Claude works seamlessly with Notion - taking users from questions to action faster. Less prompt wrangling on complex tasks, more predictable results.
MJ Felix, Product Manager

Skills streamline our management accounting and finance workflows. Claude processes multiple spreadsheets, catches critical anomalies, and generates reports using our procedures. What once took a day, we can now accomplish in an hour.
Yusuke Kaji, General Manager AI

Skills teaches Claude how to work with Box content. Users can transform stored files into PowerPoint presentations, Excel spreadsheets, and Word documents that follow their organization's standards—saving hours of effort.
Yashodha Bhavnani, Head of AI

Canva plans to leverage Skills to customize agents and expand what they can do. This unlocks new ways to bring Canva deeper into agentic workflows—helping teams capture their unique context and create stunning, high-quality designs effortlessly.
Anwar Haneef, GM & Head of Ecosystem

With Skills, Claude works seamlessly with Notion - taking users from questions to action faster. Less prompt wrangling on complex tasks, more predictable results.
MJ Felix, Product Manager

Skills streamline our management accounting and finance workflows. Claude processes multiple spreadsheets, catches critical anomalies, and generates reports using our procedures. What once took a day, we can now accomplish in an hour.
Yusuke Kaji, General Manager AI

Skills teaches Claude how to work with Box content. Users can transform stored files into PowerPoint presentations, Excel spreadsheets, and Word documents that follow their organization's standards—saving hours of effort.
Yashodha Bhavnani, Head of AI
### **Claude Code**
Skills extend Claude Code with your team's expertise and workflows. Install skills via plugins from the anthropics/skills marketplace. Claude loads them automatically when relevant. Share skills through version control with your team. You can also manually install skills by adding them to `~/.claude/skills`. The Claude Agent SDK provides the same Agent Skills support for building custom agents.
## Getting started
- **Claude apps:** [User Guide](https://support.claude.com/en/articles/12580051-teach-claude-your-way-of-working-using-skills) & [Help Center](../02-Claude-Code-CLI/what-are-skills.md)
- **API developers:** [Documentation](https://docs.claude.com/en/api/skills-guide)
- **Claude Code:** [Documentation](https://docs.claude.com/en/docs/claude-code/skills)
- **Example Skills to customize:** [GitHub repository](https://github.com/anthropics/skills)
## What's next
We're working toward simplified skill creation workflows and enterprise-wide deployment capabilities, making it easier for organizations to distribute skills across teams.
Keep in mind, this feature gives Claude access to execute code. While powerful, it means being mindful about which skills you use—stick to trusted sources to keep your data safe. [Learn more](https://support.claude.com/en/articles/12512180-using-skills-in-claude#h_2746475e70).
## Transform how your organization operates with Claude
Get the developer newsletter
Product updates, how-tos, community spotlights, and more. Delivered monthly to your inbox.
Please provide your email address if you'd like to receive our monthly developer newsletter. You can unsubscribe at any time.
Thank you! You’re subscribed.
Sorry, there was a problem with your submission, please try again later.
---
## learning-style-plugin.md
# Learning Style Plugin
This plugin combines the unshipped Learning output style with explanatory functionality as a SessionStart hook.
**Note:** This plugin differs from the original unshipped Learning output style by also incorporating all functionality from the [explanatory-output-style plugin](https://github.com/anthropics/claude-code/tree/main/plugins/explanatory-output-style), providing both interactive learning and educational insights.
WARNING: Do not install this plugin unless you are fine with incurring the token cost of this plugin's additional instructions and the interactive nature of learning mode.
## What it does
When enabled, this plugin automatically adds instructions at the start of each session that encourage Claude to:
1. **Learning Mode:** Engage you in active learning by requesting meaningful code contributions at decision points
2. **Explanatory Mode:** Provide educational insights about implementation choices and codebase patterns
Instead of implementing everything automatically, Claude will:
1. Identify opportunities where you can write 5-10 lines of meaningful code
2. Focus on business logic and design choices where your input truly matters
3. Prepare the context and location for your contribution
4. Explain trade-offs and guide your implementation
5. Provide educational insights before and after writing code
## How it works
The plugin uses a SessionStart hook to inject additional context into every session. This context instructs Claude to adopt an interactive teaching approach where you actively participate in writing key parts of the code.
## When Claude requests contributions
Claude will ask you to write code for:
- Business logic with multiple valid approaches
- Error handling strategies
- Algorithm implementation choices
- Data structure decisions
- User experience decisions
- Design patterns and architecture choices
## When Claude won't request contributions
Claude will implement directly:
- Boilerplate or repetitive code
- Obvious implementations with no meaningful choices
- Configuration or setup code
- Simple CRUD operations
## Example interaction
**Claude:** I've set up the authentication middleware. The session timeout behavior is a security vs. UX trade-off - should sessions auto-extend on activity, or have a hard timeout?
In `auth/middleware.ts`, implement the `handleSessionTimeout()` function to define the timeout behavior.
Consider: auto-extending improves UX but may leave sessions open longer; hard timeouts are more secure but might frustrate active users.
**You:** [Write 5-10 lines implementing your preferred approach]
## Educational insights
In addition to interactive learning, Claude will provide educational insights about implementation choices using this format:
```
`★ Insight ─────────────────────────────────────`
[2-3 key educational points about the codebase or implementation]
`─────────────────────────────────────────────────`
```
These insights focus on:
- Specific implementation choices for your codebase
- Patterns and conventions in your code
- Trade-offs and design decisions
- Codebase-specific details rather than general programming concepts
## Usage
Once installed, the plugin activates automatically at the start of every session. No additional configuration is needed.
## Migration from Output Styles
This plugin combines the unshipped "Learning" output style with the deprecated "Explanatory" output style. It provides an interactive learning experience where you actively contribute code at meaningful decision points, while also receiving educational insights about implementation choices.
If you previously used the explanatory-output-style plugin, this learning plugin includes all of that functionality plus interactive learning features.
This SessionStart hook pattern is roughly equivalent to CLAUDE.md, but it is more flexible and allows for distribution through plugins.
## Managing changes
- Disable the plugin - keep the code installed on your device
- Uninstall the plugin - remove the code from your device
- Update the plugin - create a local copy of this plugin to personalize it
- Hint: Ask Claude to read https://docs.claude.com/en/docs/claude-code/plugins.md and set it up for you!
## Philosophy
Learning by doing is more effective than passive observation. This plugin transforms your interaction with Claude from "watch and learn" to "build and understand," ensuring you develop practical skills through hands-on coding of meaningful logic.
---
## manifest-reference.md
# Plugin Manifest Reference
Complete reference for `plugin.json` configuration.
## File Location
**Required path**: `.claude-plugin/plugin.json`
The manifest MUST be in the `.claude-plugin/` directory at the plugin root. Claude Code will not recognize plugins without this file in the correct location.
## Complete Field Reference
### Core Fields
#### name (required)
**Type**: String
**Format**: kebab-case
**Example**: `"test-automation-suite"`
The unique identifier for the plugin. Used for:
- Plugin identification in Claude Code
- Conflict detection with other plugins
- Command namespacing (optional)
**Requirements**:
- Must be unique across all installed plugins
- Use only lowercase letters, numbers, and hyphens
- No spaces or special characters
- Start with a letter
- End with a letter or number
**Validation**:
```javascript
/^[a-z][a-z0-9]*(-[a-z0-9]+)*$/
```
**Examples**:
- ✅ Good: `api-tester`, `code-review`, `git-workflow-automation`
- ❌ Bad: `API Tester`, `code_review`, `-git-workflow`, `test-`
#### version
**Type**: String
**Format**: Semantic versioning (MAJOR.MINOR.PATCH)
**Example**: `"2.1.0"`
**Default**: `"0.1.0"` if not specified
Semantic versioning guidelines:
- **MAJOR**: Incompatible API changes, breaking changes
- **MINOR**: New functionality, backward-compatible
- **PATCH**: Bug fixes, backward-compatible
**Pre-release versions**:
- `"1.0.0-alpha.1"` - Alpha release
- `"1.0.0-beta.2"` - Beta release
- `"1.0.0-rc.1"` - Release candidate
**Examples**:
- `"0.1.0"` - Initial development
- `"1.0.0"` - First stable release
- `"1.2.3"` - Patch update to 1.2
- `"2.0.0"` - Major version with breaking changes
#### description
**Type**: String
**Length**: 50-200 characters recommended
**Example**: `"Automates code review workflows with style checks and automated feedback"`
Brief explanation of plugin purpose and functionality.
**Best practices**:
- Focus on what the plugin does, not how
- Use active voice
- Mention key features or benefits
- Keep under 200 characters for marketplace display
**Examples**:
- ✅ "Generates comprehensive test suites from code analysis and coverage reports"
- ✅ "Integrates with Jira for automatic issue tracking and sprint management"
- ❌ "A plugin that helps you do testing stuff"
- ❌ "This is a very long description that goes on and on about every single feature..."
### Metadata Fields
#### author
**Type**: Object
**Fields**: name (required), email (optional), url (optional)
```json
{
"author": {
"name": "Jane Developer",
"email": "jane@example.com",
"url": "https://janedeveloper.com"
}
}
```
**Alternative format** (string only):
```json
{
"author": "Jane Developer <jane@example.com> (https://janedeveloper.com)"
}
```
**Use cases**:
- Credit and attribution
- Contact for support or questions
- Marketplace display
- Community recognition
#### homepage
**Type**: String (URL)
**Example**: `"https://docs.example.com/plugins/my-plugin"`
Link to plugin documentation or landing page.
**Should point to**:
- Plugin documentation site
- Project homepage
- Detailed usage guide
- Installation instructions
**Not for**:
- Source code (use `repository` field)
- Issue tracker (include in documentation)
- Personal websites (use `author.url`)
#### repository
**Type**: String (URL) or Object
**Example**: `"https://github.com/user/plugin-name"`
Source code repository location.
**String format**:
```json
{
"repository": "https://github.com/user/plugin-name"
}
```
**Object format** (detailed):
```json
{
"repository": {
"type": "git",
"url": "https://github.com/user/plugin-name.git",
"directory": "packages/plugin-name"
}
}
```
**Use cases**:
- Source code access
- Issue reporting
- Community contributions
- Transparency and trust
#### license
**Type**: String
**Format**: SPDX identifier
**Example**: `"MIT"`
Software license identifier.
**Common licenses**:
- `"MIT"` - Permissive, popular choice
- `"Apache-2.0"` - Permissive with patent grant
- `"GPL-3.0"` - Copyleft
- `"BSD-3-Clause"` - Permissive
- `"ISC"` - Permissive, similar to MIT
- `"UNLICENSED"` - Proprietary, not open source
**Full list**: https://spdx.org/licenses/
**Multiple licenses**:
```json
{
"license": "(MIT OR Apache-2.0)"
}
```
#### keywords
**Type**: Array of strings
**Example**: `["testing", "automation", "ci-cd", "quality-assurance"]`
Tags for plugin discovery and categorization.
**Best practices**:
- Use 5-10 keywords
- Include functionality categories
- Add technology names
- Use common search terms
- Avoid duplicating plugin name
**Categories to consider**:
- Functionality: `testing`, `debugging`, `documentation`, `deployment`
- Technologies: `typescript`, `python`, `docker`, `aws`
- Workflows: `ci-cd`, `code-review`, `git-workflow`
- Domains: `web-development`, `data-science`, `devops`
### Component Path Fields
#### commands
**Type**: String or Array of strings
**Default**: `["./commands"]`
**Example**: `"./cli-commands"`
Additional directories or files containing command definitions.
**Single path**:
```json
{
"commands": "./custom-commands"
}
```
**Multiple paths**:
```json
{
"commands": [
"./commands",
"./admin-commands",
"./experimental-commands"
]
}
```
**Behavior**: Supplements default `commands/` directory (does not replace)
**Use cases**:
- Organizing commands by category
- Separating stable from experimental commands
- Loading commands from shared locations
#### agents
**Type**: String or Array of strings
**Default**: `["./agents"]`
**Example**: `"./specialized-agents"`
Additional directories or files containing agent definitions.
**Format**: Same as `commands` field
**Use cases**:
- Grouping agents by specialization
- Separating general-purpose from task-specific agents
- Loading agents from plugin dependencies
#### hooks
**Type**: String (path to JSON file) or Object (inline configuration)
**Default**: `"./hooks/hooks.json"`
Hook configuration location or inline definition.
**File path**:
```json
{
"hooks": "./config/hooks.json"
}
```
**Inline configuration**:
```json
{
"hooks": {
"PreToolUse": [
{
"matcher": "Write",
"hooks": [
{
"type": "command",
"command": "bash ${CLAUDE_PLUGIN_ROOT}/scripts/validate.sh",
"timeout": 30
}
]
}
]
}
}
```
**Use cases**:
- Simple plugins: Inline configuration (< 50 lines)
- Complex plugins: External JSON file
- Multiple hook sets: Separate files for different contexts
#### mcpServers
**Type**: String (path to JSON file) or Object (inline configuration)
**Default**: `./.mcp.json`
MCP server configuration location or inline definition.
**File path**:
```json
{
"mcpServers": "./.mcp.json"
}
```
**Inline configuration**:
```json
{
"mcpServers": {
"github": {
"command": "node",
"args": ["${CLAUDE_PLUGIN_ROOT}/servers/github-mcp.js"],
"env": {
"GITHUB_TOKEN": "${GITHUB_TOKEN}"
}
}
}
}
```
**Use cases**:
- Simple plugins: Single inline server (< 20 lines)
- Complex plugins: External `.mcp.json` file
- Multiple servers: Always use external file
## Path Resolution
### Relative Path Rules
All paths in component fields must follow these rules:
1. **Must be relative**: No absolute paths
2. **Must start with `./`**: Indicates relative to plugin root
3. **Cannot use `../`**: No parent directory navigation
4. **Forward slashes only**: Even on Windows
**Examples**:
- ✅ `"./commands"`
- ✅ `"./src/commands"`
- ✅ `"./configs/hooks.json"`
- ❌ `"/Users/name/plugin/commands"`
- ❌ `"commands"` (missing `./`)
- ❌ `"../shared/commands"`
- ❌ `".\\commands"` (backslash)
### Resolution Order
When Claude Code loads components:
1. **Default directories**: Scans standard locations first
- `./commands/`
- `./agents/`
- `./skills/`
- `./hooks/hooks.json`
- `./.mcp.json`
2. **Custom paths**: Scans paths specified in manifest
- Paths from `commands` field
- Paths from `agents` field
- Files from `hooks` and `mcpServers` fields
3. **Merge behavior**: Components from all locations load
- No overwriting
- All discovered components register
- Name conflicts cause errors
## Validation
### Manifest Validation
Claude Code validates the manifest on plugin load:
**Syntax validation**:
- Valid JSON format
- No syntax errors
- Correct field types
**Field validation**:
- `name` field present and valid format
- `version` follows semantic versioning (if present)
- Paths are relative with `./` prefix
- URLs are valid (if present)
**Component validation**:
- Referenced paths exist
- Hook and MCP configurations are valid
- No circular dependencies
### Common Validation Errors
**Invalid name format**:
```json
{
"name": "My Plugin" // ❌ Contains spaces
}
```
Fix: Use kebab-case
```json
{
"name": "my-plugin" // ✅
}
```
**Absolute path**:
```json
{
"commands": "/Users/name/commands" // ❌ Absolute path
}
```
Fix: Use relative path
```json
{
"commands": "./commands" // ✅
}
```
**Missing ./ prefix**:
```json
{
"hooks": "hooks/hooks.json" // ❌ No ./
}
```
Fix: Add ./ prefix
```json
{
"hooks": "./hooks/hooks.json" // ✅
}
```
**Invalid version**:
```json
{
"version": "1.0" // ❌ Not semantic versioning
}
```
Fix: Use MAJOR.MINOR.PATCH
```json
{
"version": "1.0.0" // ✅
}
```
## Minimal vs. Complete Examples
### Minimal Plugin
Bare minimum for a working plugin:
```json
{
"name": "hello-world"
}
```
Relies entirely on default directory discovery.
### Recommended Plugin
Good metadata for distribution:
```json
{
"name": "code-review-assistant",
"version": "1.0.0",
"description": "Automates code review with style checks and suggestions",
"author": {
"name": "Jane Developer",
"email": "jane@example.com"
},
"homepage": "https://docs.example.com/code-review",
"repository": "https://github.com/janedev/code-review-assistant",
"license": "MIT",
"keywords": ["code-review", "automation", "quality", "ci-cd"]
}
```
### Complete Plugin
Full configuration with all features:
```json
{
"name": "enterprise-devops",
"version": "2.3.1",
"description": "Comprehensive DevOps automation for enterprise CI/CD pipelines",
"author": {
"name": "DevOps Team",
"email": "devops@company.com",
"url": "https://company.com/devops"
},
"homepage": "https://docs.company.com/plugins/devops",
"repository": {
"type": "git",
"url": "https://github.com/company/devops-plugin.git"
},
"license": "Apache-2.0",
"keywords": [
"devops",
"ci-cd",
"automation",
"kubernetes",
"docker",
"deployment"
],
"commands": [
"./commands",
"./admin-commands"
],
"agents": "./specialized-agents",
"hooks": "./config/hooks.json",
"mcpServers": "./.mcp.json"
}
```
## Best Practices
### Metadata
1. **Always include version**: Track changes and updates
2. **Write clear descriptions**: Help users understand plugin purpose
3. **Provide contact information**: Enable user support
4. **Link to documentation**: Reduce support burden
5. **Choose appropriate license**: Match project goals
### Paths
1. **Use defaults when possible**: Minimize configuration
2. **Organize logically**: Group related components
3. **Document custom paths**: Explain why non-standard layout used
4. **Test path resolution**: Verify on multiple systems
### Maintenance
1. **Bump version on changes**: Follow semantic versioning
2. **Update keywords**: Reflect new functionality
3. **Keep description current**: Match actual capabilities
4. **Maintain changelog**: Track version history
5. **Update repository links**: Keep URLs current
### Distribution
1. **Complete metadata before publishing**: All fields filled
2. **Test on clean install**: Verify plugin works without dev environment
3. **Validate manifest**: Use validation tools
4. **Include README**: Document installation and usage
5. **Specify license file**: Include LICENSE file in plugin root
---
## marketplace-considerations.md
# Marketplace Considerations for Commands
Guidelines for creating commands designed for distribution and marketplace success.
## Overview
Commands distributed through marketplaces need additional consideration beyond personal use commands. They must work across environments, handle diverse use cases, and provide excellent user experience for unknown users.
## Design for Distribution
### Universal Compatibility
**Cross-platform considerations:**
```markdown
---
description: Cross-platform command
allowed-tools: Bash(*)
---
# Platform-Aware Command
Detecting platform...
case "$(uname)" in
Darwin*) PLATFORM="macOS" ;;
Linux*) PLATFORM="Linux" ;;
MINGW*|MSYS*|CYGWIN*) PLATFORM="Windows" ;;
*) PLATFORM="Unknown" ;;
esac
Platform: $PLATFORM
<!-- Adjust behavior based on platform -->
if [ "$PLATFORM" = "Windows" ]; then
# Windows-specific handling
PATH_SEP="\\"
NULL_DEVICE="NUL"
else
# Unix-like handling
PATH_SEP="/"
NULL_DEVICE="/dev/null"
fi
[Platform-appropriate implementation...]
```
**Avoid platform-specific commands:**
```markdown
<!-- BAD: macOS-specific -->
!`pbcopy < file.txt`
<!-- GOOD: Platform detection -->
if command -v pbcopy > /dev/null; then
pbcopy < file.txt
elif command -v xclip > /dev/null; then
xclip -selection clipboard < file.txt
elif command -v clip.exe > /dev/null; then
cat file.txt | clip.exe
else
echo "Clipboard not available on this platform"
fi
```
### Minimal Dependencies
**Check for required tools:**
```markdown
---
description: Dependency-aware command
allowed-tools: Bash(*)
---
# Check Dependencies
Required tools:
- git
- jq
- node
Checking availability...
MISSING_DEPS=""
for tool in git jq node; do
if ! command -v $tool > /dev/null; then
MISSING_DEPS="$MISSING_DEPS $tool"
fi
done
if [ -n "$MISSING_DEPS" ]; then
❌ ERROR: Missing required dependencies:$MISSING_DEPS
INSTALLATION:
- git: https://git-scm.com/downloads
- jq: https://stedolan.github.io/jq/download/
- node: https://nodejs.org/
Install missing tools and try again.
Exit.
fi
✓ All dependencies available
[Continue with command...]
```
**Document optional dependencies:**
```markdown
<!--
DEPENDENCIES:
Required:
- git 2.0+: Version control
- jq 1.6+: JSON processing
Optional:
- gh: GitHub CLI (for PR operations)
- docker: Container operations (for containerized tests)
Feature availability depends on installed tools.
-->
```
### Graceful Degradation
**Handle missing features:**
```markdown
---
description: Feature-aware command
---
# Feature Detection
Detecting available features...
FEATURES=""
if command -v gh > /dev/null; then
FEATURES="$FEATURES github"
fi
if command -v docker > /dev/null; then
FEATURES="$FEATURES docker"
fi
Available features: $FEATURES
if echo "$FEATURES" | grep -q "github"; then
# Full functionality with GitHub integration
echo "✓ GitHub integration available"
else
# Reduced functionality without GitHub
echo "⚠ Limited functionality: GitHub CLI not installed"
echo " Install 'gh' for full features"
fi
[Adapt behavior based on available features...]
```
## User Experience for Unknown Users
### Clear Onboarding
**First-run experience:**
```markdown
---
description: Command with onboarding
allowed-tools: Read, Write
---
# First Run Check
if [ ! -f ".claude/command-initialized" ]; then
**Welcome to Command Name!**
This appears to be your first time using this command.
WHAT THIS COMMAND DOES:
[Brief explanation of purpose and benefits]
QUICK START:
1. Basic usage: /command [arg]
2. For help: /command help
3. Examples: /command examples
SETUP:
No additional setup required. You're ready to go!
✓ Initialization complete
[Create initialization marker]
Ready to proceed with your request...
fi
[Normal command execution...]
```
**Progressive feature discovery:**
```markdown
---
description: Command with tips
---
# Command Execution
[Main functionality...]
---
💡 TIP: Did you know?
You can speed up this command with the --fast flag:
/command --fast [args]
For more tips: /command tips
```
### Comprehensive Error Handling
**Anticipate user mistakes:**
```markdown
---
description: Forgiving command
---
# User Input Handling
Argument: "$1"
<!-- Check for common typos -->
if [ "$1" = "hlep" ] || [ "$1" = "hepl" ]; then
Did you mean: help?
Showing help instead...
[Display help]
Exit.
fi
<!-- Suggest similar commands if not found -->
if [ "$1" != "valid-option1" ] && [ "$1" != "valid-option2" ]; then
❌ Unknown option: $1
Did you mean:
- valid-option1 (most similar)
- valid-option2
For all options: /command help
Exit.
fi
[Command continues...]
```
**Helpful diagnostics:**
```markdown
---
description: Diagnostic command
---
# Operation Failed
The operation could not complete.
**Diagnostic Information:**
Environment:
- Platform: $(uname)
- Shell: $SHELL
- Working directory: $(pwd)
- Command: /command $@
Checking common issues:
- Git repository: $(git rev-parse --git-dir 2>&1)
- Write permissions: $(test -w . && echo "OK" || echo "DENIED")
- Required files: $(test -f config.yml && echo "Found" || echo "Missing")
This information helps debug the issue.
For support, include the above diagnostics.
```
## Distribution Best Practices
### Namespace Awareness
**Avoid name collisions:**
```markdown
---
description: Namespaced command
---
<!--
COMMAND NAME: plugin-name-command
This command is namespaced with the plugin name to avoid
conflicts with commands from other plugins.
Alternative naming approaches:
- Use plugin prefix: /plugin-command
- Use category: /category-command
- Use verb-noun: /verb-noun
Chosen approach: plugin-name prefix
Reasoning: Clearest ownership, least likely to conflict
-->
# Plugin Name Command
[Implementation...]
```
**Document naming rationale:**
```markdown
<!--
NAMING DECISION:
Command name: /deploy-app
Alternatives considered:
- /deploy: Too generic, likely conflicts
- /app-deploy: Less intuitive ordering
- /my-plugin-deploy: Too verbose
Final choice balances:
- Discoverability (clear purpose)
- Brevity (easy to type)
- Uniqueness (unlikely conflicts)
-->
```
### Configurability
**User preferences:**
```markdown
---
description: Configurable command
allowed-tools: Read
---
# Load User Configuration
Default configuration:
- verbose: false
- color: true
- max_results: 10
Checking for user config: .claude/plugin-name.local.md
if [ -f ".claude/plugin-name.local.md" ]; then
# Parse YAML frontmatter for settings
VERBOSE=$(grep "^verbose:" .claude/plugin-name.local.md | cut -d: -f2 | tr -d ' ')
COLOR=$(grep "^color:" .claude/plugin-name.local.md | cut -d: -f2 | tr -d ' ')
MAX_RESULTS=$(grep "^max_results:" .claude/plugin-name.local.md | cut -d: -f2 | tr -d ' ')
echo "✓ Using user configuration"
else
echo "Using default configuration"
echo "Create .claude/plugin-name.local.md to customize"
fi
[Use configuration in command...]
```
**Sensible defaults:**
```markdown
---
description: Command with smart defaults
---
# Smart Defaults
Configuration:
- Format: ${FORMAT:-json} # Defaults to json
- Output: ${OUTPUT:-stdout} # Defaults to stdout
- Verbose: ${VERBOSE:-false} # Defaults to false
These defaults work for 80% of use cases.
Override with arguments:
/command --format yaml --output file.txt --verbose
Or set in .claude/plugin-name.local.md:
\`\`\`yaml
---
format: yaml
output: custom.txt
verbose: true
---
\`\`\`
```
### Version Compatibility
**Version checking:**
```markdown
---
description: Version-aware command
---
<!--
COMMAND VERSION: 2.1.0
COMPATIBILITY:
- Requires plugin version: >= 2.0.0
- Breaking changes from v1.x documented in MIGRATION.md
VERSION HISTORY:
- v2.1.0: Added --new-feature flag
- v2.0.0: BREAKING: Changed argument order
- v1.0.0: Initial release
-->
# Version Check
Command version: 2.1.0
Plugin version: [detect from plugin.json]
if [ "$PLUGIN_VERSION" < "2.0.0" ]; then
❌ ERROR: Incompatible plugin version
This command requires plugin version >= 2.0.0
Current version: $PLUGIN_VERSION
Update plugin:
/plugin update plugin-name
Exit.
fi
✓ Version compatible
[Command continues...]
```
**Deprecation warnings:**
```markdown
---
description: Command with deprecation warnings
---
# Deprecation Check
if [ "$1" = "--old-flag" ]; then
⚠️ DEPRECATION WARNING
The --old-flag option is deprecated as of v2.0.0
It will be removed in v3.0.0 (est. June 2025)
Use instead: --new-flag
Example:
Old: /command --old-flag value
New: /command --new-flag value
See migration guide: /command migrate
Continuing with deprecated behavior for now...
fi
[Handle both old and new flags during deprecation period...]
```
## Marketplace Presentation
### Command Discovery
**Descriptive naming:**
```markdown
---
description: Review pull request with security and quality checks
---
<!-- GOOD: Descriptive name and description -->
```
```markdown
---
description: Do the thing
---
<!-- BAD: Vague description -->
```
**Searchable keywords:**
```markdown
<!--
KEYWORDS: security, code-review, quality, validation, audit
These keywords help users discover this command when searching
for related functionality in the marketplace.
-->
```
### Showcase Examples
**Compelling demonstrations:**
```markdown
---
description: Advanced code analysis command
---
# Code Analysis Command
This command performs deep code analysis with actionable insights.
## Demo: Quick Security Audit
Try it now:
\`\`\`
/analyze-code src/ --security
\`\`\`
**What you'll get:**
- Security vulnerability detection
- Code quality metrics
- Performance bottleneck identification
- Actionable recommendations
**Sample output:**
\`\`\`
Security Analysis Results
=========================
🔴 Critical (2):
- SQL injection risk in users.js:45
- XSS vulnerability in display.js:23
🟡 Warnings (5):
- Unvalidated input in api.js:67
...
Recommendations:
1. Fix critical issues immediately
2. Review warnings before next release
3. Run /analyze-code --fix for auto-fixes
\`\`\`
---
Ready to analyze your code...
[Command implementation...]
```
### User Reviews and Feedback
**Feedback mechanism:**
```markdown
---
description: Command with feedback
---
# Command Complete
[Command results...]
---
**How was your experience?**
This helps improve the command for everyone.
Rate this command:
- 👍 Helpful
- 👎 Not helpful
- 🐛 Found a bug
- 💡 Have a suggestion
Reply with an emoji or:
- /command feedback
Your feedback matters!
```
**Usage analytics preparation:**
```markdown
<!--
ANALYTICS NOTES:
Track for improvement:
- Most common arguments
- Failure rates
- Average execution time
- User satisfaction scores
Privacy-preserving:
- No personally identifiable information
- Aggregate statistics only
- User opt-out respected
-->
```
## Quality Standards
### Professional Polish
**Consistent branding:**
```markdown
---
description: Branded command
---
# ✨ Command Name
Part of the [Plugin Name] suite
[Command functionality...]
---
**Need Help?**
- Documentation: https://docs.example.com
- Support: support@example.com
- Community: https://community.example.com
Powered by Plugin Name v2.1.0
```
**Attention to detail:**
```markdown
<!-- Details that matter -->
✓ Use proper emoji/symbols consistently
✓ Align output columns neatly
✓ Format numbers with thousands separators
✓ Use color/formatting appropriately
✓ Provide progress indicators
✓ Show estimated time remaining
✓ Confirm successful operations
```
### Reliability
**Idempotency:**
```markdown
---
description: Idempotent command
---
# Safe Repeated Execution
Checking if operation already completed...
if [ -f ".claude/operation-completed.flag" ]; then
ℹ️ Operation already completed
Completed at: $(cat .claude/operation-completed.flag)
To re-run:
1. Remove flag: rm .claude/operation-completed.flag
2. Run command again
Otherwise, no action needed.
Exit.
fi
Performing operation...
[Safe, repeatable operation...]
Marking complete...
echo "$(date)" > .claude/operation-completed.flag
```
**Atomic operations:**
```markdown
---
description: Atomic command
---
# Atomic Operation
This operation is atomic - either fully succeeds or fully fails.
Creating temporary workspace...
TEMP_DIR=$(mktemp -d)
Performing changes in isolated environment...
[Make changes in $TEMP_DIR]
if [ $? -eq 0 ]; then
✓ Changes validated
Applying changes atomically...
mv $TEMP_DIR/* ./target/
✓ Operation complete
else
❌ Changes failed validation
Rolling back...
rm -rf $TEMP_DIR
No changes applied. Safe to retry.
fi
```
## Testing for Distribution
### Pre-Release Checklist
```markdown
<!--
PRE-RELEASE CHECKLIST:
Functionality:
- [ ] Works on macOS
- [ ] Works on Linux
- [ ] Works on Windows (WSL)
- [ ] All arguments tested
- [ ] Error cases handled
- [ ] Edge cases covered
User Experience:
- [ ] Clear description
- [ ] Helpful error messages
- [ ] Examples provided
- [ ] First-run experience good
- [ ] Documentation complete
Distribution:
- [ ] No hardcoded paths
- [ ] Dependencies documented
- [ ] Configuration options clear
- [ ] Version number set
- [ ] Changelog updated
Quality:
- [ ] No TODO comments
- [ ] No debug code
- [ ] Performance acceptable
- [ ] Security reviewed
- [ ] Privacy considered
Support:
- [ ] README complete
- [ ] Troubleshooting guide
- [ ] Support contact provided
- [ ] Feedback mechanism
- [ ] License specified
-->
```
### Beta Testing
**Beta release approach:**
```markdown
---
description: Beta command (v0.9.0)
---
# 🧪 Beta Command
**This is a beta release**
Features may change based on feedback.
BETA STATUS:
- Version: 0.9.0
- Stability: Experimental
- Support: Limited
- Feedback: Encouraged
Known limitations:
- Performance not optimized
- Some edge cases not handled
- Documentation incomplete
Help improve this command:
- Report issues: /command report-issue
- Suggest features: /command suggest
- Join beta testers: /command join-beta
---
[Command implementation...]
---
**Thank you for beta testing!**
Your feedback helps make this command better.
```
## Maintenance and Updates
### Update Strategy
**Versioned commands:**
```markdown
<!--
VERSION STRATEGY:
Major (X.0.0): Breaking changes
- Document all breaking changes
- Provide migration guide
- Support old version briefly
Minor (x.Y.0): New features
- Backward compatible
- Announce new features
- Update examples
Patch (x.y.Z): Bug fixes
- No user-facing changes
- Update changelog
- Security fixes prioritized
Release schedule:
- Patches: As needed
- Minors: Monthly
- Majors: Annually or as needed
-->
```
**Update notifications:**
```markdown
---
description: Update-aware command
---
# Check for Updates
Current version: 2.1.0
Latest version: [check if available]
if [ "$CURRENT_VERSION" != "$LATEST_VERSION" ]; then
📢 UPDATE AVAILABLE
New version: $LATEST_VERSION
Current: $CURRENT_VERSION
What's new:
- Feature improvements
- Bug fixes
- Performance enhancements
Update with:
/plugin update plugin-name
Release notes: https://releases.example.com/v$LATEST_VERSION
fi
[Command continues...]
```
## Best Practices Summary
### Distribution Design
1. **Universal**: Works across platforms and environments
2. **Self-contained**: Minimal dependencies, clear requirements
3. **Graceful**: Degrades gracefully when features unavailable
4. **Forgiving**: Anticipates and handles user mistakes
5. **Helpful**: Clear errors, good defaults, excellent docs
### Marketplace Success
1. **Discoverable**: Clear name, good description, searchable keywords
2. **Professional**: Polished presentation, consistent branding
3. **Reliable**: Tested thoroughly, handles edge cases
4. **Maintainable**: Versioned, updated regularly, supported
5. **User-focused**: Great UX, responsive to feedback
### Quality Standards
1. **Complete**: Fully documented, all features working
2. **Tested**: Works in real environments, edge cases handled
3. **Secure**: No vulnerabilities, safe operations
4. **Performant**: Reasonable speed, resource-efficient
5. **Ethical**: Privacy-respecting, user consent
With these considerations, commands become marketplace-ready and delight users across diverse environments and use cases.
---
## minimal-plugin.md
# Minimal Plugin Example
A bare-bones plugin with a single command.
## Directory Structure
```
hello-world/
├── .claude-plugin/
│ └── plugin.json
└── commands/
└── hello.md
```
## File Contents
### .claude-plugin/plugin.json
```json
{
"name": "hello-world"
}
```
### commands/hello.md
```markdown
---
name: hello
description: Prints a friendly greeting message
---
# Hello Command
Print a friendly greeting to the user.
## Implementation
Output the following message to the user:
> Hello! This is a simple command from the hello-world plugin.
>
> Use this as a starting point for building more complex plugins.
Include the current timestamp in the greeting to show the command executed successfully.
```
## Usage
After installing the plugin:
```
$ claude
> /hello
Hello! This is a simple command from the hello-world plugin.
Use this as a starting point for building more complex plugins.
Executed at: 2025-01-15 14:30:22 UTC
```
## Key Points
1. **Minimal manifest**: Only the required `name` field
2. **Single command**: One markdown file in `commands/` directory
3. **Auto-discovery**: Claude Code finds the command automatically
4. **No dependencies**: No scripts, hooks, or external resources
## When to Use This Pattern
- Quick prototypes
- Single-purpose utilities
- Learning plugin development
- Internal team tools with one specific function
## Extending This Plugin
To add more functionality:
1. **Add commands**: Create more `.md` files in `commands/`
2. **Add metadata**: Update `plugin.json` with version, description, author
3. **Add agents**: Create `agents/` directory with agent definitions
4. **Add hooks**: Create `hooks/hooks.json` for event handling
---
## new-sdk-app.md
You are tasked with helping the user create a new Claude Agent SDK application. Follow these steps carefully:
## Reference Documentation
Before starting, review the official documentation to ensure you provide accurate and up-to-date guidance. Use WebFetch to read these pages:
1. **Start with the overview**: https://docs.claude.com/en/api/agent-sdk/overview
2. **Based on the user's language choice, read the appropriate SDK reference**:
- TypeScript: https://docs.claude.com/en/api/agent-sdk/typescript
- Python: https://docs.claude.com/en/api/agent-sdk/python
3. **Read relevant guides mentioned in the overview** such as:
- Streaming vs Single Mode
- Permissions
- Custom Tools
- MCP integration
- Subagents
- Sessions
- Any other relevant guides based on the user's needs
**IMPORTANT**: Always check for and use the latest versions of packages. Use WebSearch or WebFetch to verify current versions before installation.
## Gather Requirements
IMPORTANT: Ask these questions one at a time. Wait for the user's response before asking the next question. This makes it easier for the user to respond.
Ask the questions in this order (skip any that the user has already provided via arguments):
1. **Language** (ask first): "Would you like to use TypeScript or Python?"
- Wait for response before continuing
2. **Project name** (ask second): "What would you like to name your project?"
- If $ARGUMENTS is provided, use that as the project name and skip this question
- Wait for response before continuing
3. **Agent type** (ask third, but skip if #2 was sufficiently detailed): "What kind of agent are you building? Some examples:
- Coding agent (SRE, security review, code review)
- Business agent (customer support, content creation)
- Custom agent (describe your use case)"
- Wait for response before continuing
4. **Starting point** (ask fourth): "Would you like:
- A minimal 'Hello World' example to start
- A basic agent with common features
- A specific example based on your use case"
- Wait for response before continuing
5. **Tooling choice** (ask fifth): Let the user know what tools you'll use, and confirm with them that these are the tools they want to use (for example, they may prefer pnpm or bun over npm). Respect the user's preferences when executing on the requirements.
After all questions are answered, proceed to create the setup plan.
## Setup Plan
Based on the user's answers, create a plan that includes:
1. **Project initialization**:
- Create project directory (if it doesn't exist)
- Initialize package manager:
- TypeScript: `npm init -y` and setup `package.json` with type: "module" and scripts (include a "typecheck" script)
- Python: Create `requirements.txt` or use `poetry init`
- Add necessary configuration files:
- TypeScript: Create `tsconfig.json` with proper settings for the SDK
- Python: Optionally create config files if needed
2. **Check for Latest Versions**:
- BEFORE installing, use WebSearch or check npm/PyPI to find the latest version
- For TypeScript: Check https://www.npmjs.com/package/@anthropic-ai/claude-agent-sdk
- For Python: Check https://pypi.org/project/claude-agent-sdk/
- Inform the user which version you're installing
3. **SDK Installation**:
- TypeScript: `npm install @anthropic-ai/claude-agent-sdk@latest` (or specify latest version)
- Python: `pip install claude-agent-sdk` (pip installs latest by default)
- After installation, verify the installed version:
- TypeScript: Check package.json or run `npm list @anthropic-ai/claude-agent-sdk`
- Python: Run `pip show claude-agent-sdk`
4. **Create starter files**:
- TypeScript: Create an `index.ts` or `src/index.ts` with a basic query example
- Python: Create a `main.py` with a basic query example
- Include proper imports and basic error handling
- Use modern, up-to-date syntax and patterns from the latest SDK version
5. **Environment setup**:
- Create a `.env.example` file with `ANTHROPIC_API_KEY=your_api_key_here`
- Add `.env` to `.gitignore`
- Explain how to get an API key from https://console.anthropic.com/
6. **Optional: Create .claude directory structure**:
- Offer to create `.claude/` directory for agents, commands, and settings
- Ask if they want any example subagents or slash commands
## Implementation
After gathering requirements and getting user confirmation on the plan:
1. Check for latest package versions using WebSearch or WebFetch
2. Execute the setup steps
3. Create all necessary files
4. Install dependencies (always use latest stable versions)
5. Verify installed versions and inform the user
6. Create a working example based on their agent type
7. Add helpful comments in the code explaining what each part does
8. **VERIFY THE CODE WORKS BEFORE FINISHING**:
- For TypeScript:
- Run `npx tsc --noEmit` to check for type errors
- Fix ALL type errors until types pass completely
- Ensure imports and types are correct
- Only proceed when type checking passes with no errors
- For Python:
- Verify imports are correct
- Check for basic syntax errors
- **DO NOT consider the setup complete until the code verifies successfully**
## Verification
After all files are created and dependencies are installed, use the appropriate verifier agent to validate that the Agent SDK application is properly configured and ready for use:
1. **For TypeScript projects**: Launch the **agent-sdk-verifier-ts** agent to validate the setup
2. **For Python projects**: Launch the **agent-sdk-verifier-py** agent to validate the setup
3. The agent will check SDK usage, configuration, functionality, and adherence to official documentation
4. Review the verification report and address any issues
## Getting Started Guide
Once setup is complete and verified, provide the user with:
1. **Next steps**:
- How to set their API key
- How to run their agent:
- TypeScript: `npm start` or `node --loader ts-node/esm index.ts`
- Python: `python main.py`
2. **Useful resources**:
- Link to TypeScript SDK reference: https://docs.claude.com/en/api/agent-sdk/typescript
- Link to Python SDK reference: https://docs.claude.com/en/api/agent-sdk/python
- Explain key concepts: system prompts, permissions, tools, MCP servers
3. **Common next steps**:
- How to customize the system prompt
- How to add custom tools via MCP
- How to configure permissions
- How to create subagents
## Important Notes
- **ALWAYS USE LATEST VERSIONS**: Before installing any packages, check for the latest versions using WebSearch or by checking npm/PyPI directly
- **VERIFY CODE RUNS CORRECTLY**:
- For TypeScript: Run `npx tsc --noEmit` and fix ALL type errors before finishing
- For Python: Verify syntax and imports are correct
- Do NOT consider the task complete until the code passes verification
- Verify the installed version after installation and inform the user
- Check the official documentation for any version-specific requirements (Node.js version, Python version, etc.)
- Always check if directories/files already exist before creating them
- Use the user's preferred package manager (npm, yarn, pnpm for TypeScript; pip, poetry for Python)
- Ensure all code examples are functional and include proper error handling
- Use modern syntax and patterns that are compatible with the latest SDK version
- Make the experience interactive and educational
- **ASK QUESTIONS ONE AT A TIME** - Do not ask multiple questions in a single response
Begin by asking the FIRST requirement question only. Wait for the user's answer before proceeding to the next question.
---
## optimizing-skill-descriptions-agent-skills-5a76c2d184.md
# Optimizing skill descriptions
How to improve your skill’s description so it triggers reliably on relevant prompts.
A skill only helps if it gets activated. The `description` field in your `SKILL.md` frontmatter is the primary mechanism agents use to decide whether to load a skill for a given task. An under-specified description means the skill won’t trigger when it should; an over-broad description means it triggers when it shouldn’t. This guide covers how to systematically test and improve your skill’s description for triggering accuracy.
How skill triggering works
Agents use [progressive disclosure](/what-are-skills#how-skills-work) to manage context. At startup, they load only the `name` and `description` of each available skill — just enough to decide when a skill might be relevant. When a user’s task matches a description, the agent reads the full `SKILL.md` into context and follows its instructions. This means the description carries the entire burden of triggering. If the description doesn’t convey when the skill is useful, the agent won’t know to reach for it. One important nuance: agents typically only consult skills for tasks that require knowledge or capabilities beyond what they can handle alone. A simple, one-step request like “read this PDF” may not trigger a PDF skill even if the description matches perfectly, because the agent can handle it with basic tools. Tasks that involve specialized knowledge — an unfamiliar API, a domain-specific workflow, or an uncommon format — are where a well-written description can make the difference.
Writing effective descriptions
Before testing, it helps to know what a good description looks like. A few principles:
- **Use imperative phrasing.** Frame the description as an instruction to the agent: “Use this skill when…” rather than “This skill does…” The agent is deciding whether to act, so tell it when to act.
- **Focus on user intent, not implementation.** Describe what the user is trying to achieve, not the skill’s internal mechanics. The agent matches against what the user asked for.
- **Err on the side of being pushy.** Explicitly list contexts where the skill applies, including cases where the user doesn’t name the domain directly: “even if they don’t explicitly mention ‘CSV’ or ‘analysis.’”
- **Keep it concise.** A few sentences to a short paragraph is usually right — long enough to cover the skill’s scope, short enough that it doesn’t bloat the agent’s context across many skills. The [specification](/specification#description-field) enforces a hard limit of 1024 characters.
Designing trigger eval queries
To test triggering, you need a set of eval queries — realistic user prompts labeled with whether they should or shouldn’t trigger your skill.
eval_queries.json
Report incorrect code
Copy
```python
[
{ "query": "I've got a spreadsheet in ~/data/q4_results.xlsx with revenue in col C and expenses in col D — can you add a profit margin column and highlight anything under 10%?", "should_trigger": true },
{ "query": "whats the quickest way to convert this json file to yaml", "should_trigger": false }
]
```
Aim for about 20 queries: 8-10 that should trigger and 8-10 that shouldn’t.
Should-trigger queries
These test whether the description captures the skill’s scope. Vary them along several axes:
- **Phrasing**: some formal, some casual, some with typos or abbreviations.
- **Explicitness**: some name the skill’s domain directly (“analyze this CSV”), others describe the need without naming it (“my boss wants a chart from this data file”).
- **Detail**: mix terse prompts with context-heavy ones — a short “analyze my sales CSV and make a chart” alongside a longer message with file paths, column names, and backstory.
- **Complexity**: vary the number of steps and decision points. Include single-step tasks alongside multi-step workflows to test whether the agent can discern the skill is relevant when the task it addresses is buried in a larger chain.
The most useful should-trigger queries are ones where the skill would help but the connection isn’t obvious from the query alone. These are the cases where description wording makes the difference — if the query already asks for exactly what the skill does, any reasonable description would trigger.
Should-not-trigger queries
The most valuable negative test cases are **near-misses** — queries that share keywords or concepts with your skill but actually need something different. These test whether the description is precise, not just broad. For a CSV analysis skill, weak negative examples would be:
- `"Write a fibonacci function"` — obviously irrelevant, tests nothing.
- `"What's the weather today?"` — no keyword overlap, too easy.
Strong negative examples:
- `"I need to update the formulas in my Excel budget spreadsheet"` — shares “spreadsheet” and “data” concepts, but needs Excel editing, not CSV analysis.
- `"can you write a python script that reads a csv and uploads each row to our postgres database"` — involves CSV, but the task is database ETL, not analysis.
Tips for realism
Real user prompts contain context that generic test queries lack. Include:
- File paths (`~/Downloads/report_final_v2.xlsx`)
- Personal context (`"my manager asked me to..."`)
- Specific details (column names, company names, data values)
- Casual language, abbreviations, and occasional typos
Testing whether a description triggers
The basic approach: run each query through your agent with the skill installed and observe whether the agent invokes it. Make sure the skill is registered and discoverable by your agent — how this works varies by client (e.g., a skills directory, a configuration file, or a CLI flag). Most agent clients provide some form of observability — execution logs, tool call histories, or verbose output — that lets you see which skills were consulted during a run. Check your client’s documentation for details. The skill triggered if the agent loaded your skill’s `SKILL.md`; it didn’t trigger if the agent proceeded without consulting it. A query “passes” if:
- `should_trigger` is `true` and the skill was invoked, or
- `should_trigger` is `false` and the skill was not invoked.
Running multiple times
Model behavior is nondeterministic — the same query might trigger the skill on one run but not the next. Run each query multiple times (3 is a reasonable starting point) and compute a **trigger rate**: the fraction of runs where the skill was invoked. A should-trigger query passes if its trigger rate is above a threshold (0.5 is a reasonable default). A should-not-trigger query passes if its trigger rate is below that threshold. With 20 queries at 3 runs each, that’s 60 invocations. You’ll want to script this. Here’s the general structure — replace the `claude` invocation and detection logic in `check_triggered` with whatever your agent client provides:
Report incorrect code
Copy
```python
#!/bin/bash
QUERIES_FILE="${1:?Usage: $0 <queries.json>}"
SKILL_NAME="my-skill"
RUNS=3
# This example uses Claude Code's JSON output to check for Skill tool calls.
# Replace this function with detection logic for your agent client.
# Should return 0 (success) if the skill was invoked, 1 otherwise.
check_triggered() {
local query="$1"
claude -p "$query" --output-format json 2>/dev/null \
| jq -e --arg skill "$SKILL_NAME" \
'any(.messages[].content[]; .type == "tool_use" and .name == "Skill" and .input.skill == $skill)' \
> /dev/null 2>&1
}
count=$(jq length "$QUERIES_FILE")
for i in $(seq 0 $((count - 1))); do
query=$(jq -r ".[$i].query" "$QUERIES_FILE")
should_trigger=$(jq -r ".[$i].should_trigger" "$QUERIES_FILE")
triggers=0
for run in $(seq 1 $RUNS); do
check_triggered "$query" && triggers=$((triggers + 1))
done
jq -n \
--arg query "$query" \
--argjson should_trigger "$should_trigger" \
--argjson triggers "$triggers" \
--argjson runs "$RUNS" \
'{query: $query, should_trigger: $should_trigger, triggers: $triggers, runs: $runs, trigger_rate: ($triggers / $runs)}'
done | jq -s '.'
```
If your agent client supports it, you can stop a run early once the outcome is clear — the agent either consulted the skill or started working without it. This can significantly reduce the time and cost of running the full eval set.
Avoiding overfitting with train/validation splits
If you optimize the description against all your queries, you risk overfitting — crafting a description that works for these specific phrasings but fails on new ones. The solution is to split your query set:
- **Train set (~60%)**: the queries you use to identify failures and guide improvements.
- **Validation set (~40%)**: queries you set aside and only use to check whether improvements generalize.
Make sure both sets contain a proportional mix of should-trigger and should-not-trigger queries — don’t accidentally put all the positives in one set. Shuffle randomly and keep the split fixed across iterations so you’re comparing apples to apples. If you’re using a script like the one [above](#running-multiple-times), you can split your queries into two files — `train_queries.json` and `validation_queries.json` — and run the script against each one separately.
The optimization loop
1. **Evaluate** the current description on both *train and validation sets*. The train results guide your changes; the validation results tell you whether those changes are generalizing.
2. **Identify failures** in the *train set*: which should-trigger queries didn’t trigger? Which should-not-trigger queries did?
- Only use train set failures to guide your changes — whether you’re revising the description yourself or prompting an LLM, keep validation set results out of the process.
3. **Revise the description.** Focus on generalizing:
- If should-trigger queries are failing, the description may be too narrow. Broaden the scope or add context about when the skill is useful.
- If should-not-trigger queries are false-triggering, the description may be too broad. Add specificity about what the skill does *not* do, or clarify the boundary between this skill and adjacent capabilities.
- Avoid adding specific keywords from failed queries — that’s overfitting. Instead, find the general category or concept those queries represent and address that.
- If you’re stuck after several iterations, try a structurally different approach to the description rather than incremental tweaks. A different framing or sentence structure may break through where refinement can’t.
- Check that the description stays under the 1024-character limit — descriptions tend to grow during optimization.
4. **Repeat** steps 1-3 until all *train set* queries pass or you stop seeing meaningful improvement.
5. **Select the best iteration** by its validation pass rate — the fraction of queries in the *validation set* that passed. Note that the best description may not be the last one you produced; an earlier iteration might have a higher validation pass rate than later ones that overfit to the train set.
Five iterations is usually enough. If performance isn’t improving, the issue may be with the queries (too easy, too hard, or poorly labeled) rather than the description.
The [`skill-creator`](https://github.com/anthropics/skills/tree/main/skills/skill-creator) Skill automates this loop end-to-end: it splits the eval set, evaluates trigger rates in parallel, proposes description improvements using Claude, and generates a live HTML report you can watch as it runs.
Applying the result
Once you’ve selected the best description:
1. Update the `description` field in your `SKILL.md` frontmatter.
2. Verify the description is under the [1024-character limit](/specification#description-field).
3. Verify the description triggers as expected. Try a few prompts manually as a quick sanity check. For a more rigorous test, write 5-10 fresh queries (a mix of should-trigger and should-not-trigger) and run them through the eval script — since these queries were never part of the optimization process, they give you an honest check on whether the description generalizes.
Before and after:
Report incorrect code
Copy
```python
# Before
description: Process CSV files.
# After
description: >
Analyze CSV and tabular data files — compute summary statistics,
add derived columns, generate charts, and clean messy data. Use this
skill when the user has a CSV, TSV, or Excel file and wants to
explore, transform, or visualize the data, even if they don't
explicitly mention "CSV" or "analysis."
```
The improved description is more specific about what the skill does (summary stats, derived columns, charts, cleaning) and broader about when it applies (CSV, TSV, Excel; even without explicit keywords).
Next steps
Once your skill triggers reliably, you’ll want to evaluate whether it produces good outputs. See [Evaluating skill output quality](/skill-creation/evaluating-skills) for how to set up test cases, grade results, and iterate.
[Best practices](/skill-creation/best-practices)[Evaluating skills](/skill-creation/evaluating-skills)
---
## plugin-commands.md
# Plugin Command Examples
Practical examples of commands designed for Claude Code plugins, demonstrating plugin-specific patterns and features.
## Table of Contents
1. [Simple Plugin Command](#1-simple-plugin-command)
2. [Script-Based Analysis](#2-script-based-analysis)
3. [Template-Based Generation](#3-template-based-generation)
4. [Multi-Script Workflow](#4-multi-script-workflow)
5. [Configuration-Driven Deployment](#5-configuration-driven-deployment)
6. [Agent Integration](#6-agent-integration)
7. [Skill Integration](#7-skill-integration)
8. [Multi-Component Workflow](#8-multi-component-workflow)
9. [Validated Input Command](#9-validated-input-command)
10. [Environment-Aware Command](#10-environment-aware-command)
---
## 1. Simple Plugin Command
**Use case:** Basic command that uses plugin script
**File:** `commands/analyze.md`
```markdown
---
description: Analyze code quality using plugin tools
argument-hint: [file-path]
allowed-tools: Bash(node:*), Read
---
Analyze @$1 using plugin's quality checker:
!`node ${CLAUDE_PLUGIN_ROOT}/scripts/quality-check.js $1`
Review the analysis output and provide:
1. Summary of findings
2. Priority issues to address
3. Suggested improvements
4. Code quality score interpretation
```
**Key features:**
- Uses `${CLAUDE_PLUGIN_ROOT}` for portable path
- Combines file reference with script execution
- Simple single-purpose command
---
## 2. Script-Based Analysis
**Use case:** Run comprehensive analysis using multiple plugin scripts
**File:** `commands/full-audit.md`
```markdown
---
description: Complete code audit using plugin suite
argument-hint: [directory]
allowed-tools: Bash(*)
model: sonnet
---
Running complete audit on $1:
**Security scan:**
!`bash ${CLAUDE_PLUGIN_ROOT}/scripts/security-scan.sh $1`
**Performance analysis:**
!`bash ${CLAUDE_PLUGIN_ROOT}/scripts/perf-analyze.sh $1`
**Best practices check:**
!`bash ${CLAUDE_PLUGIN_ROOT}/scripts/best-practices.sh $1`
Analyze all results and create comprehensive report including:
- Critical issues requiring immediate attention
- Performance optimization opportunities
- Security vulnerabilities and fixes
- Overall health score and recommendations
```
**Key features:**
- Multiple script executions
- Organized output sections
- Comprehensive workflow
- Clear reporting structure
---
## 3. Template-Based Generation
**Use case:** Generate documentation following plugin template
**File:** `commands/gen-api-docs.md`
```markdown
---
description: Generate API documentation from template
argument-hint: [api-file]
---
Template structure: @${CLAUDE_PLUGIN_ROOT}/templates/api-documentation.md
API implementation: @$1
Generate complete API documentation following the template format above.
Ensure documentation includes:
- Endpoint descriptions with HTTP methods
- Request/response schemas
- Authentication requirements
- Error codes and handling
- Usage examples with curl commands
- Rate limiting information
Format output as markdown suitable for README or docs site.
```
**Key features:**
- Uses plugin template
- Combines template with source file
- Standardized output format
- Clear documentation structure
---
## 4. Multi-Script Workflow
**Use case:** Orchestrate build, test, and deploy workflow
**File:** `commands/release.md`
```markdown
---
description: Execute complete release workflow
argument-hint: [version]
allowed-tools: Bash(*), Read
---
Executing release workflow for version $1:
**Step 1 - Pre-release validation:**
!`bash ${CLAUDE_PLUGIN_ROOT}/scripts/pre-release-check.sh $1`
**Step 2 - Build artifacts:**
!`bash ${CLAUDE_PLUGIN_ROOT}/scripts/build-release.sh $1`
**Step 3 - Run test suite:**
!`bash ${CLAUDE_PLUGIN_ROOT}/scripts/run-tests.sh`
**Step 4 - Package release:**
!`bash ${CLAUDE_PLUGIN_ROOT}/scripts/package.sh $1`
Review all step outputs and report:
1. Any failures or warnings
2. Build artifacts location
3. Test results summary
4. Next steps for deployment
5. Rollback plan if needed
```
**Key features:**
- Multi-step workflow
- Sequential script execution
- Clear step numbering
- Comprehensive reporting
---
## 5. Configuration-Driven Deployment
**Use case:** Deploy using environment-specific plugin configuration
**File:** `commands/deploy.md`
```markdown
---
description: Deploy application to environment
argument-hint: [environment]
allowed-tools: Read, Bash(*)
---
Deployment configuration for $1: @${CLAUDE_PLUGIN_ROOT}/config/$1-deploy.json
Current git state: !`git rev-parse --short HEAD`
Build info: !`cat package.json | grep -E '(name|version)'`
Execute deployment to $1 environment using configuration above.
Deployment checklist:
1. Validate configuration settings
2. Build application for $1
3. Run pre-deployment tests
4. Deploy to target environment
5. Run smoke tests
6. Verify deployment success
7. Update deployment log
Report deployment status and any issues encountered.
```
**Key features:**
- Environment-specific configuration
- Dynamic config file loading
- Pre-deployment validation
- Structured checklist
---
## 6. Agent Integration
**Use case:** Command that launches plugin agent for complex task
**File:** `commands/deep-review.md`
```markdown
---
description: Deep code review using plugin agent
argument-hint: [file-or-directory]
---
Initiate comprehensive code review of @$1 using the code-reviewer agent.
The agent will perform:
1. **Static analysis** - Check for code smells and anti-patterns
2. **Security audit** - Identify potential vulnerabilities
3. **Performance review** - Find optimization opportunities
4. **Best practices** - Ensure code follows standards
5. **Documentation check** - Verify adequate documentation
The agent has access to:
- Plugin's linting rules: ${CLAUDE_PLUGIN_ROOT}/config/lint-rules.json
- Security checklist: ${CLAUDE_PLUGIN_ROOT}/checklists/security.md
- Performance guidelines: ${CLAUDE_PLUGIN_ROOT}/docs/performance.md
Note: This uses the Task tool to launch the plugin's code-reviewer agent for thorough analysis.
```
**Key features:**
- Delegates to plugin agent
- Documents agent capabilities
- References plugin resources
- Clear scope definition
---
## 7. Skill Integration
**Use case:** Command that leverages plugin skill for specialized knowledge
**File:** `commands/document-api.md`
```markdown
---
description: Document API following plugin standards
argument-hint: [api-file]
---
API source code: @$1
Generate API documentation following the plugin's API documentation standards.
Use the api-documentation-standards skill to ensure:
- **OpenAPI compliance** - Follow OpenAPI 3.0 specification
- **Consistent formatting** - Use plugin's documentation style
- **Complete coverage** - Document all endpoints and schemas
- **Example quality** - Provide realistic usage examples
- **Error documentation** - Cover all error scenarios
The skill provides:
- Standard documentation templates
- API documentation best practices
- Common patterns for this codebase
- Quality validation criteria
Generate production-ready API documentation.
```
**Key features:**
- Invokes plugin skill by name
- Documents skill purpose
- Clear expectations
- Leverages skill knowledge
---
## 8. Multi-Component Workflow
**Use case:** Complex workflow using agents, skills, and scripts
**File:** `commands/complete-review.md`
```markdown
---
description: Comprehensive review using all plugin components
argument-hint: [file-path]
allowed-tools: Bash(node:*), Read
---
Target file: @$1
Execute comprehensive review workflow:
**Phase 1: Automated Analysis**
Run plugin analyzer: !`node ${CLAUDE_PLUGIN_ROOT}/scripts/analyze.js $1`
**Phase 2: Deep Review (Agent)**
Launch the code-quality-reviewer agent for detailed analysis.
Agent will examine:
- Code structure and organization
- Error handling patterns
- Testing coverage
- Documentation quality
**Phase 3: Standards Check (Skill)**
Use the coding-standards skill to validate:
- Naming conventions
- Code formatting
- Best practices adherence
- Framework-specific patterns
**Phase 4: Report Generation**
Template: @${CLAUDE_PLUGIN_ROOT}/templates/review-report.md
Compile all findings into comprehensive report following template.
**Phase 5: Recommendations**
Generate prioritized action items:
1. Critical issues (must fix)
2. Important improvements (should fix)
3. Nice-to-have enhancements (could fix)
Include specific file locations and suggested changes for each item.
```
**Key features:**
- Multi-phase workflow
- Combines scripts, agents, skills
- Template-based reporting
- Prioritized outputs
---
## 9. Validated Input Command
**Use case:** Command with input validation and error handling
**File:** `commands/build-env.md`
```markdown
---
description: Build for specific environment with validation
argument-hint: [environment]
allowed-tools: Bash(*)
---
Validate environment argument: !`echo "$1" | grep -E "^(dev|staging|prod)$" && echo "VALID" || echo "INVALID"`
Check build script exists: !`test -x ${CLAUDE_PLUGIN_ROOT}/scripts/build.sh && echo "EXISTS" || echo "MISSING"`
Verify configuration available: !`test -f ${CLAUDE_PLUGIN_ROOT}/config/$1.json && echo "FOUND" || echo "NOT_FOUND"`
If all validations pass:
**Configuration:** @${CLAUDE_PLUGIN_ROOT}/config/$1.json
**Execute build:** !`bash ${CLAUDE_PLUGIN_ROOT}/scripts/build.sh $1 2>&1`
**Validation results:** !`bash ${CLAUDE_PLUGIN_ROOT}/scripts/validate-build.sh $1 2>&1`
Report build status and any issues.
If validations fail:
- Explain which validation failed
- Provide expected values/locations
- Suggest corrective actions
- Document troubleshooting steps
```
**Key features:**
- Input validation
- Resource existence checks
- Error handling
- Helpful error messages
- Graceful failure handling
---
## 10. Environment-Aware Command
**Use case:** Command that adapts behavior based on environment
**File:** `commands/run-checks.md`
```markdown
---
description: Run environment-appropriate checks
argument-hint: [environment]
allowed-tools: Bash(*), Read
---
Environment: $1
Load environment configuration: @${CLAUDE_PLUGIN_ROOT}/config/$1-checks.json
Determine check level: !`echo "$1" | grep -E "^prod$" && echo "FULL" || echo "BASIC"`
**For production environment:**
- Full test suite: !`bash ${CLAUDE_PLUGIN_ROOT}/scripts/test-full.sh`
- Security scan: !`bash ${CLAUDE_PLUGIN_ROOT}/scripts/security-scan.sh`
- Performance audit: !`bash ${CLAUDE_PLUGIN_ROOT}/scripts/perf-check.sh`
- Compliance check: !`bash ${CLAUDE_PLUGIN_ROOT}/scripts/compliance.sh`
**For non-production environments:**
- Basic tests: !`bash ${CLAUDE_PLUGIN_ROOT}/scripts/test-basic.sh`
- Quick lint: !`bash ${CLAUDE_PLUGIN_ROOT}/scripts/lint.sh`
Analyze results based on environment requirements:
**Production:** All checks must pass with zero critical issues
**Staging:** No critical issues, warnings acceptable
**Development:** Focus on blocking issues only
Report status and recommend proceed/block decision.
```
**Key features:**
- Environment-aware logic
- Conditional execution
- Different validation levels
- Appropriate reporting per environment
---
## Common Patterns Summary
### Pattern: Plugin Script Execution
```markdown
!`node ${CLAUDE_PLUGIN_ROOT}/scripts/script-name.js $1`
```
Use for: Running plugin-provided Node.js scripts
### Pattern: Plugin Configuration Loading
```markdown
@${CLAUDE_PLUGIN_ROOT}/config/config-name.json
```
Use for: Loading plugin configuration files
### Pattern: Plugin Template Usage
```markdown
@${CLAUDE_PLUGIN_ROOT}/templates/template-name.md
```
Use for: Using plugin templates for generation
### Pattern: Agent Invocation
```markdown
Launch the [agent-name] agent for [task description].
```
Use for: Delegating complex tasks to plugin agents
### Pattern: Skill Reference
```markdown
Use the [skill-name] skill to ensure [requirements].
```
Use for: Leveraging plugin skills for specialized knowledge
### Pattern: Input Validation
```markdown
Validate input: !`echo "$1" | grep -E "^pattern$" && echo "OK" || echo "ERROR"`
```
Use for: Validating command arguments
### Pattern: Resource Validation
```markdown
Check exists: !`test -f ${CLAUDE_PLUGIN_ROOT}/path/file && echo "YES" || echo "NO"`
```
Use for: Verifying required plugin files exist
---
## Development Tips
### Testing Plugin Commands
1. **Test with plugin installed:**
```bash
cd /path/to/plugin
claude /command-name args
```
2. **Verify ${CLAUDE_PLUGIN_ROOT} expansion:**
```bash
# Add debug output to command
!`echo "Plugin root: ${CLAUDE_PLUGIN_ROOT}"`
```
3. **Test across different working directories:**
```bash
cd /tmp && claude /command-name
cd /other/project && claude /command-name
```
4. **Validate resource availability:**
```bash
# Check all plugin resources exist
!`ls -la ${CLAUDE_PLUGIN_ROOT}/scripts/`
!`ls -la ${CLAUDE_PLUGIN_ROOT}/config/`
```
### Common Mistakes to Avoid
1. **Using relative paths instead of ${CLAUDE_PLUGIN_ROOT}:**
```markdown
# Wrong
!`node ./scripts/analyze.js`
# Correct
!`node ${CLAUDE_PLUGIN_ROOT}/scripts/analyze.js`
```
2. **Forgetting to allow required tools:**
```markdown
# Missing allowed-tools
!`bash script.sh` # Will fail without Bash permission
# Correct
---
allowed-tools: Bash(*)
---
!`bash ${CLAUDE_PLUGIN_ROOT}/scripts/script.sh`
```
3. **Not validating inputs:**
```markdown
# Risky - no validation
Deploy to $1 environment
# Better - with validation
Validate: !`echo "$1" | grep -E "^(dev|staging|prod)$" || echo "INVALID"`
Deploy to $1 environment (if valid)
```
4. **Hardcoding plugin paths:**
```markdown
# Wrong - breaks on different installations
@/home/user/.claude/plugins/my-plugin/config.json
# Correct - works everywhere
@${CLAUDE_PLUGIN_ROOT}/config.json
```
---
For detailed plugin-specific features, see `references/plugin-features-reference.md`.
For general command development, see main `SKILL.md`.
---
## plugin-development-toolkit.md
# Plugin Development Toolkit
A comprehensive toolkit for developing Claude Code plugins with expert guidance on hooks, MCP integration, plugin structure, and marketplace publishing.
## Overview
The plugin-dev toolkit provides seven specialized skills to help you build high-quality Claude Code plugins:
1. **Hook Development** - Advanced hooks API and event-driven automation
2. **MCP Integration** - Model Context Protocol server integration
3. **Plugin Structure** - Plugin organization and manifest configuration
4. **Plugin Settings** - Configuration patterns using .claude/plugin-name.local.md files
5. **Command Development** - Creating slash commands with frontmatter and arguments
6. **Agent Development** - Creating autonomous agents with AI-assisted generation
7. **Skill Development** - Creating skills with progressive disclosure and strong triggers
Each skill follows best practices with progressive disclosure: lean core documentation, detailed references, working examples, and utility scripts.
## Guided Workflow Command
### /plugin-dev:create-plugin
A comprehensive, end-to-end workflow command for creating plugins from scratch, similar to the feature-dev workflow.
**8-Phase Process:**
1. **Discovery** - Understand plugin purpose and requirements
2. **Component Planning** - Determine needed skills, commands, agents, hooks, MCP
3. **Detailed Design** - Specify each component and resolve ambiguities
4. **Structure Creation** - Set up directories and manifest
5. **Component Implementation** - Create each component using AI-assisted agents
6. **Validation** - Run plugin-validator and component-specific checks
7. **Testing** - Verify plugin works in Claude Code
8. **Documentation** - Finalize README and prepare for distribution
**Features:**
- Asks clarifying questions at each phase
- Loads relevant skills automatically
- Uses agent-creator for AI-assisted agent generation
- Runs validation utilities (validate-agent.sh, validate-hook-schema.sh, etc.)
- Follows plugin-dev's own proven patterns
- Guides through testing and verification
**Usage:**
```bash
/plugin-dev:create-plugin [optional description]
# Examples:
/plugin-dev:create-plugin
/plugin-dev:create-plugin A plugin for managing database migrations
```
Use this workflow for structured, high-quality plugin development from concept to completion.
## Skills
### 1. Hook Development
**Trigger phrases:** "create a hook", "add a PreToolUse hook", "validate tool use", "implement prompt-based hooks", "${CLAUDE_PLUGIN_ROOT}", "block dangerous commands"
**What it covers:**
- Prompt-based hooks (recommended) with LLM decision-making
- Command hooks for deterministic validation
- All hook events: PreToolUse, PostToolUse, Stop, SubagentStop, SessionStart, SessionEnd, UserPromptSubmit, PreCompact, Notification
- Hook output formats and JSON schemas
- Security best practices and input validation
- ${CLAUDE_PLUGIN_ROOT} for portable paths
**Resources:**
- Core SKILL.md (1,619 words)
- 3 example hook scripts (validate-write, validate-bash, load-context)
- 3 reference docs: patterns, migration, advanced techniques
- 3 utility scripts: validate-hook-schema.sh, test-hook.sh, hook-linter.sh
**Use when:** Creating event-driven automation, validating operations, or enforcing policies in your plugin.
### 2. MCP Integration
**Trigger phrases:** "add MCP server", "integrate MCP", "configure .mcp.json", "Model Context Protocol", "stdio/SSE/HTTP server", "connect external service"
**What it covers:**
- MCP server configuration (.mcp.json vs plugin.json)
- All server types: stdio (local), SSE (hosted/OAuth), HTTP (REST), WebSocket (real-time)
- Environment variable expansion (${CLAUDE_PLUGIN_ROOT}, user vars)
- MCP tool naming and usage in commands/agents
- Authentication patterns: OAuth, tokens, env vars
- Integration patterns and performance optimization
**Resources:**
- Core SKILL.md (1,666 words)
- 3 example configurations (stdio, SSE, HTTP)
- 3 reference docs: server-types (~3,200w), authentication (~2,800w), tool-usage (~2,600w)
**Use when:** Integrating external services, APIs, databases, or tools into your plugin.
### 3. Plugin Structure
**Trigger phrases:** "plugin structure", "plugin.json manifest", "auto-discovery", "component organization", "plugin directory layout"
**What it covers:**
- Standard plugin directory structure and auto-discovery
- plugin.json manifest format and all fields
- Component organization (commands, agents, skills, hooks)
- ${CLAUDE_PLUGIN_ROOT} usage throughout
- File naming conventions and best practices
- Minimal, standard, and advanced plugin patterns
**Resources:**
- Core SKILL.md (1,619 words)
- 3 example structures (minimal, standard, advanced)
- 2 reference docs: component-patterns, manifest-reference
**Use when:** Starting a new plugin, organizing components, or configuring the plugin manifest.
### 4. Plugin Settings
**Trigger phrases:** "plugin settings", "store plugin configuration", ".local.md files", "plugin state files", "read YAML frontmatter", "per-project plugin settings"
**What it covers:**
- .claude/plugin-name.local.md pattern for configuration
- YAML frontmatter + markdown body structure
- Parsing techniques for bash scripts (sed, awk, grep patterns)
- Temporarily active hooks (flag files and quick-exit)
- Real-world examples from multi-agent-swarm and ralph-wiggum plugins
- Atomic file updates and validation
- Gitignore and lifecycle management
**Resources:**
- Core SKILL.md (1,623 words)
- 3 examples (read-settings hook, create-settings command, templates)
- 2 reference docs: parsing-techniques, real-world-examples
- 2 utility scripts: validate-settings.sh, parse-frontmatter.sh
**Use when:** Making plugins configurable, storing per-project state, or implementing user preferences.
### 5. Command Development
**Trigger phrases:** "create a slash command", "add a command", "command frontmatter", "define command arguments", "organize commands"
**What it covers:**
- Slash command structure and markdown format
- YAML frontmatter fields (description, argument-hint, allowed-tools)
- Dynamic arguments and file references
- Bash execution for context
- Command organization and namespacing
- Best practices for command development
**Resources:**
- Core SKILL.md (1,535 words)
- Examples and reference documentation
- Command organization patterns
**Use when:** Creating slash commands, defining command arguments, or organizing plugin commands.
### 6. Agent Development
**Trigger phrases:** "create an agent", "add an agent", "write a subagent", "agent frontmatter", "when to use description", "agent examples", "autonomous agent"
**What it covers:**
- Agent file structure (YAML frontmatter + system prompt)
- All frontmatter fields (name, description, model, color, tools)
- Description format with <example> blocks for reliable triggering
- System prompt design patterns (analysis, generation, validation, orchestration)
- AI-assisted agent generation using Claude Code's proven prompt
- Validation rules and best practices
- Complete production-ready agent examples
**Resources:**
- Core SKILL.md (1,438 words)
- 2 examples: agent-creation-prompt (AI-assisted workflow), complete-agent-examples (4 full agents)
- 3 reference docs: agent-creation-system-prompt (from Claude Code), system-prompt-design (~4,000w), triggering-examples (~2,500w)
- 1 utility script: validate-agent.sh
**Use when:** Creating autonomous agents, defining agent behavior, or implementing AI-assisted agent generation.
### 7. Skill Development
**Trigger phrases:** "create a skill", "add a skill to plugin", "write a new skill", "improve skill description", "organize skill content"
**What it covers:**
- Skill structure (SKILL.md with YAML frontmatter)
- Progressive disclosure principle (metadata → SKILL.md → resources)
- Strong trigger descriptions with specific phrases
- Writing style (imperative/infinitive form, third person)
- Bundled resources organization (references/, examples/, scripts/)
- Skill creation workflow
- Based on skill-creator methodology adapted for Claude Code plugins
**Resources:**
- Core SKILL.md (1,232 words)
- References: skill-creator methodology, plugin-dev patterns
- Examples: Study plugin-dev's own skills as templates
**Use when:** Creating new skills for plugins or improving existing skill quality.
## Installation
Install from claude-code-marketplace:
```bash
/plugin install plugin-dev@claude-code-marketplace
```
Or for development, use directly:
```bash
cc --plugin-dir /path/to/plugin-dev
```
## Quick Start
### Creating Your First Plugin
1. **Plan your plugin structure:**
- Ask: "What's the best directory structure for a plugin with commands and MCP integration?"
- The plugin-structure skill will guide you
2. **Add MCP integration (if needed):**
- Ask: "How do I add an MCP server for database access?"
- The mcp-integration skill provides examples and patterns
3. **Implement hooks (if needed):**
- Ask: "Create a PreToolUse hook that validates file writes"
- The hook-development skill gives working examples and utilities
## Development Workflow
The plugin-dev toolkit supports your entire plugin development lifecycle:
```
┌─────────────────────┐
│ Design Structure │ → plugin-structure skill
│ (manifest, layout) │
└──────────┬──────────┘
│
┌──────────▼──────────┐
│ Add Components │
│ (commands, agents, │ → All skills provide guidance
│ skills, hooks) │
└──────────┬──────────┘
│
┌──────────▼──────────┐
│ Integrate Services │ → mcp-integration skill
│ (MCP servers) │
└──────────┬──────────┘
│
┌──────────▼──────────┐
│ Add Automation │ → hook-development skill
│ (hooks, validation)│ + utility scripts
└──────────┬──────────┘
│
┌──────────▼──────────┐
│ Test & Validate │ → hook-development utilities
│ │ validate-hook-schema.sh
└──────────┬──────────┘ test-hook.sh
│ hook-linter.sh
```
## Features
### Progressive Disclosure
Each skill uses a three-level disclosure system:
1. **Metadata** (always loaded): Concise descriptions with strong triggers
2. **Core SKILL.md** (when triggered): Essential API reference (~1,500-2,000 words)
3. **References/Examples** (as needed): Detailed guides, patterns, and working code
This keeps Claude Code's context focused while providing deep knowledge when needed.
### Utility Scripts
The hook-development skill includes production-ready utilities:
```bash
# Validate hooks.json structure
./validate-hook-schema.sh hooks/hooks.json
# Test hooks before deployment
./test-hook.sh my-hook.sh test-input.json
# Lint hook scripts for best practices
./hook-linter.sh my-hook.sh
```
### Working Examples
Every skill provides working examples:
- **Hook Development**: 3 complete hook scripts (bash, write validation, context loading)
- **MCP Integration**: 3 server configurations (stdio, SSE, HTTP)
- **Plugin Structure**: 3 plugin layouts (minimal, standard, advanced)
- **Plugin Settings**: 3 examples (read-settings hook, create-settings command, templates)
- **Command Development**: 10 complete command examples (review, test, deploy, docs, etc.)
## Documentation Standards
All skills follow consistent standards:
- Third-person descriptions ("This skill should be used when...")
- Strong trigger phrases for reliable loading
- Imperative/infinitive form throughout
- Based on official Claude Code documentation
- Security-first approach with best practices
## Total Content
- **Core Skills**: ~11,065 words across 7 SKILL.md files
- **Reference Docs**: ~10,000+ words of detailed guides
- **Examples**: 12+ working examples (hook scripts, MCP configs, plugin layouts, settings files)
- **Utilities**: 6 production-ready validation/testing/parsing scripts
## Use Cases
### Building a Database Plugin
```
1. "What's the structure for a plugin with MCP integration?"
→ plugin-structure skill provides layout
2. "How do I configure an stdio MCP server for PostgreSQL?"
→ mcp-integration skill shows configuration
3. "Add a Stop hook to ensure connections close properly"
→ hook-development skill provides pattern
```
### Creating a Validation Plugin
```
1. "Create hooks that validate all file writes for security"
→ hook-development skill with examples
2. "Test my hooks before deploying"
→ Use validate-hook-schema.sh and test-hook.sh
3. "Organize my hooks and configuration files"
→ plugin-structure skill shows best practices
```
### Integrating External Services
```
1. "Add Asana MCP server with OAuth"
→ mcp-integration skill covers SSE servers
2. "Use Asana tools in my commands"
→ mcp-integration tool-usage reference
3. "Structure my plugin with commands and MCP"
→ plugin-structure skill provides patterns
```
## Best Practices
All skills emphasize:
✅ **Security First**
- Input validation in hooks
- HTTPS/WSS for MCP servers
- Environment variables for credentials
- Principle of least privilege
✅ **Portability**
- Use ${CLAUDE_PLUGIN_ROOT} everywhere
- Relative paths only
- Environment variable substitution
✅ **Testing**
- Validate configurations before deployment
- Test hooks with sample inputs
- Use debug mode (`claude --debug`)
✅ **Documentation**
- Clear README files
- Documented environment variables
- Usage examples
## Contributing
This plugin is part of the claude-code-marketplace. To contribute improvements:
1. Fork the marketplace repository
2. Make changes to plugin-dev/
3. Test locally with `cc --plugin-dir`
4. Create PR following marketplace-publishing guidelines
## Version
0.1.0 - Initial release with seven comprehensive skills and three validation agents
## Author
Daisy Hollman (daisy@anthropic.com)
## License
MIT License - See repository for details
---
**Note:** This toolkit is designed to help you build high-quality plugins. The skills load automatically when you ask relevant questions, providing expert guidance exactly when you need it.
---
## plugin-features-reference.md
# Plugin-Specific Command Features Reference
This reference covers features and patterns specific to commands bundled in Claude Code plugins.
## Table of Contents
- [Plugin Command Discovery](#plugin-command-discovery)
- [CLAUDE_PLUGIN_ROOT Environment Variable](#claude_plugin_root-environment-variable)
- [Plugin Command Patterns](#plugin-command-patterns)
- [Integration with Plugin Components](#integration-with-plugin-components)
- [Validation Patterns](#validation-patterns)
## Plugin Command Discovery
### Auto-Discovery
Claude Code automatically discovers commands in plugins using the following locations:
```
plugin-name/
├── commands/ # Auto-discovered commands
│ ├── foo.md # /foo (plugin:plugin-name)
│ └── bar.md # /bar (plugin:plugin-name)
└── plugin.json # Plugin manifest
```
**Key points:**
- Commands are discovered at plugin load time
- No manual registration required
- Commands appear in `/help` with "(plugin:plugin-name)" label
- Subdirectories create namespaces
### Namespaced Plugin Commands
Organize commands in subdirectories for logical grouping:
```
plugin-name/
└── commands/
├── review/
│ ├── security.md # /security (plugin:plugin-name:review)
│ └── style.md # /style (plugin:plugin-name:review)
└── deploy/
├── staging.md # /staging (plugin:plugin-name:deploy)
└── prod.md # /prod (plugin:plugin-name:deploy)
```
**Namespace behavior:**
- Subdirectory name becomes namespace
- Shown as "(plugin:plugin-name:namespace)" in `/help`
- Helps organize related commands
- Use when plugin has 5+ commands
### Command Naming Conventions
**Plugin command names should:**
1. Be descriptive and action-oriented
2. Avoid conflicts with common command names
3. Use hyphens for multi-word names
4. Consider prefixing with plugin name for uniqueness
**Examples:**
```
Good:
- /mylyn-sync (plugin-specific prefix)
- /analyze-performance (descriptive action)
- /docker-compose-up (clear purpose)
Avoid:
- /test (conflicts with common name)
- /run (too generic)
- /do-stuff (not descriptive)
```
## CLAUDE_PLUGIN_ROOT Environment Variable
### Purpose
`${CLAUDE_PLUGIN_ROOT}` is a special environment variable available in plugin commands that resolves to the absolute path of the plugin directory.
**Why it matters:**
- Enables portable paths within plugin
- Allows referencing plugin files and scripts
- Works across different installations
- Essential for multi-file plugin operations
### Basic Usage
Reference files within your plugin:
```markdown
---
description: Analyze using plugin script
allowed-tools: Bash(node:*), Read
---
Run analysis: !`node ${CLAUDE_PLUGIN_ROOT}/scripts/analyze.js`
Read template: @${CLAUDE_PLUGIN_ROOT}/templates/report.md
```
**Expands to:**
```
Run analysis: !`node /path/to/plugins/plugin-name/scripts/analyze.js`
Read template: @/path/to/plugins/plugin-name/templates/report.md
```
### Common Patterns
#### 1. Executing Plugin Scripts
```markdown
---
description: Run custom linter from plugin
allowed-tools: Bash(node:*)
---
Lint results: !`node ${CLAUDE_PLUGIN_ROOT}/bin/lint.js $1`
Review the linting output and suggest fixes.
```
#### 2. Loading Configuration Files
```markdown
---
description: Deploy using plugin configuration
allowed-tools: Read, Bash(*)
---
Configuration: @${CLAUDE_PLUGIN_ROOT}/config/deploy-config.json
Deploy application using the configuration above for $1 environment.
```
#### 3. Accessing Plugin Resources
```markdown
---
description: Generate report from template
---
Use this template: @${CLAUDE_PLUGIN_ROOT}/templates/api-report.md
Generate a report for @$1 following the template format.
```
#### 4. Multi-Step Plugin Workflows
```markdown
---
description: Complete plugin workflow
allowed-tools: Bash(*), Read
---
Step 1 - Prepare: !`bash ${CLAUDE_PLUGIN_ROOT}/scripts/prepare.sh $1`
Step 2 - Config: @${CLAUDE_PLUGIN_ROOT}/config/$1.json
Step 3 - Execute: !`${CLAUDE_PLUGIN_ROOT}/bin/execute $1`
Review results and report status.
```
### Best Practices
1. **Always use for plugin-internal paths:**
```markdown
# Good
@${CLAUDE_PLUGIN_ROOT}/templates/foo.md
# Bad
@./templates/foo.md # Relative to current directory, not plugin
```
2. **Validate file existence:**
```markdown
---
description: Use plugin config if exists
allowed-tools: Bash(test:*), Read
---
!`test -f ${CLAUDE_PLUGIN_ROOT}/config.json && echo "exists" || echo "missing"`
If config exists, load it: @${CLAUDE_PLUGIN_ROOT}/config.json
Otherwise, use defaults...
```
3. **Document plugin file structure:**
```markdown
<!--
Plugin structure:
${CLAUDE_PLUGIN_ROOT}/
├── scripts/analyze.js (analysis script)
├── templates/ (report templates)
└── config/ (configuration files)
-->
```
4. **Combine with arguments:**
```markdown
Run: !`${CLAUDE_PLUGIN_ROOT}/bin/process.sh $1 $2`
```
### Troubleshooting
**Variable not expanding:**
- Ensure command is loaded from plugin
- Check bash execution is allowed
- Verify syntax is exact: `${CLAUDE_PLUGIN_ROOT}`
**File not found errors:**
- Verify file exists in plugin directory
- Check file path is correct relative to plugin root
- Ensure file permissions allow reading/execution
**Path with spaces:**
- Bash commands automatically handle spaces
- File references work with spaces in paths
- No special quoting needed
## Plugin Command Patterns
### Pattern 1: Configuration-Based Commands
Commands that load plugin-specific configuration:
```markdown
---
description: Deploy using plugin settings
allowed-tools: Read, Bash(*)
---
Load configuration: @${CLAUDE_PLUGIN_ROOT}/deploy-config.json
Deploy to $1 environment using:
1. Configuration settings above
2. Current git branch: !`git branch --show-current`
3. Application version: !`cat package.json | grep version`
Execute deployment and monitor progress.
```
**When to use:** Commands that need consistent settings across invocations
### Pattern 2: Template-Based Generation
Commands that use plugin templates:
```markdown
---
description: Generate documentation from template
argument-hint: [component-name]
---
Template: @${CLAUDE_PLUGIN_ROOT}/templates/component-docs.md
Generate documentation for $1 component following the template structure.
Include:
- Component purpose and usage
- API reference
- Examples
- Testing guidelines
```
**When to use:** Standardized output generation
### Pattern 3: Multi-Script Workflow
Commands that orchestrate multiple plugin scripts:
```markdown
---
description: Complete build and test workflow
allowed-tools: Bash(*)
---
Build: !`bash ${CLAUDE_PLUGIN_ROOT}/scripts/build.sh`
Validate: !`bash ${CLAUDE_PLUGIN_ROOT}/scripts/validate.sh`
Test: !`bash ${CLAUDE_PLUGIN_ROOT}/scripts/test.sh`
Review all outputs and report:
1. Build status
2. Validation results
3. Test results
4. Recommended next steps
```
**When to use:** Complex plugin workflows with multiple steps
### Pattern 4: Environment-Aware Commands
Commands that adapt to environment:
```markdown
---
description: Deploy based on environment
argument-hint: [dev|staging|prod]
---
Environment config: @${CLAUDE_PLUGIN_ROOT}/config/$1.json
Environment check: !`echo "Deploying to: $1"`
Deploy application using $1 environment configuration.
Verify deployment and run smoke tests.
```
**When to use:** Commands that behave differently per environment
### Pattern 5: Plugin Data Management
Commands that manage plugin-specific data:
```markdown
---
description: Save analysis results to plugin cache
allowed-tools: Bash(*), Read, Write
---
Cache directory: ${CLAUDE_PLUGIN_ROOT}/cache/
Analyze @$1 and save results to cache:
!`mkdir -p ${CLAUDE_PLUGIN_ROOT}/cache && date > ${CLAUDE_PLUGIN_ROOT}/cache/last-run.txt`
Store analysis for future reference and comparison.
```
**When to use:** Commands that need persistent data storage
## Integration with Plugin Components
### Invoking Plugin Agents
Commands can trigger plugin agents using the Task tool:
```markdown
---
description: Deep analysis using plugin agent
argument-hint: [file-path]
---
Initiate deep code analysis of @$1 using the code-analyzer agent.
The agent will:
1. Analyze code structure
2. Identify patterns
3. Suggest improvements
4. Generate detailed report
Note: This uses the Task tool to launch the plugin's code-analyzer agent.
```
**Key points:**
- Agent must be defined in plugin's `agents/` directory
- Claude will automatically use Task tool to launch agent
- Agent has access to same plugin resources
### Invoking Plugin Skills
Commands can reference plugin skills for specialized knowledge:
```markdown
---
description: API documentation with best practices
argument-hint: [api-file]
---
Document the API in @$1 following our API documentation standards.
Use the api-docs-standards skill to ensure documentation includes:
- Endpoint descriptions
- Parameter specifications
- Response formats
- Error codes
- Usage examples
Note: This leverages the plugin's api-docs-standards skill for consistency.
```
**Key points:**
- Skill must be defined in plugin's `skills/` directory
- Mention skill by name to hint Claude should invoke it
- Skills provide specialized domain knowledge
### Coordinating with Plugin Hooks
Commands can be designed to work with plugin hooks:
```markdown
---
description: Commit with pre-commit validation
allowed-tools: Bash(git:*)
---
Stage changes: !\`git add $1\`
Commit changes: !\`git commit -m "$2"\`
Note: This commit will trigger the plugin's pre-commit hook for validation.
Review hook output for any issues.
```
**Key points:**
- Hooks execute automatically on events
- Commands can prepare state for hooks
- Document hook interaction in command
### Multi-Component Plugin Commands
Commands that coordinate multiple plugin components:
```markdown
---
description: Comprehensive code review workflow
argument-hint: [file-path]
---
File to review: @$1
Execute comprehensive review:
1. **Static Analysis** (via plugin scripts)
!`node ${CLAUDE_PLUGIN_ROOT}/scripts/lint.js $1`
2. **Deep Review** (via plugin agent)
Launch the code-reviewer agent for detailed analysis.
3. **Best Practices** (via plugin skill)
Use the code-standards skill to ensure compliance.
4. **Documentation** (via plugin template)
Template: @${CLAUDE_PLUGIN_ROOT}/templates/review-report.md
Generate final report combining all outputs.
```
**When to use:** Complex workflows leveraging multiple plugin capabilities
## Validation Patterns
### Input Validation
Commands should validate inputs before processing:
```markdown
---
description: Deploy to environment with validation
argument-hint: [environment]
---
Validate environment: !`echo "$1" | grep -E "^(dev|staging|prod)$" || echo "INVALID"`
$IF($1 in [dev, staging, prod],
Deploy to $1 environment using validated configuration,
ERROR: Invalid environment '$1'. Must be one of: dev, staging, prod
)
```
**Validation approaches:**
1. Bash validation using grep/test
2. Inline validation in prompt
3. Script-based validation
### File Existence Checks
Verify required files exist:
```markdown
---
description: Process configuration file
argument-hint: [config-file]
---
Check file: !`test -f $1 && echo "EXISTS" || echo "MISSING"`
Process configuration if file exists: @$1
If file doesn't exist, explain:
- Expected location
- Required format
- How to create it
```
### Required Arguments
Validate required arguments provided:
```markdown
---
description: Create deployment with version
argument-hint: [environment] [version]
---
Validate inputs: !`test -n "$1" -a -n "$2" && echo "OK" || echo "MISSING"`
$IF($1 AND $2,
Deploy version $2 to $1 environment,
ERROR: Both environment and version required. Usage: /deploy [env] [version]
)
```
### Plugin Resource Validation
Verify plugin resources available:
```markdown
---
description: Run analysis with plugin tools
allowed-tools: Bash(test:*)
---
Validate plugin setup:
- Config exists: !`test -f ${CLAUDE_PLUGIN_ROOT}/config.json && echo "✓" || echo "✗"`
- Scripts exist: !`test -d ${CLAUDE_PLUGIN_ROOT}/scripts && echo "✓" || echo "✗"`
- Tools available: !`test -x ${CLAUDE_PLUGIN_ROOT}/bin/analyze && echo "✓" || echo "✗"`
If all checks pass, proceed with analysis.
Otherwise, report missing components and installation steps.
```
### Output Validation
Validate command execution results:
```markdown
---
description: Build and validate output
allowed-tools: Bash(*)
---
Build: !`bash ${CLAUDE_PLUGIN_ROOT}/scripts/build.sh`
Validate output:
- Exit code: !`echo $?`
- Output exists: !`test -d dist && echo "✓" || echo "✗"`
- File count: !`find dist -type f | wc -l`
Report build status and any validation failures.
```
### Graceful Error Handling
Handle errors gracefully with helpful messages:
```markdown
---
description: Process file with error handling
argument-hint: [file-path]
---
Try processing: !`node ${CLAUDE_PLUGIN_ROOT}/scripts/process.js $1 2>&1 || echo "ERROR: $?"`
If processing succeeded:
- Report results
- Suggest next steps
If processing failed:
- Explain likely causes
- Provide troubleshooting steps
- Suggest alternative approaches
```
## Best Practices Summary
### Plugin Commands Should:
1. **Use ${CLAUDE_PLUGIN_ROOT} for all plugin-internal paths**
- Scripts, templates, configuration, resources
2. **Validate inputs early**
- Check required arguments
- Verify file existence
- Validate argument formats
3. **Document plugin structure**
- Explain required files
- Document script purposes
- Clarify dependencies
4. **Integrate with plugin components**
- Reference agents for complex tasks
- Use skills for specialized knowledge
- Coordinate with hooks when relevant
5. **Provide helpful error messages**
- Explain what went wrong
- Suggest how to fix
- Offer alternatives
6. **Handle edge cases**
- Missing files
- Invalid arguments
- Failed script execution
- Missing dependencies
7. **Keep commands focused**
- One clear purpose per command
- Delegate complex logic to scripts
- Use agents for multi-step workflows
8. **Test across installations**
- Verify paths work everywhere
- Test with different arguments
- Validate error cases
---
For general command development, see main SKILL.md.
For command examples, see examples/ directory.
---
## plugin-marketplace-complete-analysis.md
# Plugin Marketplace — Complete Architecture Analysis (2.1.74)
**Date**: 2026-03-13
**Status**: Production-ready infrastructure, feature-flagged off
**Feature Flag**: `tengu_orchid_trellis` (boolean, default `false`)
**Binary**: 2.1.74 (e5613610deee76cd)
---
## Executive Summary
The Claude Code 2.1.74 binary contains a **complete, production-ready plugin marketplace system**. The infrastructure supports:
- Multi-marketplace federation (multiple plugin catalogs)
- Dependency resolution with cycle detection
- Marketplace isolation (plugins from different markets can't inter-depend)
- Multiple plugin source types (GitHub, Git, NPM, local files)
- Auto-update system with seed/managed overrides
- Policy-based access control (allowlists, blocklists, trust messages)
- Versioned caching system
- Managed settings enforcement
**Current State**: Feature-flagged off, awaiting launch. No plugin signing/verification detected yet.
---
## Table of Contents
1. [Core Architecture](#core-architecture)
2. [Function Mapping (Renamed)](#function-mapping-renamed)
3. [Plugin Source Types](#plugin-source-types)
4. [Dependency Resolution](#dependency-resolution)
5. [Marketplace Catalog](#marketplace-catalog)
6. [Installation Flow](#installation-flow)
7. [Policy & Security](#policy--security)
8. [Data Structures](#data-structures)
9. [Feature Flags](#feature-flags)
10. [Missing Features](#missing-features)
---
## Core Architecture
```
┌─────────────────────────────────────────────────────────┐
│ Marketplace Sources │
│ (GitHub, Git repos, local dirs, NPM registry, etc.) │
└────────────────────────┬────────────────────────────────┘
│
├─ loadAllMarketplaces() [lR]
│ ├─ Policy: check allowlist/blocklist
│ └─ Fetch each marketplace catalog
│
▼
┌─────────────────────────────────────────────────────────┐
│ Marketplace Registry Cache │
│ ~/.claude/plugin-marketplaces/known_marketplaces.json │
│ { "official": { source: {...}, lastUpdated, autoUpdate }}│
└────────────────────────┬────────────────────────────────┘
│
├─ loadPluginsFromMarketplace() [Do1]
│ ├─ Filter by enabledPlugins settings
│ └─ Check managed/policy constraints
│
▼
┌─────────────────────────────────────────────────────────┐
│ Dependency Resolver │
│ resolveDependencies() [Bff] + demoteUnsatisfied() │
│ [Uff] │
│ - Cycle detection │
│ - Cross-marketplace blocking │
│ - Topological sort │
└────────────────────────┬────────────────────────────────┘
│
├─ installPlugin() [f0H]
│ ├─ downloadAndCachePlugin() [OgH]
│ ├─ copyToVersionedCache() [uG$]
│ └─ installPhysically() [PgH]
│
▼
┌─────────────────────────────────────────────────────────┐
│ Installed Plugins │
│ ~/.claude/plugins/cache/<marketplace>/<name>/<version>│
│ commands/, agents/, skills/, output-styles/ │
└─────────────────────────────────────────────────────────┘
```
---
## Function Mapping (Renamed)
### Core Marketplace Functions
| Minified | Renamed | Purpose |
|----------|---------|---------|
| `T6H()` | `isMarketplaceEnabled()` | Returns `tengu_orchid_trellis` flag status |
| `lR()` | `loadAllMarketplaces()` | Load all marketplaces from config, check policies |
| `ZX()` | `loadMarketplaceCatalog()` | Memoized: load single marketplace from cache/source |
| `Z1()` | `getMarketplaceRegistry()` | Read `known_marketplaces.json` |
| `W6H()` | `saveMarketplaceRegistry()` | Write `known_marketplaces.json` |
| `MgH()` | `parseMarketplaceManifest()` | Parse marketplace index file |
| `kZA()` | `fetchMarketplaceFromSource()` | Download marketplace from git/url/file |
| `vZA()` | `loadMarketplaceWithPlugins()` | Load marketplace + all plugin entries |
| `uW()` | `getInstalledPluginMetadata()` | Get plugin install metadata from settings |
### Dependency Resolution
| Minified | Renamed | Purpose |
|----------|---------|---------|
| `Bff()` | `resolveDependencies()` | Main dependency resolver with cycle detection |
| `Uff()` | `demoteUnsatisfiedDependencies()` | Find plugins with missing deps, disable them |
| `VZA()` | `findDependents()` | Find plugins that depend on a given plugin |
| `gff()` | `getEnabledPluginIds()` | Extract enabled plugin IDs from settings |
| `hZA()` | `formatDependencyError()` | Format human-readable error for resolution failure |
### Installation Functions
| Minified | Renamed | Purpose |
|----------|---------|---------|
| `f0H()` | `installPlugin()` | Main entry point for plugin installation |
| `SZA()` | `resolveAndEnablePlugin()` | Resolve deps + write to settings + install all |
| `PgH()` | `installPhysically()` | Move plugin to install location, register in settings |
| `Qff()` | `recordPluginInstallation()` | Save install metadata to settings |
| `OgH()` | `downloadAndCachePlugin()` | Download plugin from source to temp cache |
| `uG$()` | `copyToVersionedCache()` | Copy plugin to versioned cache dir |
### Plugin Source Handlers
| Minified | Renamed | Purpose |
|----------|---------|---------|
| `or1()` | `installFromNpm()` | Install NPM package to cache |
| `tr1()` | `cloneFromGitHub()` | Clone GitHub repo (SSH or HTTPS) |
| `ar1()` | `cloneFromGit()` | Clone generic git repo |
| `eff()` | `cloneFromUrl()` | Clone from URL (validates HTTPS/SSH/file) |
| `er1()` | `cloneGitSubdirectory()` | Clone git repo + sparse-checkout subdirectory |
| `Ho1()` | `copyFromLocalPath()` | Copy plugin from local filesystem |
| `sff()` | `validateGitUrl()` | Validate git URL (HTTPS/SSH/file only) |
| `sr1()` | `resolveGitHubShorthand()` | Convert `owner/repo` → full git URL |
### Plugin Loading & Parsing
| Minified | Renamed | Purpose |
|----------|---------|---------|
| `Do1()` | `loadPluginsFromMarketplace()` | Load all marketplace plugins, filter by settings |
| `fo1()` | `loadPluginFromMarketplaceEntry()` | Load single plugin from marketplace entry |
| `H8f()` | `loadPluginFromDisk()` | Parse plugin directory into plugin object |
| `bG$()` | `readPluginManifest()` | Read + validate plugin.json |
| `uZA()` | `validateManifestStripMarketplace()` | Validate manifest, strip marketplace-only fields |
| `rff()` | `readPluginHooksConfig()` | Read hooks config from plugin |
| `_o1()` | `loadInlinePlugins()` | Load plugins from `--plugin-dir` |
| `Mo1()` | `mergePluginSources()` | Merge managed/session/marketplace/builtin plugins |
### Builtin Plugins
| Minified | Renamed | Purpose |
|----------|---------|---------|
| `CZA()` | `getBuiltinPlugins()` | Get all built-in plugins (like `@builtin`) |
| `iff()` | `getBuiltinSkills()` | Extract skills from builtin plugins |
| `ir1()` | `convertSkillToPrompt()` | Convert skill definition to prompt |
| `RZA` | `BUILTIN_PLUGIN_REGISTRY` | Map of builtin plugin definitions |
| `wgH` | `BUILTIN_NAMESPACE` | Constant: `"builtin"` |
### Policy & Security
| Minified | Renamed | Purpose |
|----------|---------|---------|
| `U1H()` | `isMarketplaceSourceAllowed()` | Check if marketplace source passes policy |
| `B1H()` | `getStrictAllowedMarketplaces()` | Get `strictKnownMarketplaces` from policy |
| `mB1()` | `getBlockedMarketplaces()` | Get `blockedMarketplaces` from policy |
| `ZoD()` | `getManagedPluginNames()` | Get plugin names locked by policy |
| `ToD()` | `getPluginTrustMessage()` | Get custom trust/warning message for plugins |
| `pB1()` | `pluginSourcesMatch()` | Compare two plugin sources for equality |
| `o2A()` | `extractHostnameFromSource()` | Extract hostname from git/url source |
| `BB1()` | `sourceMatchesHostPattern()` | Check if source hostname matches regex pattern |
| `rBH()` | `isSourceInBlocklist()` | Check if source is blocked by policy |
| `DXH()` | `formatSourceForDisplay()` | Format source for user-facing display |
### Cache & Paths
| Minified | Renamed | Purpose |
|----------|---------|---------|
| `rR()` | `getPluginCachePath()` | Build cache path: `cache/<market>/<name>/<ver>` |
| `bZA()` | `buildPluginCachePath()` | Build cache path with custom base dir |
| `_0H()` | `getPluginZipPath()` | Get ZIP path for compressed cache |
| `_XH()` | `getTempCacheDir()` | Get temp cache directory |
| `tff()` | `findSeedCache()` | Find plugin in seed cache (shared across users) |
| `rr1()` | `findAnySeedVersionCache()` | Find any version in seed cache |
| `YgH()` | `copyDirectoryRecursive()` | Recursive directory copy with symlink handling |
| `CG$()` | `safeJoinPath()` | Join path with traversal protection |
### Versioning & Git
| Minified | Renamed | Purpose |
|----------|---------|---------|
| `Ic()` | `resolvePluginVersion()` | Resolve version from manifest/git/provided |
| `nr1()` | `getGitCommitSha()` | Get git SHA for a path |
| `N0$()` | `getGitCommitShaForPath()` | Alias for nr1 |
| `cff()` | `getCurrentTimestamp()` | Get ISO 8601 timestamp |
### Settings & Metadata
| Minified | Renamed | Purpose |
|----------|---------|---------|
| `DEA()` | `writePluginInstallMetadata()` | Save install record to settings |
| `Ko1()` | `mergePluginSettings()` | Merge settings from all plugins |
| `qo1()` | `cachePluginSettings()` | Cache merged plugin settings |
| `Lo1()` | `loadPluginSettingsFile()` | Read settings.json from plugin |
| `off()` | `validatePluginSettings()` | Validate plugin settings object |
### Marketplace Management (CLI operations)
| Minified | Renamed | Purpose |
|----------|---------|---------|
| `pff()` | `setMarketplaceAutoUpdate()` | Enable/disable auto-update for marketplace |
| `yff()` | `refreshMarketplace()` | Re-fetch marketplace catalog from source |
| `xff()` | `downloadMarketplaceFromUrl()` | Download marketplace index from URL |
### Utility Functions
| Minified | Renamed | Purpose |
|----------|---------|---------|
| `dff()` | `formatDependencyNote()` | Format "+ N dependencies" message |
| `yZA()` | `formatRequiredByNote()` | Format "required by X, Y" message |
| `lff()` | `isBuiltinPlugin()` | Check if plugin ID ends with `@builtin` |
| `nff()` | `getBuiltinPluginDefinition()` | Get builtin plugin definition by name |
| `$o1()` | `generateTempPluginName()` | Generate temp name for plugin download |
| `UH()` | `formatPluginSourceForDisplay()` | Format plugin source for logging |
---
## Plugin Source Types
### 1. GitHub Shorthand
```json
{
"source": "github",
"repo": "anthropics/claude-mcp-example",
"ref": "main", // optional branch/tag
"sha": "abc123..." // optional specific commit
}
```
**Handler**: `cloneFromGitHub()` [tr1]
**Behavior**: Converts `owner/repo` to full git URL (SSH for local, HTTPS for remote mode)
---
### 2. Git URL
```json
{
"source": "url",
"url": "https://github.com/user/repo.git",
"ref": "v1.0.0", // optional
"sha": "abc123..." // optional
}
```
**Handler**: `cloneFromUrl()` [eff]
**Behavior**: Clones from arbitrary git URL (HTTPS/SSH/file)
---
### 3. Git Subdirectory (Monorepo)
```json
{
"source": "git-subdir",
"url": "https://github.com/user/monorepo.git",
"path": "packages/claude-plugin",
"ref": "main", // optional
"sha": "abc123..." // optional
}
```
**Handler**: `cloneGitSubdirectory()` [er1]
**Requirements**: Git >= 2.25 (for sparse-checkout cone mode)
**Behavior**: Clones repo, uses sparse-checkout to extract only subdirectory
---
### 4. NPM Package
```json
{
"source": "npm",
"package": "@anthropic/claude-plugin",
"version": "1.0.0", // optional
"registry": "https://registry.npmjs.org/" // optional
}
```
**Handler**: `installFromNpm()` [or1]
**Behavior**: Runs `npm install` to cache, copies from `node_modules`
---
### 5. Local Directory
```json
{
"source": "directory",
"path": "./my-plugin"
}
```
**Handler**: `copyFromLocalPath()` [Ho1]
**Behavior**: Direct copy from filesystem
---
### 6. Local File (single file plugin)
```json
{
"source": "file",
"path": "./plugin.js"
}
```
**Handler**: `copyFromLocalPath()` [Ho1]
**Behavior**: Copy single file
---
### 7. Python Package (Not Implemented)
```json
{
"source": "pip",
"package": "claude-plugin"
}
```
**Status**: Throws `"Python package plugins are not yet supported"`
---
## Dependency Resolution
### Algorithm: Topological Sort with Cycle Detection
**Function**: `resolveDependencies()` [Bff]
```javascript
async function resolveDependencies(pluginId, getPluginEntry, alreadyEnabled) {
let marketplace = getPluginMetadata(pluginId).marketplace;
let closure = []; // Topological order
let visited = new Set();
let stack = []; // Current recursion stack
async function visit(plugin, requiredBy) {
// 1. Skip if already enabled by user
if (plugin !== pluginId && alreadyEnabled.has(plugin))
return null;
// 2. Check marketplace isolation
if (getPluginMetadata(plugin).marketplace !== marketplace)
return {
ok: false,
reason: "cross-marketplace",
dependency: plugin,
requiredBy
};
// 3. Detect cycles
if (stack.includes(plugin))
return {
ok: false,
reason: "cycle",
chain: [...stack, plugin]
};
// 4. Skip if already visited
if (visited.has(plugin))
return null;
visited.add(plugin);
// 5. Get plugin entry (from marketplace catalog or cache)
let entry = await getPluginEntry(plugin);
if (!entry)
return {
ok: false,
reason: "not-found",
missing: plugin,
requiredBy
};
// 6. Recurse into dependencies
stack.push(plugin);
for (let dep of entry.dependencies ?? []) {
let error = await visit(dep, plugin);
if (error) return error;
}
stack.pop();
// 7. Add to closure in topological order
closure.push(plugin);
return null;
}
let error = await visit(pluginId, pluginId);
if (error) return error;
return { ok: true, closure }; // closure = install order
}
```
**Key Properties**:
- **Post-order traversal** → dependencies installed before dependents
- **Marketplace isolation** → blocks cross-marketplace dependencies
- **Cycle detection** → full chain reported in error
- **Idempotent** → already-enabled plugins skipped
---
### Demotion: Disable Plugins with Missing Dependencies
**Function**: `demoteUnsatisfiedDependencies()` [Uff]
```javascript
function demoteUnsatisfiedDependencies(plugins) {
let allSources = new Set(plugins.map(p => p.source));
let enabled = new Set(plugins.filter(p => p.enabled).map(p => p.source));
let errors = [];
let changed = true;
// Iterate until no more changes
while (changed) {
changed = false;
for (let plugin of plugins) {
if (!enabled.has(plugin.source)) continue;
// Check all dependencies
for (let dep of plugin.manifest.dependencies ?? []) {
if (!enabled.has(dep)) {
// Dependency not enabled → demote this plugin
enabled.delete(plugin.source);
errors.push({
type: "dependency-unsatisfied",
source: plugin.source,
plugin: plugin.name,
dependency: dep,
reason: allSources.has(dep) ? "not-enabled" : "not-found"
});
changed = true;
break;
}
}
}
}
return {
demoted: new Set(plugins.filter(p => p.enabled && !enabled.has(p.source)).map(p => p.source)),
errors
};
}
```
**Purpose**: After user disables a plugin, find all plugins that depend on it and disable them too (cascade).
---
## Marketplace Catalog
### Registry File
**Path**: `~/.claude/plugin-marketplaces/known_marketplaces.json`
```json
{
"official": {
"source": {
"source": "github",
"repo": "anthropics/claude-plugins",
"path": "marketplace.json"
},
"installLocation": "/home/user/.claude/plugin-marketplaces/official",
"lastUpdated": "2026-03-13T10:30:00.000Z",
"autoUpdate": true
},
"community": {
"source": {
"source": "url",
"url": "https://example.com/marketplace.json"
},
"installLocation": "/home/user/.claude/plugin-marketplaces/community",
"lastUpdated": "2026-03-12T15:20:00.000Z",
"autoUpdate": false
}
}
```
---
### Marketplace Index Format
**File**: `marketplace.json` (at source location)
```json
{
"name": "Official Claude Plugins",
"description": "Curated plugins from Anthropic",
"version": "1.0.0",
"plugins": [
{
"name": "database-assistant",
"description": "Query databases with natural language",
"version": "2.1.0",
"source": "github",
"repo": "anthropics/database-plugin",
"ref": "v2.1.0",
"dependencies": ["sql-formatter"],
"tags": ["database", "sql"],
"author": "Anthropic",
"license": "MIT"
},
{
"name": "sql-formatter",
"description": "Format SQL queries",
"version": "1.0.0",
"source": {
"source": "npm",
"package": "sql-formatter"
}
}
]
}
```
---
### Plugin Manifest Format
**File**: `.claude-plugin/plugin.json` or `plugin.json` (in plugin directory)
```json
{
"name": "database-assistant",
"description": "Query databases with natural language",
"version": "2.1.0",
"dependencies": ["sql-formatter"],
"commands": {
"query-db": {
"source": "commands/query.ts",
"description": "Execute a SQL query"
}
},
"agents": {
"db-expert": {
"source": "agents/expert.md"
}
},
"skills": {
"schema-inspector": {
"source": "skills/schema.md"
}
},
"hooks": {
"PreMessageProcessing": ["hooks/sanitize.sh"]
},
"outputStyles": ["output-styles/table.css"],
"settings": {
"DB_CONNECTION_TIMEOUT": 30000
},
"mcpServers": {
"postgres-mcp": {
"command": "npx",
"args": ["@anthropic/postgres-mcp"]
}
}
}
```
**Fields**:
- `name` (required): Plugin identifier
- `description` (required): Human-readable description
- `version`: Semantic version
- `dependencies`: Array of plugin names (from same marketplace)
- `commands`: CLI commands the plugin provides
- `agents`: Agent definitions (`.md` files with YAML frontmatter)
- `skills`: Skill/prompt definitions
- `hooks`: Shell scripts to run on events
- `outputStyles`: CSS files for rendering
- `settings`: Environment variables/config the plugin needs
- `mcpServers`: MCP servers the plugin provides
---
## Installation Flow
### 1. User Command
```bash
claude plugin install database-assistant --marketplace official
```
---
### 2. Lookup in Marketplace
```javascript
// Load marketplace catalog
let marketplace = await loadMarketplaceWithPlugins("official");
// Find plugin entry
let entry = marketplace.plugins.find(p => p.name === "database-assistant");
```
---
### 3. Dependency Resolution
```javascript
// Resolve all dependencies
let resolution = await resolveDependencies(
"database-assistant",
async (pluginId) => {
// Look up in marketplace or installed plugins
return getPluginEntry(pluginId);
},
getEnabledPluginIds(settings)
);
if (!resolution.ok) {
return { error: formatDependencyError(resolution) };
}
// resolution.closure = ["sql-formatter", "database-assistant"]
```
---
### 4. Download & Cache
```javascript
for (let pluginId of resolution.closure) {
let entry = getPluginEntry(pluginId);
// Download from source
let tempPath = await downloadAndCachePlugin(entry.source, {
manifest: entry
});
// Copy to versioned cache
let version = await resolvePluginVersion(pluginId, entry.source, manifest);
let cachePath = await copyToVersionedCache(
tempPath,
pluginId,
version,
entry,
marketplace.installLocation
);
// Install to final location
await installPhysically(pluginId, entry, "user", cwd, cachePath);
}
```
---
### 5. Enable in Settings
```javascript
// Write to settings.json
settings.enabledPlugins = {
...settings.enabledPlugins,
"sql-formatter": true,
"database-assistant": true
};
```
---
### 6. Success Message
```
✓ Installed database-assistant (+ 1 dependency). Run /reload-plugins to activate.
```
---
## Policy & Security
### Strict Allowlist
**File**: `policySettings` in settings.json
```json
{
"policySettings": {
"strictKnownMarketplaces": [
{
"source": "github",
"repo": "anthropics/claude-plugins",
"hostPattern": "github\\.com"
}
]
}
}
```
**Behavior**: If set, **only** these marketplaces can be added. All others rejected.
---
### Blocklist
```json
{
"policySettings": {
"blockedMarketplaces": [
{
"hostPattern": "untrusted\\.example\\.com"
}
]
}
}
```
**Behavior**: Marketplaces matching these patterns are blocked, even if in allowlist.
---
### Managed Plugins
```json
{
"policySettings": {
"enabledPlugins": {
"security-scanner@official": true, // Force-enabled
"risky-plugin@community": false // Force-disabled
}
}
}
```
**Behavior**: User cannot enable/disable these plugins. Managed settings win.
---
### Trust Message
```json
{
"policySettings": {
"pluginTrustMessage": "Plugins from non-corporate marketplaces require approval from IT Security."
}
}
```
**Behavior**: Shown to user when installing from non-approved sources.
---
### Source Validation
**Function**: `isMarketplaceSourceAllowed()` [U1H]
```javascript
function isMarketplaceSourceAllowed(source) {
// 1. Check blocklist
let blocklist = getBlockedMarketplaces();
if (blocklist && isSourceInBlocklist(source, blocklist))
return false;
// 2. Check strict allowlist
let allowlist = getStrictAllowedMarketplaces();
if (!allowlist)
return true; // No allowlist = allow all (except blocklist)
// 3. Source must match an allowlist entry
return allowlist.some(pattern =>
sourceMatchesHostPattern(source, pattern)
);
}
```
---
## Data Structures
### Plugin Object (In-Memory)
```typescript
interface Plugin {
name: string;
manifest: {
name: string;
description: string;
version?: string;
dependencies?: string[];
commands?: Record<string, CommandDef>;
agents?: Record<string, AgentDef>;
skills?: Record<string, SkillDef>;
hooks?: Record<HookEvent, string[]>;
outputStyles?: string[];
settings?: Record<string, any>;
mcpServers?: Record<string, McpServerDef>;
};
path: string; // Install directory
source: string | PluginSource; // Where it came from
repository: string; // Display name
enabled: boolean;
isBuiltin?: boolean;
// Optional
commandsPath?: string;
agentsPath?: string;
skillsPath?: string;
outputStylesPath?: string;
hooksConfig?: Record<HookEvent, HookConfig[]>;
mcpServers?: Record<string, McpServerConfig>;
settings?: Record<string, any>;
}
```
---
### Marketplace Config
```typescript
interface MarketplaceConfig {
source: PluginSource;
installLocation: string;
lastUpdated: string; // ISO 8601 timestamp
autoUpdate: boolean;
}
```
---
### Marketplace Index
```typescript
interface MarketplaceIndex {
name: string;
description: string;
version?: string;
plugins: MarketplacePluginEntry[];
}
interface MarketplacePluginEntry {
name: string;
description: string;
version?: string;
source: PluginSource;
dependencies?: string[];
tags?: string[];
author?: string;
license?: string;
}
```
---
### Plugin Source (Union Type)
```typescript
type PluginSource =
| { source: "github"; repo: string; ref?: string; sha?: string; }
| { source: "url"; url: string; ref?: string; sha?: string; }
| { source: "git-subdir"; url: string; path: string; ref?: string; sha?: string; }
| { source: "npm"; package: string; version?: string; registry?: string; }
| { source: "file"; path: string; }
| { source: "directory"; path: string; }
| { source: "pip"; package: string; }; // Not implemented
```
---
## Feature Flags
### Main Gate
```javascript
function isMarketplaceEnabled() { // T6H
return XA("tengu_orchid_trellis", false);
}
```
**Effect**: When `false`, dependency resolution always succeeds with `closure: [pluginId]` (no dep checks).
---
### Related Flags (Not Directly Marketplace)
| Flag | Purpose |
|------|---------|
| `tengu_amber_flint` | Agent teams (related to multi-plugin coordination) |
| `tengu_plan_mode_interview_phase` | Plan mode (may use plugins) |
---
## Missing Features
### 1. Plugin Signing & Verification
**Status**: Not implemented
**Evidence**: No code for signature validation, checksums, or public key verification
**Risk**: Plugins can be tampered with during transit or in cache
---
### 2. Plugin Sandboxing
**Status**: Plugins run in main process with full access
**Evidence**: Commands/hooks execute as shell scripts, agents use full tool set
**Risk**: Malicious plugin can access filesystem, env vars, network
---
### 3. Plugin Permissions Model
**Status**: No granular permissions
**Evidence**: No code for requesting/granting specific capabilities (filesystem, network, etc.)
**Risk**: Plugins are all-or-nothing trusted
---
### 4. Plugin Ratings / Reviews
**Status**: No rating system in marketplace index
**Evidence**: No fields in `MarketplacePluginEntry` for ratings, reviews, downloads
**Implication**: No user feedback mechanism
---
### 5. Plugin Auto-Update Enforcement
**Status**: Marketplace-level auto-update exists, but plugin-level updates are manual
**Evidence**: `autoUpdate` is per-marketplace, not per-plugin
**Gap**: Can't auto-update individual plugins
---
### 6. Plugin Rollback
**Status**: No version history or rollback mechanism
**Evidence**: Versioned cache exists but no UI/API for reverting to previous version
**Risk**: Bad update breaks workflow with no easy recovery
---
### 7. Dependency Version Constraints
**Status**: Dependencies are by name only, no version ranges
**Evidence**: `dependencies: string[]` — no semver constraints
**Risk**: Dependency version conflicts
---
### 8. Circular Dependency Handling
**Status**: Detected and rejected (hard error)
**Evidence**: Cycle detection returns `{ reason: "cycle", chain: [...] }`
**Limitation**: No support for optional/dev dependencies to break cycles
---
### 9. Plugin Uninstall
**Status**: Implied but not traced
**Evidence**: `removePlugin`, `uninstallPlugin` functions not found in marketplace code
**Gap**: Install flow complete, uninstall flow not analyzed
---
### 10. Marketplace Moderation
**Status**: No moderation queue or approval workflow
**Evidence**: Marketplace index is static JSON, no submission API
**Implication**: Anthropic manually curates official marketplace
---
## Recommendations
### For Anthropic (Before Launch)
1. **Add plugin signing** — GPG or Ed25519 signatures in marketplace index
2. **Implement sandboxing** — Run plugins in restricted subprocess or V8 isolate
3. **Add permissions model** — Plugin manifest declares capabilities, user approves
4. **Version constraints** — Support semver ranges in dependencies (e.g., `"^1.2.0"`)
5. **Rollback mechanism** — Keep last N versions in cache, add `/plugin rollback` command
6. **Uninstall flow** — Complete the lifecycle with clean removal + dependency checks
7. **Trust UI** — Show plugin source, author, last updated before install
### For Researchers
1. **Test marketplace isolation** — Verify cross-marketplace dependency blocking works
2. **Cycle detection stress test** — Large dependency graphs with complex cycles
3. **Policy bypass attempts** — Try to install blocked plugins via manual file placement
4. **Source validation** — Test git URL parsing for injection vulnerabilities
5. **Cache poisoning** — Check if versioned cache can be exploited
### For Users
1. **Wait for signing** — Don't use marketplace in production until signatures exist
2. **Trust official only** — Stick to Anthropic-curated marketplace initially
3. **Review plugin code** — Marketplace makes it easy, but plugins are unvetted
4. **Local testing first** — Use `--plugin-dir` to test plugins before installing
---
## Appendix: Key File Paths
| Purpose | Path |
|---------|------|
| Marketplace registry | `~/.claude/plugin-marketplaces/known_marketplaces.json` |
| Marketplace cache | `~/.claude/plugin-marketplaces/<name>/` |
| Plugin cache (versioned) | `~/.claude/plugins/cache/<marketplace>/<name>/<version>/` |
| Plugin cache (ZIP) | `~/.claude/plugins/cache/<marketplace>/<name>/<version>.zip` |
| Seed cache (shared) | `$CLAUDE_CODE_SEED_DIRECTORY/cache/<marketplace>/<name>/<version>/` |
| NPM cache | `~/.claude/plugins/npm-cache/` |
| Temp downloads | `~/.claude/plugins/cache/temp_<source>_<timestamp>_<random>/` |
| Settings (user) | `~/.claude/settings.json` → `enabledPlugins` |
| Settings (project) | `./.claude/settings.json` → `enabledPlugins` |
| Policy settings | `<managed_settings_dir>/settings.json` → `policySettings` |
---
## Appendix: Telemetry Events
| Event | Trigger |
|-------|---------|
| `tengu_plugin_installed` | Plugin installation succeeds |
| `tengu_plugin_marketplace_<event>` | Marketplace operations (not traced) |
---
**Analysis Status**: ✅ Complete
**Documentation**: 36 functions renamed, architecture mapped, data structures defined
**Confidence**: High (direct source extraction + decompilation)
---
**Generated**: 2026-03-13
**Analyst**: Claude Code reverse engineering workflow
**Binary**: 2.1.74 (e5613610deee76cd)
---
## plugin-marketplace-reality-check.md
# Plugin Marketplace: What It Actually Is
**Date**: 2026-03-13
**Finding**: The plugin marketplace is **NOT CoWork-specific** — it's for **enterprise managed deployments**
---
## What I Found vs. What It Actually Is
### Initial Theory ❌
> "This might already work in Claude CoWork"
### Reality ✅
The plugin system is designed for **enterprise/team managed deployments**, not CoWork specifically.
CoWork in 2.1.70/2.1.74 only added:
- `CLAUDE_COWORK_MEMORY_PATH_OVERRIDE` — Shared team memory sync
- `teammate_id` — Team member identification
- `tengu_team_mem_sync_started` — Memory sync telemetry
**CoWork ≠ Plugin Marketplace**. They're separate features.
---
## Seed Directory Architecture (Enterprise Deployment)
### Core Functions
```javascript
// Get seed directory (admin-managed shared plugin location)
function zp() {
let seedDir = process.env.CLAUDE_CODE_PLUGIN_SEED_DIR;
return seedDir ? normalizePath(seedDir) : undefined;
}
// Check if path is in seed (read-only)
function qgH(path) {
let seed = zp();
if (!seed) return false;
return path === seed || path.startsWith(seed + PATH_SEP);
}
```
### Usage Pattern
**Corporate IT sets up**:
```bash
# On shared NFS mount or corporate file server
export CLAUDE_CODE_PLUGIN_SEED_DIR=/nfs/corporate/claude-plugins
# Pre-install approved plugins
/nfs/corporate/claude-plugins/
├── cache/
│ ├── corporate-internal/
│ │ ├── security-scanner/
│ │ │ └── 1.0.0/ # Pre-downloaded, cached
│ │ └── compliance-agent/
│ │ └── 2.1.0/
│ └── official/
│ └── database-assistant/
│ └── 1.5.0/
└── known_marketplaces.json # Pre-configured marketplace sources
```
**Users get**:
- ✅ Instant access to pre-approved plugins (no download)
- ✅ Read-only — can't modify admin-installed plugins
- ✅ Can still install personal plugins to `~/.claude/plugins/`
- ❌ Can't enable/disable seed plugins (policy-locked)
---
## How It Actually Works
### Marketplace Loading Priority
1. **Check seed directory first** (`CLAUDE_CODE_PLUGIN_SEED_DIR`)
- If marketplace exists in seed → use read-only copy
- If plugin cached in seed → use cached copy
2. **Check user directory** (`~/.claude/plugin-marketplaces/`)
- If marketplace not in seed → load from user config
- Download plugins to user cache
3. **Error handling**:
```javascript
if (qgH(marketplace.installLocation)) {
throw Error(
`Marketplace '${name}' is seed-managed (${zp()}). ` +
`To use a different source, ask your admin to update the seed, ` +
`or use a different marketplace name.`
);
}
```
### Auto-Update Behavior
```javascript
async function setMarketplaceAutoUpdate(name, enabled) {
let marketplaces = await getMarketplaceRegistry();
let marketplace = marketplaces[name];
if (qgH(marketplace.installLocation)) {
throw Error(
`Marketplace '${name}' is seed-managed (${zp()}) ` +
`and auto-update is always disabled for seed content. ` +
`To update: ask your admin to update the seed.`
);
}
// ... normal auto-update logic
}
```
**Seed marketplaces cannot be auto-updated by users** — only admins can update the seed.
---
## Plugin Installation Flow (With Seed)
```
User runs: claude plugin install database-assistant --marketplace official
1. Check if "official" marketplace in seed
└─ Yes: Use /nfs/corporate/claude-plugins/known_marketplaces.json
2. Load marketplace catalog
└─ Check seed cache for plugin
└─ Yes: Use /nfs/corporate/claude-plugins/cache/official/database-assistant/1.5.0/
└─ No: Download to ~/.claude/plugins/cache/official/database-assistant/1.5.0/
3. Check dependencies (same process for each)
4. Install to:
- Seed plugins: Use in-place (no copy)
- Downloaded plugins: ~/.claude/plugins/cache/<marketplace>/<name>/<version>/
5. Enable in settings
- User settings: ~/.claude/settings.json (if not policy-locked)
- Policy settings: Read-only from admin
```
---
## CoWork vs. Seed Plugins: Separate Features
| Feature | CoWork | Seed Plugins |
|---------|--------|--------------|
| **Purpose** | Team memory sync | Enterprise plugin distribution |
| **Env Var** | `CLAUDE_COWORK_MEMORY_PATH_OVERRIDE` | `CLAUDE_CODE_PLUGIN_SEED_DIR` |
| **What's Shared** | Conversation memory, learnings | Pre-installed plugins, marketplaces |
| **Write Access** | Team members can write memory | Users read-only, admin manages |
| **Version** | New in 2.1.70 | New in 2.1.70 |
| **Telemetry** | `tengu_team_mem_sync_started` | None specific (uses plugin events) |
---
## Deployment Scenarios
### 1. Individual Developer (Default)
```bash
# No seed directory
unset CLAUDE_CODE_PLUGIN_SEED_DIR
# Install plugins to ~/.claude/
claude plugin marketplace add official --source github --repo anthropics/plugins
claude plugin install database-assistant
```
**Result**: Everything in `~/.claude/plugin-marketplaces/` and `~/.claude/plugins/cache/`
---
### 2. Corporate Managed Deployment
```bash
# Corporate IT mounts shared plugin directory
export CLAUDE_CODE_PLUGIN_SEED_DIR=/nfs/corp-it/claude-plugins
# Pre-configured marketplaces in seed
ls $CLAUDE_CODE_PLUGIN_SEED_DIR/known_marketplaces.json
# → corporate-internal, approved-oss
# Users get instant access
claude plugin list --marketplace corporate-internal
# → security-scanner, compliance-agent, sql-auditor (all pre-cached)
```
**Result**:
- Seed plugins available immediately (no download)
- Users can't modify/remove seed marketplaces
- Personal plugins still go to `~/.claude/`
---
### 3. CoWork Team (Separate from Plugins)
```bash
# Team memory sync (separate feature)
export CLAUDE_COWORK_MEMORY_PATH_OVERRIDE=/shared/team-memory
# Plugins still work normally
export CLAUDE_CODE_PLUGIN_SEED_DIR=/shared/team-plugins # Optional
```
**Result**:
- Team shares conversation memory/learnings
- Plugins can be shared OR individual
- Two independent systems
---
## Policy Integration
Seed plugins integrate with policy settings:
```json
{
"policySettings": {
"strictKnownMarketplaces": [
{
"source": "directory",
"path": "/nfs/corp-it/claude-plugins/corporate-internal"
}
],
"enabledPlugins": {
"security-scanner@corporate-internal": true, // Force-enabled
"risky-plugin@community": false // Force-disabled
},
"pluginTrustMessage": "Only corporate-internal plugins are approved for production use."
}
}
```
**Effect**:
- Users can only use marketplaces from seed
- Certain plugins are mandatory
- Custom trust message shown
---
## Why Seed Exists: The Enterprise Use Case
### Problem
1. **Slow onboarding**: Each developer downloads plugins individually
2. **Version drift**: Developers on different plugin versions
3. **Security**: Can't control what plugins developers install
4. **Bandwidth**: 100 developers × 50MB plugins = 5GB network traffic
### Solution (Seed Directory)
1. **Fast onboarding**: Plugins pre-cached on NFS mount
2. **Version pinning**: Everyone uses admin-approved versions
3. **Security**: Policy locks allowed marketplaces
4. **Bandwidth**: One download to seed, everyone reads locally
---
## Actual Status: Where Is This Live?
### Evidence It's NOT Live Publicly
1. **Feature flag still off**: `tengu_orchid_trellis = false` by default
2. **No public marketplace**: No `anthropics/claude-plugins` repo exists
3. **No signing/sandboxing**: Security not implemented yet
4. **Seed directory optional**: Not mentioned in public docs
### Evidence It MIGHT Be Live Internally
1. **Seed directory infrastructure complete** — Fully implemented
2. **Policy controls production-ready** — Allowlists, blocklists, managed plugins
3. **CoWork + seed together** — Both added in 2.1.70 (team features)
4. **Deployment-focused** — Not consumer-oriented
### Most Likely Scenario
**Anthropic is using this internally for their own teams:**
- Internal marketplace: `@anthropic/internal-plugins`
- Seed directory: `/shared/anthropic-plugins`
- CoWork memory: `/shared/team-memory`
- Policy-locked: Only approved internal plugins
**Not yet ready for public use:**
- No plugin signing → can't trust community plugins
- No sandboxing → malicious plugins = full access
- No moderation → no review process
---
## Conclusion
The plugin marketplace is **not a CoWork feature** — it's an **enterprise managed deployment system** with:
1. ✅ **Seed directory support** for pre-installed shared plugins
2. ✅ **Policy controls** for locked-down corporate environments
3. ✅ **Multi-marketplace federation** for internal + external catalogs
4. ✅ **Complete dependency resolution** with cycle detection
5. ❌ **No public catalog** — infrastructure only
6. ❌ **No security hardening** — signing/sandboxing missing
**CoWork** is a separate feature for **team memory sync**, not plugin distribution.
Both features likely **exist for Anthropic's internal use** and will be publicly launched when security is ready.
---
**Key Env Vars**:
- `CLAUDE_CODE_PLUGIN_SEED_DIR` — Shared read-only plugin cache
- `CLAUDE_COWORK_MEMORY_PATH_OVERRIDE` — Shared team memory sync (separate)
**Status**: Infrastructure complete, security hardening in progress, no public launch yet.
---
## plugin-marketplaces.md
> Fetch the complete documentation index at: https://code.claude.com/docs/llms.txt
> Use this file to discover all available pages before exploring further.
# Create and distribute a plugin marketplace
> Build and host plugin marketplaces to distribute Claude Code extensions across teams and communities.
A plugin marketplace is a catalog that lets you distribute plugins to others. Marketplaces provide centralized discovery, version tracking, automatic updates, and support for multiple source types (git repositories, local paths, and more). This guide shows you how to create your own marketplace to share plugins with your team or community.
Looking to install plugins from an existing marketplace? See [Discover and install prebuilt plugins](../02-Claude-Code-CLI/discover-and-install-prebuilt-plugins-through-marketplaces-claude-code-docs.md).
## Overview
Creating and distributing a marketplace involves:
1. **Creating plugins**: build one or more plugins with commands, agents, hooks, MCP servers, or LSP servers. This guide assumes you already have plugins to distribute; see [Create plugins](create-plugins-claude-code-docs.md) for details on how to create them.
2. **Creating a marketplace file**: define a `marketplace.json` that lists your plugins and where to find them (see [Create the marketplace file](#create-the-marketplace-file)).
3. **Host the marketplace**: push to GitHub, GitLab, or another git host (see [Host and distribute marketplaces](#host-and-distribute-marketplaces)).
4. **Share with users**: users add your marketplace with `/plugin marketplace add` and install individual plugins (see [Discover and install plugins](../02-Claude-Code-CLI/discover-and-install-prebuilt-plugins-through-marketplaces-claude-code-docs.md)).
Once your marketplace is live, you can update it by pushing changes to your repository. Users refresh their local copy with `/plugin marketplace update`.
## Walkthrough: create a local marketplace
This example creates a marketplace with one plugin: a `/review` skill for code reviews. You'll create the directory structure, add a skill, create the plugin manifest and marketplace catalog, then install and test it.
<Steps>
<Step title="Create the directory structure">
```bash theme={null}
mkdir -p my-marketplace/.claude-plugin
mkdir -p my-marketplace/plugins/review-plugin/.claude-plugin
mkdir -p my-marketplace/plugins/review-plugin/skills/review
```
</Step>
<Step title="Create the skill">
Create a `SKILL.md` file that defines what the `/review` skill does.
```markdown my-marketplace/plugins/review-plugin/skills/review/SKILL.md theme={null}
---
description: Review code for bugs, security, and performance
disable-model-invocation: true
---
Review the code I've selected or the recent changes for:
- Potential bugs or edge cases
- Security concerns
- Performance issues
- Readability improvements
Be concise and actionable.
```
</Step>
<Step title="Create the plugin manifest">
Create a `plugin.json` file that describes the plugin. The manifest goes in the `.claude-plugin/` directory.
```json my-marketplace/plugins/review-plugin/.claude-plugin/plugin.json theme={null}
{
"name": "review-plugin",
"description": "Adds a /review skill for quick code reviews",
"version": "1.0.0"
}
```
</Step>
<Step title="Create the marketplace file">
Create the marketplace catalog that lists your plugin.
```json my-marketplace/.claude-plugin/marketplace.json theme={null}
{
"name": "my-plugins",
"owner": {
"name": "Your Name"
},
"plugins": [
{
"name": "review-plugin",
"source": "./plugins/review-plugin",
"description": "Adds a /review skill for quick code reviews"
}
]
}
```
</Step>
<Step title="Add and install">
Add the marketplace and install the plugin.
```shell theme={null}
/plugin marketplace add ./my-marketplace
/plugin install review-plugin@my-plugins
```
</Step>
<Step title="Try it out">
Select some code in your editor and run your new command.
```shell theme={null}
/review
```
</Step>
</Steps>
To learn more about what plugins can do, including hooks, agents, MCP servers, and LSP servers, see [Plugins](create-plugins-claude-code-docs.md).
<Note>
**How plugins are installed**: When users install a plugin, Claude Code copies the plugin directory to a cache location. This means plugins can't reference files outside their directory using paths like `../shared-utils`, because those files won't be copied.
If you need to share files across plugins, use symlinks (which are followed during copying) or restructure your marketplace so the shared directory is inside the plugin source path. See [Plugin caching and file resolution](/en/plugins-reference#plugin-caching-and-file-resolution) for details.
</Note>
## Create the marketplace file
Create `.claude-plugin/marketplace.json` in your repository root. This file defines your marketplace's name, owner information, and a list of plugins with their sources.
Each plugin entry needs at minimum a `name` and `source` (where to fetch it from). See the [full schema](#marketplace-schema) below for all available fields.
```json theme={null}
{
"name": "company-tools",
"owner": {
"name": "DevTools Team",
"email": "devtools@example.com"
},
"plugins": [
{
"name": "code-formatter",
"source": "./plugins/formatter",
"description": "Automatic code formatting on save",
"version": "2.1.0",
"author": {
"name": "DevTools Team"
}
},
{
"name": "deployment-tools",
"source": {
"source": "github",
"repo": "company/deploy-plugin"
},
"description": "Deployment automation tools"
}
]
}
```
## Marketplace schema
### Required fields
| Field | Type | Description | Example |
| :-------- | :----- | :--------------------------------------------------------------------------------------------------------------------------------------------------------------------- | :------------- |
| `name` | string | Marketplace identifier (kebab-case, no spaces). This is public-facing: users see it when installing plugins (for example, `/plugin install my-tool@your-marketplace`). | `"acme-tools"` |
| `owner` | object | Marketplace maintainer information ([see fields below](#owner-fields)) | |
| `plugins` | array | List of available plugins | See below |
<Note>
**Reserved names**: The following marketplace names are reserved for official Anthropic use and cannot be used by third-party marketplaces: `claude-code-marketplace`, `claude-code-plugins`, `claude-plugins-official`, `anthropic-marketplace`, `anthropic-plugins`, `agent-skills`, `life-sciences`. Names that impersonate official marketplaces (like `official-claude-plugins` or `anthropic-tools-v2`) are also blocked.
</Note>
### Owner fields
| Field | Type | Required | Description |
| :------ | :----- | :------- | :------------------------------- |
| `name` | string | Yes | Name of the maintainer or team |
| `email` | string | No | Contact email for the maintainer |
### Optional metadata
| Field | Type | Description |
| :--------------------- | :----- | :------------------------------------------------------------------------------------------------------------------------------------------------------------------------ |
| `metadata.description` | string | Brief marketplace description |
| `metadata.version` | string | Marketplace version |
| `metadata.pluginRoot` | string | Base directory prepended to relative plugin source paths (for example, `"./plugins"` lets you write `"source": "formatter"` instead of `"source": "./plugins/formatter"`) |
## Plugin entries
Each plugin entry in the `plugins` array describes a plugin and where to find it. You can include any field from the [plugin manifest schema](/en/plugins-reference#plugin-manifest-schema) (like `description`, `version`, `author`, `commands`, `hooks`, etc.), plus these marketplace-specific fields: `source`, `category`, `tags`, and `strict`.
### Required fields
| Field | Type | Description |
| :------- | :------------- | :----------------------------------------------------------------------------------------------------------------------------------------------------- |
| `name` | string | Plugin identifier (kebab-case, no spaces). This is public-facing: users see it when installing (for example, `/plugin install my-plugin@marketplace`). |
| `source` | string\|object | Where to fetch the plugin from (see [Plugin sources](#plugin-sources) below) |
### Optional plugin fields
**Standard metadata fields:**
| Field | Type | Description |
| :------------ | :------ | :------------------------------------------------------------------------------------------------------------------------------------------------------------------------------------------------------------------------------------------------------------------------------------------------------------------------------------------------------------------------------------------------------------------------------- |
| `description` | string | Brief plugin description |
| `version` | string | Plugin version |
| `author` | object | Plugin author information (`name` required, `email` optional) |
| `homepage` | string | Plugin homepage or documentation URL |
| `repository` | string | Source code repository URL |
| `license` | string | SPDX license identifier (for example, MIT, Apache-2.0) |
| `keywords` | array | Tags for plugin discovery and categorization |
| `category` | string | Plugin category for organization |
| `tags` | array | Tags for searchability |
| `strict` | boolean | Controls whether plugins need their own `plugin.json` file. When `true` (default), the plugin source must contain a `plugin.json`, and any fields you add here in the marketplace entry get merged with it. When `false`, the plugin doesn't need its own `plugin.json`; the marketplace entry itself defines everything about the plugin. Use `false` when you want to define simple plugins entirely in your marketplace file. |
**Component configuration fields:**
| Field | Type | Description |
| :----------- | :------------- | :----------------------------------------------- |
| `commands` | string\|array | Custom paths to command files or directories |
| `agents` | string\|array | Custom paths to agent files |
| `hooks` | string\|object | Custom hooks configuration or path to hooks file |
| `mcpServers` | string\|object | MCP server configurations or path to MCP config |
| `lspServers` | string\|object | LSP server configurations or path to LSP config |
## Plugin sources
### Relative paths
For plugins in the same repository:
```json theme={null}
{
"name": "my-plugin",
"source": "./plugins/my-plugin"
}
```
<Note>
Relative paths only work when users add your marketplace via Git (GitHub, GitLab, or git URL). If users add your marketplace via a direct URL to the `marketplace.json` file, relative paths will not resolve correctly. For URL-based distribution, use GitHub, npm, or git URL sources instead. See [Troubleshooting](#plugins-with-relative-paths-fail-in-url-based-marketplaces) for details.
</Note>
### GitHub repositories
```json theme={null}
{
"name": "github-plugin",
"source": {
"source": "github",
"repo": "owner/plugin-repo"
}
}
```
You can pin to a specific branch, tag, or commit:
```json theme={null}
{
"name": "github-plugin",
"source": {
"source": "github",
"repo": "owner/plugin-repo",
"ref": "v2.0.0",
"sha": "a1b2c3d4e5f6a7b8c9d0e1f2a3b4c5d6e7f8a9b0"
}
}
```
| Field | Type | Description |
| :----- | :----- | :-------------------------------------------------------------------- |
| `repo` | string | Required. GitHub repository in `owner/repo` format |
| `ref` | string | Optional. Git branch or tag (defaults to repository default branch) |
| `sha` | string | Optional. Full 40-character git commit SHA to pin to an exact version |
### Git repositories
```json theme={null}
{
"name": "git-plugin",
"source": {
"source": "url",
"url": "https://gitlab.com/team/plugin.git"
}
}
```
You can pin to a specific branch, tag, or commit:
```json theme={null}
{
"name": "git-plugin",
"source": {
"source": "url",
"url": "https://gitlab.com/team/plugin.git",
"ref": "main",
"sha": "a1b2c3d4e5f6a7b8c9d0e1f2a3b4c5d6e7f8a9b0"
}
}
```
| Field | Type | Description |
| :---- | :----- | :-------------------------------------------------------------------- |
| `url` | string | Required. Full git repository URL (must end with `.git`) |
| `ref` | string | Optional. Git branch or tag (defaults to repository default branch) |
| `sha` | string | Optional. Full 40-character git commit SHA to pin to an exact version |
### Advanced plugin entries
This example shows a plugin entry using many of the optional fields, including custom paths for commands, agents, hooks, and MCP servers:
```json theme={null}
{
"name": "enterprise-tools",
"source": {
"source": "github",
"repo": "company/enterprise-plugin"
},
"description": "Enterprise workflow automation tools",
"version": "2.1.0",
"author": {
"name": "Enterprise Team",
"email": "enterprise@example.com"
},
"homepage": "https://docs.example.com/plugins/enterprise-tools",
"repository": "https://github.com/company/enterprise-plugin",
"license": "MIT",
"keywords": ["enterprise", "workflow", "automation"],
"category": "productivity",
"commands": [
"./commands/core/",
"./commands/enterprise/",
"./commands/experimental/preview.md"
],
"agents": ["./agents/security-reviewer.md", "./agents/compliance-checker.md"],
"hooks": {
"PostToolUse": [
{
"matcher": "Write|Edit",
"hooks": [
{
"type": "command",
"command": "${CLAUDE_PLUGIN_ROOT}/scripts/validate.sh"
}
]
}
]
},
"mcpServers": {
"enterprise-db": {
"command": "${CLAUDE_PLUGIN_ROOT}/servers/db-server",
"args": ["--config", "${CLAUDE_PLUGIN_ROOT}/config.json"]
}
},
"strict": false
}
```
Key things to notice:
* **`commands` and `agents`**: You can specify multiple directories or individual files. Paths are relative to the plugin root.
* **`${CLAUDE_PLUGIN_ROOT}`**: Use this variable in hooks and MCP server configs to reference files within the plugin's installation directory. This is necessary because plugins are copied to a cache location when installed.
* **`strict: false`**: Since this is set to false, the plugin doesn't need its own `plugin.json`. The marketplace entry defines everything.
## Host and distribute marketplaces
### Host on GitHub (recommended)
GitHub provides the easiest distribution method:
1. **Create a repository**: Set up a new repository for your marketplace
2. **Add marketplace file**: Create `.claude-plugin/marketplace.json` with your plugin definitions
3. **Share with teams**: Users add your marketplace with `/plugin marketplace add owner/repo`
**Benefits**: Built-in version control, issue tracking, and team collaboration features.
### Host on other git services
Any git hosting service works, such as GitLab, Bitbucket, and self-hosted servers. Users add with the full repository URL:
```shell theme={null}
/plugin marketplace add https://gitlab.com/company/plugins.git
```
### Private repositories
Claude Code supports installing plugins from private repositories. For manual installation and updates, Claude Code uses your existing git credential helpers. If `git clone` works for a private repository in your terminal, it works in Claude Code too. Common credential helpers include `gh auth login` for GitHub, macOS Keychain, and `git-credential-store`.
Background auto-updates run at startup without credential helpers, since interactive prompts would block Claude Code from starting. To enable auto-updates for private marketplaces, set the appropriate authentication token in your environment:
| Provider | Environment variables | Notes |
| :-------- | :--------------------------- | :---------------------------------------- |
| GitHub | `GITHUB_TOKEN` or `GH_TOKEN` | Personal access token or GitHub App token |
| GitLab | `GITLAB_TOKEN` or `GL_TOKEN` | Personal access token or project token |
| Bitbucket | `BITBUCKET_TOKEN` | App password or repository access token |
Set the token in your shell configuration (for example, `.bashrc`, `.zshrc`) or pass it when running Claude Code:
```bash theme={null}
export GITHUB_TOKEN=ghp_xxxxxxxxxxxxxxxxxxxx
```
<Note>
For CI/CD environments, configure the token as a secret environment variable. GitHub Actions automatically provides `GITHUB_TOKEN` for repositories in the same organization.
</Note>
### Test locally before distribution
Test your marketplace locally before sharing:
```shell theme={null}
/plugin marketplace add ./my-local-marketplace
/plugin install test-plugin@my-local-marketplace
```
For the full range of add commands (GitHub, Git URLs, local paths, remote URLs), see [Add marketplaces](/en/discover-plugins#add-marketplaces).
### Require marketplaces for your team
You can configure your repository so team members are automatically prompted to install your marketplace when they trust the project folder. Add your marketplace to `.claude/settings.json`:
```json theme={null}
{
"extraKnownMarketplaces": {
"company-tools": {
"source": {
"source": "github",
"repo": "your-org/claude-plugins"
}
}
}
}
```
You can also specify which plugins should be enabled by default:
```json theme={null}
{
"enabledPlugins": {
"code-formatter@company-tools": true,
"deployment-tools@company-tools": true
}
}
```
For full configuration options, see [Plugin settings](/en/settings#plugin-settings).
### Managed marketplace restrictions
For organizations requiring strict control over plugin sources, administrators can restrict which plugin marketplaces users are allowed to add using the [`strictKnownMarketplaces`](/en/settings#strictknownmarketplaces) setting in managed settings.
When `strictKnownMarketplaces` is configured in managed settings, the restriction behavior depends on the value:
| Value | Behavior |
| ------------------- | ---------------------------------------------------------------- |
| Undefined (default) | No restrictions. Users can add any marketplace |
| Empty array `[]` | Complete lockdown. Users cannot add any new marketplaces |
| List of sources | Users can only add marketplaces that match the allowlist exactly |
#### Common configurations
Disable all marketplace additions:
```json theme={null}
{
"strictKnownMarketplaces": []
}
```
Allow specific marketplaces only:
```json theme={null}
{
"strictKnownMarketplaces": [
{
"source": "github",
"repo": "acme-corp/approved-plugins"
},
{
"source": "github",
"repo": "acme-corp/security-tools",
"ref": "v2.0"
},
{
"source": "url",
"url": "https://plugins.example.com/marketplace.json"
}
]
}
```
Allow all marketplaces from an internal git server using regex pattern matching:
```json theme={null}
{
"strictKnownMarketplaces": [
{
"source": "hostPattern",
"hostPattern": "^github\\.example\\.com$"
}
]
}
```
#### How restrictions work
Restrictions are validated early in the plugin installation process, before any network requests or filesystem operations occur. This prevents unauthorized marketplace access attempts.
The allowlist uses exact matching for most source types. For a marketplace to be allowed, all specified fields must match exactly:
* For GitHub sources: `repo` is required, and `ref` or `path` must also match if specified in the allowlist
* For URL sources: the full URL must match exactly
* For `hostPattern` sources: the marketplace host is matched against the regex pattern
Because `strictKnownMarketplaces` is set in [managed settings](/en/settings#settings-files), individual users and project configurations cannot override these restrictions.
For complete configuration details including all supported source types and comparison with `extraKnownMarketplaces`, see the [strictKnownMarketplaces reference](/en/settings#strictknownmarketplaces).
## Validation and testing
Test your marketplace before sharing.
Validate your marketplace JSON syntax:
```bash theme={null}
claude plugin validate .
```
Or from within Claude Code:
```shell theme={null}
/plugin validate .
```
Add the marketplace for testing:
```shell theme={null}
/plugin marketplace add ./path/to/marketplace
```
Install a test plugin to verify everything works:
```shell theme={null}
/plugin install test-plugin@marketplace-name
```
For complete plugin testing workflows, see [Test your plugins locally](/en/plugins#test-your-plugins-locally). For technical troubleshooting, see [Plugins reference](plugins-reference-claude-code-docs.md).
## Troubleshooting
### Marketplace not loading
**Symptoms**: Can't add marketplace or see plugins from it
**Solutions**:
* Verify the marketplace URL is accessible
* Check that `.claude-plugin/marketplace.json` exists at the specified path
* Ensure JSON syntax is valid using `claude plugin validate` or `/plugin validate`
* For private repositories, confirm you have access permissions
### Marketplace validation errors
Run `claude plugin validate .` or `/plugin validate .` from your marketplace directory to check for issues. Common errors:
| Error | Cause | Solution |
| :------------------------------------------------ | :------------------------------ | :------------------------------------------------------------ |
| `File not found: .claude-plugin/marketplace.json` | Missing manifest | Create `.claude-plugin/marketplace.json` with required fields |
| `Invalid JSON syntax: Unexpected token...` | JSON syntax error | Check for missing commas, extra commas, or unquoted strings |
| `Duplicate plugin name "x" found in marketplace` | Two plugins share the same name | Give each plugin a unique `name` value |
| `plugins[0].source: Path traversal not allowed` | Source path contains `..` | Use paths relative to marketplace root without `..` |
**Warnings** (non-blocking):
* `Marketplace has no plugins defined`: add at least one plugin to the `plugins` array
* `No marketplace description provided`: add `metadata.description` to help users understand your marketplace
* `Plugin "x" uses npm source which is not yet fully implemented`: use `github` or local path sources instead
### Plugin installation failures
**Symptoms**: Marketplace appears but plugin installation fails
**Solutions**:
* Verify plugin source URLs are accessible
* Check that plugin directories contain required files
* For GitHub sources, ensure repositories are public or you have access
* Test plugin sources manually by cloning/downloading
### Private repository authentication fails
**Symptoms**: Authentication errors when installing plugins from private repositories
**Solutions**:
For manual installation and updates:
* Verify you're authenticated with your git provider (for example, run `gh auth status` for GitHub)
* Check that your credential helper is configured correctly: `git config --global credential.helper`
* Try cloning the repository manually to verify your credentials work
For background auto-updates:
* Set the appropriate token in your environment: `echo $GITHUB_TOKEN`
* Check that the token has the required permissions (read access to the repository)
* For GitHub, ensure the token has the `repo` scope for private repositories
* For GitLab, ensure the token has at least `read_repository` scope
* Verify the token hasn't expired
### Plugins with relative paths fail in URL-based marketplaces
**Symptoms**: Added a marketplace via URL (such as `https://example.com/marketplace.json`), but plugins with relative path sources like `"./plugins/my-plugin"` fail to install with "path not found" errors.
**Cause**: URL-based marketplaces only download the `marketplace.json` file itself. They do not download plugin files from the server. Relative paths in the marketplace entry reference files on the remote server that were not downloaded.
**Solutions**:
* **Use external sources**: Change plugin entries to use GitHub, npm, or git URL sources instead of relative paths:
```json theme={null}
{ "name": "my-plugin", "source": { "source": "github", "repo": "owner/repo" } }
```
* **Use a Git-based marketplace**: Host your marketplace in a Git repository and add it with the git URL. Git-based marketplaces clone the entire repository, making relative paths work correctly.
### Files not found after installation
**Symptoms**: Plugin installs but references to files fail, especially files outside the plugin directory
**Cause**: Plugins are copied to a cache directory rather than used in-place. Paths that reference files outside the plugin's directory (such as `../shared-utils`) won't work because those files aren't copied.
**Solutions**: See [Plugin caching and file resolution](/en/plugins-reference#plugin-caching-and-file-resolution) for workarounds including symlinks and directory restructuring.
For additional debugging tools and common issues, see [Debugging and development tools](/en/plugins-reference#debugging-and-development-tools).
## See also
* [Discover and install prebuilt plugins](../02-Claude-Code-CLI/discover-and-install-prebuilt-plugins-through-marketplaces-claude-code-docs.md) - Installing plugins from existing marketplaces
* [Plugins](create-plugins-claude-code-docs.md) - Creating your own plugins
* [Plugins reference](plugins-reference-claude-code-docs.md) - Complete technical specifications and schemas
* [Plugin settings](/en/settings#plugin-settings) - Plugin configuration options
* [strictKnownMarketplaces reference](/en/settings#strictknownmarketplaces) - Managed marketplace restrictions
---
## plugin-structure-skill.md
# Plugin Structure Skill
Comprehensive guidance on Claude Code plugin architecture, directory layout, and best practices.
## Overview
This skill provides detailed knowledge about:
- Plugin directory structure and organization
- `plugin.json` manifest configuration
- Component organization (commands, agents, skills, hooks)
- Auto-discovery mechanisms
- Portable path references with `${CLAUDE_PLUGIN_ROOT}`
- File naming conventions
## Skill Structure
### SKILL.md (1,619 words)
Core skill content covering:
- Directory structure overview
- Plugin manifest (plugin.json) fields
- Component organization patterns
- ${CLAUDE_PLUGIN_ROOT} usage
- File naming conventions
- Auto-discovery mechanism
- Best practices
- Common patterns
- Troubleshooting
### References
Detailed documentation for deep dives:
- **manifest-reference.md**: Complete `plugin.json` field reference
- All field descriptions and examples
- Path resolution rules
- Validation guidelines
- Minimal vs. complete manifest examples
- **component-patterns.md**: Advanced organization patterns
- Component lifecycle (discovery, activation)
- Command organization patterns
- Agent organization patterns
- Skill organization patterns
- Hook organization patterns
- Script organization patterns
- Cross-component patterns
- Best practices for scalability
### Examples
Three complete plugin examples:
- **minimal-plugin.md**: Simplest possible plugin
- Single command
- Minimal manifest
- When to use this pattern
- **standard-plugin.md**: Well-structured production plugin
- Multiple components (commands, agents, skills, hooks)
- Complete manifest with metadata
- Rich skill structure
- Integration between components
- **advanced-plugin.md**: Enterprise-grade plugin
- Multi-level organization
- MCP server integration
- Shared libraries
- Configuration management
- Security automation
- Monitoring integration
## When This Skill Triggers
Claude Code activates this skill when users:
- Ask to "create a plugin" or "scaffold a plugin"
- Need to "understand plugin structure"
- Want to "organize plugin components"
- Need to "set up plugin.json"
- Ask about "${CLAUDE_PLUGIN_ROOT}" usage
- Want to "add commands/agents/skills/hooks"
- Need "configure auto-discovery" help
- Ask about plugin architecture or best practices
## Progressive Disclosure
The skill uses progressive disclosure to manage context:
1. **SKILL.md** (~1600 words): Core concepts and workflows
2. **References** (~6000 words): Detailed field references and patterns
3. **Examples** (~8000 words): Complete working examples
Claude loads references and examples only as needed based on the task.
## Related Skills
This skill works well with:
- **hook-development**: For creating plugin hooks
- **mcp-integration**: For integrating MCP servers (when available)
- **marketplace-publishing**: For publishing plugins (when available)
## Maintenance
To update this skill:
1. Keep SKILL.md lean and focused on core concepts
2. Move detailed information to references/
3. Add new examples/ for common patterns
4. Update version in SKILL.md frontmatter
5. Ensure all documentation uses imperative/infinitive form
---
## plugin-teammate-integration.md
# Plugin System + Teammate Architecture Integration
**Version**: 2.1.76
**Date**: 2026-03-14
**Purpose**: How to wire the teammate system into a Burn development team plugin
---
## Table of Contents
1. [Plugin System Architecture](#plugin-system-architecture)
2. [Agent Loading Pipeline](#agent-loading-pipeline)
3. [Plugin Manifest Schema](#plugin-manifest-schema)
4. [Agent Markdown Format](#agent-markdown-format)
5. [Skill Definition Format](#skill-definition-format)
6. [Integration Strategy](#integration-strategy)
7. [Burn Development Team Design](#burn-development-team-design)
8. [Implementation Guide](#implementation-guide)
9. [File Structure Example](#file-structure-example)
---
## Plugin System Architecture
### Plugin Discovery
Plugins are loaded from:
1. **User plugins**: `~/.claude/plugins/`
2. **Project plugins**: `./.claude/plugins/`
3. **Marketplace plugins**: Downloaded and cached
### Plugin Loading Flow
```javascript
async function KK() {
// 1. Discover plugins from all sources
let plugins = await discoverPlugins();
// 2. Read plugin.json manifests
for (let plugin of plugins) {
let manifest = await readPluginManifest(plugin.path);
plugin.manifest = manifest;
}
// 3. Load components
let { enabled, disabled, errors } = await loadPluginComponents(plugins);
return { enabled, disabled, errors };
}
```
### Component Loading
**Agents**:
```javascript
pgH = HA(async () => {
let { enabled } = await KK();
let agents = [];
for (let plugin of enabled) {
// Default path: plugin-root/agents/
if (plugin.agentsPath) {
let agentsFromDefault = await J1f(
plugin.agentsPath,
plugin.name,
plugin.source,
plugin.path,
plugin.manifest
);
agents.push(...agentsFromDefault);
}
// Additional paths from manifest
if (plugin.agentsPaths) {
for (let path of plugin.agentsPaths) {
let agentsFromPath = await loadAgentsFromPath(path, plugin);
agents.push(...agentsFromPath);
}
}
}
return agents;
});
```
**Skills**:
```javascript
tkA = HA(async () => {
let { enabled } = await KK();
let skills = [];
for (let plugin of enabled) {
// Default path: plugin-root/skills/
if (plugin.skillsPath) {
let skillsFromDefault = await C9f(
plugin.skillsPath,
plugin.name,
plugin.source,
plugin.manifest,
plugin.path
);
skills.push(...skillsFromDefault);
}
// Additional paths from manifest
if (plugin.skillsPaths) {
for (let path of plugin.skillsPaths) {
let skillsFromPath = await loadSkillsFromPath(path, plugin);
skills.push(...skillsFromPath);
}
}
}
return skills;
});
```
**Commands** (slash commands):
```javascript
// Similar pattern for commands/
// Default: plugin-root/commands/
// Additional: manifest.commandsPaths
```
**Hooks**:
```javascript
NB = HA(async () => {
let { enabled } = await KK();
let allHooks = {
PreToolUse: [],
PostToolUse: [],
TeammateIdle: [],
TaskCompleted: [],
// ... all hook events
};
for (let plugin of enabled) {
if (!plugin.hooksConfig) continue;
let pluginHooks = yo1(plugin);
for (let event of Object.keys(pluginHooks)) {
allHooks[event].push(...pluginHooks[event]);
}
}
return allHooks;
});
```
---
## Agent Loading Pipeline
### 1. Directory Scan
```javascript
async function J1f(agentsDir, pluginName, source, pluginPath, manifest, seenFiles) {
let agents = [];
// Recursively scan directory for .md files
async function scanDir(dir, pathComponents = []) {
let files = await readdir(dir);
for (let file of files) {
if (file.isDirectory()) {
await scanDir(path.join(dir, file.name), [...pathComponents, file.name]);
} else if (file.isFile() && file.name.endsWith('.md')) {
let filePath = path.join(dir, file.name);
let agent = await G1f(filePath, pluginName, pathComponents, source, pluginPath, manifest, seenFiles);
if (agent) agents.push(agent);
}
}
}
await scanDir(agentsDir);
return agents;
}
```
### 2. Markdown Parsing
```javascript
async function G1f(filePath, pluginName, pathComponents, source, pluginPath, manifest, seenFiles) {
// Avoid duplicate loading
if (isAlreadySeen(seenFiles, filePath)) return null;
// Read file
let content = await readFile(filePath, 'utf-8');
// Parse frontmatter + content
let { frontmatter, content: promptContent } = Pw(content, filePath);
// Build agent type name
let agentType = [pluginName, ...pathComponents, frontmatter.name || basename(filePath, '.md')].join(':');
// Parse and validate
return v1f(filePath, pluginPath, frontmatter, promptContent, source);
}
```
### 3. Agent Definition Construction
```javascript
function v1f(filePath, baseDir, frontmatter, content, source) {
let { name, description, color, model, tools, skills, memory, background, isolation } = frontmatter;
// Validate required fields
if (!name || !description) return null;
// Parse tools
let parsedTools = Q6H(tools); // Handles "*", array, or undefined
// Memory auto-injection
if (memory && parsedTools) {
let toolSet = new Set(parsedTools);
for (let requiredTool of [Read, Write, Bash]) {
if (!toolSet.has(requiredTool)) {
parsedTools = [...parsedTools, requiredTool];
}
}
}
return {
baseDir,
agentType: name,
whenToUse: description,
tools: parsedTools,
skills: YC(skills), // Parse skill references
getSystemPrompt: () => {
if (memory) {
return content + '\n\n' + I6H(name, memory);
}
return content;
},
source, // "plugin"
filename: basename(filePath, '.md'),
color,
model,
background,
memory,
isolation,
};
}
```
---
## Plugin Manifest Schema
### Complete plugin.json Structure
```typescript
{
// Basic metadata
"name": "burn-dev-team",
"version": "1.0.0",
"description": "Burn ML framework development team",
"author": "Your Name",
"repository": "https://github.com/user/burn-dev-team-plugin",
// Components (can use default paths or override)
"agents": "agents/", // OR specify paths
"agents": ["agents/", "custom-agents/"], // Multiple paths
"skills": "skills/",
"skills": ["skills/", "custom-skills/"],
"commands": "commands/",
"commands": ["commands/", "slash-commands/"],
"commands": { // OR inline definitions
"burn-help": {
"content": "...",
"description": "Burn framework help"
}
},
"hooks": "hooks/hooks.json",
"hooks": { // OR inline definitions
"TeammateIdle": [{
"matcher": "",
"hooks": [{
"type": "command",
"command": "echo 'Teammate ${AGENT_NAME} is idle'"
}]
}]
},
// MCP servers
"mcpServers": ".mcp.json", // Path to MCP config
"mcpServers": { // OR inline definitions
"burn-mcp": {
"type": "stdio",
"command": "burn-mcp-server"
}
},
// User configuration
"userConfig": {
"API_KEY": {
"type": "string",
"title": "API Key",
"description": "Your API key",
"sensitive": true,
"required": true
},
"MODEL_PREFERENCE": {
"type": "string",
"title": "Preferred Model",
"default": "sonnet",
"required": false
}
}
}
```
### Zod Schema (from source)
```javascript
// Plugin manifest schema
PluginManifestSchema = C.object({
// Required
name: C.string().min(1),
version: C.string().min(1),
// Optional metadata
description: C.string().optional(),
author: C.string().optional(),
repository: C.string().optional(),
// Component paths
agents: C.union([
C.string(), // Single path
C.array(C.string()) // Multiple paths
]).optional(),
skills: C.union([
C.string(),
C.array(C.string())
]).optional(),
commands: C.union([
C.string(),
C.array(C.string()),
C.record(C.string(), CommandMetadata) // Inline commands
]).optional(),
hooks: C.union([
C.string(), // Path to hooks.json
C.lazy(() => HooksConfig) // Inline hook definitions
]).optional(),
mcpServers: C.union([
C.string(), // Path to .mcp.json
C.record(C.string(), McpServerConfig) // Inline MCP config
]).optional(),
userConfig: C.record(C.string(), UserConfigField).optional(),
});
```
---
## Agent Markdown Format
### File Structure
```markdown
---
name: burn-architect
description: Burn framework architecture specialist - tensors, modules, autodiff
tools: ["*"]
skills: ["burn-router"]
model: sonnet
color: blue
memory: project
background: false
isolation: worktree
permissionMode: acceptEdits
effort: high
maxTurns: 50
mcpServers:
- burn-docs-server
hooks:
PostToolUse:
- matcher: "Write"
hooks:
- type: command
command: "rg 'TODO|FIXME' ${FILE_PATH}"
---
# Burn Architecture Specialist
You are an expert in the Burn deep learning framework. You specialize in:
- **Tensor operations**: Creating, manipulating, and optimizing tensor computations
- **Module system**: Designing neural network architectures using Burn's module trait
- **Autodiff**: Understanding and implementing automatic differentiation
- **Config system**: Using Burn's config pattern for reproducible experiments
- **Records**: Saving and loading model weights
## Your Role in the Team
When working as part of the Burn development team:
1. **Check TaskList** periodically for architecture-related tasks
2. **Claim tasks** that involve tensor operations, module design, or autodiff
3. **Coordinate** with burn-trainer for training integration
4. **Review** code for idiomatic Burn patterns
5. **Communicate** via SendMessage when you need input from teammates
## Architecture Patterns
[... detailed patterns, best practices, code examples ...]
```
### Frontmatter Fields
```typescript
interface AgentFrontmatter {
// Required
name: string; // Agent identifier (becomes agentType)
description: string; // whenToUse description
// Tools
tools?: string[] | "*"; // Tool allowlist ("*" = all tools)
disallowedTools?: string[]; // Tool denylist
// Skills
skills?: string[]; // Skills to preload (e.g., ["burn-router"])
// Configuration
model?: string; // "sonnet" | "opus" | "haiku" | "inherit"
color?: string; // UI color
permissionMode?: string; // "default" | "acceptEdits" | "plan" | etc.
effort?: string | number; // "low" | "medium" | "high" | integer
maxTurns?: number; // Max conversation turns
// Advanced
memory?: "user" | "project" | "local"; // Auto-inject memory tools
background?: boolean; // Run in background
isolation?: "worktree"; // Run in isolated worktree
// MCP servers
mcpServers?: string[] | Array<string | Record<string, McpServerConfig>>;
// Hooks
hooks?: HooksConfig;
}
```
---
## Skill Definition Format
### Skill Directory Structure
```
skills/
└── burn-router/
└── SKILL.md
```
### SKILL.md Format
```markdown
---
trigger: burn-router
description: Route Burn framework queries to specialized agents
tools: ["Agent", "TeamCreate", "SendMessage", "TaskCreate"]
model: haiku
effort: low
context: fork
---
# Burn Router Skill
This skill routes incoming Burn framework queries to the appropriate specialist:
- **Tensor operations, modules, autodiff** → burn-architect
- **Training loops, learners, metrics** → burn-trainer
- **Backend selection, deployment, WASM** → burn-deployer
- **ONNX import, model conversion** → burn-importer
## Workflow
1. Analyze the user's request
2. Determine which specialist(s) are needed
3. Create a team if multiple specialists required
4. Spawn appropriate teammates
5. Create tasks for the work
6. Coordinate execution
[... skill implementation ...]
```
### Skill Frontmatter Fields
```typescript
interface SkillFrontmatter {
// Required
trigger: string; // Slash command name (/burn-router)
description: string; // Shown in skill list
// Optional
tools?: string[] | "*"; // Tool allowlist
model?: string; // Preferred model
effort?: string | number; // Effort level
context?: "main" | "fork"; // Execution context
argumentHint?: string; // Args hint for UI
allowedTools?: string[]; // Synonym for tools
}
```
---
## Integration Strategy
### Key Integration Points
1. **Plugin-defined agents** become available in the Agent tool's `subagent_type` dropdown
2. **Agent tool with `team_name` + `name`** spawns plugin agents as teammates
3. **Shared task list** coordinates work between teammates
4. **Message passing** enables inter-agent communication
5. **Hooks** monitor teammate lifecycle events
### Critical Workflow
```
User → /burn-router
↓
Skill analyzes request
↓
TeamCreate({ team_name: "burn-dev", description: "..." })
↓
TaskCreate tasks for work breakdown
↓
Agent({ name: "architect", team_name: "burn-dev", subagent_type: "burn:burn-architect", ... })
Agent({ name: "trainer", team_name: "burn-dev", subagent_type: "burn:burn-trainer", ... })
Agent({ name: "deployer", team_name: "burn-dev", subagent_type: "burn:burn-deployer", ... })
↓
Teammates auto-claim tasks, execute work, send idle notifications
↓
Team lead coordinates, assigns additional tasks
↓
SendMessage({ to: "*", message: { type: "shutdown_request" } }) when done
↓
TeamDelete()
```
### Agent Type Resolution
```javascript
// Plugin agents get namespaced names
// Format: "{pluginName}:{agentName}"
// Example: "burn:burn-architect"
// When spawning via Agent tool:
Agent({
name: "architect", // Teammate name (for SendMessage)
team_name: "burn-dev", // Team context
subagent_type: "burn:burn-architect", // Plugin-defined agent
prompt: "Check TaskList for architecture tasks",
description: "Architecture specialist"
});
// The system resolves:
// 1. subagent_type → finds agent definition from plugin
// 2. Loads agent's systemPrompt, tools, permissions
// 3. Spawns teammate with those capabilities
```
---
## Burn Development Team Design
### Team Structure
Based on the proposed structure, here's how to map to teammates:
#### Core Team Members (4 teammates)
1. **burn-architect** (was burn-app-dev)
- **Domain**: Tensors, modules, config, autodiff, records
- **Tools**: `["*"]` (full access)
- **Skills**: `["burn-router"]` (routing skill)
- **Responsibilities**: Core Burn application development, architecture decisions
2. **burn-trainer** (was burn-training)
- **Domain**: Training loops, Learner API, metrics, datasets
- **Tools**: `["*"]`
- **Skills**: `["burn-router"]`
- **Responsibilities**: Training workflows, loss functions, optimization
3. **burn-deployer** (was burn-backends)
- **Domain**: Backend selection, WASM, no_std, fusion, quantization
- **Tools**: `["*"]`
- **Skills**: `["burn-router"]`
- **Responsibilities**: Production deployment, performance optimization
4. **burn-importer** (was burn-onnx + burn-onnx-surgeon)
- **Domain**: ONNX import, model conversion, troubleshooting
- **Tools**: `["*"]`
- **Skills**: `["burn-router"]`
- **Responsibilities**: External model integration, format conversion
#### Ecosystem Specialists (4 teammates)
5. **burn-lm**
- **Domain**: Llama inference/training, InferenceServer
- **Tools**: `["*"]`
- **MCP Servers**: `["burn-lm-docs"]`
6. **burn-central**
- **Domain**: Experiment tracking, model sharing
- **Tools**: `["*"]`
7. **burn-models**
- **Domain**: Pre-trained model zoo (8 official + community)
- **Tools**: `["Read", "WebFetch", "Bash"]`
8. **burn-bench**
- **Domain**: Benchmarking infrastructure
- **Tools**: `["*"]`
#### Coordinator Skills
9. **burn-cubecl** (skill, not teammate)
- **Type**: Skill (not a teammate - invoked when needed)
- **Trigger**: `/burn-cubecl`
- **Context**: Fork
- **Domain**: GPU kernels, CubeCL, #[cube] macro
10. **burn-contrib** (skill, not teammate)
- **Trigger**: `/burn-contrib`
- **Domain**: Contributing to Burn codebase
11. **burn-router** (skill, not teammate)
- **Trigger**: `/burn-router`
- **Domain**: Intent classification → routing to specialists
### Teammate Capabilities Matrix
| Agent | Debug | Review | Full-Stack | Background |
|-------|-------|--------|------------|------------|
| burn-architect | ✓ | ✓ | ✓ | ✗ |
| burn-trainer | ✓ | ✓ | ✓ | ✗ |
| burn-deployer | ✓ | ✓ | ✓ | ✗ |
| burn-importer | ✓ | ✓ | ✓ | ✗ |
| burn-lm | ✓ | ✓ | ✓ | ✓ |
| burn-central | ✓ | ✓ | ✓ | ✓ |
| burn-models | ✓ | ✗ | ✗ | ✓ |
| burn-bench | ✓ | ✓ | ✓ | ✓ |
**Key**:
- **Debug**: Can diagnose and fix errors in their domain
- **Review**: Can review code for idiomatic patterns
- **Full-Stack**: Can develop + debug + review (no separate reviewer needed)
- **Background**: Suitable for background execution
---
## Implementation Guide
### Step 1: Plugin Structure
```
burn-dev-team/
├── plugin.json
├── agents/
│ ├── burn-architect.md
│ ├── burn-trainer.md
│ ├── burn-deployer.md
│ ├── burn-importer.md
│ ├── burn-lm.md
│ ├── burn-central.md
│ ├── burn-models.md
│ └── burn-bench.md
├── skills/
│ ├── burn-router/
│ │ └── SKILL.md
│ ├── burn-cubecl/
│ │ └── SKILL.md
│ └── burn-contrib/
│ └── SKILL.md
├── hooks/
│ └── hooks.json
└── .mcp.json
```
### Step 2: plugin.json
```json
{
"name": "burn-dev-team",
"version": "1.0.0",
"description": "Burn ML framework development team",
"author": "Your Name",
"repository": "https://github.com/user/burn-dev-team-plugin",
"agents": "agents/",
"skills": "skills/",
"hooks": "hooks/hooks.json",
"mcpServers": ".mcp.json"
}
```
### Step 3: Agent Definitions
**agents/burn-architect.md**:
```markdown
---
name: burn-architect
description: Burn architecture specialist - tensors, modules, config, autodiff, records. Full-stack developer who can design, debug, and review within the architecture domain.
tools: ["*"]
skills: ["burn-router"]
model: sonnet
color: blue
memory: project
permissionMode: acceptEdits
effort: high
---
# Burn Architecture Specialist
You are an expert Burn framework architect on a development team.
## Your Expertise
- Tensor operations and shape management
- Module system and neural network architectures
- Automatic differentiation
- Config pattern for reproducibility
- Record system for model persistence
## Team Workflow
As a teammate in the Burn development team:
1. **Check TaskList** after completing each task
2. **Claim unassigned, unblocked tasks** related to architecture
3. **Prioritize tasks by ID** (lowest first)
4. **Communicate via SendMessage** - your text output is NOT visible to the team
5. **Mark tasks completed** with TaskUpdate when done
6. **Debug and review** your own work - you're a full-stack specialist
## Architecture Patterns
### Tensor Shape Management
```rust
use burn::tensor::Tensor;
// Always document expected shapes
fn linear_forward<B: Backend>(
input: Tensor<B, 2>, // [batch_size, input_dim]
weight: Tensor<B, 2>, // [output_dim, input_dim]
) -> Tensor<B, 2> { // [batch_size, output_dim]
input.matmul(weight.transpose())
}
```
[... continue with detailed patterns, examples, debugging tips ...]
```
### Step 4: Routing Skill
**skills/burn-router/SKILL.md**:
```markdown
---
trigger: burn-router
description: Route Burn framework queries to specialized development team
tools: ["Agent", "TeamCreate", "SendMessage", "TaskCreate", "TaskUpdate", "TaskList"]
model: haiku
effort: low
context: fork
---
# Burn Development Team Router
Route incoming Burn framework requests to the appropriate specialist teammates.
## Specialist Mapping
- **Tensors, modules, autodiff, records** → burn-architect
- **Training, learner, metrics, datasets** → burn-trainer
- **Backends, WASM, deployment, optimization** → burn-deployer
- **ONNX import, model conversion** → burn-importer
- **Language models, InferenceServer** → burn-lm
- **Experiment tracking** → burn-central
- **Pre-trained models** → burn-models
- **Benchmarking** → burn-bench
## Workflow
1. Analyze the user's request
2. Determine complexity (single specialist vs. team needed)
3. For teams:
- Create team with `TeamCreate`
- Break work into tasks with `TaskCreate`
- Spawn specialists with `Agent` tool
- Monitor progress
- Coordinate via `SendMessage`
- Shut down gracefully when complete
4. For single specialists:
- Spawn one agent with appropriate prompt
- Let them work independently
## Examples
### Complex Multi-Agent Task
User: "Implement a Llama model with training loop and ONNX export"
```
1. TeamCreate({ team_name: "llama-impl", description: "Llama model implementation" })
2. TaskCreate([
{ subject: "Design Llama architecture", owner: null },
{ subject: "Implement training loop", blockedBy: ["1"] },
{ subject: "Add ONNX export", blockedBy: ["2"] }
])
3. Agent({ name: "architect", team_name: "llama-impl", subagent_type: "burn:burn-architect", ... })
Agent({ name: "trainer", team_name: "llama-impl", subagent_type: "burn:burn-trainer", ... })
Agent({ name: "importer", team_name: "llama-impl", subagent_type: "burn:burn-importer", ... })
4. Monitor and coordinate
5. SendMessage({ to: "*", message: { type: "shutdown_request" } }) when done
6. TeamDelete()
```
[... detailed routing logic ...]
```
### Step 5: Hooks Configuration
**hooks/hooks.json**:
```json
{
"TeammateIdle": [
{
"matcher": "",
"hooks": [
{
"type": "command",
"command": "echo '[Burn Team] ${AGENT_NAME} is idle (${IDLE_REASON})' >> ~/.claude/burn-team.log"
}
]
}
],
"TaskCompleted": [
{
"matcher": "",
"hooks": [
{
"type": "command",
"command": "echo '[Burn Team] Task ${TASK_ID} completed by ${OWNER}' >> ~/.claude/burn-team.log"
}
]
}
],
"SessionStart": [
{
"matcher": "",
"hooks": [
{
"type": "command",
"command": "echo '=== Burn Development Team Session Started ===' >> ~/.claude/burn-team.log"
}
]
}
]
}
```
### Step 6: MCP Servers (Optional)
**.mcp.json**:
```json
{
"mcpServers": {
"burn-docs": {
"type": "stdio",
"command": "uvx",
"args": ["burn-docs-mcp"],
"env": {
"BURN_DOCS_PATH": "/path/to/burn/docs"
}
}
}
}
```
### Step 7: Installation
```bash
# Option 1: User-level plugin
mkdir -p ~/.claude/plugins/
cd ~/.claude/plugins/
git clone https://github.com/user/burn-dev-team-plugin burn-dev-team
# Option 2: Project-level plugin
mkdir -p .claude/plugins/
cd .claude/plugins/
git clone https://github.com/user/burn-dev-team-plugin burn-dev-team
# Enable plugin in settings.json
# Add to enabledPlugins:
{
"enabledPlugins": {
"burn-dev-team": {
"enabled": true
}
}
}
```
### Step 8: Usage
```bash
# Set the required environment variable
export CLAUDE_CODE_EXPERIMENTAL_AGENT_TEAMS=1
# Start Claude Code
claude
# Use the router skill
/burn-router Implement a CNN for image classification with training loop
# Or manually create team and spawn agents
TeamCreate({ team_name: "cnn-impl", description: "CNN implementation" })
TaskCreate({ subject: "Design CNN architecture", status: "pending" })
TaskCreate({ subject: "Implement training loop", status: "pending", blockedBy: ["1"] })
Agent({
name: "architect",
team_name: "cnn-impl",
subagent_type: "burn:burn-architect",
prompt: "Check TaskList for architecture tasks",
description: "CNN architecture"
})
Agent({
name: "trainer",
team_name: "cnn-impl",
subagent_type: "burn:burn-trainer",
prompt: "Check TaskList for training tasks",
description: "Training loop"
})
# Monitor progress via TaskList
TaskList()
# Coordinate via messages
SendMessage({ to: "architect", message: "Use 3x3 kernels for convolutions" })
# Shut down when complete
SendMessage({ to: "*", message: { type: "shutdown_request", reason: "Work complete" } })
TeamDelete()
```
---
## File Structure Example
### Complete Plugin Layout
```
~/.claude/plugins/burn-dev-team/
├── plugin.json
│
├── agents/
│ ├── burn-architect.md # Core team member
│ ├── burn-trainer.md # Core team member
│ ├── burn-deployer.md # Core team member
│ ├── burn-importer.md # Core team member
│ ├── burn-lm.md # Ecosystem specialist
│ ├── burn-central.md # Ecosystem specialist
│ ├── burn-models.md # Ecosystem specialist
│ └── burn-bench.md # Ecosystem specialist
│
├── skills/
│ ├── burn-router/
│ │ └── SKILL.md # Main routing skill
│ ├── burn-cubecl/
│ │ └── SKILL.md # CubeCL kernel skill
│ └── burn-contrib/
│ └── SKILL.md # Contribution guide skill
│
├── hooks/
│ └── hooks.json # Lifecycle hooks
│
├── .mcp.json # MCP server config (optional)
│
└── README.md # Plugin documentation
```
### Agent File Template
```markdown
---
name: {agent-name}
description: {one-line description of expertise and full-stack capability}
tools: ["*"]
skills: ["burn-router"]
model: sonnet
color: {blue|green|yellow|purple|etc}
memory: project
permissionMode: acceptEdits
effort: high
---
# {Agent Title}
You are a {role} on the Burn development team.
## Your Expertise
- {Domain area 1}
- {Domain area 2}
- {Domain area 3}
## Team Workflow
As a teammate in the Burn development team:
1. **Check TaskList** after completing each task
2. **Claim unassigned, unblocked tasks** in your domain (prefer lowest ID first)
3. **Communicate via SendMessage** - your text output is NOT visible to the team
4. **Mark tasks completed** with TaskUpdate when done
5. **Debug and review** your own work - you're a full-stack specialist
6. **Ask for help** via SendMessage when blocked
## Implementation Patterns
[... domain-specific patterns, code examples, debugging guides ...]
## Common Issues
[... troubleshooting guide for domain ...]
## Review Checklist
When reviewing your own work:
- [ ] {Domain-specific check 1}
- [ ] {Domain-specific check 2}
- [ ] {Domain-specific check 3}
```
---
## Summary
### Key Integration Points
1. **Plugin agents** are loaded automatically from `agents/` directory
2. **Agent names** become `{plugin}:{agent}` (e.g., `burn:burn-architect`)
3. **Agent tool** spawns plugin agents as teammates when `name` + `team_name` provided
4. **Skills** provide high-level orchestration and routing
5. **Hooks** monitor teammate lifecycle for logging/notifications
6. **Task system** automatically shared between team members
7. **Message passing** enables coordination
### Critical Flow
```
User invokes /burn-router
↓
Skill analyzes request
↓
Creates team + tasks
↓
Spawns plugin agents as teammates
↓
Teammates auto-claim tasks
↓
Execute work in parallel
↓
Coordinate via SendMessage
↓
Mark tasks complete
↓
Graceful shutdown
```
### Benefits of This Architecture
1. **Modular**: Each agent is a self-contained specialist
2. **Composable**: Mix and match agents for different tasks
3. **Scalable**: Add new specialists without modifying existing ones
4. **Observable**: Hooks provide visibility into team activity
5. **Maintainable**: Each agent has clear domain boundaries
6. **Full-Stack**: No separate debugger/reviewer - agents handle their own quality
This design enables a true multi-agent Burn development team that coordinates through tasks and messages, exactly like the human development team it's modeled after.
---
## plugin-validator.md
You are an expert plugin validator specializing in comprehensive validation of Claude Code plugin structure, configuration, and components.
**Your Core Responsibilities:**
1. Validate plugin structure and organization
2. Check plugin.json manifest for correctness
3. Validate all component files (commands, agents, skills, hooks)
4. Verify naming conventions and file organization
5. Check for common issues and anti-patterns
6. Provide specific, actionable recommendations
**Validation Process:**
1. **Locate Plugin Root**:
- Check for `.claude-plugin/plugin.json`
- Verify plugin directory structure
- Note plugin location (project vs marketplace)
2. **Validate Manifest** (`.claude-plugin/plugin.json`):
- Check JSON syntax (use Bash with `jq` or Read + manual parsing)
- Verify required field: `name`
- Check name format (kebab-case, no spaces)
- Validate optional fields if present:
- `version`: Semantic versioning format (X.Y.Z)
- `description`: Non-empty string
- `author`: Valid structure
- `mcpServers`: Valid server configurations
- Check for unknown fields (warn but don't fail)
3. **Validate Directory Structure**:
- Use Glob to find component directories
- Check standard locations:
- `commands/` for slash commands
- `agents/` for agent definitions
- `skills/` for skill directories
- `hooks/hooks.json` for hooks
- Verify auto-discovery works
4. **Validate Commands** (if `commands/` exists):
- Use Glob to find `commands/**/*.md`
- For each command file:
- Check YAML frontmatter present (starts with `---`)
- Verify `description` field exists
- Check `argument-hint` format if present
- Validate `allowed-tools` is array if present
- Ensure markdown content exists
- Check for naming conflicts
5. **Validate Agents** (if `agents/` exists):
- Use Glob to find `agents/**/*.md`
- For each agent file:
- Use the validate-agent.sh utility from agent-development skill
- Or manually check:
- Frontmatter with `name`, `description`, `model`, `color`
- Name format (lowercase, hyphens, 3-50 chars)
- Description includes `<example>` blocks
- Model is valid (inherit/sonnet/opus/haiku)
- Color is valid (blue/cyan/green/yellow/magenta/red)
- System prompt exists and is substantial (>20 chars)
6. **Validate Skills** (if `skills/` exists):
- Use Glob to find `skills/*/SKILL.md`
- For each skill directory:
- Verify `SKILL.md` file exists
- Check YAML frontmatter with `name` and `description`
- Verify description is concise and clear
- Check for references/, examples/, scripts/ subdirectories
- Validate referenced files exist
7. **Validate Hooks** (if `hooks/hooks.json` exists):
- Use the validate-hook-schema.sh utility from hook-development skill
- Or manually check:
- Valid JSON syntax
- Valid event names (PreToolUse, PostToolUse, Stop, etc.)
- Each hook has `matcher` and `hooks` array
- Hook type is `command` or `prompt`
- Commands reference existing scripts with ${CLAUDE_PLUGIN_ROOT}
8. **Validate MCP Configuration** (if `.mcp.json` or `mcpServers` in manifest):
- Check JSON syntax
- Verify server configurations:
- stdio: has `command` field
- sse/http/ws: has `url` field
- Type-specific fields present
- Check ${CLAUDE_PLUGIN_ROOT} usage for portability
9. **Check File Organization**:
- README.md exists and is comprehensive
- No unnecessary files (node_modules, .DS_Store, etc.)
- .gitignore present if needed
- LICENSE file present
10. **Security Checks**:
- No hardcoded credentials in any files
- MCP servers use HTTPS/WSS not HTTP/WS
- Hooks don't have obvious security issues
- No secrets in example files
**Quality Standards:**
- All validation errors include file path and specific issue
- Warnings distinguished from errors
- Provide fix suggestions for each issue
- Include positive findings for well-structured components
- Categorize by severity (critical/major/minor)
**Output Format:**
## Plugin Validation Report
### Plugin: [name]
Location: [path]
### Summary
[Overall assessment - pass/fail with key stats]
### Critical Issues ([count])
- `file/path` - [Issue] - [Fix]
### Warnings ([count])
- `file/path` - [Issue] - [Recommendation]
### Component Summary
- Commands: [count] found, [count] valid
- Agents: [count] found, [count] valid
- Skills: [count] found, [count] valid
- Hooks: [present/not present], [valid/invalid]
- MCP Servers: [count] configured
### Positive Findings
- [What's done well]
### Recommendations
1. [Priority recommendation]
2. [Additional recommendation]
### Overall Assessment
[PASS/FAIL] - [Reasoning]
**Edge Cases:**
- Minimal plugin (just plugin.json): Valid if manifest correct
- Empty directories: Warn but don't fail
- Unknown fields in manifest: Warn but don't fail
- Multiple validation errors: Group by file, prioritize critical
- Plugin not found: Clear error message with guidance
- Corrupted files: Skip and report, continue validation
```
Excellent work! The agent-development skill is now complete and all 6 skills are documented in the README. Would you like me to create more agents (like skill-reviewer) or work on something else?
---
## plugins-47f40108cc.md
> ## Documentation Index
> Fetch the complete documentation index at: https://code.claude.com/docs/llms.txt
> Use this file to discover all available pages before exploring further.
# Create plugins
> Create custom plugins to extend Claude Code with skills, agents, hooks, and MCP servers.
Plugins let you extend Claude Code with custom functionality that can be shared across projects and teams. This guide covers creating your own plugins with skills, agents, hooks, and MCP servers.
Looking to install existing plugins? See [Discover and install plugins](discover-and-install-prebuilt-plugins-through-marketplaces-claude-code-docs-fe3568ee5c.md). For complete technical specifications, see [Plugins reference](plugins-reference-44aeea7968.md).
## When to use plugins vs standalone configuration
Claude Code supports two ways to add custom skills, agents, and hooks:
| Approach | Skill names | Best for |
| :---------------------------------------------------------- | :------------------- | :---------------------------------------------------------------------------------------------- |
| **Standalone** (`.claude/` directory) | `/hello` | Personal workflows, project-specific customizations, quick experiments |
| **Plugins** (directories with `.claude-plugin/plugin.json`) | `/plugin-name:hello` | Sharing with teammates, distributing to community, versioned releases, reusable across projects |
**Use standalone configuration when**:
* You're customizing Claude Code for a single project
* The configuration is personal and doesn't need to be shared
* You're experimenting with skills or hooks before packaging them
* You want short skill names like `/hello` or `/deploy`
**Use plugins when**:
* You want to share functionality with your team or community
* You need the same skills/agents across multiple projects
* You want version control and easy updates for your extensions
* You're distributing through a marketplace
* You're okay with namespaced skills like `/my-plugin:hello` (namespacing prevents conflicts between plugins)
<Tip>
Start with standalone configuration in `.claude/` for quick iteration, then [convert to a plugin](#convert-existing-configurations-to-plugins) when you're ready to share.
</Tip>
## Quickstart
This quickstart walks you through creating a plugin with a custom skill. You'll create a manifest (the configuration file that defines your plugin), add a skill, and test it locally using the `--plugin-dir` flag.
### Prerequisites
* Claude Code [installed and authenticated](/en/quickstart#step-1-install-claude-code)
<Note>
If you don't see the `/plugin` command, update Claude Code to the latest version. See [Troubleshooting](../21-Account-Support/troubleshooting-claude-code-docs-3f3657ed0f.md) for upgrade instructions.
</Note>
### Create your first plugin
<Steps>
<Step title="Create the plugin directory">
Every plugin lives in its own directory containing a manifest and your skills, agents, or hooks. Create one now:
```bash theme={null}
mkdir my-first-plugin
```
</Step>
<Step title="Create the plugin manifest">
The manifest file at `.claude-plugin/plugin.json` defines your plugin's identity: its name, description, and version. Claude Code uses this metadata to display your plugin in the plugin manager.
Create the `.claude-plugin` directory inside your plugin folder:
```bash theme={null}
mkdir my-first-plugin/.claude-plugin
```
Then create `my-first-plugin/.claude-plugin/plugin.json` with this content:
```json my-first-plugin/.claude-plugin/plugin.json theme={null}
{
"name": "my-first-plugin",
"description": "A greeting plugin to learn the basics",
"version": "1.0.0",
"author": {
"name": "Your Name"
}
}
```
| Field | Purpose |
| :------------ | :------------------------------------------------------------------------------------------------------------------------------------------------------------------------------------------------------------------------------------------------------------- |
| `name` | Unique identifier and skill namespace. Skills are prefixed with this (e.g., `/my-first-plugin:hello`). |
| `description` | Shown in the plugin manager when browsing or installing plugins. |
| `version` | Optional. If set, users only receive updates when you bump this field. If omitted and your plugin is distributed via git, the commit SHA is used and every commit counts as a new version. See [version management](/en/plugins-reference#version-management). |
| `author` | Optional. Helpful for attribution. |
For additional fields like `homepage`, `repository`, and `license`, see the [full manifest schema](/en/plugins-reference#plugin-manifest-schema).
</Step>
<Step title="Add a skill">
Skills live in the `skills/` directory. Each skill is a folder containing a `SKILL.md` file. The folder name becomes the skill name, prefixed with the plugin's namespace (`hello/` in a plugin named `my-first-plugin` creates `/my-first-plugin:hello`).
Create a skill directory in your plugin folder:
```bash theme={null}
mkdir -p my-first-plugin/skills/hello
```
Then create `my-first-plugin/skills/hello/SKILL.md` with this content:
```markdown my-first-plugin/skills/hello/SKILL.md theme={null}
---
description: Greet the user with a friendly message
disable-model-invocation: true
---
Greet the user warmly and ask how you can help them today.
```
</Step>
<Step title="Test your plugin">
Run Claude Code with the `--plugin-dir` flag to load your plugin:
```bash theme={null}
claude --plugin-dir ./my-first-plugin
```
Once Claude Code starts, try your new skill:
```shell theme={null}
/my-first-plugin:hello
```
You'll see Claude respond with a greeting. Run `/help` to see your skill listed under the plugin namespace.
<Note>
**Why namespacing?** Plugin skills are always namespaced (like `/my-first-plugin:hello`) to prevent conflicts when multiple plugins have skills with the same name.
To change the namespace prefix, update the `name` field in `plugin.json`.
</Note>
</Step>
<Step title="Add skill arguments">
Make your skill dynamic by accepting user input. The `$ARGUMENTS` placeholder captures any text the user provides after the skill name.
Update your `SKILL.md` file:
```markdown my-first-plugin/skills/hello/SKILL.md theme={null}
---
description: Greet the user with a personalized message
---
# Hello Skill
Greet the user named "$ARGUMENTS" warmly and ask how you can help them today. Make the greeting personal and encouraging.
```
Run `/reload-plugins` to pick up the changes, then try the skill with your name:
```shell theme={null}
/my-first-plugin:hello Alex
```
Claude will greet you by name. For more on passing arguments to skills, see [Skills](/en/skills#pass-arguments-to-skills).
</Step>
</Steps>
You've successfully created and tested a plugin with these key components:
* **Plugin manifest** (`.claude-plugin/plugin.json`): describes your plugin's metadata
* **Skills directory** (`skills/`): contains your custom skills
* **Skill arguments** (`$ARGUMENTS`): captures user input for dynamic behavior
<Tip>
The `--plugin-dir` flag is useful for development and testing. When you're ready to share your plugin with others, see [Create and distribute a plugin marketplace](create-and-distribute-a-plugin-marketplace-claude-code-docs-34a8f3c5e8.md).
</Tip>
## Plugin structure overview
You've created a plugin with a skill, but plugins can include much more: custom agents, hooks, MCP servers, LSP servers, and background monitors.
<Warning>
**Common mistake**: Don't put `commands/`, `agents/`, `skills/`, or `hooks/` inside the `.claude-plugin/` directory. Only `plugin.json` goes inside `.claude-plugin/`. All other directories must be at the plugin root level.
</Warning>
| Directory | Location | Purpose |
| :---------------- | :---------- | :----------------------------------------------------------------------------- |
| `.claude-plugin/` | Plugin root | Contains `plugin.json` manifest (optional if components use default locations) |
| `skills/` | Plugin root | Skills as `<name>/SKILL.md` directories |
| `commands/` | Plugin root | Skills as flat Markdown files. Use `skills/` for new plugins |
| `agents/` | Plugin root | Custom agent definitions |
| `hooks/` | Plugin root | Event handlers in `hooks.json` |
| `.mcp.json` | Plugin root | MCP server configurations |
| `.lsp.json` | Plugin root | LSP server configurations for code intelligence |
| `monitors/` | Plugin root | Background monitor configurations in `monitors.json` |
| `bin/` | Plugin root | Executables added to the Bash tool's `PATH` while the plugin is enabled |
| `settings.json` | Plugin root | Default [settings](../02-Claude-Code-CLI/claude-code-settings-claude-code-docs-d4420b4b52.md) applied when the plugin is enabled |
<Note>
**Next steps**: Ready to add more features? Jump to [Develop more complex plugins](#develop-more-complex-plugins) to add agents, hooks, MCP servers, and LSP servers. For complete technical specifications of all plugin components, see [Plugins reference](plugins-reference-44aeea7968.md).
</Note>
## Develop more complex plugins
Once you're comfortable with basic plugins, you can create more sophisticated extensions.
### Add Skills to your plugin
Plugins can include [Agent Skills](extend-claude-with-skills-claude-code-docs.md) to extend Claude's capabilities. Skills are model-invoked: Claude automatically uses them based on the task context.
Add a `skills/` directory at your plugin root with Skill folders containing `SKILL.md` files:
```text theme={null}
my-plugin/
├── .claude-plugin/
│ └── plugin.json
└── skills/
└── code-review/
└── SKILL.md
```
Each `SKILL.md` contains YAML frontmatter and instructions. Include a `description` so Claude knows when to use the skill:
```yaml theme={null}
---
description: Reviews code for best practices and potential issues. Use when reviewing code, checking PRs, or analyzing code quality.
---
When reviewing code, check for:
1. Code organization and structure
2. Error handling
3. Security concerns
4. Test coverage
```
After installing the plugin, run `/reload-plugins` to load the Skills. For complete Skill authoring guidance including progressive disclosure and tool restrictions, see [Agent Skills](extend-claude-with-skills-claude-code-docs.md).
### Add LSP servers to your plugin
<Tip>
For common languages like TypeScript, Python, and Rust, install the pre-built LSP plugins from the official marketplace. Create custom LSP plugins only when you need support for languages not already covered.
</Tip>
LSP (Language Server Protocol) plugins give Claude real-time code intelligence. If you need to support a language that doesn't have an official LSP plugin, you can create your own by adding an `.lsp.json` file to your plugin:
```json .lsp.json theme={null}
{
"go": {
"command": "gopls",
"args": ["serve"],
"extensionToLanguage": {
".go": "go"
}
}
}
```
Users installing your plugin must have the language server binary installed on their machine.
For complete LSP configuration options, see [LSP servers](/en/plugins-reference#lsp-servers).
### Add background monitors to your plugin
Background monitors let your plugin watch logs, files, or external status in the background and notify Claude as events arrive. Claude Code starts each monitor automatically when the plugin is active, so you don't need to instruct Claude to start the watch.
Add a `monitors/monitors.json` file at the plugin root with an array of monitor entries:
```json monitors/monitors.json theme={null}
[
{
"name": "error-log",
"command": "tail -F ./logs/error.log",
"description": "Application error log"
}
]
```
Each stdout line from `command` is delivered to Claude as a notification during the session. For the full schema, including the `when` trigger and variable substitution, see [Monitors](/en/plugins-reference#monitors).
### Ship default settings with your plugin
Plugins can include a `settings.json` file at the plugin root to apply default configuration when the plugin is enabled. Currently, only the `agent` and `subagentStatusLine` keys are supported.
Setting `agent` activates one of the plugin's [custom agents](../09-Agents-Patterns/create-custom-subagents-claude-code-docs-7dc93e85c0.md) as the main thread, applying its system prompt, tool restrictions, and model. This lets a plugin change how Claude Code behaves by default when enabled.
```json settings.json theme={null}
{
"agent": "security-reviewer"
}
```
This example activates the `security-reviewer` agent defined in the plugin's `agents/` directory. Settings from `settings.json` take priority over `settings` declared in `plugin.json`. Unknown keys are silently ignored.
### Organize complex plugins
For plugins with many components, organize your directory structure by functionality. For complete directory layouts and organization patterns, see [Plugin directory structure](/en/plugins-reference#plugin-directory-structure).
### Test your plugins locally
Use the `--plugin-dir` flag to test plugins during development. This loads your plugin directly without requiring installation.
```bash theme={null}
claude --plugin-dir ./my-plugin
```
When a `--plugin-dir` plugin has the same name as an installed marketplace plugin, the local copy takes precedence for that session. This lets you test changes to a plugin you already have installed without uninstalling it first. Marketplace plugins force-enabled by managed settings are the only exception and cannot be overridden.
As you make changes to your plugin, run `/reload-plugins` to pick up the updates without restarting. This reloads plugins, skills, agents, hooks, plugin MCP servers, and plugin LSP servers. Test your plugin components:
* Try your skills with `/plugin-name:skill-name`
* Check that agents appear in `/agents`
* Verify hooks work as expected
<Tip>
You can load multiple plugins at once by specifying the flag multiple times:
```bash theme={null}
claude --plugin-dir ./plugin-one --plugin-dir ./plugin-two
```
</Tip>
### Debug plugin issues
If your plugin isn't working as expected:
1. **Check the structure**: Ensure your directories are at the plugin root, not inside `.claude-plugin/`
2. **Test components individually**: Check each skill, agent, and hook separately
3. **Use validation and debugging tools**: See [Debugging and development tools](/en/plugins-reference#debugging-and-development-tools) for CLI commands and troubleshooting techniques
### Share your plugins
When your plugin is ready to share:
1. **Add documentation**: Include a `README.md` with installation and usage instructions
2. **Choose a versioning strategy**: Decide whether to set an explicit `version` or rely on the git commit SHA. See [version management](/en/plugins-reference#version-management)
3. **Create or use a marketplace**: Distribute through [plugin marketplaces](create-and-distribute-a-plugin-marketplace-claude-code-docs-34a8f3c5e8.md) for installation
4. **Test with others**: Have team members test the plugin before wider distribution
Once your plugin is in a marketplace, others can install it using the instructions in [Discover and install plugins](discover-and-install-prebuilt-plugins-through-marketplaces-claude-code-docs-fe3568ee5c.md).
### Submit your plugin to the official marketplace
To submit a plugin to the official Anthropic marketplace, use one of the in-app submission forms:
* **Claude.ai**: [claude.ai/settings/plugins/submit](https://claude.ai/settings/plugins/submit)
* **Console**: [platform.claude.com/plugins/submit](https://platform.claude.com/plugins/submit)
Once your plugin is listed, you can have your own CLI prompt Claude Code users to install it. See [Recommend your plugin from your CLI](/en/plugin-hints).
<Note>
For complete technical specifications, debugging techniques, and distribution strategies, see [Plugins reference](plugins-reference-44aeea7968.md).
</Note>
## Convert existing configurations to plugins
If you already have skills or hooks in your `.claude/` directory, you can convert them into a plugin for easier sharing and distribution.
### Migration steps
<Steps>
<Step title="Create the plugin structure">
Create a new plugin directory:
```bash theme={null}
mkdir -p my-plugin/.claude-plugin
```
Create the manifest file at `my-plugin/.claude-plugin/plugin.json`:
```json my-plugin/.claude-plugin/plugin.json theme={null}
{
"name": "my-plugin",
"description": "Migrated from standalone configuration",
"version": "1.0.0"
}
```
</Step>
<Step title="Copy your existing files">
Copy your existing configurations to the plugin directory:
```bash theme={null}
# Copy commands
cp -r .claude/commands my-plugin/
# Copy agents (if any)
cp -r .claude/agents my-plugin/
# Copy skills (if any)
cp -r .claude/skills my-plugin/
```
</Step>
<Step title="Migrate hooks">
If you have hooks in your settings, create a hooks directory:
```bash theme={null}
mkdir my-plugin/hooks
```
Create `my-plugin/hooks/hooks.json` with your hooks configuration. Copy the `hooks` object from your `.claude/settings.json` or `settings.local.json`, since the format is the same. The command receives hook input as JSON on stdin, so use `jq` to extract the file path:
```json my-plugin/hooks/hooks.json theme={null}
{
"hooks": {
"PostToolUse": [
{
"matcher": "Write|Edit",
"hooks": [{ "type": "command", "command": "jq -r '.tool_input.file_path' | xargs npm run lint:fix" }]
}
]
}
}
```
</Step>
<Step title="Test your migrated plugin">
Load your plugin to verify everything works:
```bash theme={null}
claude --plugin-dir ./my-plugin
```
Test each component: run your commands, check agents appear in `/agents`, and verify hooks trigger correctly.
</Step>
</Steps>
### What changes when migrating
| Standalone (`.claude/`) | Plugin |
| :---------------------------- | :------------------------------- |
| Only available in one project | Can be shared via marketplaces |
| Files in `.claude/commands/` | Files in `plugin-name/commands/` |
| Hooks in `settings.json` | Hooks in `hooks/hooks.json` |
| Must manually copy to share | Install with `/plugin install` |
<Note>
After migrating, you can remove the original files from `.claude/` to avoid duplicates. The plugin version will take precedence when loaded.
</Note>
## Next steps
Now that you understand Claude Code's plugin system, here are suggested paths for different goals:
### For plugin users
* [Discover and install plugins](discover-and-install-prebuilt-plugins-through-marketplaces-claude-code-docs-fe3568ee5c.md): browse marketplaces and install plugins
* [Configure team marketplaces](/en/discover-plugins#configure-team-marketplaces): set up repository-level plugins for your team
### For plugin developers
* [Create and distribute a marketplace](create-and-distribute-a-plugin-marketplace-claude-code-docs-34a8f3c5e8.md): package and share your plugins
* [Plugins reference](plugins-reference-44aeea7968.md): complete technical specifications
* Dive deeper into specific plugin components:
* [Skills](extend-claude-with-skills-claude-code-docs.md): skill development details
* [Subagents](../09-Agents-Patterns/create-custom-subagents-claude-code-docs-7dc93e85c0.md): agent configuration and capabilities
* [Hooks](../07-Hooks/hooks-9168ed62a4.md): event handling and automation
* [MCP](../06-MCP-Tools/mcp-208e742686.md): external tool integration
---
## plugins-reference-44aeea7968.md
> ## Documentation Index
> Fetch the complete documentation index at: https://code.claude.com/docs/llms.txt
> Use this file to discover all available pages before exploring further.
# Plugins reference
> Complete technical reference for Claude Code plugin system, including schemas, CLI commands, and component specifications.
<Tip>
Looking to install plugins? See [Discover and install plugins](discover-and-install-prebuilt-plugins-through-marketplaces-claude-code-docs-fe3568ee5c.md). For creating plugins, see [Plugins](create-plugins-claude-code-docs.md). For distributing plugins, see [Plugin marketplaces](create-and-distribute-a-plugin-marketplace-claude-code-docs-34a8f3c5e8.md).
</Tip>
This reference provides complete technical specifications for the Claude Code plugin system, including component schemas, CLI commands, and development tools.
A **plugin** is a self-contained directory of components that extends Claude Code with custom functionality. Plugin components include skills, agents, hooks, MCP servers, LSP servers, and monitors.
## Plugin components reference
### Skills
Plugins add skills to Claude Code, creating `/name` shortcuts that you or Claude can invoke.
**Location**: `skills/` or `commands/` directory in plugin root
**File format**: Skills are directories with `SKILL.md`; commands are simple markdown files
**Skill structure**:
```text theme={null}
skills/
├── pdf-processor/
│ ├── SKILL.md
│ ├── reference.md (optional)
│ └── scripts/ (optional)
└── code-reviewer/
└── SKILL.md
```
**Integration behavior**:
* Skills and commands are automatically discovered when the plugin is installed
* Claude can invoke them automatically based on task context
* Skills can include supporting files alongside SKILL.md
For complete details, see [Skills](extend-claude-with-skills-claude-code-docs.md).
### Agents
Plugins can provide specialized subagents for specific tasks that Claude can invoke automatically when appropriate.
**Location**: `agents/` directory in plugin root
**File format**: Markdown files describing agent capabilities
**Agent structure**:
```markdown theme={null}
---
name: agent-name
description: What this agent specializes in and when Claude should invoke it
model: sonnet
effort: medium
maxTurns: 20
disallowedTools: Write, Edit
---
Detailed system prompt for the agent describing its role, expertise, and behavior.
```
Plugin agents support `name`, `description`, `model`, `effort`, `maxTurns`, `tools`, `disallowedTools`, `skills`, `memory`, `background`, and `isolation` frontmatter fields. The only valid `isolation` value is `"worktree"`. For security reasons, `hooks`, `mcpServers`, and `permissionMode` are not supported for plugin-shipped agents.
**Integration points**:
* Agents appear in the `/agents` interface
* Claude can invoke agents automatically based on task context
* Agents can be invoked manually by users
* Plugin agents work alongside built-in Claude agents
For complete details, see [Subagents](../09-Agents-Patterns/create-custom-subagents-claude-code-docs-7dc93e85c0.md).
### Hooks
Plugins can provide event handlers that respond to Claude Code events automatically.
**Location**: `hooks/hooks.json` in plugin root, or inline in plugin.json
**Format**: JSON configuration with event matchers and actions
**Hook configuration**:
```json theme={null}
{
"hooks": {
"PostToolUse": [
{
"matcher": "Write|Edit",
"hooks": [
{
"type": "command",
"command": "${CLAUDE_PLUGIN_ROOT}/scripts/format-code.sh"
}
]
}
]
}
}
```
Plugin hooks respond to the same lifecycle events as [user-defined hooks](../07-Hooks/hooks-9168ed62a4.md):
| Event | When it fires |
| :-------------------- | :----------------------------------------------------------------------------------------------------------------------------------------------------- |
| `SessionStart` | When a session begins or resumes |
| `UserPromptSubmit` | When you submit a prompt, before Claude processes it |
| `UserPromptExpansion` | When a user-typed command expands into a prompt, before it reaches Claude. Can block the expansion |
| `PreToolUse` | Before a tool call executes. Can block it |
| `PermissionRequest` | When a permission dialog appears |
| `PermissionDenied` | When a tool call is denied by the auto mode classifier. Return `{retry: true}` to tell the model it may retry the denied tool call |
| `PostToolUse` | After a tool call succeeds |
| `PostToolUseFailure` | After a tool call fails |
| `PostToolBatch` | After a full batch of parallel tool calls resolves, before the next model call |
| `Notification` | When Claude Code sends a notification |
| `SubagentStart` | When a subagent is spawned |
| `SubagentStop` | When a subagent finishes |
| `TaskCreated` | When a task is being created via `TaskCreate` |
| `TaskCompleted` | When a task is being marked as completed |
| `Stop` | When Claude finishes responding |
| `StopFailure` | When the turn ends due to an API error. Output and exit code are ignored |
| `TeammateIdle` | When an [agent team](../09-Agents-Patterns/agent-teams-e29da6ed1b.md) teammate is about to go idle |
| `InstructionsLoaded` | When a CLAUDE.md or `.claude/rules/*.md` file is loaded into context. Fires at session start and when files are lazily loaded during a session |
| `ConfigChange` | When a configuration file changes during a session |
| `CwdChanged` | When the working directory changes, for example when Claude executes a `cd` command. Useful for reactive environment management with tools like direnv |
| `FileChanged` | When a watched file changes on disk. The `matcher` field specifies which filenames to watch |
| `WorktreeCreate` | When a worktree is being created via `--worktree` or `isolation: "worktree"`. Replaces default git behavior |
| `WorktreeRemove` | When a worktree is being removed, either at session exit or when a subagent finishes |
| `PreCompact` | Before context compaction |
| `PostCompact` | After context compaction completes |
| `Elicitation` | When an MCP server requests user input during a tool call |
| `ElicitationResult` | After a user responds to an MCP elicitation, before the response is sent back to the server |
| `SessionEnd` | When a session terminates |
**Hook types**:
* `command`: execute shell commands or scripts
* `http`: send the event JSON as a POST request to a URL
* `mcp_tool`: call a tool on a configured [MCP server](../06-MCP-Tools/mcp-208e742686.md)
* `prompt`: evaluate a prompt with an LLM (uses `$ARGUMENTS` placeholder for context)
* `agent`: run an agentic verifier with tools for complex verification tasks
### MCP servers
Plugins can bundle Model Context Protocol (MCP) servers to connect Claude Code with external tools and services.
**Location**: `.mcp.json` in plugin root, or inline in plugin.json
**Format**: Standard MCP server configuration
**MCP server configuration**:
```json theme={null}
{
"mcpServers": {
"plugin-database": {
"command": "${CLAUDE_PLUGIN_ROOT}/servers/db-server",
"args": ["--config", "${CLAUDE_PLUGIN_ROOT}/config.json"],
"env": {
"DB_PATH": "${CLAUDE_PLUGIN_ROOT}/data"
}
},
"plugin-api-client": {
"command": "npx",
"args": ["@company/mcp-server", "--plugin-mode"],
"cwd": "${CLAUDE_PLUGIN_ROOT}"
}
}
}
```
**Integration behavior**:
* Plugin MCP servers start automatically when the plugin is enabled
* Servers appear as standard MCP tools in Claude's toolkit
* Server capabilities integrate seamlessly with Claude's existing tools
* Plugin servers can be configured independently of user MCP servers
### LSP servers
<Tip>
Looking to use LSP plugins? Install them from the official marketplace: search for "lsp" in the `/plugin` Discover tab. This section documents how to create LSP plugins for languages not covered by the official marketplace.
</Tip>
Plugins can provide [Language Server Protocol](https://microsoft.github.io/language-server-protocol/) (LSP) servers to give Claude real-time code intelligence while working on your codebase.
LSP integration provides:
* **Instant diagnostics**: Claude sees errors and warnings immediately after each edit
* **Code navigation**: go to definition, find references, and hover information
* **Language awareness**: type information and documentation for code symbols
**Location**: `.lsp.json` in plugin root, or inline in `plugin.json`
**Format**: JSON configuration mapping language server names to their configurations
**`.lsp.json` file format**:
```json theme={null}
{
"go": {
"command": "gopls",
"args": ["serve"],
"extensionToLanguage": {
".go": "go"
}
}
}
```
**Inline in `plugin.json`**:
```json theme={null}
{
"name": "my-plugin",
"lspServers": {
"go": {
"command": "gopls",
"args": ["serve"],
"extensionToLanguage": {
".go": "go"
}
}
}
}
```
**Required fields:**
| Field | Description |
| :-------------------- | :------------------------------------------- |
| `command` | The LSP binary to execute (must be in PATH) |
| `extensionToLanguage` | Maps file extensions to language identifiers |
**Optional fields:**
| Field | Description |
| :---------------------- | :-------------------------------------------------------- |
| `args` | Command-line arguments for the LSP server |
| `transport` | Communication transport: `stdio` (default) or `socket` |
| `env` | Environment variables to set when starting the server |
| `initializationOptions` | Options passed to the server during initialization |
| `settings` | Settings passed via `workspace/didChangeConfiguration` |
| `workspaceFolder` | Workspace folder path for the server |
| `startupTimeout` | Max time to wait for server startup (milliseconds) |
| `shutdownTimeout` | Max time to wait for graceful shutdown (milliseconds) |
| `restartOnCrash` | Whether to automatically restart the server if it crashes |
| `maxRestarts` | Maximum number of restart attempts before giving up |
<Warning>
**You must install the language server binary separately.** LSP plugins configure how Claude Code connects to a language server, but they don't include the server itself. If you see `Executable not found in $PATH` in the `/plugin` Errors tab, install the required binary for your language.
</Warning>
**Available LSP plugins:**
| Plugin | Language server | Install command |
| :--------------- | :------------------------- | :----------------------------------------------------------------------------------------- |
| `pyright-lsp` | Pyright (Python) | `pip install pyright` or `npm install -g pyright` |
| `typescript-lsp` | TypeScript Language Server | `npm install -g typescript-language-server typescript` |
| `rust-lsp` | rust-analyzer | [See rust-analyzer installation](https://rust-analyzer.github.io/manual.html#installation) |
Install the language server first, then install the plugin from the marketplace.
### Monitors
Plugins can declare background monitors that Claude Code starts automatically when the plugin is active. Each monitor runs a shell command for the lifetime of the session and delivers every stdout line to Claude as a notification, so Claude can react to log entries, status changes, or polled events without being asked to start the watch itself.
Plugin monitors use the same mechanism as the [Monitor tool](/en/tools-reference#monitor-tool) and share its availability constraints. They run only in interactive CLI sessions, run unsandboxed at the same trust level as [hooks](#hooks), and are skipped on hosts where the Monitor tool is unavailable.
<Note>
Plugin monitors require Claude Code v2.1.105 or later.
</Note>
**Location**: `monitors/monitors.json` in the plugin root, or inline in `plugin.json`
**Format**: JSON array of monitor entries
The following `monitors/monitors.json` watches a deployment status endpoint and a local error log:
```json theme={null}
[
{
"name": "deploy-status",
"command": "${CLAUDE_PLUGIN_ROOT}/scripts/poll-deploy.sh ${user_config.api_endpoint}",
"description": "Deployment status changes"
},
{
"name": "error-log",
"command": "tail -F ./logs/error.log",
"description": "Application error log",
"when": "on-skill-invoke:debug"
}
]
```
To declare monitors inline, set the `monitors` key in `plugin.json` to the same array. To load from a non-default path, set `monitors` to a relative path string such as `"./config/monitors.json"`.
**Required fields:**
| Field | Description |
| :------------ | :-------------------------------------------------------------------------------------------------------------------- |
| `name` | Identifier unique within the plugin. Prevents duplicate processes when the plugin reloads or a skill is invoked again |
| `command` | Shell command run as a persistent background process in the session working directory |
| `description` | Short summary of what is being watched. Shown in the task panel and in notification summaries |
**Optional fields:**
| Field | Description |
| :----- | :----------------------------------------------------------------------------------------------------------------------------------------------------------------------------------------------------------------------- |
| `when` | Controls when the monitor starts. `"always"` starts it at session start and on plugin reload, and is the default. `"on-skill-invoke:<skill-name>"` starts it the first time the named skill in this plugin is dispatched |
The `command` value supports the same [variable substitutions](#environment-variables) as MCP and LSP server configs: `${CLAUDE_PLUGIN_ROOT}`, `${CLAUDE_PLUGIN_DATA}`, `${user_config.*}`, and any `${ENV_VAR}` from the environment. Prefix the command with `cd "${CLAUDE_PLUGIN_ROOT}" && ` if the script needs to run from the plugin's own directory.
Disabling a plugin mid-session does not stop monitors that are already running. They stop when the session ends.
### Themes
Plugins can ship color themes that appear in `/theme` alongside the built-in presets and the user's local themes. A theme is a JSON file in `themes/` with a `base` preset and a sparse `overrides` map of color tokens.
```json theme={null}
{
"name": "Dracula",
"base": "dark",
"overrides": {
"claude": "#bd93f9",
"error": "#ff5555",
"success": "#50fa7b"
}
}
```
Selecting a plugin theme persists `custom:<plugin-name>:<slug>` in the user's config. Plugin themes are read-only; pressing `Ctrl+E` on one in `/theme` copies it into `~/.claude/themes/` so the user can edit the copy.
***
## Plugin installation scopes
When you install a plugin, you choose a **scope** that determines where the plugin is available and who else can use it:
| Scope | Settings file | Use case |
| :-------- | :---------------------------------------------- | :------------------------------------------------------- |
| `user` | `~/.claude/settings.json` | Personal plugins available across all projects (default) |
| `project` | `.claude/settings.json` | Team plugins shared via version control |
| `local` | `.claude/settings.local.json` | Project-specific plugins, gitignored |
| `managed` | [Managed settings](/en/settings#settings-files) | Managed plugins (read-only, update only) |
Plugins use the same scope system as other Claude Code configurations. For installation instructions and scope flags, see [Install plugins](/en/discover-plugins#install-plugins). For a complete explanation of scopes, see [Configuration scopes](/en/settings#configuration-scopes).
***
## Plugin manifest schema
The `.claude-plugin/plugin.json` file defines your plugin's metadata and configuration. This section documents all supported fields and options.
The manifest is optional. If omitted, Claude Code auto-discovers components in [default locations](#file-locations-reference) and derives the plugin name from the directory name. Use a manifest when you need to provide metadata or custom component paths.
### Complete schema
```json theme={null}
{
"name": "plugin-name",
"version": "1.2.0",
"description": "Brief plugin description",
"author": {
"name": "Author Name",
"email": "author@example.com",
"url": "https://github.com/author"
},
"homepage": "https://docs.example.com/plugin",
"repository": "https://github.com/author/plugin",
"license": "MIT",
"keywords": ["keyword1", "keyword2"],
"skills": "./custom/skills/",
"commands": ["./custom/commands/special.md"],
"agents": "./custom/agents/",
"hooks": "./config/hooks.json",
"mcpServers": "./mcp-config.json",
"outputStyles": "./styles/",
"themes": "./themes/",
"lspServers": "./.lsp.json",
"monitors": "./monitors.json",
"dependencies": [
"helper-lib",
{ "name": "secrets-vault", "version": "~2.1.0" }
]
}
```
### Required fields
If you include a manifest, `name` is the only required field.
| Field | Type | Description | Example |
| :----- | :----- | :---------------------------------------- | :------------------- |
| `name` | string | Unique identifier (kebab-case, no spaces) | `"deployment-tools"` |
This name is used for namespacing components. For example, in the UI, the
agent `agent-creator` for the plugin with name `plugin-dev` will appear as
`plugin-dev:agent-creator`.
### Metadata fields
| Field | Type | Description | Example |
| :------------ | :----- | :----------------------------------------------------------------------------------------------------------------------------------------------------------------------------------------------------------------------------------------------------------------------------------------------------------------------------------------------- | :------------------------------------------------- |
| `version` | string | Optional. Semantic version. Setting this pins the plugin to that version string, so users only receive updates when you bump it. If omitted, Claude Code falls back to the git commit SHA, so every commit is treated as a new version. If also set in the marketplace entry, `plugin.json` wins. See [Version management](#version-management). | `"2.1.0"` |
| `description` | string | Brief explanation of plugin purpose | `"Deployment automation tools"` |
| `author` | object | Author information | `{"name": "Dev Team", "email": "dev@company.com"}` |
| `homepage` | string | Documentation URL | `"https://docs.example.com"` |
| `repository` | string | Source code URL | `"https://github.com/user/plugin"` |
| `license` | string | License identifier | `"MIT"`, `"Apache-2.0"` |
| `keywords` | array | Discovery tags | `["deployment", "ci-cd"]` |
### Component path fields
| Field | Type | Description | Example |
| :------------- | :-------------------- | :-------------------------------------------------------------------------------------------------------------------------------------------------------- | :--------------------------------------------------- |
| `skills` | string\|array | Custom skill directories containing `<name>/SKILL.md` (replaces default `skills/`) | `"./custom/skills/"` |
| `commands` | string\|array | Custom flat `.md` skill files or directories (replaces default `commands/`) | `"./custom/cmd.md"` or `["./cmd1.md"]` |
| `agents` | string\|array | Custom agent files (replaces default `agents/`) | `"./custom/agents/reviewer.md"` |
| `hooks` | string\|array\|object | Hook config paths or inline config | `"./my-extra-hooks.json"` |
| `mcpServers` | string\|array\|object | MCP config paths or inline config | `"./my-extra-mcp-config.json"` |
| `outputStyles` | string\|array | Custom output style files/directories (replaces default `output-styles/`) | `"./styles/"` |
| `themes` | string\|array | Color theme files/directories (replaces default `themes/`). See [Themes](#themes) | `"./themes/"` |
| `lspServers` | string\|array\|object | [Language Server Protocol](https://microsoft.github.io/language-server-protocol/) configs for code intelligence (go to definition, find references, etc.) | `"./.lsp.json"` |
| `monitors` | string\|array | Background [Monitor](/en/tools-reference#monitor-tool) configurations that start automatically when the plugin is active. See [Monitors](#monitors) | `"./monitors.json"` |
| `userConfig` | object | User-configurable values prompted at enable time. See [User configuration](#user-configuration) | See below |
| `channels` | array | Channel declarations for message injection (Telegram, Slack, Discord style). See [Channels](#channels) | See below |
| `dependencies` | array | Other plugins this plugin requires, optionally with semver version constraints. See [Constrain plugin dependency versions](../02-Claude-Code-CLI/plugin-dependencies-6fe908ccfc.md) | `[{ "name": "secrets-vault", "version": "~2.1.0" }]` |
### User configuration
The `userConfig` field declares values that Claude Code prompts the user for when the plugin is enabled. Use this instead of requiring users to hand-edit `settings.json`.
```json theme={null}
{
"userConfig": {
"api_endpoint": {
"type": "string",
"title": "API endpoint",
"description": "Your team's API endpoint"
},
"api_token": {
"type": "string",
"title": "API token",
"description": "API authentication token",
"sensitive": true
}
}
}
```
Keys must be valid identifiers. Each option supports these fields:
| Field | Required | Description |
| :------------ | :------- | :--------------------------------------------------------------------------------------- |
| `type` | Yes | One of `string`, `number`, `boolean`, `directory`, or `file` |
| `title` | Yes | Label shown in the configuration dialog |
| `description` | Yes | Help text shown beneath the field |
| `sensitive` | No | If `true`, masks input and stores the value in secure storage instead of `settings.json` |
| `required` | No | If `true`, validation fails when the field is empty |
| `default` | No | Value used when the user provides nothing |
| `multiple` | No | For `string` type, allow an array of strings |
| `min` / `max` | No | Bounds for `number` type |
Each value is available for substitution as `${user_config.KEY}` in MCP and LSP server configs, hook commands, and monitor commands. Non-sensitive values can also be substituted in skill and agent content. All values are exported to plugin subprocesses as `CLAUDE_PLUGIN_OPTION_<KEY>` environment variables.
Non-sensitive values are stored in `settings.json` under `pluginConfigs[<plugin-id>].options`. Sensitive values go to the system keychain (or `~/.claude/.credentials.json` where the keychain is unavailable). Keychain storage is shared with OAuth tokens and has an approximately 2 KB total limit, so keep sensitive values small.
### Channels
The `channels` field lets a plugin declare one or more message channels that inject content into the conversation. Each channel binds to an MCP server that the plugin provides.
```json theme={null}
{
"channels": [
{
"server": "telegram",
"userConfig": {
"bot_token": {
"type": "string",
"title": "Bot token",
"description": "Telegram bot token",
"sensitive": true
},
"owner_id": {
"type": "string",
"title": "Owner ID",
"description": "Your Telegram user ID"
}
}
}
]
}
```
The `server` field is required and must match a key in the plugin's `mcpServers`. The optional per-channel `userConfig` uses the same schema as the top-level field, letting the plugin prompt for bot tokens or owner IDs when the plugin is enabled.
### Path behavior rules
For `skills`, `commands`, `agents`, `outputStyles`, `themes`, and `monitors`, a custom path replaces the default. If the manifest specifies `skills`, the default `skills/` directory is not scanned; if it specifies `monitors`, the default `monitors/monitors.json` is not loaded. [Hooks](#hooks), [MCP servers](#mcp-servers), and [LSP servers](#lsp-servers) have different semantics for handling multiple sources.
* All paths must be relative to the plugin root and start with `./`
* Components from custom paths use the same naming and namespacing rules
* Multiple paths can be specified as arrays
* To keep the default directory and add more paths for skills, commands, agents, or output styles, include the default in your array: `"skills": ["./skills/", "./extras/"]`
* When a skill path points to a directory that contains a `SKILL.md` directly, for example `"skills": ["./"]` pointing to the plugin root, the frontmatter `name` field in `SKILL.md` determines the skill's invocation name. This gives a stable name regardless of the install directory. If `name` is not set in the frontmatter, the directory basename is used as a fallback.
**Path examples**:
```json theme={null}
{
"commands": [
"./specialized/deploy.md",
"./utilities/batch-process.md"
],
"agents": [
"./custom-agents/reviewer.md",
"./custom-agents/tester.md"
]
}
```
### Environment variables
Claude Code provides two variables for referencing plugin paths. Both are substituted inline anywhere they appear in skill content, agent content, hook commands, monitor commands, and MCP or LSP server configs. Both are also exported as environment variables to hook processes and MCP or LSP server subprocesses.
**`${CLAUDE_PLUGIN_ROOT}`**: the absolute path to your plugin's installation directory. Use this to reference scripts, binaries, and config files bundled with the plugin. This path changes when the plugin updates, so files you write here do not survive an update.
**`${CLAUDE_PLUGIN_DATA}`**: a persistent directory for plugin state that survives updates. Use this for installed dependencies such as `node_modules` or Python virtual environments, generated code, caches, and any other files that should persist across plugin versions. The directory is created automatically the first time this variable is referenced.
```json theme={null}
{
"hooks": {
"PostToolUse": [
{
"hooks": [
{
"type": "command",
"command": "${CLAUDE_PLUGIN_ROOT}/scripts/process.sh"
}
]
}
]
}
}
```
#### Persistent data directory
The `${CLAUDE_PLUGIN_DATA}` directory resolves to `~/.claude/plugins/data/{id}/`, where `{id}` is the plugin identifier with characters outside `a-z`, `A-Z`, `0-9`, `_`, and `-` replaced by `-`. For a plugin installed as `formatter@my-marketplace`, the directory is `~/.claude/plugins/data/formatter-my-marketplace/`.
A common use is installing language dependencies once and reusing them across sessions and plugin updates. Because the data directory outlives any single plugin version, a check for directory existence alone cannot detect when an update changes the plugin's dependency manifest. The recommended pattern compares the bundled manifest against a copy in the data directory and reinstalls when they differ.
This `SessionStart` hook installs `node_modules` on the first run and again whenever a plugin update includes a changed `package.json`:
```json theme={null}
{
"hooks": {
"SessionStart": [
{
"hooks": [
{
"type": "command",
"command": "diff -q \"${CLAUDE_PLUGIN_ROOT}/package.json\" \"${CLAUDE_PLUGIN_DATA}/package.json\" >/dev/null 2>&1 || (cd \"${CLAUDE_PLUGIN_DATA}\" && cp \"${CLAUDE_PLUGIN_ROOT}/package.json\" . && npm install) || rm -f \"${CLAUDE_PLUGIN_DATA}/package.json\""
}
]
}
]
}
}
```
The `diff` exits nonzero when the stored copy is missing or differs from the bundled one, covering both first run and dependency-changing updates. If `npm install` fails, the trailing `rm` removes the copied manifest so the next session retries.
Scripts bundled in `${CLAUDE_PLUGIN_ROOT}` can then run against the persisted `node_modules`:
```json theme={null}
{
"mcpServers": {
"routines": {
"command": "node",
"args": ["${CLAUDE_PLUGIN_ROOT}/server.js"],
"env": {
"NODE_PATH": "${CLAUDE_PLUGIN_DATA}/node_modules"
}
}
}
}
```
The data directory is deleted automatically when you uninstall the plugin from the last scope where it is installed. The `/plugin` interface shows the directory size and prompts before deleting. The CLI deletes by default; pass [`--keep-data`](#plugin-uninstall) to preserve it.
***
## Plugin caching and file resolution
Plugins are specified in one of two ways:
* Through `claude --plugin-dir`, for the duration of a session.
* Through a marketplace, installed for future sessions.
For security and verification purposes, Claude Code copies *marketplace* plugins to the user's local **plugin cache** (`~/.claude/plugins/cache`) rather than using them in-place. Understanding this behavior is important when developing plugins that reference external files.
Each installed version is a separate directory in the cache. When you update or uninstall a plugin, the previous version directory is marked as orphaned and removed automatically 7 days later. The grace period lets concurrent Claude Code sessions that already loaded the old version keep running without errors.
Claude's Glob and Grep tools skip orphaned version directories during searches, so file results don't include outdated plugin code.
### Path traversal limitations
Installed plugins cannot reference files outside their directory. Paths that traverse outside the plugin root (such as `../shared-utils`) will not work after installation because those external files are not copied to the cache.
### Working with external dependencies
If your plugin needs to access files outside its directory, you can create symbolic links to external files within your plugin directory. Symlinks are preserved in the cache rather than dereferenced, and they resolve to their target at runtime. The following command creates a link from inside your plugin directory to a shared utilities location:
```bash theme={null}
ln -s /path/to/shared-utils ./shared-utils
```
This provides flexibility while maintaining the security benefits of the caching system.
***
## Plugin directory structure
### Standard plugin layout
A complete plugin follows this structure:
```text theme={null}
enterprise-plugin/
├── .claude-plugin/ # Metadata directory (optional)
│ └── plugin.json # plugin manifest
├── skills/ # Skills
│ ├── code-reviewer/
│ │ └── SKILL.md
│ └── pdf-processor/
│ ├── SKILL.md
│ └── scripts/
├── commands/ # Skills as flat .md files
│ ├── status.md
│ └── logs.md
├── agents/ # Subagent definitions
│ ├── security-reviewer.md
│ ├── performance-tester.md
│ └── compliance-checker.md
├── output-styles/ # Output style definitions
│ └── terse.md
├── themes/ # Color theme definitions
│ └── dracula.json
├── monitors/ # Background monitor configurations
│ └── monitors.json
├── hooks/ # Hook configurations
│ ├── hooks.json # Main hook config
│ └── security-hooks.json # Additional hooks
├── bin/ # Plugin executables added to PATH
│ └── my-tool # Invokable as bare command in Bash tool
├── settings.json # Default settings for the plugin
├── .mcp.json # MCP server definitions
├── .lsp.json # LSP server configurations
├── scripts/ # Hook and utility scripts
│ ├── security-scan.sh
│ ├── format-code.py
│ └── deploy.js
├── LICENSE # License file
└── CHANGELOG.md # Version history
```
<Warning>
The `.claude-plugin/` directory contains the `plugin.json` file. All other directories (commands/, agents/, skills/, output-styles/, themes/, monitors/, hooks/) must be at the plugin root, not inside `.claude-plugin/`.
</Warning>
### File locations reference
| Component | Default Location | Purpose |
| :---------------- | :--------------------------- | :----------------------------------------------------------------------------------------------------------------------------------------------------------------------------------------- |
| **Manifest** | `.claude-plugin/plugin.json` | Plugin metadata and configuration (optional) |
| **Skills** | `skills/` | Skills with `<name>/SKILL.md` structure |
| **Commands** | `commands/` | Skills as flat Markdown files. Use `skills/` for new plugins |
| **Agents** | `agents/` | Subagent Markdown files |
| **Output styles** | `output-styles/` | Output style definitions |
| **Themes** | `themes/` | Color theme definitions |
| **Hooks** | `hooks/hooks.json` | Hook configuration |
| **MCP servers** | `.mcp.json` | MCP server definitions |
| **LSP servers** | `.lsp.json` | Language server configurations |
| **Monitors** | `monitors/monitors.json` | Background monitor configurations |
| **Executables** | `bin/` | Executables added to the Bash tool's `PATH`. Files here are invokable as bare commands in any Bash tool call while the plugin is enabled |
| **Settings** | `settings.json` | Default configuration applied when the plugin is enabled. Only the [`agent`](../09-Agents-Patterns/create-custom-subagents-claude-code-docs-7dc93e85c0.md) and [`subagentStatusLine`](/en/statusline#subagent-status-lines) keys are currently supported |
***
## CLI commands reference
Claude Code provides CLI commands for non-interactive plugin management, useful for scripting and automation.
### plugin install
Install a plugin from available marketplaces.
```bash theme={null}
claude plugin install <plugin> [options]
```
**Arguments:**
* `<plugin>`: Plugin name or `plugin-name@marketplace-name` for a specific marketplace
**Options:**
| Option | Description | Default |
| :-------------------- | :------------------------------------------------ | :------ |
| `-s, --scope <scope>` | Installation scope: `user`, `project`, or `local` | `user` |
| `-h, --help` | Display help for command | |
Scope determines which settings file the installed plugin is added to. For example, `--scope project` writes to `enabledPlugins` in .claude/settings.json, making the plugin available to everyone who clones the project repository.
**Examples:**
```bash theme={null}
# Install to user scope (default)
claude plugin install formatter@my-marketplace
# Install to project scope (shared with team)
claude plugin install formatter@my-marketplace --scope project
# Install to local scope (gitignored)
claude plugin install formatter@my-marketplace --scope local
```
### plugin uninstall
Remove an installed plugin.
```bash theme={null}
claude plugin uninstall <plugin> [options]
```
**Arguments:**
* `<plugin>`: Plugin name or `plugin-name@marketplace-name`
**Options:**
| Option | Description | Default |
| :-------------------- | :---------------------------------------------------------------------------- | :------ |
| `-s, --scope <scope>` | Uninstall from scope: `user`, `project`, or `local` | `user` |
| `--keep-data` | Preserve the plugin's [persistent data directory](#persistent-data-directory) | |
| `-h, --help` | Display help for command | |
**Aliases:** `remove`, `rm`
By default, uninstalling from the last remaining scope also deletes the plugin's `${CLAUDE_PLUGIN_DATA}` directory. Use `--keep-data` to preserve it, for example when reinstalling after testing a new version.
### plugin enable
Enable a disabled plugin.
```bash theme={null}
claude plugin enable <plugin> [options]
```
**Arguments:**
* `<plugin>`: Plugin name or `plugin-name@marketplace-name`
**Options:**
| Option | Description | Default |
| :-------------------- | :--------------------------------------------- | :------ |
| `-s, --scope <scope>` | Scope to enable: `user`, `project`, or `local` | `user` |
| `-h, --help` | Display help for command | |
### plugin disable
Disable a plugin without uninstalling it.
```bash theme={null}
claude plugin disable <plugin> [options]
```
**Arguments:**
* `<plugin>`: Plugin name or `plugin-name@marketplace-name`
**Options:**
| Option | Description | Default |
| :-------------------- | :---------------------------------------------- | :------ |
| `-s, --scope <scope>` | Scope to disable: `user`, `project`, or `local` | `user` |
| `-h, --help` | Display help for command | |
### plugin update
Update a plugin to the latest version.
```bash theme={null}
claude plugin update <plugin> [options]
```
**Arguments:**
* `<plugin>`: Plugin name or `plugin-name@marketplace-name`
**Options:**
| Option | Description | Default |
| :-------------------- | :-------------------------------------------------------- | :------ |
| `-s, --scope <scope>` | Scope to update: `user`, `project`, `local`, or `managed` | `user` |
| `-h, --help` | Display help for command | |
***
### plugin list
List installed plugins with their version, source marketplace, and enable status.
```bash theme={null}
claude plugin list [options]
```
**Options:**
| Option | Description | Default |
| :------------ | :------------------------------------------------------------- | :------ |
| `--json` | Output as JSON | |
| `--available` | Include available plugins from marketplaces. Requires `--json` | |
| `-h, --help` | Display help for command | |
### plugin tag
Create a release git tag for the plugin in the current directory. Run from inside the plugin's folder. See [Tag plugin releases](/en/plugin-dependencies#tag-plugin-releases-for-version-resolution).
```bash theme={null}
claude plugin tag [options]
```
**Options:**
| Option | Description | Default |
| :------------ | :------------------------------------------------------------------------- | :------ |
| `--push` | Push the tag to the remote after creating it | |
| `--dry-run` | Print what would be tagged without creating the tag | |
| `-f, --force` | Create the tag even if the working tree is dirty or the tag already exists | |
| `-h, --help` | Display help for command | |
***
## Debugging and development tools
### Debugging commands
Use `claude --debug` to see plugin loading details:
This shows:
* Which plugins are being loaded
* Any errors in plugin manifests
* Skill, agent, and hook registration
* MCP server initialization
### Common issues
| Issue | Cause | Solution |
| :---------------------------------- | :------------------------------ | :-------------------------------------------------------------------------------------------------------------------------------------------------------------- |
| Plugin not loading | Invalid `plugin.json` | Run `claude plugin validate` or `/plugin validate` to check `plugin.json`, skill/agent/command frontmatter, and `hooks/hooks.json` for syntax and schema errors |
| Skills not appearing | Wrong directory structure | Ensure `skills/` or `commands/` is at the plugin root, not inside `.claude-plugin/` |
| Hooks not firing | Script not executable | Run `chmod +x script.sh` |
| MCP server fails | Missing `${CLAUDE_PLUGIN_ROOT}` | Use variable for all plugin paths |
| Path errors | Absolute paths used | All paths must be relative and start with `./` |
| LSP `Executable not found in $PATH` | Language server not installed | Install the binary (e.g., `npm install -g typescript-language-server typescript`) |
### Example error messages
**Manifest validation errors**:
* `Invalid JSON syntax: Unexpected token } in JSON at position 142`: check for missing commas, extra commas, or unquoted strings
* `Plugin has an invalid manifest file at .claude-plugin/plugin.json. Validation errors: name: Required`: a required field is missing
* `Plugin has a corrupt manifest file at .claude-plugin/plugin.json. JSON parse error: ...`: JSON syntax error
**Plugin loading errors**:
* `Warning: No commands found in plugin my-plugin custom directory: ./cmds. Expected .md files or SKILL.md in subdirectories.`: command path exists but contains no valid command files
* `Plugin directory not found at path: ./plugins/my-plugin. Check that the marketplace entry has the correct path.`: the `source` path in marketplace.json points to a non-existent directory
* `Plugin my-plugin has conflicting manifests: both plugin.json and marketplace entry specify components.`: remove duplicate component definitions or remove `strict: false` in marketplace entry
### Hook troubleshooting
**Hook script not executing**:
1. Check the script is executable: `chmod +x ./scripts/your-script.sh`
2. Verify the shebang line: First line should be `#!/bin/bash` or `#!/usr/bin/env bash`
3. Check the path uses `${CLAUDE_PLUGIN_ROOT}`: `"command": "${CLAUDE_PLUGIN_ROOT}/scripts/your-script.sh"`
4. Test the script manually: `./scripts/your-script.sh`
**Hook not triggering on expected events**:
1. Verify the event name is correct (case-sensitive): `PostToolUse`, not `postToolUse`
2. Check the matcher pattern matches your tools: `"matcher": "Write|Edit"` for file operations
3. Confirm the hook type is valid: `command`, `http`, `mcp_tool`, `prompt`, or `agent`
### MCP server troubleshooting
**Server not starting**:
1. Check the command exists and is executable
2. Verify all paths use `${CLAUDE_PLUGIN_ROOT}` variable
3. Check the MCP server logs: `claude --debug` shows initialization errors
4. Test the server manually outside of Claude Code
**Server tools not appearing**:
1. Ensure the server is properly configured in `.mcp.json` or `plugin.json`
2. Verify the server implements the MCP protocol correctly
3. Check for connection timeouts in debug output
### Directory structure mistakes
**Symptoms**: Plugin loads but components (skills, agents, hooks) are missing.
**Correct structure**: Components must be at the plugin root, not inside `.claude-plugin/`. Only `plugin.json` belongs in `.claude-plugin/`.
```text theme={null}
my-plugin/
├── .claude-plugin/
│ └── plugin.json ← Only manifest here
├── commands/ ← At root level
├── agents/ ← At root level
└── hooks/ ← At root level
```
If your components are inside `.claude-plugin/`, move them to the plugin root.
**Debug checklist**:
1. Run `claude --debug` and look for "loading plugin" messages
2. Check that each component directory is listed in the debug output
3. Verify file permissions allow reading the plugin files
***
## Distribution and versioning reference
### Version management
Claude Code uses the plugin's version as the cache key that determines whether an update is available. When you run `/plugin update` or auto-update fires, Claude Code computes the current version and skips the update if it matches what's already installed.
The version is resolved from the first of these that is set:
1. The `version` field in the plugin's `plugin.json`
2. The `version` field in the plugin's marketplace entry in `marketplace.json`
3. The git commit SHA of the plugin's source, for `github`, `url`, `git-subdir`, and relative-path sources in a git-hosted marketplace
4. `unknown`, for `npm` sources or local directories not inside a git repository
This gives you two ways to version a plugin:
| Approach | How | Update behavior | Best for |
| :--------------------- | :--------------------------------------------------------------- | :------------------------------------------------------------------------------------------------------------------------------------------------------------------- | :------------------------------------------------ |
| **Explicit version** | Set `"version": "2.1.0"` in `plugin.json` | Users get updates only when you bump this field. Pushing new commits without bumping it has no effect, and `/plugin update` reports "already at the latest version". | Published plugins with stable release cycles |
| **Commit-SHA version** | Omit `version` from both `plugin.json` and the marketplace entry | Users get updates on every new commit to the plugin's git source | Internal or team plugins under active development |
<Warning>
If you set `version` in `plugin.json`, you must bump it every time you want users to receive changes. Pushing new commits alone is not enough, because Claude Code sees the same version string and keeps the cached copy. If you're iterating quickly, leave `version` unset so the git commit SHA is used instead.
</Warning>
If you use explicit versions, follow [semantic versioning](https://semver.org) (`MAJOR.MINOR.PATCH`): bump MAJOR for breaking changes, MINOR for new features, PATCH for bug fixes. Document changes in a `CHANGELOG.md`.
***
## See also
* [Plugins](create-plugins-claude-code-docs.md) - Tutorials and practical usage
* [Plugin marketplaces](create-and-distribute-a-plugin-marketplace-claude-code-docs-34a8f3c5e8.md) - Creating and managing marketplaces
* [Skills](extend-claude-with-skills-claude-code-docs.md) - Skill development details
* [Subagents](../09-Agents-Patterns/create-custom-subagents-claude-code-docs-7dc93e85c0.md) - Agent configuration and capabilities
* [Hooks](../07-Hooks/hooks-9168ed62a4.md) - Event handling and automation
* [MCP](../06-MCP-Tools/mcp-208e742686.md) - External tool integration
* [Settings](../02-Claude-Code-CLI/claude-code-settings-claude-code-docs-d4420b4b52.md) - Configuration options for plugins
---
## plugins-reference-claude-code-docs-e80a6d455d.md
# Plugins reference
Complete technical reference for Claude Code plugin system, including schemas, CLI commands, and component specifications.
> ## Documentation Index
>
> Fetch the complete documentation index at: <https://code.claude.com/docs/llms.txt>
>
> Use this file to discover all available pages before exploring further.
Looking to install plugins? See [Discover and install plugins](/docs/en/discover-plugins). For creating plugins, see [Plugins](/docs/en/plugins). For distributing plugins, see [Plugin marketplaces](/docs/en/plugin-marketplaces).
This reference provides complete technical specifications for the Claude Code plugin system, including component schemas, CLI commands, and development tools. A **plugin** is a self-contained directory of components that extends Claude Code with custom functionality. Plugin components include skills, agents, hooks, MCP servers, LSP servers, and monitors.
Plugin components reference
Skills
Plugins add skills to Claude Code, creating `/name` shortcuts that you or Claude can invoke. **Location**: `skills/` or `commands/` directory in plugin root, or a single `SKILL.md` file at the plugin root **File format**: Skills are directories with `SKILL.md`; commands are simple markdown files **Skill structure**:
```python
skills/
├── pdf-processor/
│ ├── SKILL.md
│ ├── reference.md (optional)
│ └── scripts/ (optional)
└── code-reviewer/
└── SKILL.md
```
**Integration behavior**:
- Skills and commands are automatically discovered when the plugin is installed
- Claude can invoke them automatically based on task context
- Skills can include supporting files alongside SKILL.md
For complete details, see [Skills](/docs/en/skills).
Agents
Plugins can provide specialized subagents for specific tasks that Claude can invoke automatically when appropriate. **Location**: `agents/` directory in plugin root **File format**: Markdown files describing agent capabilities **Agent structure**:
```python
---
name: agent-name
description: What this agent specializes in and when Claude should invoke it
model: sonnet
effort: medium
maxTurns: 20
disallowedTools: Write, Edit
---
Detailed system prompt for the agent describing its role, expertise, and behavior.
```
Plugin agents support `name`, `description`, `model`, `effort`, `maxTurns`, `tools`, `disallowedTools`, `skills`, `memory`, `background`, and `isolation` frontmatter fields. The only valid `isolation` value is `"worktree"`. For security reasons, `hooks`, `mcpServers`, and `permissionMode` are not supported for plugin-shipped agents. **Integration points**:
- Agents appear in the `/agents` interface
- Claude can invoke agents automatically based on task context
- Agents can be invoked manually by users
- Plugin agents work alongside built-in Claude agents
For complete details, see [Subagents](/docs/en/sub-agents).
Hooks
Plugins can provide event handlers that respond to Claude Code events automatically. **Location**: `hooks/hooks.json` in plugin root, or inline in plugin.json **Format**: JSON configuration with event matchers and actions **Hook configuration**:
```python
{
"hooks": {
"PostToolUse": [
{
"matcher": "Write|Edit",
"hooks": [
{
"type": "command",
"command": "\"${CLAUDE_PLUGIN_ROOT}\"/scripts/format-code.sh"
}
]
}
]
}
}
```
Plugin hooks respond to the same lifecycle events as [user-defined hooks](/docs/en/hooks):
| Event | When it fires |
|:----------------------|:-------------------------------------------------------------------------------------------------------------------------------------------------------|
| `SessionStart` | When a session begins or resumes |
| `Setup` | When you start Claude Code with `--init-only`, or with `--init` or `--maintenance` in `-p` mode. For one-time preparation in CI or scripts |
| `UserPromptSubmit` | When you submit a prompt, before Claude processes it |
| `UserPromptExpansion` | When a user-typed command expands into a prompt, before it reaches Claude. Can block the expansion |
| `PreToolUse` | Before a tool call executes. Can block it |
| `PermissionRequest` | When a permission dialog appears |
| `PermissionDenied` | When a tool call is denied by the auto mode classifier. Return `{retry: true}` to tell the model it may retry the denied tool call |
| `PostToolUse` | After a tool call succeeds |
| `PostToolUseFailure` | After a tool call fails |
| `PostToolBatch` | After a full batch of parallel tool calls resolves, before the next model call |
| `Notification` | When Claude Code sends a notification |
| `SubagentStart` | When a subagent is spawned |
| `SubagentStop` | When a subagent finishes |
| `TaskCreated` | When a task is being created via `TaskCreate` |
| `TaskCompleted` | When a task is being marked as completed |
| `Stop` | When Claude finishes responding |
| `StopFailure` | When the turn ends due to an API error. Output and exit code are ignored |
| `TeammateIdle` | When an [agent team](/docs/en/agent-teams) teammate is about to go idle |
| `InstructionsLoaded` | When a CLAUDE.md or `.claude/rules/*.md` file is loaded into context. Fires at session start and when files are lazily loaded during a session |
| `ConfigChange` | When a configuration file changes during a session |
| `CwdChanged` | When the working directory changes, for example when Claude executes a `cd` command. Useful for reactive environment management with tools like direnv |
| `FileChanged` | When a watched file changes on disk. The `matcher` field specifies which filenames to watch |
| `WorktreeCreate` | When a worktree is being created via `--worktree` or `isolation: "worktree"`. Replaces default git behavior |
| `WorktreeRemove` | When a worktree is being removed, either at session exit or when a subagent finishes |
| `PreCompact` | Before context compaction |
| `PostCompact` | After context compaction completes |
| `Elicitation` | When an MCP server requests user input during a tool call |
| `ElicitationResult` | After a user responds to an MCP elicitation, before the response is sent back to the server |
| `SessionEnd` | When a session terminates |
**Hook types**:
- `command`: execute shell commands or scripts
- `http`: send the event JSON as a POST request to a URL
- `mcp_tool`: call a tool on a configured [MCP server](/docs/en/mcp)
- `prompt`: evaluate a prompt with an LLM (uses `$ARGUMENTS` placeholder for context)
- `agent`: run an agentic verifier with tools for complex verification tasks
MCP servers
Plugins can bundle Model Context Protocol (MCP) servers to connect Claude Code with external tools and services. **Location**: `.mcp.json` in plugin root, or inline in plugin.json **Format**: Standard MCP server configuration **MCP server configuration**:
```python
{
"mcpServers": {
"plugin-database": {
"command": "${CLAUDE_PLUGIN_ROOT}/servers/db-server",
"args": ["--config", "${CLAUDE_PLUGIN_ROOT}/config.json"],
"env": {
"DB_PATH": "${CLAUDE_PLUGIN_ROOT}/data"
}
},
"plugin-api-client": {
"command": "npx",
"args": ["@company/mcp-server", "--plugin-mode"],
"cwd": "${CLAUDE_PLUGIN_ROOT}"
}
}
}
```
**Integration behavior**:
- Plugin MCP servers start automatically when the plugin is enabled
- Servers appear as standard MCP tools in Claude’s toolkit
- Server capabilities integrate seamlessly with Claude’s existing tools
- Plugin servers can be configured independently of user MCP servers
LSP servers
Looking to use LSP plugins? Install them from the official marketplace: search for “lsp” in the `/plugin` Discover tab. This section documents how to create LSP plugins for languages not covered by the official marketplace.
Plugins can provide [Language Server Protocol](https://microsoft.github.io/language-server-protocol/) (LSP) servers to give Claude real-time code intelligence while working on your codebase. LSP integration provides:
- **Instant diagnostics**: Claude sees errors and warnings immediately after each edit
- **Code navigation**: go to definition, find references, and hover information
- **Language awareness**: type information and documentation for code symbols
**Location**: `.lsp.json` in plugin root, or inline in `plugin.json` **Format**: JSON configuration mapping language server names to their configurations **`.lsp.json` file format**:
```python
{
"go": {
"command": "gopls",
"args": ["serve"],
"extensionToLanguage": {
".go": "go"
}
}
}
```
**Inline in `plugin.json`**:
```python
{
"name": "my-plugin",
"lspServers": {
"go": {
"command": "gopls",
"args": ["serve"],
"extensionToLanguage": {
".go": "go"
}
}
}
}
```
**Required fields:**
| Field | Description |
|:----------------------|:---------------------------------------------|
| `command` | The LSP binary to execute (must be in PATH) |
| `extensionToLanguage` | Maps file extensions to language identifiers |
**Optional fields:**
| Field | Description |
|:------------------------|:----------------------------------------------------------|
| `args` | Command-line arguments for the LSP server |
| `transport` | Communication transport: `stdio` (default) or `socket` |
| `env` | Environment variables to set when starting the server |
| `initializationOptions` | Options passed to the server during initialization |
| `settings` | Settings passed via `workspace/didChangeConfiguration` |
| `workspaceFolder` | Workspace folder path for the server |
| `startupTimeout` | Max time to wait for server startup (milliseconds) |
| `shutdownTimeout` | Max time to wait for graceful shutdown (milliseconds) |
| `restartOnCrash` | Whether to automatically restart the server if it crashes |
| `maxRestarts` | Maximum number of restart attempts before giving up |
**You must install the language server binary separately.** LSP plugins configure how Claude Code connects to a language server, but they don’t include the server itself. If you see `Executable not found in $PATH` in the `/plugin` Errors tab, install the required binary for your language.
**Available LSP plugins:**
| Plugin | Language server | Install command |
|:--------------------|:---------------------------|:-------------------------------------------------------------------------------------------|
| `pyright-lsp` | Pyright (Python) | `pip install pyright` or `npm install -g pyright` |
| `typescript-lsp` | TypeScript Language Server | `npm install -g typescript-language-server typescript` |
| `rust-analyzer-lsp` | rust-analyzer | [See rust-analyzer installation](https://rust-analyzer.github.io/manual.html#installation) |
Install the language server first, then install the plugin from the marketplace.
Monitors
Plugins can declare background monitors that Claude Code starts automatically when the plugin is active. Each monitor runs a shell command for the lifetime of the session and delivers every stdout line to Claude as a notification, so Claude can react to log entries, status changes, or polled events without being asked to start the watch itself. Plugin monitors use the same mechanism as the [Monitor tool](/docs/en/tools-reference#monitor-tool) and share its availability constraints. They run only in interactive CLI sessions, run unsandboxed at the same trust level as [hooks](#hooks), and are skipped on hosts where the Monitor tool is unavailable.
Plugin monitors require Claude Code v2.1.105 or later.
**Location**: `monitors/monitors.json` in the plugin root, or inline in `plugin.json` **Format**: JSON array of monitor entries The following `monitors/monitors.json` watches a deployment status endpoint and a local error log:
```python
[
{
"name": "deploy-status",
"command": "\"${CLAUDE_PLUGIN_ROOT}\"/scripts/poll-deploy.sh ${user_config.api_endpoint}",
"description": "Deployment status changes"
},
{
"name": "error-log",
"command": "tail -F ./logs/error.log",
"description": "Application error log",
"when": "on-skill-invoke:debug"
}
]
```
To declare monitors inline, set `experimental.monitors` in `plugin.json` to the same array. To load from a non-default path, set `experimental.monitors` to a relative path string such as `"./config/monitors.json"`. Monitors are an [experimental component](#experimental-components). **Required fields:**
| Field | Description |
|:--------------|:----------------------------------------------------------------------------------------------------------------------|
| `name` | Identifier unique within the plugin. Prevents duplicate processes when the plugin reloads or a skill is invoked again |
| `command` | Shell command run as a persistent background process in the session working directory |
| `description` | Short summary of what is being watched. Shown in the task panel and in notification summaries |
**Optional fields:**
| Field | Description |
|:-------|:-------------------------------------------------------------------------------------------------------------------------------------------------------------------------------------------------------------------------|
| `when` | Controls when the monitor starts. `"always"` starts it at session start and on plugin reload, and is the default. `"on-skill-invoke:<skill-name>"` starts it the first time the named skill in this plugin is dispatched |
The `command` value supports the same [variable substitutions](#environment-variables) as MCP and LSP server configs: `${CLAUDE_PLUGIN_ROOT}`, `${CLAUDE_PLUGIN_DATA}`, `${CLAUDE_PROJECT_DIR}`, `${user_config.*}`, and any `${ENV_VAR}` from the environment. Prefix the command with `cd "${CLAUDE_PLUGIN_ROOT}" && ` if the script needs to run from the plugin’s own directory. Disabling a plugin mid-session does not stop monitors that are already running. They stop when the session ends.
Themes
Plugins can ship color themes that appear in `/theme` alongside the built-in presets and the user’s local themes. A theme is a JSON file in `themes/` with a `base` preset and a sparse `overrides` map of color tokens. Themes are an [experimental component](#experimental-components).
```python
{
"name": "Dracula",
"base": "dark",
"overrides": {
"claude": "#bd93f9",
"error": "#ff5555",
"success": "#50fa7b"
}
}
```
Selecting a plugin theme persists `custom:<plugin-name>:<slug>` in the user’s config. Plugin themes are read-only; pressing `Ctrl+E` on one in `/theme` copies it into `~/.claude/themes/` so the user can edit the copy.
------------------------------------------------------------------------
Plugin installation scopes
When you install a plugin, you choose a **scope** that determines where the plugin is available and who else can use it:
| Scope | Settings file | Use case |
|:----------|:-----------------------------------------------------|:---------------------------------------------------------|
| `user` | `~/.claude/settings.json` | Personal plugins available across all projects (default) |
| `project` | `.claude/settings.json` | Team plugins shared via version control |
| `local` | `.claude/settings.local.json` | Project-specific plugins, gitignored |
| `managed` | [Managed settings](/docs/en/settings#settings-files) | Managed plugins (read-only, update only) |
Plugins use the same scope system as other Claude Code configurations. For installation instructions and scope flags, see [Install plugins](/docs/en/discover-plugins#install-plugins). For a complete explanation of scopes, see [Configuration scopes](/docs/en/settings#configuration-scopes).
------------------------------------------------------------------------
Plugin manifest schema
The `.claude-plugin/plugin.json` file defines your plugin’s metadata and configuration. This section documents all supported fields and options. The manifest is optional. If omitted, Claude Code auto-discovers components in [default locations](#file-locations-reference) and derives the plugin name from the directory name. Use a manifest when you need to provide metadata or custom component paths.
Complete schema
```python
{
"name": "plugin-name",
"displayName": "Plugin Name",
"version": "1.2.0",
"description": "Brief plugin description",
"author": {
"name": "Author Name",
"email": "author@example.com",
"url": "https://github.com/author"
},
"homepage": "https://docs.example.com/plugin",
"repository": "https://github.com/author/plugin",
"license": "MIT",
"keywords": ["keyword1", "keyword2"],
"skills": "./custom/skills/",
"commands": ["./custom/commands/special.md"],
"agents": ["./custom/agents/reviewer.md"],
"hooks": "./config/hooks.json",
"mcpServers": "./mcp-config.json",
"outputStyles": "./styles/",
"lspServers": "./.lsp.json",
"experimental": {
"themes": "./themes/",
"monitors": "./monitors.json"
},
"dependencies": [
"helper-lib",
{ "name": "secrets-vault", "version": "~2.1.0" }
]
}
```
Required fields
If you include a manifest, `name` is the only required field.
| Field | Type | Description | Example |
|:-------|:-------|:------------------------------------------|:---------------------|
| `name` | string | Unique identifier (kebab-case, no spaces) | `"deployment-tools"` |
This name is used for namespacing components. For example, in the UI, the agent `agent-creator` for the plugin with name `plugin-dev` will appear as `plugin-dev:agent-creator`.
Metadata fields
| Field | Type | Description | Example |
|:--------------|:-------|:-------------------------------------------------------------------------------------------------------------------------------------------------------------------------------------------------------------------------------------------------------------------------------------------------------------------------------------------------|:------------------------------------------------------------------|
| `$schema` | string | JSON Schema URL for editor autocomplete and validation. Claude Code ignores this field at load time. | `"https://json.schemastore.org/claude-code-plugin-manifest.json"` |
| `displayName` | string | Human-readable name shown in the `/plugin` picker and other UI surfaces. Falls back to `name` when omitted. Unlike `name`, may contain spaces and any casing. Not used for namespacing or lookup. Requires Claude Code v2.1.143 or later. | `"Deployment Tools"` |
| `version` | string | Optional. Semantic version. Setting this pins the plugin to that version string, so users only receive updates when you bump it. If omitted, Claude Code falls back to the git commit SHA, so every commit is treated as a new version. If also set in the marketplace entry, `plugin.json` wins. See [Version management](#version-management). | `"2.1.0"` |
| `description` | string | Brief explanation of plugin purpose | `"Deployment automation tools"` |
| `author` | object | Author information | `{"name": "Dev Team", "email": "dev@company.com"}` |
| `homepage` | string | Documentation URL | `"https://docs.example.com"` |
| `repository` | string | Source code URL | `"https://github.com/user/plugin"` |
| `license` | string | License identifier | `"MIT"`, `"Apache-2.0"` |
| `keywords` | array | Discovery tags | `["deployment", "ci-cd"]` |
Component path fields
| Field | Type | Description | Example |
|:------------------------|:----------------------|:----------------------------------------------------------------------------------------------------------------------------------------------------------|:-----------------------------------------------------|
| `skills` | string\|array | Custom skill directories containing `<name>/SKILL.md` (in addition to default `skills/`) | `"./custom/skills/"` |
| `commands` | string\|array | Custom flat `.md` skill files or directories (replaces default `commands/`) | `"./custom/cmd.md"` or `["./cmd1.md"]` |
| `agents` | string\|array | Custom agent files (replaces default `agents/`) | `"./custom/agents/reviewer.md"` |
| `hooks` | string\|array\|object | Hook config paths or inline config | `"./my-extra-hooks.json"` |
| `mcpServers` | string\|array\|object | MCP config paths or inline config | `"./my-extra-mcp-config.json"` |
| `outputStyles` | string\|array | Custom output style files/directories (replaces default `output-styles/`) | `"./styles/"` |
| `lspServers` | string\|array\|object | [Language Server Protocol](https://microsoft.github.io/language-server-protocol/) configs for code intelligence (go to definition, find references, etc.) | `"./.lsp.json"` |
| `experimental.themes` | string\|array | Color theme files/directories (replaces default `themes/`). See [Themes](#themes) | `"./themes/"` |
| `experimental.monitors` | string\|array | Background [Monitor](/docs/en/tools-reference#monitor-tool) configurations that start automatically when the plugin is active. See [Monitors](#monitors) | `"./monitors.json"` |
| `userConfig` | object | User-configurable values prompted at enable time. See [User configuration](#user-configuration) | See below |
| `channels` | array | Channel declarations for message injection (Telegram, Slack, Discord style). See [Channels](#channels) | See below |
| `dependencies` | array | Other plugins this plugin requires, optionally with semver version constraints. See [Constrain plugin dependency versions](/docs/en/plugin-dependencies) | `[{ "name": "secrets-vault", "version": "~2.1.0" }]` |
Experimental components
Components under the `experimental` key, `themes` and `monitors`, have a manifest schema that may change between releases while they stabilize. Where you declare them is a separate migration: the top level still works, `claude plugin validate` warns, and a future release will require `experimental.*`.
User configuration
The `userConfig` field declares values that Claude Code prompts the user for when the plugin is enabled. Use this instead of requiring users to hand-edit `settings.json`.
```python
{
"userConfig": {
"api_endpoint": {
"type": "string",
"title": "API endpoint",
"description": "Your team's API endpoint"
},
"api_token": {
"type": "string",
"title": "API token",
"description": "API authentication token",
"sensitive": true
}
}
}
```
Keys must be valid identifiers. Each option supports these fields:
| Field | Required | Description |
|:--------------|:---------|:-----------------------------------------------------------------------------------------|
| `type` | Yes | One of `string`, `number`, `boolean`, `directory`, or `file` |
| `title` | Yes | Label shown in the configuration dialog |
| `description` | Yes | Help text shown beneath the field |
| `sensitive` | No | If `true`, masks input and stores the value in secure storage instead of `settings.json` |
| `required` | No | If `true`, validation fails when the field is empty |
| `default` | No | Value used when the user provides nothing |
| `multiple` | No | For `string` type, allow an array of strings |
| `min` / `max` | No | Bounds for `number` type |
Each value is available for substitution as `${user_config.KEY}` in MCP and LSP server configs, hook commands, and monitor commands. Non-sensitive values can also be substituted in skill and agent content. All values are exported to plugin subprocesses as `CLAUDE_PLUGIN_OPTION_<KEY>` environment variables. Non-sensitive values are stored in `settings.json` under `pluginConfigs[<plugin-id>].options`. Sensitive values go to the system keychain (or `~/.claude/.credentials.json` where the keychain is unavailable). Keychain storage is shared with OAuth tokens and has an approximately 2 KB total limit, so keep sensitive values small.
Channels
The `channels` field lets a plugin declare one or more message channels that inject content into the conversation. Each channel binds to an MCP server that the plugin provides.
```python
{
"channels": [
{
"server": "telegram",
"userConfig": {
"bot_token": {
"type": "string",
"title": "Bot token",
"description": "Telegram bot token",
"sensitive": true
},
"owner_id": {
"type": "string",
"title": "Owner ID",
"description": "Your Telegram user ID"
}
}
}
]
}
```
The `server` field is required and must match a key in the plugin’s `mcpServers`. The optional per-channel `userConfig` uses the same schema as the top-level field, letting the plugin prompt for bot tokens or owner IDs when the plugin is enabled.
Path behavior rules
Whether a custom path replaces or extends the plugin’s default directory depends on the field:
- **Replaces the default**: `commands`, `agents`, `outputStyles`, `experimental.themes`, `experimental.monitors`. For example, when the manifest specifies `commands`, the default `commands/` directory is not scanned. To keep the default and add more, list it explicitly: `"commands": ["./commands/", "./extras/"]`
- **Adds to the default**: `skills`. The default `skills/` directory is always scanned, and directories listed in `skills` are loaded alongside it
- **Own merge rules**: [hooks](#hooks), [MCP servers](#mcp-servers), and [LSP servers](#lsp-servers). See each section for how multiple sources combine
When a plugin has both a default folder and the matching manifest key, Claude Code v2.1.140 and later flags the ignored folder in `/doctor`, `claude plugin list`, and the `/plugin` detail view. The plugin still loads using the manifest paths. No warning is shown when the manifest key points into the default folder, for example `"commands": ["./commands/deploy.md"]`, because the folder is addressed explicitly in that case. For all path fields:
- All paths must be relative to the plugin root and start with `./`
- Components from custom paths use the same naming and namespacing rules
- Multiple paths can be specified as arrays
- When a skill path points to a directory that contains a `SKILL.md` directly, for example `"skills": ["./"]` pointing to the plugin root, the frontmatter `name` field in `SKILL.md` determines the skill’s invocation name. This gives a stable name regardless of the install directory. If `name` is not set in the frontmatter, the directory basename is used as a fallback.
A plugin that has a `SKILL.md` at its root, no `skills/` subdirectory, and no `skills` manifest field is automatically loaded as a single-skill plugin in Claude Code v2.1.142 and later. You do not need to set `"skills": ["./"]` in `plugin.json` for this layout. The skill’s invocation name follows the same rule as above: the frontmatter `name` field, or the directory basename as a fallback. **Path examples**:
```python
{
"commands": [
"./specialized/deploy.md",
"./utilities/batch-process.md"
],
"agents": [
"./custom-agents/reviewer.md",
"./custom-agents/tester.md"
]
}
```
Environment variables
Claude Code provides three variables for referencing paths. All are substituted inline anywhere they appear in skill content, agent content, hook commands, monitor commands, and MCP or LSP server configs. All are also exported as environment variables to hook processes and MCP or LSP server subprocesses. **`${CLAUDE_PLUGIN_ROOT}`**: the absolute path to your plugin’s installation directory. Use this to reference scripts, binaries, and config files bundled with the plugin. In hook commands, use [exec form](/docs/en/hooks#exec-form-and-shell-form) with `args` so the path is passed as one argument with no quoting. In shell-form hooks and monitor commands, wrap it in double quotes, as in `"${CLAUDE_PLUGIN_ROOT}"`. This path changes when the plugin updates. The previous version’s directory remains on disk for about seven days after an update before cleanup, but treat it as ephemeral and do not write state here. When a plugin updates mid-session, hook commands, monitors, MCP servers, and LSP servers keep using the previous version’s path. Run `/reload-plugins` to switch hooks, MCP servers, and LSP servers to the new path; monitors require a session restart. **`${CLAUDE_PLUGIN_DATA}`**: a persistent directory for plugin state that survives updates. Use this for installed dependencies such as `node_modules` or Python virtual environments, generated code, caches, and any other files that should persist across plugin versions. The directory is created automatically the first time this variable is referenced. **`${CLAUDE_PROJECT_DIR}`**: the project root. This is the same directory hooks receive in their `CLAUDE_PROJECT_DIR` variable. Use this to reference project-local scripts or config files. Wrap in quotes to handle paths with spaces, for example `"${CLAUDE_PROJECT_DIR}/scripts/server.sh"`. MCP servers can also call the MCP `roots/list` request, which returns the directory Claude Code was launched from.
```python
{
"hooks": {
"PostToolUse": [
{
"hooks": [
{
"type": "command",
"command": "\"${CLAUDE_PLUGIN_ROOT}\"/scripts/process.sh"
}
]
}
]
}
}
```
Persistent data directory
The `${CLAUDE_PLUGIN_DATA}` directory resolves to `~/.claude/plugins/data/{id}/`, where `{id}` is the plugin identifier with characters outside `a-z`, `A-Z`, `0-9`, `_`, and `-` replaced by `-`. For a plugin installed as `formatter@my-marketplace`, the directory is `~/.claude/plugins/data/formatter-my-marketplace/`. A common use is installing language dependencies once and reusing them across sessions and plugin updates. Because the data directory outlives any single plugin version, a check for directory existence alone cannot detect when an update changes the plugin’s dependency manifest. The recommended pattern compares the bundled manifest against a copy in the data directory and reinstalls when they differ. This `SessionStart` hook installs `node_modules` on the first run and again whenever a plugin update includes a changed `package.json`:
```python
{
"hooks": {
"SessionStart": [
{
"hooks": [
{
"type": "command",
"command": "diff -q \"${CLAUDE_PLUGIN_ROOT}/package.json\" \"${CLAUDE_PLUGIN_DATA}/package.json\" >/dev/null 2>&1 || (cd \"${CLAUDE_PLUGIN_DATA}\" && cp \"${CLAUDE_PLUGIN_ROOT}/package.json\" . && npm install) || rm -f \"${CLAUDE_PLUGIN_DATA}/package.json\""
}
]
}
]
}
}
```
The `diff` exits nonzero when the stored copy is missing or differs from the bundled one, covering both first run and dependency-changing updates. If `npm install` fails, the trailing `rm` removes the copied manifest so the next session retries. Scripts bundled in `${CLAUDE_PLUGIN_ROOT}` can then run against the persisted `node_modules`:
```python
{
"mcpServers": {
"routines": {
"command": "node",
"args": ["${CLAUDE_PLUGIN_ROOT}/server.js"],
"env": {
"NODE_PATH": "${CLAUDE_PLUGIN_DATA}/node_modules"
}
}
}
}
```
The data directory is deleted automatically when you uninstall the plugin from the last scope where it is installed. The `/plugin` interface shows the directory size and prompts before deleting. The CLI deletes by default; pass [`--keep-data`](#plugin-uninstall) to preserve it.
------------------------------------------------------------------------
Plugin caching and file resolution
Plugins are specified in one of two ways:
- Through `claude --plugin-dir` or `claude --plugin-url`, for the duration of a session.
- Through a marketplace, installed for future sessions.
For security and verification purposes, Claude Code copies *marketplace* plugins to the user’s local **plugin cache** (`~/.claude/plugins/cache`) rather than using them in-place. Understanding this behavior is important when developing plugins that reference external files. Each installed version is a separate directory in the cache. When you update or uninstall a plugin, the previous version directory is marked as orphaned and removed automatically 7 days later. The grace period lets concurrent Claude Code sessions that already loaded the old version keep running without errors. Claude’s Glob and Grep tools skip orphaned version directories during searches, so file results don’t include outdated plugin code.
Path traversal limitations
Installed plugins cannot reference files outside their directory. Paths that traverse outside the plugin root (such as `../shared-utils`) will not work after installation because those external files are not copied to the cache.
Share files within a marketplace with symlinks
If your plugin needs to share files with other parts of the same marketplace, you can create symbolic links inside your plugin directory. How a symlink is handled when the plugin is copied into the cache depends on where its target resolves:
- **Within the plugin’s own directory:** the symlink is preserved as a relative symlink in the cache, so it keeps resolving to the copied target at runtime.
- **Elsewhere within the same marketplace:** the symlink is dereferenced. The target’s content is copied into the cache in its place. This lets a meta-plugin’s `skills/` directory link to skills defined by other plugins in the marketplace.
- **Outside the marketplace:** the symlink is skipped for security. This prevents plugins from pulling arbitrary host files such as system paths into the cache.
For plugins installed with `--plugin-dir` or from a local path, only symlinks that resolve within the plugin’s own directory are preserved. All others are skipped. The following command creates a link from inside a marketplace plugin to a shared skill defined by a sibling plugin. On Windows, use `mklink /D` from an elevated Command Prompt or enable Developer Mode:
```python
ln -s ../../shared-plugin/skills/foo ./skills/foo
```
This provides flexibility while maintaining the security benefits of the caching system.
------------------------------------------------------------------------
Plugin directory structure
Standard plugin layout
A complete plugin follows this structure:
```python
enterprise-plugin/
├── .claude-plugin/ # Metadata directory (optional)
│ └── plugin.json # plugin manifest
├── skills/ # Skills
│ ├── code-reviewer/
│ │ └── SKILL.md
│ └── pdf-processor/
│ ├── SKILL.md
│ └── scripts/
├── commands/ # Skills as flat .md files
│ ├── status.md
│ └── logs.md
├── agents/ # Subagent definitions
│ ├── security-reviewer.md
│ ├── performance-tester.md
│ └── compliance-checker.md
├── output-styles/ # Output style definitions
│ └── terse.md
├── themes/ # Color theme definitions
│ └── dracula.json
├── monitors/ # Background monitor configurations
│ └── monitors.json
├── hooks/ # Hook configurations
│ ├── hooks.json # Main hook config
│ └── security-hooks.json # Additional hooks
├── bin/ # Plugin executables added to PATH
│ └── my-tool # Invokable as bare command in Bash tool
├── settings.json # Default settings for the plugin
├── .mcp.json # MCP server definitions
├── .lsp.json # LSP server configurations
├── scripts/ # Hook and utility scripts
│ ├── security-scan.sh
│ ├── format-code.py
│ └── deploy.js
├── LICENSE # License file
└── CHANGELOG.md # Version history
```
The `.claude-plugin/` directory contains the `plugin.json` file. All other directories (commands/, agents/, skills/, output-styles/, themes/, monitors/, hooks/) must be at the plugin root, not inside `.claude-plugin/`.
A `CLAUDE.md` file at the plugin root is not loaded as project context. Plugins contribute context through skills, agents, and hooks rather than CLAUDE.md. To ship instructions that load into Claude’s context, put them in a [skill](#skills).
File locations reference
| Component | Default Location | Purpose |
|:------------------|:-----------------------------|:-----------------------------------------------------------------------------------------------------------------------------------------------------------------------------------------------------|
| **Manifest** | `.claude-plugin/plugin.json` | Plugin metadata and configuration (optional) |
| **Skills** | `skills/` | Skills with `<name>/SKILL.md` structure |
| **Commands** | `commands/` | Skills as flat Markdown files. Use `skills/` for new plugins |
| **Agents** | `agents/` | Subagent Markdown files |
| **Output styles** | `output-styles/` | Output style definitions |
| **Themes** | `themes/` | Color theme definitions |
| **Hooks** | `hooks/hooks.json` | Hook configuration |
| **MCP servers** | `.mcp.json` | MCP server definitions |
| **LSP servers** | `.lsp.json` | Language server configurations |
| **Monitors** | `monitors/monitors.json` | Background monitor configurations |
| **Executables** | `bin/` | Executables added to the Bash tool’s `PATH`. Files here are invokable as bare commands in any Bash tool call while the plugin is enabled |
| **Settings** | `settings.json` | Default configuration applied when the plugin is enabled. Only the [`agent`](/docs/en/sub-agents) and [`subagentStatusLine`](/docs/en/statusline#subagent-status-lines) keys are currently supported |
------------------------------------------------------------------------
CLI commands reference
Claude Code provides CLI commands for non-interactive plugin management, useful for scripting and automation.
plugin install
Install a plugin from available marketplaces.
```python
claude plugin install <plugin> [options]
```
**Arguments:**
- `<plugin>`: Plugin name or `plugin-name@marketplace-name` for a specific marketplace
**Options:**
| Option | Description | Default |
|:----------------------|:--------------------------------------------------|:--------|
| `-s, --scope <scope>` | Installation scope: `user`, `project`, or `local` | `user` |
| `-h, --help` | Display help for command | |
Scope determines which settings file the installed plugin is added to. For example, `--scope project` writes to `enabledPlugins` in .claude/settings.json, making the plugin available to everyone who clones the project repository. **Examples:**
```python
# Install to user scope (default)
claude plugin install formatter@my-marketplace
# Install to project scope (shared with team)
claude plugin install formatter@my-marketplace --scope project
# Install to local scope (gitignored)
claude plugin install formatter@my-marketplace --scope local
```
plugin uninstall
Remove an installed plugin.
```python
claude plugin uninstall <plugin> [options]
```
**Arguments:**
- `<plugin>`: Plugin name or `plugin-name@marketplace-name`
**Options:**
| Option | Description | Default |
|:----------------------|:---------------------------------------------------------------------------------------------------------|:--------|
| `-s, --scope <scope>` | Uninstall from scope: `user`, `project`, or `local` | `user` |
| `--keep-data` | Preserve the plugin’s [persistent data directory](#persistent-data-directory) | |
| `--prune` | Also remove auto-installed dependencies that no other plugin requires. See [plugin prune](#plugin-prune) | |
| `-y, --yes` | Skip the `--prune` confirmation prompt. Required when stdin or stdout is not a TTY | |
| `-h, --help` | Display help for command | |
**Aliases:** `remove`, `rm` By default, uninstalling from the last remaining scope also deletes the plugin’s `${CLAUDE_PLUGIN_DATA}` directory. Use `--keep-data` to preserve it, for example when reinstalling after testing a new version.
plugin prune
Remove auto-installed plugin dependencies that are no longer required by any installed plugin. Dependencies that Claude Code pulled in to satisfy another plugin’s [`dependencies`](/docs/en/plugin-dependencies) field are removed; plugins you installed directly are never touched.
```python
claude plugin prune [options]
```
**Options:**
| Option | Description | Default |
|:----------------------|:-------------------------------------------------------------------------|:--------|
| `-s, --scope <scope>` | Prune at scope: `user`, `project`, or `local` | `user` |
| `--dry-run` | List what would be removed without removing anything | |
| `-y, --yes` | Skip the confirmation prompt. Required when stdin or stdout is not a TTY | |
| `-h, --help` | Display help for command | |
**Aliases:** `autoremove` The command lists orphaned dependencies and asks for confirmation before removing them. To remove a plugin and clean up its dependencies in one step, run `claude plugin uninstall <plugin> --prune`.
`claude plugin prune` requires Claude Code v2.1.121 or later.
plugin enable
Enable a disabled plugin. If the plugin declares [dependencies](/docs/en/plugin-dependencies), Claude Code enables them transitively at the same scope, and the command fails when a dependency is not installed.
```python
claude plugin enable <plugin> [options]
```
**Arguments:**
- `<plugin>`: Plugin name or `plugin-name@marketplace-name`
**Options:**
| Option | Description | Default |
|:----------------------|:-----------------------------------------------|:--------|
| `-s, --scope <scope>` | Scope to enable: `user`, `project`, or `local` | `user` |
| `-h, --help` | Display help for command | |
plugin disable
Disable a plugin without uninstalling it. Fails when another enabled plugin [depends on](/docs/en/plugin-dependencies#enable-or-disable-a-plugin-with-dependencies) the target. The error message includes a chained command that disables every dependent first.
```python
claude plugin disable <plugin> [options]
```
**Arguments:**
- `<plugin>`: Plugin name or `plugin-name@marketplace-name`
**Options:**
| Option | Description | Default |
|:----------------------|:------------------------------------------------|:--------|
| `-s, --scope <scope>` | Scope to disable: `user`, `project`, or `local` | `user` |
| `-h, --help` | Display help for command | |
plugin update
Update a plugin to the latest version.
```python
claude plugin update <plugin> [options]
```
**Arguments:**
- `<plugin>`: Plugin name or `plugin-name@marketplace-name`
**Options:**
| Option | Description | Default |
|:----------------------|:----------------------------------------------------------|:--------|
| `-s, --scope <scope>` | Scope to update: `user`, `project`, `local`, or `managed` | `user` |
| `-h, --help` | Display help for command | |
------------------------------------------------------------------------
plugin list
List installed plugins with their version, source marketplace, and enable status.
```python
claude plugin list [options]
```
**Options:**
| Option | Description | Default |
|:--------------|:---------------------------------------------------------------|:--------|
| `--json` | Output as JSON | |
| `--available` | Include available plugins from marketplaces. Requires `--json` | |
| `-h, --help` | Display help for command | |
plugin details
Show a plugin’s component inventory and projected token cost. The output lists all components the plugin contributes, grouped as Skills, Agents, Hooks, MCP servers, and LSP servers, along with an estimate of how many tokens it adds to each session. The Skills group includes both `skills/` and `commands/` entries.
```python
claude plugin details <name>
```
**Arguments:**
- `<name>`: Plugin name or `plugin-name@marketplace-name`
**Options:**
| Option | Description | Default |
|:-------------|:-------------------------|:--------|
| `-h, --help` | Display help for command | |
The output shows two cost figures for each component:
- **Always-on:** tokens added to every session by the plugin’s listing text, such as skill descriptions, agent descriptions, and command names, regardless of whether any component fires.
- **On-invoke:** tokens a component costs when it fires. Shown per component, not as a plugin total, because a typical session invokes only a subset of components.
This example shows what the output looks like for a plugin with two skills:
```python
security-guidance 1.2.0
Real-time security analysis for Claude Code sessions
Source: security-guidance@claude-code-marketplace
Component inventory
Skills (2) scan-dependencies, review-changes
Agents (0)
Hooks (1) (harness-only — no model context cost)
MCP servers (0)
LSP servers (0)
Projected token cost
Always-on: ~180 tok added to every session
Per-component (rounded)
component always-on on-invoke
scan-dependencies ~100 ~2400
review-changes ~80 ~1800
On-invoke cost is paid each time a skill or agent fires.
Token counts are estimates and may differ from actual usage.
```
The always-on total is computed via the `count_tokens` API for your active model. Per-component numbers are proportionally scaled from that total. If the API is unreachable, the command falls back to a character-based estimate.
plugin tag
Create a release git tag for the plugin in the current directory. Run from inside the plugin’s folder. See [Tag plugin releases](/docs/en/plugin-dependencies#tag-plugin-releases-for-version-resolution).
```python
claude plugin tag [options]
```
**Options:**
| Option | Description | Default |
|:--------------|:---------------------------------------------------------------------------|:--------|
| `--push` | Push the tag to the remote after creating it | |
| `--dry-run` | Print what would be tagged without creating the tag | |
| `-f, --force` | Create the tag even if the working tree is dirty or the tag already exists | |
| `-h, --help` | Display help for command | |
------------------------------------------------------------------------
Debugging and development tools
Debugging commands
Use `claude --debug` to see plugin loading details: This shows:
- Which plugins are being loaded
- Any errors in plugin manifests
- Skill, agent, and hook registration
- MCP server initialization
Common issues
| Issue | Cause | Solution |
|:------------------------------------|:--------------------------------|:----------------------------------------------------------------------------------------------------------------------------------------------------------------|
| Plugin not loading | Invalid `plugin.json` | Run `claude plugin validate` or `/plugin validate` to check `plugin.json`, skill/agent/command frontmatter, and `hooks/hooks.json` for syntax and schema errors |
| Skills not appearing | Wrong directory structure | Ensure `skills/` or `commands/` is at the plugin root, not inside `.claude-plugin/` |
| Hooks not firing | Script not executable | Run `chmod +x script.sh` |
| MCP server fails | Missing `${CLAUDE_PLUGIN_ROOT}` | Use variable for all plugin paths |
| Path errors | Absolute paths used | All paths must be relative and start with `./` |
| LSP `Executable not found in $PATH` | Language server not installed | Install the binary (e.g., `npm install -g typescript-language-server typescript`) |
Example error messages
**Manifest validation errors**:
- `Invalid JSON syntax: Unexpected token } in JSON at position 142`: check for missing commas, extra commas, or unquoted strings
- `Plugin has an invalid manifest file at .claude-plugin/plugin.json. Validation errors: name: Required`: a required field is missing
- `Plugin has a corrupt manifest file at .claude-plugin/plugin.json. JSON parse error: ...`: JSON syntax error
**Plugin loading errors**:
- `Warning: No commands found in plugin my-plugin custom directory: ./cmds. Expected .md files or SKILL.md in subdirectories.`: command path exists but contains no valid command files
- `Plugin directory not found at path: ./plugins/my-plugin. Check that the marketplace entry has the correct path.`: the `source` path in marketplace.json points to a non-existent directory
- `Plugin my-plugin has conflicting manifests: both plugin.json and marketplace entry specify components.`: remove duplicate component definitions or remove `strict: false` in marketplace entry
Hook troubleshooting
**Hook script not executing**:
1. Check the script is executable: `chmod +x ./scripts/your-script.sh`
2. Verify the shebang line: First line should be `#!/bin/bash` or `#!/usr/bin/env bash`
3. Check the path uses `${CLAUDE_PLUGIN_ROOT}`: `"command": "\"${CLAUDE_PLUGIN_ROOT}\"/scripts/your-script.sh"`
4. Test the script manually: `./scripts/your-script.sh`
**Hook not triggering on expected events**:
1. Verify the event name is correct (case-sensitive): `PostToolUse`, not `postToolUse`
2. Check the matcher pattern matches your tools: `"matcher": "Write|Edit"` for file operations
3. Confirm the hook type is valid: `command`, `http`, `mcp_tool`, `prompt`, or `agent`
MCP server troubleshooting
**Server not starting**:
1. Check the command exists and is executable
2. Verify all paths use `${CLAUDE_PLUGIN_ROOT}` variable
3. Check the MCP server logs: `claude --debug` shows initialization errors
4. Test the server manually outside of Claude Code
**Server tools not appearing**:
1. Ensure the server is properly configured in `.mcp.json` or `plugin.json`
2. Verify the server implements the MCP protocol correctly
3. Check for connection timeouts in debug output
Directory structure mistakes
**Symptoms**: Plugin loads but components (skills, agents, hooks) are missing. **Correct structure**: Components must be at the plugin root, not inside `.claude-plugin/`. Only `plugin.json` belongs in `.claude-plugin/`.
```python
my-plugin/
├── .claude-plugin/
│ └── plugin.json ← Only manifest here
├── commands/ ← At root level
├── agents/ ← At root level
└── hooks/ ← At root level
```
If your components are inside `.claude-plugin/`, move them to the plugin root. **Debug checklist**:
1. Run `claude --debug` and look for “loading plugin” messages
2. Check that each component directory is listed in the debug output
3. Verify file permissions allow reading the plugin files
------------------------------------------------------------------------
Distribution and versioning reference
Version management
Claude Code uses the plugin’s version as the cache key that determines whether an update is available. When you run `/plugin update` or auto-update fires, Claude Code computes the current version and skips the update if it matches what’s already installed. The version is resolved from the first of these that is set:
1. The `version` field in the plugin’s `plugin.json`
2. The `version` field in the plugin’s marketplace entry in `marketplace.json`
3. The git commit SHA of the plugin’s source, for `github`, `url`, `git-subdir`, and relative-path sources in a git-hosted marketplace
4. `unknown`, for `npm` sources or local directories not inside a git repository
This gives you two ways to version a plugin:
| Approach | How | Update behavior | Best for |
|:-----------------------|:-----------------------------------------------------------------|:---------------------------------------------------------------------------------------------------------------------------------------------------------------------|:--------------------------------------------------|
| **Explicit version** | Set `"version": "2.1.0"` in `plugin.json` | Users get updates only when you bump this field. Pushing new commits without bumping it has no effect, and `/plugin update` reports “already at the latest version”. | Published plugins with stable release cycles |
| **Commit-SHA version** | Omit `version` from both `plugin.json` and the marketplace entry | Users get updates on every new commit to the plugin’s git source | Internal or team plugins under active development |
If you set `version` in `plugin.json`, you must bump it every time you want users to receive changes. Pushing new commits alone is not enough, because Claude Code sees the same version string and keeps the cached copy. If you’re iterating quickly, leave `version` unset so the git commit SHA is used instead.
If you use explicit versions, follow [semantic versioning](https://semver.org) (`MAJOR.MINOR.PATCH`): bump MAJOR for breaking changes, MINOR for new features, PATCH for bug fixes. Document changes in a `CHANGELOG.md`.
------------------------------------------------------------------------
See also
- [Plugins](/docs/en/plugins) - Tutorials and practical usage
- [Plugin marketplaces](/docs/en/plugin-marketplaces) - Creating and managing marketplaces
- [Skills](/docs/en/skills) - Skill development details
- [Subagents](/docs/en/sub-agents) - Agent configuration and capabilities
- [Hooks](/docs/en/hooks) - Event handling and automation
- [MCP](/docs/en/mcp) - External tool integration
- [Settings](/docs/en/settings) - Configuration options for plugins
---
## plugins-reference-claude-code-docs.md
# Plugins reference
Complete technical reference for Claude Code plugin system, including schemas, CLI commands, and component specifications.
Looking to install plugins? See [Discover and install plugins](/docs/en/discover-plugins). For creating plugins, see [Plugins](/docs/en/plugins). For distributing plugins, see [Plugin marketplaces](/docs/en/plugin-marketplaces).
This reference provides complete technical specifications for the Claude Code plugin system, including component schemas, CLI commands, and development tools. A **plugin** is a self-contained directory of components that extends Claude Code with custom functionality. Plugin components include skills, agents, hooks, MCP servers, LSP servers, and monitors.
Plugin components reference
Skills
Plugins add skills to Claude Code, creating `/name` shortcuts that you or Claude can invoke. **Location**: `skills/` or `commands/` directory in plugin root **File format**: Skills are directories with `SKILL.md`; commands are simple markdown files **Skill structure**:
```python
skills/
├── pdf-processor/
│ ├── SKILL.md
│ ├── reference.md (optional)
│ └── scripts/ (optional)
└── code-reviewer/
└── SKILL.md
```
**Integration behavior**:
- Skills and commands are automatically discovered when the plugin is installed
- Claude can invoke them automatically based on task context
- Skills can include supporting files alongside SKILL.md
For complete details, see [Skills](/docs/en/skills).
Agents
Plugins can provide specialized subagents for specific tasks that Claude can invoke automatically when appropriate. **Location**: `agents/` directory in plugin root **File format**: Markdown files describing agent capabilities **Agent structure**:
```python
---
name: agent-name
description: What this agent specializes in and when Claude should invoke it
model: sonnet
effort: medium
maxTurns: 20
disallowedTools: Write, Edit
---
Detailed system prompt for the agent describing its role, expertise, and behavior.
```
Plugin agents support `name`, `description`, `model`, `effort`, `maxTurns`, `tools`, `disallowedTools`, `skills`, `memory`, `background`, and `isolation` frontmatter fields. The only valid `isolation` value is `"worktree"`. For security reasons, `hooks`, `mcpServers`, and `permissionMode` are not supported for plugin-shipped agents. **Integration points**:
- Agents appear in the `/agents` interface
- Claude can invoke agents automatically based on task context
- Agents can be invoked manually by users
- Plugin agents work alongside built-in Claude agents
For complete details, see [Subagents](/docs/en/sub-agents).
Hooks
Plugins can provide event handlers that respond to Claude Code events automatically. **Location**: `hooks/hooks.json` in plugin root, or inline in plugin.json **Format**: JSON configuration with event matchers and actions **Hook configuration**:
```python
{
"hooks": {
"PostToolUse": [
{
"matcher": "Write|Edit",
"hooks": [
{
"type": "command",
"command": "${CLAUDE_PLUGIN_ROOT}/scripts/format-code.sh"
}
]
}
]
}
}
```
Plugin hooks respond to the same lifecycle events as [user-defined hooks](/docs/en/hooks):
| Event | When it fires |
|:---|:---|
| `SessionStart` | When a session begins or resumes |
| `UserPromptSubmit` | When you submit a prompt, before Claude processes it |
| `UserPromptExpansion` | When a user-typed command expands into a prompt, before it reaches Claude. Can block the expansion |
| `PreToolUse` | Before a tool call executes. Can block it |
| `PermissionRequest` | When a permission dialog appears |
| `PermissionDenied` | When a tool call is denied by the auto mode classifier. Return `{retry: true}` to tell the model it may retry the denied tool call |
| `PostToolUse` | After a tool call succeeds |
| `PostToolUseFailure` | After a tool call fails |
| `PostToolBatch` | After a full batch of parallel tool calls resolves, before the next model call |
| `Notification` | When Claude Code sends a notification |
| `SubagentStart` | When a subagent is spawned |
| `SubagentStop` | When a subagent finishes |
| `TaskCreated` | When a task is being created via `TaskCreate` |
| `TaskCompleted` | When a task is being marked as completed |
| `Stop` | When Claude finishes responding |
| `StopFailure` | When the turn ends due to an API error. Output and exit code are ignored |
| `TeammateIdle` | When an [agent team](/docs/en/agent-teams) teammate is about to go idle |
| `InstructionsLoaded` | When a CLAUDE.md or `.claude/rules/*.md` file is loaded into context. Fires at session start and when files are lazily loaded during a session |
| `ConfigChange` | When a configuration file changes during a session |
| `CwdChanged` | When the working directory changes, for example when Claude executes a `cd` command. Useful for reactive environment management with tools like direnv |
| `FileChanged` | When a watched file changes on disk. The `matcher` field specifies which filenames to watch |
| `WorktreeCreate` | When a worktree is being created via `--worktree` or `isolation: "worktree"`. Replaces default git behavior |
| `WorktreeRemove` | When a worktree is being removed, either at session exit or when a subagent finishes |
| `PreCompact` | Before context compaction |
| `PostCompact` | After context compaction completes |
| `Elicitation` | When an MCP server requests user input during a tool call |
| `ElicitationResult` | After a user responds to an MCP elicitation, before the response is sent back to the server |
| `SessionEnd` | When a session terminates |
**Hook types**:
- `command`: execute shell commands or scripts
- `http`: send the event JSON as a POST request to a URL
- `mcp_tool`: call a tool on a configured [MCP server](/docs/en/mcp)
- `prompt`: evaluate a prompt with an LLM (uses `$ARGUMENTS` placeholder for context)
- `agent`: run an agentic verifier with tools for complex verification tasks
MCP servers
Plugins can bundle Model Context Protocol (MCP) servers to connect Claude Code with external tools and services. **Location**: `.mcp.json` in plugin root, or inline in plugin.json **Format**: Standard MCP server configuration **MCP server configuration**:
```python
{
"mcpServers": {
"plugin-database": {
"command": "${CLAUDE_PLUGIN_ROOT}/servers/db-server",
"args": ["--config", "${CLAUDE_PLUGIN_ROOT}/config.json"],
"env": {
"DB_PATH": "${CLAUDE_PLUGIN_ROOT}/data"
}
},
"plugin-api-client": {
"command": "npx",
"args": ["@company/mcp-server", "--plugin-mode"],
"cwd": "${CLAUDE_PLUGIN_ROOT}"
}
}
}
```
**Integration behavior**:
- Plugin MCP servers start automatically when the plugin is enabled
- Servers appear as standard MCP tools in Claude’s toolkit
- Server capabilities integrate seamlessly with Claude’s existing tools
- Plugin servers can be configured independently of user MCP servers
LSP servers
Looking to use LSP plugins? Install them from the official marketplace: search for “lsp” in the `/plugin` Discover tab. This section documents how to create LSP plugins for languages not covered by the official marketplace.
Plugins can provide [Language Server Protocol](https://microsoft.github.io/language-server-protocol/) (LSP) servers to give Claude real-time code intelligence while working on your codebase. LSP integration provides:
- **Instant diagnostics**: Claude sees errors and warnings immediately after each edit
- **Code navigation**: go to definition, find references, and hover information
- **Language awareness**: type information and documentation for code symbols
**Location**: `.lsp.json` in plugin root, or inline in `plugin.json` **Format**: JSON configuration mapping language server names to their configurations **`.lsp.json` file format**:
```python
{
"go": {
"command": "gopls",
"args": ["serve"],
"extensionToLanguage": {
".go": "go"
}
}
}
```
**Inline in `plugin.json`**:
```python
{
"name": "my-plugin",
"lspServers": {
"go": {
"command": "gopls",
"args": ["serve"],
"extensionToLanguage": {
".go": "go"
}
}
}
}
```
**Required fields:**
| Field | Description |
|:----------------------|:---------------------------------------------|
| `command` | The LSP binary to execute (must be in PATH) |
| `extensionToLanguage` | Maps file extensions to language identifiers |
**Optional fields:**
| Field | Description |
|:---|:---|
| `args` | Command-line arguments for the LSP server |
| `transport` | Communication transport: `stdio` (default) or `socket` |
| `env` | Environment variables to set when starting the server |
| `initializationOptions` | Options passed to the server during initialization |
| `settings` | Settings passed via `workspace/didChangeConfiguration` |
| `workspaceFolder` | Workspace folder path for the server |
| `startupTimeout` | Max time to wait for server startup (milliseconds) |
| `shutdownTimeout` | Max time to wait for graceful shutdown (milliseconds) |
| `restartOnCrash` | Whether to automatically restart the server if it crashes |
| `maxRestarts` | Maximum number of restart attempts before giving up |
**You must install the language server binary separately.** LSP plugins configure how Claude Code connects to a language server, but they don’t include the server itself. If you see `Executable not found in $PATH` in the `/plugin` Errors tab, install the required binary for your language.
**Available LSP plugins:**
| Plugin | Language server | Install command |
|:---|:---|:---|
| `pyright-lsp` | Pyright (Python) | `pip install pyright` or `npm install -g pyright` |
| `typescript-lsp` | TypeScript Language Server | `npm install -g typescript-language-server typescript` |
| `rust-lsp` | rust-analyzer | [See rust-analyzer installation](https://rust-analyzer.github.io/manual.html#installation) |
Install the language server first, then install the plugin from the marketplace.
Monitors
Plugins can declare background monitors that Claude Code starts automatically when the plugin is active. Each monitor runs a shell command for the lifetime of the session and delivers every stdout line to Claude as a notification, so Claude can react to log entries, status changes, or polled events without being asked to start the watch itself. Plugin monitors use the same mechanism as the [Monitor tool](/docs/en/tools-reference#monitor-tool) and share its availability constraints. They run only in interactive CLI sessions, run unsandboxed at the same trust level as [hooks](#hooks), and are skipped on hosts where the Monitor tool is unavailable.
Plugin monitors require Claude Code v2.1.105 or later.
**Location**: `monitors/monitors.json` in the plugin root, or inline in `plugin.json` **Format**: JSON array of monitor entries The following `monitors/monitors.json` watches a deployment status endpoint and a local error log:
```python
[
{
"name": "deploy-status",
"command": "${CLAUDE_PLUGIN_ROOT}/scripts/poll-deploy.sh ${user_config.api_endpoint}",
"description": "Deployment status changes"
},
{
"name": "error-log",
"command": "tail -F ./logs/error.log",
"description": "Application error log",
"when": "on-skill-invoke:debug"
}
]
```
To declare monitors inline, set the `monitors` key in `plugin.json` to the same array. To load from a non-default path, set `monitors` to a relative path string such as `"./config/monitors.json"`. **Required fields:**
| Field | Description |
|:---|:---|
| `name` | Identifier unique within the plugin. Prevents duplicate processes when the plugin reloads or a skill is invoked again |
| `command` | Shell command run as a persistent background process in the session working directory |
| `description` | Short summary of what is being watched. Shown in the task panel and in notification summaries |
**Optional fields:**
| Field | Description |
|:---|:---|
| `when` | Controls when the monitor starts. `"always"` starts it at session start and on plugin reload, and is the default. `"on-skill-invoke:<skill-name>"` starts it the first time the named skill in this plugin is dispatched |
The `command` value supports the same [variable substitutions](#environment-variables) as MCP and LSP server configs: `${CLAUDE_PLUGIN_ROOT}`, `${CLAUDE_PLUGIN_DATA}`, `${user_config.*}`, and any `${ENV_VAR}` from the environment. Prefix the command with `cd "${CLAUDE_PLUGIN_ROOT}" && ` if the script needs to run from the plugin’s own directory. Disabling a plugin mid-session does not stop monitors that are already running. They stop when the session ends.
Themes
Plugins can ship color themes that appear in `/theme` alongside the built-in presets and the user’s local themes. A theme is a JSON file in `themes/` with a `base` preset and a sparse `overrides` map of color tokens.
```python
{
"name": "Dracula",
"base": "dark",
"overrides": {
"claude": "#bd93f9",
"error": "#ff5555",
"success": "#50fa7b"
}
}
```
Selecting a plugin theme persists `custom:<plugin-name>:<slug>` in the user’s config. Plugin themes are read-only; pressing `Ctrl+E` on one in `/theme` copies it into `~/.claude/themes/` so the user can edit the copy.
------------------------------------------------------------------------
Plugin installation scopes
When you install a plugin, you choose a **scope** that determines where the plugin is available and who else can use it:
| Scope | Settings file | Use case |
|:---|:---|:---|
| `user` | `~/.claude/settings.json` | Personal plugins available across all projects (default) |
| `project` | `.claude/settings.json` | Team plugins shared via version control |
| `local` | `.claude/settings.local.json` | Project-specific plugins, gitignored |
| `managed` | [Managed settings](/docs/en/settings#settings-files) | Managed plugins (read-only, update only) |
Plugins use the same scope system as other Claude Code configurations. For installation instructions and scope flags, see [Install plugins](/docs/en/discover-plugins#install-plugins). For a complete explanation of scopes, see [Configuration scopes](/docs/en/settings#configuration-scopes).
------------------------------------------------------------------------
Plugin manifest schema
The `.claude-plugin/plugin.json` file defines your plugin’s metadata and configuration. This section documents all supported fields and options. The manifest is optional. If omitted, Claude Code auto-discovers components in [default locations](#file-locations-reference) and derives the plugin name from the directory name. Use a manifest when you need to provide metadata or custom component paths.
Complete schema
```python
{
"name": "plugin-name",
"version": "1.2.0",
"description": "Brief plugin description",
"author": {
"name": "Author Name",
"email": "author@example.com",
"url": "https://github.com/author"
},
"homepage": "https://docs.example.com/plugin",
"repository": "https://github.com/author/plugin",
"license": "MIT",
"keywords": ["keyword1", "keyword2"],
"skills": "./custom/skills/",
"commands": ["./custom/commands/special.md"],
"agents": "./custom/agents/",
"hooks": "./config/hooks.json",
"mcpServers": "./mcp-config.json",
"outputStyles": "./styles/",
"themes": "./themes/",
"lspServers": "./.lsp.json",
"monitors": "./monitors.json",
"dependencies": [
"helper-lib",
{ "name": "secrets-vault", "version": "~2.1.0" }
]
}
```
Required fields
If you include a manifest, `name` is the only required field.
| Field | Type | Description | Example |
|:---|:---|:---|:---|
| `name` | string | Unique identifier (kebab-case, no spaces) | `"deployment-tools"` |
This name is used for namespacing components. For example, in the UI, the agent `agent-creator` for the plugin with name `plugin-dev` will appear as `plugin-dev:agent-creator`.
Metadata fields
| Field | Type | Description | Example |
|:---|:---|:---|:---|
| `version` | string | Optional. Semantic version. Setting this pins the plugin to that version string, so users only receive updates when you bump it. If omitted, Claude Code falls back to the git commit SHA, so every commit is treated as a new version. If also set in the marketplace entry, `plugin.json` wins. See [Version management](#version-management). | `"2.1.0"` |
| `description` | string | Brief explanation of plugin purpose | `"Deployment automation tools"` |
| `author` | object | Author information | `{"name": "Dev Team", "email": "dev@company.com"}` |
| `homepage` | string | Documentation URL | `"https://docs.example.com"` |
| `repository` | string | Source code URL | `"https://github.com/user/plugin"` |
| `license` | string | License identifier | `"MIT"`, `"Apache-2.0"` |
| `keywords` | array | Discovery tags | `["deployment", "ci-cd"]` |
Component path fields
| Field | Type | Description | Example |
|:---|:---|:---|:---|
| `skills` | string\|array | Custom skill directories containing `<name>/SKILL.md` (replaces default `skills/`) | `"./custom/skills/"` |
| `commands` | string\|array | Custom flat `.md` skill files or directories (replaces default `commands/`) | `"./custom/cmd.md"` or `["./cmd1.md"]` |
| `agents` | string\|array | Custom agent files (replaces default `agents/`) | `"./custom/agents/reviewer.md"` |
| `hooks` | string\|array\|object | Hook config paths or inline config | `"./my-extra-hooks.json"` |
| `mcpServers` | string\|array\|object | MCP config paths or inline config | `"./my-extra-mcp-config.json"` |
| `outputStyles` | string\|array | Custom output style files/directories (replaces default `output-styles/`) | `"./styles/"` |
| `themes` | string\|array | Color theme files/directories (replaces default `themes/`). See [Themes](#themes) | `"./themes/"` |
| `lspServers` | string\|array\|object | [Language Server Protocol](https://microsoft.github.io/language-server-protocol/) configs for code intelligence (go to definition, find references, etc.) | `"./.lsp.json"` |
| `monitors` | string\|array | Background [Monitor](/docs/en/tools-reference#monitor-tool) configurations that start automatically when the plugin is active. See [Monitors](#monitors) | `"./monitors.json"` |
| `userConfig` | object | User-configurable values prompted at enable time. See [User configuration](#user-configuration) | See below |
| `channels` | array | Channel declarations for message injection (Telegram, Slack, Discord style). See [Channels](#channels) | See below |
| `dependencies` | array | Other plugins this plugin requires, optionally with semver version constraints. See [Constrain plugin dependency versions](/docs/en/plugin-dependencies) | `[{ "name": "secrets-vault", "version": "~2.1.0" }]` |
User configuration
The `userConfig` field declares values that Claude Code prompts the user for when the plugin is enabled. Use this instead of requiring users to hand-edit `settings.json`.
```python
{
"userConfig": {
"api_endpoint": {
"type": "string",
"title": "API endpoint",
"description": "Your team's API endpoint"
},
"api_token": {
"type": "string",
"title": "API token",
"description": "API authentication token",
"sensitive": true
}
}
}
```
Keys must be valid identifiers. Each option supports these fields:
| Field | Required | Description |
|:---|:---|:---|
| `type` | Yes | One of `string`, `number`, `boolean`, `directory`, or `file` |
| `title` | Yes | Label shown in the configuration dialog |
| `description` | Yes | Help text shown beneath the field |
| `sensitive` | No | If `true`, masks input and stores the value in secure storage instead of `settings.json` |
| `required` | No | If `true`, validation fails when the field is empty |
| `default` | No | Value used when the user provides nothing |
| `multiple` | No | For `string` type, allow an array of strings |
| `min` / `max` | No | Bounds for `number` type |
Each value is available for substitution as `${user_config.KEY}` in MCP and LSP server configs, hook commands, and monitor commands. Non-sensitive values can also be substituted in skill and agent content. All values are exported to plugin subprocesses as `CLAUDE_PLUGIN_OPTION_<KEY>` environment variables. Non-sensitive values are stored in `settings.json` under `pluginConfigs[<plugin-id>].options`. Sensitive values go to the system keychain (or `~/.claude/.credentials.json` where the keychain is unavailable). Keychain storage is shared with OAuth tokens and has an approximately 2 KB total limit, so keep sensitive values small.
Channels
The `channels` field lets a plugin declare one or more message channels that inject content into the conversation. Each channel binds to an MCP server that the plugin provides.
```python
{
"channels": [
{
"server": "telegram",
"userConfig": {
"bot_token": {
"type": "string",
"title": "Bot token",
"description": "Telegram bot token",
"sensitive": true
},
"owner_id": {
"type": "string",
"title": "Owner ID",
"description": "Your Telegram user ID"
}
}
}
]
}
```
The `server` field is required and must match a key in the plugin’s `mcpServers`. The optional per-channel `userConfig` uses the same schema as the top-level field, letting the plugin prompt for bot tokens or owner IDs when the plugin is enabled.
Path behavior rules
For `skills`, `commands`, `agents`, `outputStyles`, `themes`, and `monitors`, a custom path replaces the default. If the manifest specifies `skills`, the default `skills/` directory is not scanned; if it specifies `monitors`, the default `monitors/monitors.json` is not loaded. [Hooks](#hooks), [MCP servers](#mcp-servers), and [LSP servers](#lsp-servers) have different semantics for handling multiple sources.
- All paths must be relative to the plugin root and start with `./`
- Components from custom paths use the same naming and namespacing rules
- Multiple paths can be specified as arrays
- To keep the default directory and add more paths for skills, commands, agents, or output styles, include the default in your array: `"skills": ["./skills/", "./extras/"]`
- When a skill path points to a directory that contains a `SKILL.md` directly, for example `"skills": ["./"]` pointing to the plugin root, the frontmatter `name` field in `SKILL.md` determines the skill’s invocation name. This gives a stable name regardless of the install directory. If `name` is not set in the frontmatter, the directory basename is used as a fallback.
**Path examples**:
```python
{
"commands": [
"./specialized/deploy.md",
"./utilities/batch-process.md"
],
"agents": [
"./custom-agents/reviewer.md",
"./custom-agents/tester.md"
]
}
```
Environment variables
Claude Code provides two variables for referencing plugin paths. Both are substituted inline anywhere they appear in skill content, agent content, hook commands, monitor commands, and MCP or LSP server configs. Both are also exported as environment variables to hook processes and MCP or LSP server subprocesses. **`${CLAUDE_PLUGIN_ROOT}`**: the absolute path to your plugin’s installation directory. Use this to reference scripts, binaries, and config files bundled with the plugin. This path changes when the plugin updates, so files you write here do not survive an update. **`${CLAUDE_PLUGIN_DATA}`**: a persistent directory for plugin state that survives updates. Use this for installed dependencies such as `node_modules` or Python virtual environments, generated code, caches, and any other files that should persist across plugin versions. The directory is created automatically the first time this variable is referenced.
```python
{
"hooks": {
"PostToolUse": [
{
"hooks": [
{
"type": "command",
"command": "${CLAUDE_PLUGIN_ROOT}/scripts/process.sh"
}
]
}
]
}
}
```
Persistent data directory
The `${CLAUDE_PLUGIN_DATA}` directory resolves to `~/.claude/plugins/data/{id}/`, where `{id}` is the plugin identifier with characters outside `a-z`, `A-Z`, `0-9`, `_`, and `-` replaced by `-`. For a plugin installed as `formatter@my-marketplace`, the directory is `~/.claude/plugins/data/formatter-my-marketplace/`. A common use is installing language dependencies once and reusing them across sessions and plugin updates. Because the data directory outlives any single plugin version, a check for directory existence alone cannot detect when an update changes the plugin’s dependency manifest. The recommended pattern compares the bundled manifest against a copy in the data directory and reinstalls when they differ. This `SessionStart` hook installs `node_modules` on the first run and again whenever a plugin update includes a changed `package.json`:
```python
{
"hooks": {
"SessionStart": [
{
"hooks": [
{
"type": "command",
"command": "diff -q \"${CLAUDE_PLUGIN_ROOT}/package.json\" \"${CLAUDE_PLUGIN_DATA}/package.json\" >/dev/null 2>&1 || (cd \"${CLAUDE_PLUGIN_DATA}\" && cp \"${CLAUDE_PLUGIN_ROOT}/package.json\" . && npm install) || rm -f \"${CLAUDE_PLUGIN_DATA}/package.json\""
}
]
}
]
}
}
```
The `diff` exits nonzero when the stored copy is missing or differs from the bundled one, covering both first run and dependency-changing updates. If `npm install` fails, the trailing `rm` removes the copied manifest so the next session retries. Scripts bundled in `${CLAUDE_PLUGIN_ROOT}` can then run against the persisted `node_modules`:
```python
{
"mcpServers": {
"routines": {
"command": "node",
"args": ["${CLAUDE_PLUGIN_ROOT}/server.js"],
"env": {
"NODE_PATH": "${CLAUDE_PLUGIN_DATA}/node_modules"
}
}
}
}
```
The data directory is deleted automatically when you uninstall the plugin from the last scope where it is installed. The `/plugin` interface shows the directory size and prompts before deleting. The CLI deletes by default; pass [`--keep-data`](#plugin-uninstall) to preserve it.
------------------------------------------------------------------------
Plugin caching and file resolution
Plugins are specified in one of two ways:
- Through `claude --plugin-dir`, for the duration of a session.
- Through a marketplace, installed for future sessions.
For security and verification purposes, Claude Code copies *marketplace* plugins to the user’s local **plugin cache** (`~/.claude/plugins/cache`) rather than using them in-place. Understanding this behavior is important when developing plugins that reference external files. Each installed version is a separate directory in the cache. When you update or uninstall a plugin, the previous version directory is marked as orphaned and removed automatically 7 days later. The grace period lets concurrent Claude Code sessions that already loaded the old version keep running without errors. Claude’s Glob and Grep tools skip orphaned version directories during searches, so file results don’t include outdated plugin code.
Path traversal limitations
Installed plugins cannot reference files outside their directory. Paths that traverse outside the plugin root (such as `../shared-utils`) will not work after installation because those external files are not copied to the cache.
Working with external dependencies
If your plugin needs to access files outside its directory, you can create symbolic links to external files within your plugin directory. Symlinks are preserved in the cache rather than dereferenced, and they resolve to their target at runtime. The following command creates a link from inside your plugin directory to a shared utilities location:
```python
ln -s /path/to/shared-utils ./shared-utils
```
This provides flexibility while maintaining the security benefits of the caching system.
------------------------------------------------------------------------
Plugin directory structure
Standard plugin layout
A complete plugin follows this structure:
```python
enterprise-plugin/
├── .claude-plugin/ # Metadata directory (optional)
│ └── plugin.json # plugin manifest
├── skills/ # Skills
│ ├── code-reviewer/
│ │ └── SKILL.md
│ └── pdf-processor/
│ ├── SKILL.md
│ └── scripts/
├── commands/ # Skills as flat .md files
│ ├── status.md
│ └── logs.md
├── agents/ # Subagent definitions
│ ├── security-reviewer.md
│ ├── performance-tester.md
│ └── compliance-checker.md
├── output-styles/ # Output style definitions
│ └── terse.md
├── themes/ # Color theme definitions
│ └── dracula.json
├── monitors/ # Background monitor configurations
│ └── monitors.json
├── hooks/ # Hook configurations
│ ├── hooks.json # Main hook config
│ └── security-hooks.json # Additional hooks
├── bin/ # Plugin executables added to PATH
│ └── my-tool # Invokable as bare command in Bash tool
├── settings.json # Default settings for the plugin
├── .mcp.json # MCP server definitions
├── .lsp.json # LSP server configurations
├── scripts/ # Hook and utility scripts
│ ├── security-scan.sh
│ ├── format-code.py
│ └── deploy.js
├── LICENSE # License file
└── CHANGELOG.md # Version history
```
The `.claude-plugin/` directory contains the `plugin.json` file. All other directories (commands/, agents/, skills/, output-styles/, themes/, monitors/, hooks/) must be at the plugin root, not inside `.claude-plugin/`.
File locations reference
| Component | Default Location | Purpose |
|:---|:---|:---|
| **Manifest** | `.claude-plugin/plugin.json` | Plugin metadata and configuration (optional) |
| **Skills** | `skills/` | Skills with `<name>/SKILL.md` structure |
| **Commands** | `commands/` | Skills as flat Markdown files. Use `skills/` for new plugins |
| **Agents** | `agents/` | Subagent Markdown files |
| **Output styles** | `output-styles/` | Output style definitions |
| **Themes** | `themes/` | Color theme definitions |
| **Hooks** | `hooks/hooks.json` | Hook configuration |
| **MCP servers** | `.mcp.json` | MCP server definitions |
| **LSP servers** | `.lsp.json` | Language server configurations |
| **Monitors** | `monitors/monitors.json` | Background monitor configurations |
| **Executables** | `bin/` | Executables added to the Bash tool’s `PATH`. Files here are invokable as bare commands in any Bash tool call while the plugin is enabled |
| **Settings** | `settings.json` | Default configuration applied when the plugin is enabled. Only the [`agent`](/docs/en/sub-agents) and [`subagentStatusLine`](/docs/en/statusline#subagent-status-lines) keys are currently supported |
------------------------------------------------------------------------
CLI commands reference
Claude Code provides CLI commands for non-interactive plugin management, useful for scripting and automation.
plugin install
Install a plugin from available marketplaces.
```python
claude plugin install <plugin> [options]
```
**Arguments:**
- `<plugin>`: Plugin name or `plugin-name@marketplace-name` for a specific marketplace
**Options:**
| Option | Description | Default |
|:---|:---|:---|
| `-s, --scope <scope>` | Installation scope: `user`, `project`, or `local` | `user` |
| `-h, --help` | Display help for command | |
Scope determines which settings file the installed plugin is added to. For example, `--scope project` writes to `enabledPlugins` in .claude/settings.json, making the plugin available to everyone who clones the project repository. **Examples:**
```python
# Install to user scope (default)
claude plugin install formatter@my-marketplace
# Install to project scope (shared with team)
claude plugin install formatter@my-marketplace --scope project
# Install to local scope (gitignored)
claude plugin install formatter@my-marketplace --scope local
```
plugin uninstall
Remove an installed plugin.
```python
claude plugin uninstall <plugin> [options]
```
**Arguments:**
- `<plugin>`: Plugin name or `plugin-name@marketplace-name`
**Options:**
| Option | Description | Default |
|:---|:---|:---|
| `-s, --scope <scope>` | Uninstall from scope: `user`, `project`, or `local` | `user` |
| `--keep-data` | Preserve the plugin’s [persistent data directory](#persistent-data-directory) | |
| `-h, --help` | Display help for command | |
**Aliases:** `remove`, `rm` By default, uninstalling from the last remaining scope also deletes the plugin’s `${CLAUDE_PLUGIN_DATA}` directory. Use `--keep-data` to preserve it, for example when reinstalling after testing a new version.
plugin enable
Enable a disabled plugin.
```python
claude plugin enable <plugin> [options]
```
**Arguments:**
- `<plugin>`: Plugin name or `plugin-name@marketplace-name`
**Options:**
| Option | Description | Default |
|:---|:---|:---|
| `-s, --scope <scope>` | Scope to enable: `user`, `project`, or `local` | `user` |
| `-h, --help` | Display help for command | |
plugin disable
Disable a plugin without uninstalling it.
```python
claude plugin disable <plugin> [options]
```
**Arguments:**
- `<plugin>`: Plugin name or `plugin-name@marketplace-name`
**Options:**
| Option | Description | Default |
|:---|:---|:---|
| `-s, --scope <scope>` | Scope to disable: `user`, `project`, or `local` | `user` |
| `-h, --help` | Display help for command | |
plugin update
Update a plugin to the latest version.
```python
claude plugin update <plugin> [options]
```
**Arguments:**
- `<plugin>`: Plugin name or `plugin-name@marketplace-name`
**Options:**
| Option | Description | Default |
|:---|:---|:---|
| `-s, --scope <scope>` | Scope to update: `user`, `project`, `local`, or `managed` | `user` |
| `-h, --help` | Display help for command | |
------------------------------------------------------------------------
plugin list
List installed plugins with their version, source marketplace, and enable status.
```python
claude plugin list [options]
```
**Options:**
| Option | Description | Default |
|:---|:---|:---|
| `--json` | Output as JSON | |
| `--available` | Include available plugins from marketplaces. Requires `--json` | |
| `-h, --help` | Display help for command | |
plugin tag
Create a release git tag for the plugin in the current directory. Run from inside the plugin’s folder. See [Tag plugin releases](/docs/en/plugin-dependencies#tag-plugin-releases-for-version-resolution).
```python
claude plugin tag [options]
```
**Options:**
| Option | Description | Default |
|:---|:---|:---|
| `--push` | Push the tag to the remote after creating it | |
| `--dry-run` | Print what would be tagged without creating the tag | |
| `-f, --force` | Create the tag even if the working tree is dirty or the tag already exists | |
| `-h, --help` | Display help for command | |
------------------------------------------------------------------------
Debugging and development tools
Debugging commands
Use `claude --debug` to see plugin loading details: This shows:
- Which plugins are being loaded
- Any errors in plugin manifests
- Skill, agent, and hook registration
- MCP server initialization
Common issues
| Issue | Cause | Solution |
|:---|:---|:---|
| Plugin not loading | Invalid `plugin.json` | Run `claude plugin validate` or `/plugin validate` to check `plugin.json`, skill/agent/command frontmatter, and `hooks/hooks.json` for syntax and schema errors |
| Skills not appearing | Wrong directory structure | Ensure `skills/` or `commands/` is at the plugin root, not inside `.claude-plugin/` |
| Hooks not firing | Script not executable | Run `chmod +x script.sh` |
| MCP server fails | Missing `${CLAUDE_PLUGIN_ROOT}` | Use variable for all plugin paths |
| Path errors | Absolute paths used | All paths must be relative and start with `./` |
| LSP `Executable not found in $PATH` | Language server not installed | Install the binary (e.g., `npm install -g typescript-language-server typescript`) |
Example error messages
**Manifest validation errors**:
- `Invalid JSON syntax: Unexpected token } in JSON at position 142`: check for missing commas, extra commas, or unquoted strings
- `Plugin has an invalid manifest file at .claude-plugin/plugin.json. Validation errors: name: Required`: a required field is missing
- `Plugin has a corrupt manifest file at .claude-plugin/plugin.json. JSON parse error: ...`: JSON syntax error
**Plugin loading errors**:
- `Warning: No commands found in plugin my-plugin custom directory: ./cmds. Expected .md files or SKILL.md in subdirectories.`: command path exists but contains no valid command files
- `Plugin directory not found at path: ./plugins/my-plugin. Check that the marketplace entry has the correct path.`: the `source` path in marketplace.json points to a non-existent directory
- `Plugin my-plugin has conflicting manifests: both plugin.json and marketplace entry specify components.`: remove duplicate component definitions or remove `strict: false` in marketplace entry
Hook troubleshooting
**Hook script not executing**:
1. Check the script is executable: `chmod +x ./scripts/your-script.sh`
2. Verify the shebang line: First line should be `#!/bin/bash` or `#!/usr/bin/env bash`
3. Check the path uses `${CLAUDE_PLUGIN_ROOT}`: `"command": "${CLAUDE_PLUGIN_ROOT}/scripts/your-script.sh"`
4. Test the script manually: `./scripts/your-script.sh`
**Hook not triggering on expected events**:
1. Verify the event name is correct (case-sensitive): `PostToolUse`, not `postToolUse`
2. Check the matcher pattern matches your tools: `"matcher": "Write|Edit"` for file operations
3. Confirm the hook type is valid: `command`, `http`, `mcp_tool`, `prompt`, or `agent`
MCP server troubleshooting
**Server not starting**:
1. Check the command exists and is executable
2. Verify all paths use `${CLAUDE_PLUGIN_ROOT}` variable
3. Check the MCP server logs: `claude --debug` shows initialization errors
4. Test the server manually outside of Claude Code
**Server tools not appearing**:
1. Ensure the server is properly configured in `.mcp.json` or `plugin.json`
2. Verify the server implements the MCP protocol correctly
3. Check for connection timeouts in debug output
Directory structure mistakes
**Symptoms**: Plugin loads but components (skills, agents, hooks) are missing. **Correct structure**: Components must be at the plugin root, not inside `.claude-plugin/`. Only `plugin.json` belongs in `.claude-plugin/`.
```python
my-plugin/
├── .claude-plugin/
│ └── plugin.json ← Only manifest here
├── commands/ ← At root level
├── agents/ ← At root level
└── hooks/ ← At root level
```
If your components are inside `.claude-plugin/`, move them to the plugin root. **Debug checklist**:
1. Run `claude --debug` and look for “loading plugin” messages
2. Check that each component directory is listed in the debug output
3. Verify file permissions allow reading the plugin files
------------------------------------------------------------------------
Distribution and versioning reference
Version management
Claude Code uses the plugin’s version as the cache key that determines whether an update is available. When you run `/plugin update` or auto-update fires, Claude Code computes the current version and skips the update if it matches what’s already installed. The version is resolved from the first of these that is set:
1. The `version` field in the plugin’s `plugin.json`
2. The `version` field in the plugin’s marketplace entry in `marketplace.json`
3. The git commit SHA of the plugin’s source, for `github`, `url`, `git-subdir`, and relative-path sources in a git-hosted marketplace
4. `unknown`, for `npm` sources or local directories not inside a git repository
This gives you two ways to version a plugin:
| Approach | How | Update behavior | Best for |
|:---|:---|:---|:---|
| **Explicit version** | Set `"version": "2.1.0"` in `plugin.json` | Users get updates only when you bump this field. Pushing new commits without bumping it has no effect, and `/plugin update` reports “already at the latest version”. | Published plugins with stable release cycles |
| **Commit-SHA version** | Omit `version` from both `plugin.json` and the marketplace entry | Users get updates on every new commit to the plugin’s git source | Internal or team plugins under active development |
If you set `version` in `plugin.json`, you must bump it every time you want users to receive changes. Pushing new commits alone is not enough, because Claude Code sees the same version string and keeps the cached copy. If you’re iterating quickly, leave `version` unset so the git commit SHA is used instead.
If you use explicit versions, follow [semantic versioning](https://semver.org) (`MAJOR.MINOR.PATCH`): bump MAJOR for breaking changes, MINOR for new features, PATCH for bug fixes. Document changes in a `CHANGELOG.md`.
------------------------------------------------------------------------
See also
- [Plugins](/docs/en/plugins) - Tutorials and practical usage
- [Plugin marketplaces](/docs/en/plugin-marketplaces) - Creating and managing marketplaces
- [Skills](/docs/en/skills) - Skill development details
- [Subagents](/docs/en/sub-agents) - Agent configuration and capabilities
- [Hooks](/docs/en/hooks) - Event handling and automation
- [MCP](/docs/en/mcp) - External tool integration
- [Settings](/docs/en/settings) - Configuration options for plugins
---
## plugins-reference.md
> Fetch the complete documentation index at: https://code.claude.com/docs/llms.txt
> Use this file to discover all available pages before exploring further.
# Plugins reference
> Complete technical reference for Claude Code plugin system, including schemas, CLI commands, and component specifications.
<Tip>
Looking to install plugins? See [Discover and install plugins](../02-Claude-Code-CLI/discover-and-install-prebuilt-plugins-through-marketplaces-claude-code-docs.md). For creating plugins, see [Plugins](create-plugins-claude-code-docs.md). For distributing plugins, see [Plugin marketplaces](create-and-distribute-a-plugin-marketplace-claude-code-docs-34a8f3c5e8.md).
</Tip>
This reference provides complete technical specifications for the Claude Code plugin system, including component schemas, CLI commands, and development tools.
## Plugin components reference
This section documents the types of components that plugins can provide.
### Skills
Plugins add skills to Claude Code, creating `/name` shortcuts that you or Claude can invoke.
**Location**: `skills/` or `commands/` directory in plugin root
**File format**: Skills are directories with `SKILL.md`; commands are simple markdown files
**Skill structure**:
```
skills/
├── pdf-processor/
│ ├── SKILL.md
│ ├── reference.md (optional)
│ └── scripts/ (optional)
└── code-reviewer/
└── SKILL.md
```
**Integration behavior**:
* Skills and commands are automatically discovered when the plugin is installed
* Claude can invoke them automatically based on task context
* Skills can include supporting files alongside SKILL.md
For complete details, see [Skills](extend-claude-with-skills-claude-code-docs.md).
### Agents
Plugins can provide specialized subagents for specific tasks that Claude can invoke automatically when appropriate.
**Location**: `agents/` directory in plugin root
**File format**: Markdown files describing agent capabilities
**Agent structure**:
```markdown theme={null}
---
description: What this agent specializes in
capabilities: ["task1", "task2", "task3"]
---
# Agent Name
Detailed description of the agent's role, expertise, and when Claude should invoke it.
## Capabilities
- Specific task the agent excels at
- Another specialized capability
- When to use this agent vs others
## Context and examples
Provide examples of when this agent should be used and what kinds of problems it solves.
```
**Integration points**:
* Agents appear in the `/agents` interface
* Claude can invoke agents automatically based on task context
* Agents can be invoked manually by users
* Plugin agents work alongside built-in Claude agents
### Hooks
Plugins can provide event handlers that respond to Claude Code events automatically.
**Location**: `hooks/hooks.json` in plugin root, or inline in plugin.json
**Format**: JSON configuration with event matchers and actions
**Hook configuration**:
```json theme={null}
{
"hooks": {
"PostToolUse": [
{
"matcher": "Write|Edit",
"hooks": [
{
"type": "command",
"command": "${CLAUDE_PLUGIN_ROOT}/scripts/format-code.sh"
}
]
}
]
}
}
```
**Available events**:
* `PreToolUse`: Before Claude uses any tool
* `PostToolUse`: After Claude successfully uses any tool
* `PostToolUseFailure`: After Claude tool execution fails
* `PermissionRequest`: When a permission dialog is shown
* `UserPromptSubmit`: When user submits a prompt
* `Notification`: When Claude Code sends notifications
* `Stop`: When Claude attempts to stop
* `SubagentStart`: When a subagent is started
* `SubagentStop`: When a subagent attempts to stop
* `SessionStart`: At the beginning of sessions
* `SessionEnd`: At the end of sessions
* `PreCompact`: Before conversation history is compacted
**Hook types**:
* `command`: Execute shell commands or scripts
* `prompt`: Evaluate a prompt with an LLM (uses `$ARGUMENTS` placeholder for context)
* `agent`: Run an agentic verifier with tools for complex verification tasks
### MCP servers
Plugins can bundle Model Context Protocol (MCP) servers to connect Claude Code with external tools and services.
**Location**: `.mcp.json` in plugin root, or inline in plugin.json
**Format**: Standard MCP server configuration
**MCP server configuration**:
```json theme={null}
{
"mcpServers": {
"plugin-database": {
"command": "${CLAUDE_PLUGIN_ROOT}/servers/db-server",
"args": ["--config", "${CLAUDE_PLUGIN_ROOT}/config.json"],
"env": {
"DB_PATH": "${CLAUDE_PLUGIN_ROOT}/data"
}
},
"plugin-api-client": {
"command": "npx",
"args": ["@company/mcp-server", "--plugin-mode"],
"cwd": "${CLAUDE_PLUGIN_ROOT}"
}
}
}
```
**Integration behavior**:
* Plugin MCP servers start automatically when the plugin is enabled
* Servers appear as standard MCP tools in Claude's toolkit
* Server capabilities integrate seamlessly with Claude's existing tools
* Plugin servers can be configured independently of user MCP servers
### LSP servers
<Tip>
Looking to use LSP plugins? Install them from the official marketplace—search for "lsp" in the `/plugin` Discover tab. This section documents how to create LSP plugins for languages not covered by the official marketplace.
</Tip>
Plugins can provide [Language Server Protocol](https://microsoft.github.io/language-server-protocol/) (LSP) servers to give Claude real-time code intelligence while working on your codebase.
LSP integration provides:
* **Instant diagnostics**: Claude sees errors and warnings immediately after each edit
* **Code navigation**: go to definition, find references, and hover information
* **Language awareness**: type information and documentation for code symbols
**Location**: `.lsp.json` in plugin root, or inline in `plugin.json`
**Format**: JSON configuration mapping language server names to their configurations
**`.lsp.json` file format**:
```json theme={null}
{
"go": {
"command": "gopls",
"args": ["serve"],
"extensionToLanguage": {
".go": "go"
}
}
}
```
**Inline in `plugin.json`**:
```json theme={null}
{
"name": "my-plugin",
"lspServers": {
"go": {
"command": "gopls",
"args": ["serve"],
"extensionToLanguage": {
".go": "go"
}
}
}
}
```
**Required fields:**
| Field | Description |
| :-------------------- | :------------------------------------------- |
| `command` | The LSP binary to execute (must be in PATH) |
| `extensionToLanguage` | Maps file extensions to language identifiers |
**Optional fields:**
| Field | Description |
| :---------------------- | :-------------------------------------------------------- |
| `args` | Command-line arguments for the LSP server |
| `transport` | Communication transport: `stdio` (default) or `socket` |
| `env` | Environment variables to set when starting the server |
| `initializationOptions` | Options passed to the server during initialization |
| `settings` | Settings passed via `workspace/didChangeConfiguration` |
| `workspaceFolder` | Workspace folder path for the server |
| `startupTimeout` | Max time to wait for server startup (milliseconds) |
| `shutdownTimeout` | Max time to wait for graceful shutdown (milliseconds) |
| `restartOnCrash` | Whether to automatically restart the server if it crashes |
| `maxRestarts` | Maximum number of restart attempts before giving up |
<Warning>
**You must install the language server binary separately.** LSP plugins configure how Claude Code connects to a language server, but they don't include the server itself. If you see `Executable not found in $PATH` in the `/plugin` Errors tab, install the required binary for your language.
</Warning>
**Available LSP plugins:**
| Plugin | Language server | Install command |
| :--------------- | :------------------------- | :----------------------------------------------------------------------------------------- |
| `pyright-lsp` | Pyright (Python) | `pip install pyright` or `npm install -g pyright` |
| `typescript-lsp` | TypeScript Language Server | `npm install -g typescript-language-server typescript` |
| `rust-lsp` | rust-analyzer | [See rust-analyzer installation](https://rust-analyzer.github.io/manual.html#installation) |
Install the language server first, then install the plugin from the marketplace.
***
## Plugin installation scopes
When you install a plugin, you choose a **scope** that determines where the plugin is available and who else can use it:
| Scope | Settings file | Use case |
| :-------- | :---------------------------- | :------------------------------------------------------- |
| `user` | `~/.claude/settings.json` | Personal plugins available across all projects (default) |
| `project` | `.claude/settings.json` | Team plugins shared via version control |
| `local` | `.claude/settings.local.json` | Project-specific plugins, gitignored |
| `managed` | `managed-settings.json` | Managed plugins (read-only, update only) |
Plugins use the same scope system as other Claude Code configurations. For installation instructions and scope flags, see [Install plugins](/en/discover-plugins#install-plugins). For a complete explanation of scopes, see [Configuration scopes](/en/settings#configuration-scopes).
***
## Plugin manifest schema
The `plugin.json` file defines your plugin's metadata and configuration. This section documents all supported fields and options.
### Complete schema
```json theme={null}
{
"name": "plugin-name",
"version": "1.2.0",
"description": "Brief plugin description",
"author": {
"name": "Author Name",
"email": "author@example.com",
"url": "https://github.com/author"
},
"homepage": "https://docs.example.com/plugin",
"repository": "https://github.com/author/plugin",
"license": "MIT",
"keywords": ["keyword1", "keyword2"],
"commands": ["./custom/commands/special.md"],
"agents": "./custom/agents/",
"skills": "./custom/skills/",
"hooks": "./config/hooks.json",
"mcpServers": "./mcp-config.json",
"outputStyles": "./styles/",
"lspServers": "./.lsp.json"
}
```
### Required fields
| Field | Type | Description | Example |
| :----- | :----- | :---------------------------------------- | :------------------- |
| `name` | string | Unique identifier (kebab-case, no spaces) | `"deployment-tools"` |
### Metadata fields
| Field | Type | Description | Example |
| :------------ | :----- | :---------------------------------- | :------------------------------------------------- |
| `version` | string | Semantic version | `"2.1.0"` |
| `description` | string | Brief explanation of plugin purpose | `"Deployment automation tools"` |
| `author` | object | Author information | `{"name": "Dev Team", "email": "dev@company.com"}` |
| `homepage` | string | Documentation URL | `"https://docs.example.com"` |
| `repository` | string | Source code URL | `"https://github.com/user/plugin"` |
| `license` | string | License identifier | `"MIT"`, `"Apache-2.0"` |
| `keywords` | array | Discovery tags | `["deployment", "ci-cd"]` |
### Component path fields
| Field | Type | Description | Example |
| :------------- | :------------- | :------------------------------------------------------------------------------------------------------------------------------------------------------- | :------------------------------------- |
| `commands` | string\|array | Additional command files/directories | `"./custom/cmd.md"` or `["./cmd1.md"]` |
| `agents` | string\|array | Additional agent files | `"./custom/agents/"` |
| `skills` | string\|array | Additional skill directories | `"./custom/skills/"` |
| `hooks` | string\|object | Hook config path or inline config | `"./hooks.json"` |
| `mcpServers` | string\|object | MCP config path or inline config | `"./mcp-config.json"` |
| `outputStyles` | string\|array | Additional output style files/directories | `"./styles/"` |
| `lspServers` | string\|object | [Language Server Protocol](https://microsoft.github.io/language-server-protocol/) config for code intelligence (go to definition, find references, etc.) | `"./.lsp.json"` |
### Path behavior rules
**Important**: Custom paths supplement default directories - they don't replace them.
* If `commands/` exists, it's loaded in addition to custom command paths
* All paths must be relative to plugin root and start with `./`
* Commands from custom paths use the same naming and namespacing rules
* Multiple paths can be specified as arrays for flexibility
**Path examples**:
```json theme={null}
{
"commands": [
"./specialized/deploy.md",
"./utilities/batch-process.md"
],
"agents": [
"./custom-agents/reviewer.md",
"./custom-agents/tester.md"
]
}
```
### Environment variables
**`${CLAUDE_PLUGIN_ROOT}`**: Contains the absolute path to your plugin directory. Use this in hooks, MCP servers, and scripts to ensure correct paths regardless of installation location.
```json theme={null}
{
"hooks": {
"PostToolUse": [
{
"hooks": [
{
"type": "command",
"command": "${CLAUDE_PLUGIN_ROOT}/scripts/process.sh"
}
]
}
]
}
}
```
***
## Plugin caching and file resolution
For security and verification purposes, Claude Code copies plugins to a cache directory rather than using them in-place. Understanding this behavior is important when developing plugins that reference external files.
### How plugin caching works
When you install a plugin, Claude Code copies the plugin files to a cache directory:
* **For marketplace plugins with relative paths**: The path specified in the `source` field is copied recursively. For example, if your marketplace entry specifies `"source": "./plugins/my-plugin"`, the entire `./plugins` directory is copied.
* **For plugins with `.claude-plugin/plugin.json`**: The implicit root directory (the directory containing `.claude-plugin/plugin.json`) is copied recursively.
### Path traversal limitations
Plugins cannot reference files outside their copied directory structure. Paths that traverse outside the plugin root (such as `../shared-utils`) will not work after installation because those external files are not copied to the cache.
### Working with external dependencies
If your plugin needs to access files outside its directory, you have two options:
**Option 1: Use symlinks**
Create symbolic links to external files within your plugin directory. Symlinks are honored during the copy process:
```bash theme={null}
# Inside your plugin directory
ln -s /path/to/shared-utils ./shared-utils
```
The symlinked content will be copied into the plugin cache.
**Option 2: Restructure your marketplace**
Set the plugin path to a parent directory that contains all required files, then provide the rest of the plugin manifest directly in the marketplace entry:
```json theme={null}
{
"name": "my-plugin",
"source": "./",
"description": "Plugin that needs root-level access",
"commands": ["./plugins/my-plugin/commands/"],
"agents": ["./plugins/my-plugin/agents/"],
"strict": false
}
```
This approach copies the entire marketplace root, giving your plugin access to sibling directories.
<Note>
Symlinks that point to locations outside the plugin's logical root are followed during copying. This provides flexibility while maintaining the security benefits of the caching system.
</Note>
***
## Plugin directory structure
### Standard plugin layout
A complete plugin follows this structure:
```
enterprise-plugin/
├── .claude-plugin/ # Metadata directory
│ └── plugin.json # Required: plugin manifest
├── commands/ # Default command location
│ ├── status.md
│ └── logs.md
├── agents/ # Default agent location
│ ├── security-reviewer.md
│ ├── performance-tester.md
│ └── compliance-checker.md
├── skills/ # Agent Skills
│ ├── code-reviewer/
│ │ └── SKILL.md
│ └── pdf-processor/
│ ├── SKILL.md
│ └── scripts/
├── hooks/ # Hook configurations
│ ├── hooks.json # Main hook config
│ └── security-hooks.json # Additional hooks
├── .mcp.json # MCP server definitions
├── .lsp.json # LSP server configurations
├── scripts/ # Hook and utility scripts
│ ├── security-scan.sh
│ ├── format-code.py
│ └── deploy.js
├── LICENSE # License file
└── CHANGELOG.md # Version history
```
<Warning>
The `.claude-plugin/` directory contains the `plugin.json` file. All other directories (commands/, agents/, skills/, hooks/) must be at the plugin root, not inside `.claude-plugin/`.
</Warning>
### File locations reference
| Component | Default Location | Purpose |
| :-------------- | :--------------------------- | :---------------------------------------------------------- |
| **Manifest** | `.claude-plugin/plugin.json` | Required metadata file |
| **Commands** | `commands/` | Skill Markdown files (legacy; use `skills/` for new skills) |
| **Agents** | `agents/` | Subagent Markdown files |
| **Skills** | `skills/` | Skills with `<name>/SKILL.md` structure |
| **Hooks** | `hooks/hooks.json` | Hook configuration |
| **MCP servers** | `.mcp.json` | MCP server definitions |
| **LSP servers** | `.lsp.json` | Language server configurations |
***
## CLI commands reference
Claude Code provides CLI commands for non-interactive plugin management, useful for scripting and automation.
### plugin install
Install a plugin from available marketplaces.
```bash theme={null}
claude plugin install <plugin> [options]
```
**Arguments:**
* `<plugin>`: Plugin name or `plugin-name@marketplace-name` for a specific marketplace
**Options:**
| Option | Description | Default |
| :-------------------- | :------------------------------------------------ | :------ |
| `-s, --scope <scope>` | Installation scope: `user`, `project`, or `local` | `user` |
| `-h, --help` | Display help for command | |
**Examples:**
```bash theme={null}
# Install to user scope (default)
claude plugin install formatter@my-marketplace
# Install to project scope (shared with team)
claude plugin install formatter@my-marketplace --scope project
# Install to local scope (gitignored)
claude plugin install formatter@my-marketplace --scope local
```
### plugin uninstall
Remove an installed plugin.
```bash theme={null}
claude plugin uninstall <plugin> [options]
```
**Arguments:**
* `<plugin>`: Plugin name or `plugin-name@marketplace-name`
**Options:**
| Option | Description | Default |
| :-------------------- | :-------------------------------------------------- | :------ |
| `-s, --scope <scope>` | Uninstall from scope: `user`, `project`, or `local` | `user` |
| `-h, --help` | Display help for command | |
**Aliases:** `remove`, `rm`
### plugin enable
Enable a disabled plugin.
```bash theme={null}
claude plugin enable <plugin> [options]
```
**Arguments:**
* `<plugin>`: Plugin name or `plugin-name@marketplace-name`
**Options:**
| Option | Description | Default |
| :-------------------- | :--------------------------------------------- | :------ |
| `-s, --scope <scope>` | Scope to enable: `user`, `project`, or `local` | `user` |
| `-h, --help` | Display help for command | |
### plugin disable
Disable a plugin without uninstalling it.
```bash theme={null}
claude plugin disable <plugin> [options]
```
**Arguments:**
* `<plugin>`: Plugin name or `plugin-name@marketplace-name`
**Options:**
| Option | Description | Default |
| :-------------------- | :---------------------------------------------- | :------ |
| `-s, --scope <scope>` | Scope to disable: `user`, `project`, or `local` | `user` |
| `-h, --help` | Display help for command | |
### plugin update
Update a plugin to the latest version.
```bash theme={null}
claude plugin update <plugin> [options]
```
**Arguments:**
* `<plugin>`: Plugin name or `plugin-name@marketplace-name`
**Options:**
| Option | Description | Default |
| :-------------------- | :-------------------------------------------------------- | :------ |
| `-s, --scope <scope>` | Scope to update: `user`, `project`, `local`, or `managed` | `user` |
| `-h, --help` | Display help for command | |
***
## Debugging and development tools
### Debugging commands
Use `claude --debug` to see plugin loading details:
```bash theme={null}
claude --debug
```
This shows:
* Which plugins are being loaded
* Any errors in plugin manifests
* Command, agent, and hook registration
* MCP server initialization
### Common issues
| Issue | Cause | Solution |
| :---------------------------------- | :------------------------------ | :-------------------------------------------------------------------------------- |
| Plugin not loading | Invalid `plugin.json` | Validate JSON syntax with `claude plugin validate` or `/plugin validate` |
| Commands not appearing | Wrong directory structure | Ensure `commands/` at root, not in `.claude-plugin/` |
| Hooks not firing | Script not executable | Run `chmod +x script.sh` |
| MCP server fails | Missing `${CLAUDE_PLUGIN_ROOT}` | Use variable for all plugin paths |
| Path errors | Absolute paths used | All paths must be relative and start with `./` |
| LSP `Executable not found in $PATH` | Language server not installed | Install the binary (e.g., `npm install -g typescript-language-server typescript`) |
### Example error messages
**Manifest validation errors**:
* `Invalid JSON syntax: Unexpected token } in JSON at position 142`: check for missing commas, extra commas, or unquoted strings
* `Plugin has an invalid manifest file at .claude-plugin/plugin.json. Validation errors: name: Required`: a required field is missing
* `Plugin has a corrupt manifest file at .claude-plugin/plugin.json. JSON parse error: ...`: JSON syntax error
**Plugin loading errors**:
* `Warning: No commands found in plugin my-plugin custom directory: ./cmds. Expected .md files or SKILL.md in subdirectories.`: command path exists but contains no valid command files
* `Plugin directory not found at path: ./plugins/my-plugin. Check that the marketplace entry has the correct path.`: the `source` path in marketplace.json points to a non-existent directory
* `Plugin my-plugin has conflicting manifests: both plugin.json and marketplace entry specify components.`: remove duplicate component definitions or set `strict: true` in marketplace entry
### Hook troubleshooting
**Hook script not executing**:
1. Check the script is executable: `chmod +x ./scripts/your-script.sh`
2. Verify the shebang line: First line should be `#!/bin/bash` or `#!/usr/bin/env bash`
3. Check the path uses `${CLAUDE_PLUGIN_ROOT}`: `"command": "${CLAUDE_PLUGIN_ROOT}/scripts/your-script.sh"`
4. Test the script manually: `./scripts/your-script.sh`
**Hook not triggering on expected events**:
1. Verify the event name is correct (case-sensitive): `PostToolUse`, not `postToolUse`
2. Check the matcher pattern matches your tools: `"matcher": "Write|Edit"` for file operations
3. Confirm the hook type is valid: `command`, `prompt`, or `agent`
### MCP server troubleshooting
**Server not starting**:
1. Check the command exists and is executable
2. Verify all paths use `${CLAUDE_PLUGIN_ROOT}` variable
3. Check the MCP server logs: `claude --debug` shows initialization errors
4. Test the server manually outside of Claude Code
**Server tools not appearing**:
1. Ensure the server is properly configured in `.mcp.json` or `plugin.json`
2. Verify the server implements the MCP protocol correctly
3. Check for connection timeouts in debug output
### Directory structure mistakes
**Symptoms**: Plugin loads but components (commands, agents, hooks) are missing.
**Correct structure**: Components must be at the plugin root, not inside `.claude-plugin/`. Only `plugin.json` belongs in `.claude-plugin/`.
```
my-plugin/
├── .claude-plugin/
│ └── plugin.json ← Only manifest here
├── commands/ ← At root level
├── agents/ ← At root level
└── hooks/ ← At root level
```
If your components are inside `.claude-plugin/`, move them to the plugin root.
**Debug checklist**:
1. Run `claude --debug` and look for "loading plugin" messages
2. Check that each component directory is listed in the debug output
3. Verify file permissions allow reading the plugin files
***
## Distribution and versioning reference
### Version management
Follow semantic versioning for plugin releases:
```json theme={null}
{
"name": "my-plugin",
"version": "2.1.0"
}
```
**Version format**: `MAJOR.MINOR.PATCH`
* **MAJOR**: Breaking changes (incompatible API changes)
* **MINOR**: New features (backward-compatible additions)
* **PATCH**: Bug fixes (backward-compatible fixes)
**Best practices**:
* Start at `1.0.0` for your first stable release
* Update the version in `plugin.json` before distributing changes
* Document changes in a `CHANGELOG.md` file
* Use pre-release versions like `2.0.0-beta.1` for testing
***
## See also
* [Plugins](create-plugins-claude-code-docs.md) - Tutorials and practical usage
* [Plugin marketplaces](create-and-distribute-a-plugin-marketplace-claude-code-docs-34a8f3c5e8.md) - Creating and managing marketplaces
* [Skills](extend-claude-with-skills-claude-code-docs.md) - Skill development details
* [Subagents](../09-Agents-Patterns/create-custom-subagents-claude-code-docs-7dc93e85c0.md) - Agent configuration and capabilities
* [Hooks](../07-Hooks/hooks-reference-claude-code-docs.md) - Event handling and automation
* [MCP](../06-MCP-Tools/General/connect-claude-code-to-tools-via-mcp-claude-code-docs.md) - External tool integration
* [Settings](../02-Claude-Code-CLI/claude-code-settings-claude-code-docs-d4420b4b52.md) - Configuration options for plugins
---
## plugins.md
> Fetch the complete documentation index at: https://code.claude.com/docs/llms.txt
> Use this file to discover all available pages before exploring further.
# Create plugins
> Create custom plugins to extend Claude Code with skills, agents, hooks, and MCP servers.
Plugins let you extend Claude Code with custom functionality that can be shared across projects and teams. This guide covers creating your own plugins with skills, agents, hooks, and MCP servers.
Looking to install existing plugins? See [Discover and install plugins](../02-Claude-Code-CLI/discover-and-install-prebuilt-plugins-through-marketplaces-claude-code-docs.md). For complete technical specifications, see [Plugins reference](plugins-reference-claude-code-docs.md).
## When to use plugins vs standalone configuration
Claude Code supports two ways to add custom skills, agents, and hooks:
| Approach | Skill names | Best for |
| :---------------------------------------------------------- | :------------------- | :---------------------------------------------------------------------------------------------- |
| **Standalone** (`.claude/` directory) | `/hello` | Personal workflows, project-specific customizations, quick experiments |
| **Plugins** (directories with `.claude-plugin/plugin.json`) | `/plugin-name:hello` | Sharing with teammates, distributing to community, versioned releases, reusable across projects |
**Use standalone configuration when**:
* You're customizing Claude Code for a single project
* The configuration is personal and doesn't need to be shared
* You're experimenting with skills or hooks before packaging them
* You want short skill names like `/hello` or `/review`
**Use plugins when**:
* You want to share functionality with your team or community
* You need the same skills/agents across multiple projects
* You want version control and easy updates for your extensions
* You're distributing through a marketplace
* You're okay with namespaced skills like `/my-plugin:hello` (namespacing prevents conflicts between plugins)
<Tip>
Start with standalone configuration in `.claude/` for quick iteration, then [convert to a plugin](#convert-existing-configurations-to-plugins) when you're ready to share.
</Tip>
## Quickstart
This quickstart walks you through creating a plugin with a custom skill. You'll create a manifest (the configuration file that defines your plugin), add a skill, and test it locally using the `--plugin-dir` flag.
### Prerequisites
* Claude Code [installed and authenticated](/en/quickstart#step-1-install-claude-code)
* Claude Code version 1.0.33 or later (run `claude --version` to check)
<Note>
If you don't see the `/plugin` command, update Claude Code to the latest version. See [Troubleshooting](../21-Account-Support/troubleshooting-claude-code-docs-3f3657ed0f.md) for upgrade instructions.
</Note>
### Create your first plugin
<Steps>
<Step title="Create the plugin directory">
Every plugin lives in its own directory containing a manifest and your skills, agents, or hooks. Create one now:
```bash theme={null}
mkdir my-first-plugin
```
</Step>
<Step title="Create the plugin manifest">
The manifest file at `.claude-plugin/plugin.json` defines your plugin's identity: its name, description, and version. Claude Code uses this metadata to display your plugin in the plugin manager.
Create the `.claude-plugin` directory inside your plugin folder:
```bash theme={null}
mkdir my-first-plugin/.claude-plugin
```
Then create `my-first-plugin/.claude-plugin/plugin.json` with this content:
```json my-first-plugin/.claude-plugin/plugin.json theme={null}
{
"name": "my-first-plugin",
"description": "A greeting plugin to learn the basics",
"version": "1.0.0",
"author": {
"name": "Your Name"
}
}
```
| Field | Purpose |
| :------------ | :----------------------------------------------------------------------------------------------------- |
| `name` | Unique identifier and skill namespace. Skills are prefixed with this (e.g., `/my-first-plugin:hello`). |
| `description` | Shown in the plugin manager when browsing or installing plugins. |
| `version` | Track releases using [semantic versioning](/en/plugins-reference#version-management). |
| `author` | Optional. Helpful for attribution. |
For additional fields like `homepage`, `repository`, and `license`, see the [full manifest schema](/en/plugins-reference#plugin-manifest-schema).
</Step>
<Step title="Add a skill">
Skills live in the `skills/` directory. Each skill is a folder containing a `SKILL.md` file. The folder name becomes the skill name, prefixed with the plugin's namespace (`hello/` in a plugin named `my-first-plugin` creates `/my-first-plugin:hello`).
Create a skill directory in your plugin folder:
```bash theme={null}
mkdir -p my-first-plugin/skills/hello
```
Then create `my-first-plugin/skills/hello/SKILL.md` with this content:
```markdown my-first-plugin/skills/hello/SKILL.md theme={null}
---
description: Greet the user with a friendly message
disable-model-invocation: true
---
Greet the user warmly and ask how you can help them today.
```
</Step>
<Step title="Test your plugin">
Run Claude Code with the `--plugin-dir` flag to load your plugin:
```bash theme={null}
claude --plugin-dir ./my-first-plugin
```
Once Claude Code starts, try your new command:
```shell theme={null}
/my-first-plugin:hello
```
You'll see Claude respond with a greeting. Run `/help` to see your command listed under the plugin namespace.
<Note>
**Why namespacing?** Plugin skills are always namespaced (like `/greet:hello`) to prevent conflicts when multiple plugins have skills with the same name.
To change the namespace prefix, update the `name` field in `plugin.json`.
</Note>
</Step>
<Step title="Add skill arguments">
Make your skill dynamic by accepting user input. The `$ARGUMENTS` placeholder captures any text the user provides after the skill name.
Update your `hello.md` file:
```markdown my-first-plugin/commands/hello.md theme={null}
---
description: Greet the user with a personalized message
---
# Hello Command
Greet the user named "$ARGUMENTS" warmly and ask how you can help them today. Make the greeting personal and encouraging.
```
Restart Claude Code to pick up the changes, then try the command with your name:
```shell theme={null}
/my-first-plugin:hello Alex
```
Claude will greet you by name. For more on passing arguments to skills, see [Skills](/en/skills#pass-arguments-to-skills).
</Step>
</Steps>
You've successfully created and tested a plugin with these key components:
* **Plugin manifest** (`.claude-plugin/plugin.json`): describes your plugin's metadata
* **Commands directory** (`commands/`): contains your custom skills
* **Skill arguments** (`$ARGUMENTS`): captures user input for dynamic behavior
<Tip>
The `--plugin-dir` flag is useful for development and testing. When you're ready to share your plugin with others, see [Create and distribute a plugin marketplace](create-and-distribute-a-plugin-marketplace-claude-code-docs-34a8f3c5e8.md).
</Tip>
## Plugin structure overview
You've created a plugin with a skill, but plugins can include much more: custom agents, hooks, MCP servers, and LSP servers.
<Warning>
**Common mistake**: Don't put `commands/`, `agents/`, `skills/`, or `hooks/` inside the `.claude-plugin/` directory. Only `plugin.json` goes inside `.claude-plugin/`. All other directories must be at the plugin root level.
</Warning>
| Directory | Location | Purpose |
| :---------------- | :---------- | :---------------------------------------------- |
| `.claude-plugin/` | Plugin root | Contains only `plugin.json` manifest (required) |
| `commands/` | Plugin root | Skills as Markdown files |
| `agents/` | Plugin root | Custom agent definitions |
| `skills/` | Plugin root | Agent Skills with `SKILL.md` files |
| `hooks/` | Plugin root | Event handlers in `hooks.json` |
| `.mcp.json` | Plugin root | MCP server configurations |
| `.lsp.json` | Plugin root | LSP server configurations for code intelligence |
<Note>
**Next steps**: Ready to add more features? Jump to [Develop more complex plugins](#develop-more-complex-plugins) to add agents, hooks, MCP servers, and LSP servers. For complete technical specifications of all plugin components, see [Plugins reference](plugins-reference-claude-code-docs.md).
</Note>
## Develop more complex plugins
Once you're comfortable with basic plugins, you can create more sophisticated extensions.
### Add Skills to your plugin
Plugins can include [Agent Skills](extend-claude-with-skills-claude-code-docs.md) to extend Claude's capabilities. Skills are model-invoked: Claude automatically uses them based on the task context.
Add a `skills/` directory at your plugin root with Skill folders containing `SKILL.md` files:
```
my-plugin/
├── .claude-plugin/
│ └── plugin.json
└── skills/
└── code-review/
└── SKILL.md
```
Each `SKILL.md` needs frontmatter with `name` and `description` fields, followed by instructions:
```yaml theme={null}
---
name: code-review
description: Reviews code for best practices and potential issues. Use when reviewing code, checking PRs, or analyzing code quality.
---
When reviewing code, check for:
1. Code organization and structure
2. Error handling
3. Security concerns
4. Test coverage
```
After installing the plugin, restart Claude Code to load the Skills. For complete Skill authoring guidance including progressive disclosure and tool restrictions, see [Agent Skills](extend-claude-with-skills-claude-code-docs.md).
### Add LSP servers to your plugin
<Tip>
For common languages like TypeScript, Python, and Rust, install the pre-built LSP plugins from the official marketplace. Create custom LSP plugins only when you need support for languages not already covered.
</Tip>
LSP (Language Server Protocol) plugins give Claude real-time code intelligence. If you need to support a language that doesn't have an official LSP plugin, you can create your own by adding an `.lsp.json` file to your plugin:
```json .lsp.json theme={null}
{
"go": {
"command": "gopls",
"args": ["serve"],
"extensionToLanguage": {
".go": "go"
}
}
}
```
Users installing your plugin must have the language server binary installed on their machine.
For complete LSP configuration options, see [LSP servers](/en/plugins-reference#lsp-servers).
### Organize complex plugins
For plugins with many components, organize your directory structure by functionality. For complete directory layouts and organization patterns, see [Plugin directory structure](/en/plugins-reference#plugin-directory-structure).
### Test your plugins locally
Use the `--plugin-dir` flag to test plugins during development. This loads your plugin directly without requiring installation.
```bash theme={null}
claude --plugin-dir ./my-plugin
```
As you make changes to your plugin, restart Claude Code to pick up the updates. Test your plugin components:
* Try your commands with `/command-name`
* Check that agents appear in `/agents`
* Verify hooks work as expected
<Tip>
You can load multiple plugins at once by specifying the flag multiple times:
```bash theme={null}
claude --plugin-dir ./plugin-one --plugin-dir ./plugin-two
```
</Tip>
### Debug plugin issues
If your plugin isn't working as expected:
1. **Check the structure**: Ensure your directories are at the plugin root, not inside `.claude-plugin/`
2. **Test components individually**: Check each command, agent, and hook separately
3. **Use validation and debugging tools**: See [Debugging and development tools](/en/plugins-reference#debugging-and-development-tools) for CLI commands and troubleshooting techniques
### Share your plugins
When your plugin is ready to share:
1. **Add documentation**: Include a `README.md` with installation and usage instructions
2. **Version your plugin**: Use [semantic versioning](/en/plugins-reference#version-management) in your `plugin.json`
3. **Create or use a marketplace**: Distribute through [plugin marketplaces](create-and-distribute-a-plugin-marketplace-claude-code-docs-34a8f3c5e8.md) for installation
4. **Test with others**: Have team members test the plugin before wider distribution
Once your plugin is in a marketplace, others can install it using the instructions in [Discover and install plugins](../02-Claude-Code-CLI/discover-and-install-prebuilt-plugins-through-marketplaces-claude-code-docs.md).
<Note>
For complete technical specifications, debugging techniques, and distribution strategies, see [Plugins reference](plugins-reference-claude-code-docs.md).
</Note>
## Convert existing configurations to plugins
If you already have skills or hooks in your `.claude/` directory, you can convert them into a plugin for easier sharing and distribution.
### Migration steps
<Steps>
<Step title="Create the plugin structure">
Create a new plugin directory:
```bash theme={null}
mkdir -p my-plugin/.claude-plugin
```
Create the manifest file at `my-plugin/.claude-plugin/plugin.json`:
```json my-plugin/.claude-plugin/plugin.json theme={null}
{
"name": "my-plugin",
"description": "Migrated from standalone configuration",
"version": "1.0.0"
}
```
</Step>
<Step title="Copy your existing files">
Copy your existing configurations to the plugin directory:
```bash theme={null}
# Copy commands
cp -r .claude/commands my-plugin/
# Copy agents (if any)
cp -r .claude/agents my-plugin/
# Copy skills (if any)
cp -r .claude/skills my-plugin/
```
</Step>
<Step title="Migrate hooks">
If you have hooks in your settings, create a hooks directory:
```bash theme={null}
mkdir my-plugin/hooks
```
Create `my-plugin/hooks/hooks.json` with your hooks configuration. Copy the `hooks` object from your `.claude/settings.json` or `settings.local.json`, since the format is the same. The command receives hook input as JSON on stdin, so use `jq` to extract the file path:
```json my-plugin/hooks/hooks.json theme={null}
{
"hooks": {
"PostToolUse": [
{
"matcher": "Write|Edit",
"hooks": [{ "type": "command", "command": "jq -r '.tool_input.file_path' | xargs npm run lint:fix" }]
}
]
}
}
```
</Step>
<Step title="Test your migrated plugin">
Load your plugin to verify everything works:
```bash theme={null}
claude --plugin-dir ./my-plugin
```
Test each component: run your commands, check agents appear in `/agents`, and verify hooks trigger correctly.
</Step>
</Steps>
### What changes when migrating
| Standalone (`.claude/`) | Plugin |
| :---------------------------- | :------------------------------- |
| Only available in one project | Can be shared via marketplaces |
| Files in `.claude/commands/` | Files in `plugin-name/commands/` |
| Hooks in `settings.json` | Hooks in `hooks/hooks.json` |
| Must manually copy to share | Install with `/plugin install` |
<Note>
After migrating, you can remove the original files from `.claude/` to avoid duplicates. The plugin version will take precedence when loaded.
</Note>
## Next steps
Now that you understand Claude Code's plugin system, here are suggested paths for different goals:
### For plugin users
* [Discover and install plugins](../02-Claude-Code-CLI/discover-and-install-prebuilt-plugins-through-marketplaces-claude-code-docs.md): browse marketplaces and install plugins
* [Configure team marketplaces](/en/discover-plugins#configure-team-marketplaces): set up repository-level plugins for your team
### For plugin developers
* [Create and distribute a marketplace](create-and-distribute-a-plugin-marketplace-claude-code-docs-34a8f3c5e8.md): package and share your plugins
* [Plugins reference](plugins-reference-claude-code-docs.md): complete technical specifications
* Dive deeper into specific plugin components:
* [Skills](extend-claude-with-skills-claude-code-docs.md): skill development details
* [Subagents](../09-Agents-Patterns/create-custom-subagents-claude-code-docs-7dc93e85c0.md): agent configuration and capabilities
* [Hooks](../07-Hooks/hooks-reference-claude-code-docs.md): event handling and automation
* [MCP](../06-MCP-Tools/General/connect-claude-code-to-tools-via-mcp-claude-code-docs.md): external tool integration
---
## pr-test-analyzer.md
You are an expert test coverage analyst specializing in pull request review. Your primary responsibility is to ensure that PRs have adequate test coverage for critical functionality without being overly pedantic about 100% coverage.
**Your Core Responsibilities:**
1. **Analyze Test Coverage Quality**: Focus on behavioral coverage rather than line coverage. Identify critical code paths, edge cases, and error conditions that must be tested to prevent regressions.
2. **Identify Critical Gaps**: Look for:
- Untested error handling paths that could cause silent failures
- Missing edge case coverage for boundary conditions
- Uncovered critical business logic branches
- Absent negative test cases for validation logic
- Missing tests for concurrent or async behavior where relevant
3. **Evaluate Test Quality**: Assess whether tests:
- Test behavior and contracts rather than implementation details
- Would catch meaningful regressions from future code changes
- Are resilient to reasonable refactoring
- Follow DAMP principles (Descriptive and Meaningful Phrases) for clarity
4. **Prioritize Recommendations**: For each suggested test or modification:
- Provide specific examples of failures it would catch
- Rate criticality from 1-10 (10 being absolutely essential)
- Explain the specific regression or bug it prevents
- Consider whether existing tests might already cover the scenario
**Analysis Process:**
1. First, examine the PR's changes to understand new functionality and modifications
2. Review the accompanying tests to map coverage to functionality
3. Identify critical paths that could cause production issues if broken
4. Check for tests that are too tightly coupled to implementation
5. Look for missing negative cases and error scenarios
6. Consider integration points and their test coverage
**Rating Guidelines:**
- 9-10: Critical functionality that could cause data loss, security issues, or system failures
- 7-8: Important business logic that could cause user-facing errors
- 5-6: Edge cases that could cause confusion or minor issues
- 3-4: Nice-to-have coverage for completeness
- 1-2: Minor improvements that are optional
**Output Format:**
Structure your analysis as:
1. **Summary**: Brief overview of test coverage quality
2. **Critical Gaps** (if any): Tests rated 8-10 that must be added
3. **Important Improvements** (if any): Tests rated 5-7 that should be considered
4. **Test Quality Issues** (if any): Tests that are brittle or overfit to implementation
5. **Positive Observations**: What's well-tested and follows best practices
**Important Considerations:**
- Focus on tests that prevent real bugs, not academic completeness
- Consider the project's testing standards from CLAUDE.md if available
- Remember that some code paths may be covered by existing integration tests
- Avoid suggesting tests for trivial getters/setters unless they contain logic
- Consider the cost/benefit of each suggested test
- Be specific about what each test should verify and why it matters
- Note when tests are testing implementation rather than behavior
You are thorough but pragmatic, focusing on tests that provide real value in catching bugs and preventing regressions rather than achieving metrics. You understand that good tests are those that fail when behavior changes unexpectedly, not when implementation details change.
---
## quickstart-agent-skills-c65b6c1280.md
# Quickstart
Create your first Agent Skill and see it work in VS Code.
In this tutorial, you’ll create a skill that gives an agent the capability to roll dice using true randomness.
Prerequisites
- [VS Code](https://code.visualstudio.com/) with [GitHub Copilot](https://marketplace.visualstudio.com/items?itemName=GitHub.copilot)
This tutorial uses VS Code, but Agent Skills are an open format. The same skill works in any compatible agent, including Claude Code and OpenAI Codex.
Create the skill
A skill is a folder containing a `SKILL.md` file. VS Code looks for skills in `.agents/skills/` by default. Create `.agents/skills/roll-dice/SKILL.md` in your project:
.agents/skills/roll-dice/SKILL.md
Report incorrect code
Copy
```` shiki
---
name: roll-dice
description: Roll dice with true randomness. Use when asked to roll a die (d6, d20, etc.), roll dice, or generate a random dice roll.
---
To roll a die, use the following command that generates a random number from 1
to the given number of sides:
```bash
shuf -i 1-<sides> -n 1
```
```powershell
Get-Random -Minimum 1 -Maximum (<sides> + 1)
```
Replace `<sides>` with the number of sides on the die (e.g., 6 for a standard
die, 20 for a d20).
````
That’s it — one file, under 20 lines. Here’s what each part does:
- **`name`** — A short identifier for the skill. Must match the folder name.
- **`description`** — Tells the agent when to use this skill. This is how the agent decides whether to activate it.
- **The body** — Instructions the agent follows when the skill activates. Here, the agent is instructed to generate a random number using a terminal command, substituting the number of sides from the user’s request.
Try it out
1. Open your project in VS Code.
2. Open the Copilot Chat panel.
3. Select **Agent** mode from the mode dropdown at the bottom of the chat panel.
4. Type `/skills` to confirm that `roll-dice` appears in the list. If it doesn’t, check that the file is at `.agents/skills/roll-dice/SKILL.md` relative to your project root.
5. Ask: **“Roll a d20”**
The agent should activate the `roll-dice` skill. It may ask for permission to run a terminal command — allow it. It will run the command and return a random number between 1 and 20.
Tool-use reliability varies across models — some follow skill instructions and run commands consistently, while others may attempt to answer on their own. If the agent responds without running a terminal command, try selecting a different model from the model dropdown.
How it works
Here’s what happened behind the scenes:
1. **Discovery** — When the chat session started, the agent scanned default skill directories and found your skill. It read only the `name` and `description`, just enough to know when the skill might be relevant.
2. **Activation** — When you asked about rolling dice, the agent matched your question to the skill’s description and loaded the full `SKILL.md` body into context.
3. **Execution** — The agent followed the instructions in the body, adapting the terminal command to the number of sides in your request.
This process uses **progressive disclosure** to let the agent access many skills without loading all their instructions up front. For more detail, see [How skills work](/what-are-skills#how-skills-work).
Next steps
You’ve created a working Agent Skill. From here:
- **[Best practices](/skill-creation/best-practices)** — How to write skills that are well-scoped and effective.
- **[Optimizing skill descriptions](/skill-creation/optimizing-descriptions)** — Test and improve your skill’s description so it activates on the right prompts.
- **[Specification](/specification)** — The complete format reference for `SKILL.md` files.
- **[Example skills](https://github.com/anthropics/skills)** — Browse real-world skills on GitHub.
[Specification](/specification)[Best practices](/skill-creation/best-practices)
---
## ralph-loop.md
# Ralph Loop Command
Execute the setup script to initialize the Ralph loop:
```!
"${CLAUDE_PLUGIN_ROOT}/scripts/setup-ralph-loop.sh" $ARGUMENTS
```
Please work on the task. When you try to exit, the Ralph loop will feed the SAME PROMPT back to you for the next iteration. You'll see your previous work in files and git history, allowing you to iterate and improve.
CRITICAL RULE: If a completion promise is set, you may ONLY output it when the statement is completely and unequivocally TRUE. Do not output false promises to escape the loop, even if you think you're stuck or should exit for other reasons. The loop is designed to continue until genuine completion.
---
## ralph-wiggum-plugin.md
# Ralph Wiggum Plugin
Implementation of the Ralph Wiggum technique for iterative, self-referential AI development loops in Claude Code.
## What is Ralph?
Ralph is a development methodology based on continuous AI agent loops. As Geoffrey Huntley describes it: **"Ralph is a Bash loop"** - a simple `while true` that repeatedly feeds an AI agent a prompt file, allowing it to iteratively improve its work until completion.
The technique is named after Ralph Wiggum from The Simpsons, embodying the philosophy of persistent iteration despite setbacks.
### Core Concept
This plugin implements Ralph using a **Stop hook** that intercepts Claude's exit attempts:
```bash
# You run ONCE:
/ralph-loop "Your task description" --completion-promise "DONE"
# Then Claude Code automatically:
# 1. Works on the task
# 2. Tries to exit
# 3. Stop hook blocks exit
# 4. Stop hook feeds the SAME prompt back
# 5. Repeat until completion
```
The loop happens **inside your current session** - you don't need external bash loops. The Stop hook in `hooks/stop-hook.sh` creates the self-referential feedback loop by blocking normal session exit.
This creates a **self-referential feedback loop** where:
- The prompt never changes between iterations
- Claude's previous work persists in files
- Each iteration sees modified files and git history
- Claude autonomously improves by reading its own past work in files
## Quick Start
```bash
/ralph-loop "Build a REST API for todos. Requirements: CRUD operations, input validation, tests. Output <promise>COMPLETE</promise> when done." --completion-promise "COMPLETE" --max-iterations 50
```
Claude will:
- Implement the API iteratively
- Run tests and see failures
- Fix bugs based on test output
- Iterate until all requirements met
- Output the completion promise when done
## Commands
### /ralph-loop
Start a Ralph loop in your current session.
**Usage:**
```bash
/ralph-loop "<prompt>" --max-iterations <n> --completion-promise "<text>"
```
**Options:**
- `--max-iterations <n>` - Stop after N iterations (default: unlimited)
- `--completion-promise <text>` - Phrase that signals completion
### /cancel-ralph
Cancel the active Ralph loop.
**Usage:**
```bash
/cancel-ralph
```
## Prompt Writing Best Practices
### 1. Clear Completion Criteria
❌ Bad: "Build a todo API and make it good."
✅ Good:
```markdown
Build a REST API for todos.
When complete:
- All CRUD endpoints working
- Input validation in place
- Tests passing (coverage > 80%)
- README with API docs
- Output: <promise>COMPLETE</promise>
```
### 2. Incremental Goals
❌ Bad: "Create a complete e-commerce platform."
✅ Good:
```markdown
Phase 1: User authentication (JWT, tests)
Phase 2: Product catalog (list/search, tests)
Phase 3: Shopping cart (add/remove, tests)
Output <promise>COMPLETE</promise> when all phases done.
```
### 3. Self-Correction
❌ Bad: "Write code for feature X."
✅ Good:
```markdown
Implement feature X following TDD:
1. Write failing tests
2. Implement feature
3. Run tests
4. If any fail, debug and fix
5. Refactor if needed
6. Repeat until all green
7. Output: <promise>COMPLETE</promise>
```
### 4. Escape Hatches
Always use `--max-iterations` as a safety net to prevent infinite loops on impossible tasks:
```bash
# Recommended: Always set a reasonable iteration limit
/ralph-loop "Try to implement feature X" --max-iterations 20
# In your prompt, include what to do if stuck:
# "After 15 iterations, if not complete:
# - Document what's blocking progress
# - List what was attempted
# - Suggest alternative approaches"
```
**Note**: The `--completion-promise` uses exact string matching, so you cannot use it for multiple completion conditions (like "SUCCESS" vs "BLOCKED"). Always rely on `--max-iterations` as your primary safety mechanism.
## Philosophy
Ralph embodies several key principles:
### 1. Iteration > Perfection
Don't aim for perfect on first try. Let the loop refine the work.
### 2. Failures Are Data
"Deterministically bad" means failures are predictable and informative. Use them to tune prompts.
### 3. Operator Skill Matters
Success depends on writing good prompts, not just having a good model.
### 4. Persistence Wins
Keep trying until success. The loop handles retry logic automatically.
## When to Use Ralph
**Good for:**
- Well-defined tasks with clear success criteria
- Tasks requiring iteration and refinement (e.g., getting tests to pass)
- Greenfield projects where you can walk away
- Tasks with automatic verification (tests, linters)
**Not good for:**
- Tasks requiring human judgment or design decisions
- One-shot operations
- Tasks with unclear success criteria
- Production debugging (use targeted debugging instead)
## Real-World Results
- Successfully generated 6 repositories overnight in Y Combinator hackathon testing
- One $50k contract completed for $297 in API costs
- Created entire programming language ("cursed") over 3 months using this approach
## Learn More
- Original technique: https://ghuntley.com/ralph/
- Ralph Orchestrator: https://github.com/mikeyobrien/ralph-orchestrator
## For Help
Run `/help` in Claude Code for detailed command reference and examples.
---
## real-world-examples.md
# Real-World Plugin Settings Examples
Detailed analysis of how production plugins use the `.claude/plugin-name.local.md` pattern.
## multi-agent-swarm Plugin
### Settings File Structure
**.claude/multi-agent-swarm.local.md:**
```markdown
---
agent_name: auth-implementation
task_number: 3.5
pr_number: 1234
coordinator_session: team-leader
enabled: true
dependencies: ["Task 3.4"]
additional_instructions: "Use JWT tokens, not sessions"
---
# Task: Implement Authentication
Build JWT-based authentication for the REST API.
## Requirements
- JWT token generation and validation
- Refresh token flow
- Secure password hashing
## Success Criteria
- Auth endpoints implemented
- Tests passing (100% coverage)
- PR created and CI green
- Documentation updated
## Coordination
Depends on Task 3.4 (user model).
Report status to 'team-leader' session.
```
### How It's Used
**File:** `hooks/agent-stop-notification.sh`
**Purpose:** Send notifications to coordinator when agent becomes idle
**Implementation:**
```bash
#!/bin/bash
set -euo pipefail
SWARM_STATE_FILE=".claude/multi-agent-swarm.local.md"
# Quick exit if no swarm active
if [[ ! -f "$SWARM_STATE_FILE" ]]; then
exit 0
fi
# Parse frontmatter
FRONTMATTER=$(sed -n '/^---$/,/^---$/{ /^---$/d; p; }' "$SWARM_STATE_FILE")
# Extract configuration
COORDINATOR_SESSION=$(echo "$FRONTMATTER" | grep '^coordinator_session:' | sed 's/coordinator_session: *//' | sed 's/^"\(.*\)"$/\1/')
AGENT_NAME=$(echo "$FRONTMATTER" | grep '^agent_name:' | sed 's/agent_name: *//' | sed 's/^"\(.*\)"$/\1/')
TASK_NUMBER=$(echo "$FRONTMATTER" | grep '^task_number:' | sed 's/task_number: *//' | sed 's/^"\(.*\)"$/\1/')
PR_NUMBER=$(echo "$FRONTMATTER" | grep '^pr_number:' | sed 's/pr_number: *//' | sed 's/^"\(.*\)"$/\1/')
ENABLED=$(echo "$FRONTMATTER" | grep '^enabled:' | sed 's/enabled: *//')
# Check if enabled
if [[ "$ENABLED" != "true" ]]; then
exit 0
fi
# Send notification to coordinator
NOTIFICATION="🤖 Agent ${AGENT_NAME} (Task ${TASK_NUMBER}, PR #${PR_NUMBER}) is idle."
if tmux has-session -t "$COORDINATOR_SESSION" 2>/dev/null; then
tmux send-keys -t "$COORDINATOR_SESSION" "$NOTIFICATION" Enter
sleep 0.5
tmux send-keys -t "$COORDINATOR_SESSION" Enter
fi
exit 0
```
**Key patterns:**
1. **Quick exit** (line 7-9): Returns immediately if file doesn't exist
2. **Field extraction** (lines 11-17): Parses each frontmatter field
3. **Enabled check** (lines 19-21): Respects enabled flag
4. **Action based on settings** (lines 23-29): Uses coordinator_session to send notification
### Creation
**File:** `commands/launch-swarm.md`
Settings files are created during swarm launch with:
```bash
cat > "$WORKTREE_PATH/.claude/multi-agent-swarm.local.md" <<EOF
---
agent_name: $AGENT_NAME
task_number: $TASK_ID
pr_number: TBD
coordinator_session: $COORDINATOR_SESSION
enabled: true
dependencies: [$DEPENDENCIES]
additional_instructions: "$EXTRA_INSTRUCTIONS"
---
# Task: $TASK_DESCRIPTION
$TASK_DETAILS
EOF
```
### Updates
PR number updated after PR creation:
```bash
# Update pr_number field
sed "s/^pr_number: .*/pr_number: $PR_NUM/" \
".claude/multi-agent-swarm.local.md" > temp.md
mv temp.md ".claude/multi-agent-swarm.local.md"
```
## ralph-wiggum Plugin
### Settings File Structure
**.claude/ralph-loop.local.md:**
```markdown
---
iteration: 1
max_iterations: 10
completion_promise: "All tests passing and build successful"
started_at: "2025-01-15T14:30:00Z"
---
Fix all the linting errors in the project.
Make sure tests pass after each fix.
Document any changes needed in CLAUDE.md.
```
### How It's Used
**File:** `hooks/stop-hook.sh`
**Purpose:** Prevent session exit and loop Claude's output back as input
**Implementation:**
```bash
#!/bin/bash
set -euo pipefail
RALPH_STATE_FILE=".claude/ralph-loop.local.md"
# Quick exit if no active loop
if [[ ! -f "$RALPH_STATE_FILE" ]]; then
exit 0
fi
# Parse frontmatter
FRONTMATTER=$(sed -n '/^---$/,/^---$/{ /^---$/d; p; }' "$RALPH_STATE_FILE")
# Extract configuration
ITERATION=$(echo "$FRONTMATTER" | grep '^iteration:' | sed 's/iteration: *//')
MAX_ITERATIONS=$(echo "$FRONTMATTER" | grep '^max_iterations:' | sed 's/max_iterations: *//')
COMPLETION_PROMISE=$(echo "$FRONTMATTER" | grep '^completion_promise:' | sed 's/completion_promise: *//' | sed 's/^"\(.*\)"$/\1/')
# Check max iterations
if [[ $MAX_ITERATIONS -gt 0 ]] && [[ $ITERATION -ge $MAX_ITERATIONS ]]; then
echo "🛑 Ralph loop: Max iterations ($MAX_ITERATIONS) reached."
rm "$RALPH_STATE_FILE"
exit 0
fi
# Get transcript and check for completion promise
TRANSCRIPT_PATH=$(echo "$HOOK_INPUT" | jq -r '.transcript_path')
LAST_OUTPUT=$(grep '"role":"assistant"' "$TRANSCRIPT_PATH" | tail -1 | jq -r '.message.content | map(select(.type == "text")) | map(.text) | join("\n")')
# Check for completion
if [[ "$COMPLETION_PROMISE" != "null" ]] && [[ -n "$COMPLETION_PROMISE" ]]; then
PROMISE_TEXT=$(echo "$LAST_OUTPUT" | perl -0777 -pe 's/.*?<promise>(.*?)<\/promise>.*/$1/s; s/^\s+|\s+$//g')
if [[ "$PROMISE_TEXT" = "$COMPLETION_PROMISE" ]]; then
echo "✅ Ralph loop: Detected completion"
rm "$RALPH_STATE_FILE"
exit 0
fi
fi
# Continue loop - increment iteration
NEXT_ITERATION=$((ITERATION + 1))
# Extract prompt from markdown body
PROMPT_TEXT=$(awk '/^---$/{i++; next} i>=2' "$RALPH_STATE_FILE")
# Update iteration counter
TEMP_FILE="${RALPH_STATE_FILE}.tmp.$$"
sed "s/^iteration: .*/iteration: $NEXT_ITERATION/" "$RALPH_STATE_FILE" > "$TEMP_FILE"
mv "$TEMP_FILE" "$RALPH_STATE_FILE"
# Block exit and feed prompt back
jq -n \
--arg prompt "$PROMPT_TEXT" \
--arg msg "🔄 Ralph iteration $NEXT_ITERATION" \
'{
"decision": "block",
"reason": $prompt,
"systemMessage": $msg
}'
exit 0
```
**Key patterns:**
1. **Quick exit** (line 7-9): Skip if not active
2. **Iteration tracking** (lines 11-20): Count and enforce max iterations
3. **Promise detection** (lines 25-33): Check for completion signal in output
4. **Prompt extraction** (line 38): Read markdown body as next prompt
5. **State update** (lines 40-43): Increment iteration atomically
6. **Loop continuation** (lines 45-53): Block exit and feed prompt back
### Creation
**File:** `scripts/setup-ralph-loop.sh`
```bash
#!/bin/bash
PROMPT="$1"
MAX_ITERATIONS="${2:-0}"
COMPLETION_PROMISE="${3:-}"
# Create state file
cat > ".claude/ralph-loop.local.md" <<EOF
---
iteration: 1
max_iterations: $MAX_ITERATIONS
completion_promise: "$COMPLETION_PROMISE"
started_at: "$(date -Iseconds)"
---
$PROMPT
EOF
echo "Ralph loop initialized: .claude/ralph-loop.local.md"
```
## Pattern Comparison
| Feature | multi-agent-swarm | ralph-wiggum |
|---------|-------------------|--------------|
| **File** | `.claude/multi-agent-swarm.local.md` | `.claude/ralph-loop.local.md` |
| **Purpose** | Agent coordination state | Loop iteration state |
| **Frontmatter** | Agent metadata | Loop configuration |
| **Body** | Task assignment | Prompt to loop |
| **Updates** | PR number, status | Iteration counter |
| **Deletion** | Manual or on completion | On loop exit |
| **Hook** | Stop (notifications) | Stop (loop control) |
## Best Practices from Real Plugins
### 1. Quick Exit Pattern
Both plugins check file existence first:
```bash
if [[ ! -f "$STATE_FILE" ]]; then
exit 0 # Not active
fi
```
**Why:** Avoids errors when plugin isn't configured and performs fast.
### 2. Enabled Flag
Both use an `enabled` field for explicit control:
```yaml
enabled: true
```
**Why:** Allows temporary deactivation without deleting file.
### 3. Atomic Updates
Both use temp file + atomic move:
```bash
TEMP_FILE="${FILE}.tmp.$$"
sed "s/^field: .*/field: $NEW_VALUE/" "$FILE" > "$TEMP_FILE"
mv "$TEMP_FILE" "$FILE"
```
**Why:** Prevents corruption if process is interrupted.
### 4. Quote Handling
Both strip surrounding quotes from YAML values:
```bash
sed 's/^"\(.*\)"$/\1/'
```
**Why:** YAML allows both `field: value` and `field: "value"`.
### 5. Error Handling
Both handle missing/corrupt files gracefully:
```bash
if [[ ! -f "$FILE" ]]; then
exit 0 # No error, just not configured
fi
if [[ -z "$CRITICAL_FIELD" ]]; then
echo "Settings file corrupt" >&2
rm "$FILE" # Clean up
exit 0
fi
```
**Why:** Fails gracefully instead of crashing.
## Anti-Patterns to Avoid
### ❌ Hardcoded Paths
```bash
# BAD
FILE="/Users/alice/.claude/my-plugin.local.md"
# GOOD
FILE=".claude/my-plugin.local.md"
```
### ❌ Unquoted Variables
```bash
# BAD
echo $VALUE
# GOOD
echo "$VALUE"
```
### ❌ Non-Atomic Updates
```bash
# BAD: Can corrupt file if interrupted
sed -i "s/field: .*/field: $VALUE/" "$FILE"
# GOOD: Atomic
TEMP_FILE="${FILE}.tmp.$$"
sed "s/field: .*/field: $VALUE/" "$FILE" > "$TEMP_FILE"
mv "$TEMP_FILE" "$FILE"
```
### ❌ No Default Values
```bash
# BAD: Fails if field missing
if [[ $MAX -gt 100 ]]; then
# MAX might be empty!
fi
# GOOD: Provide default
MAX=${MAX:-10}
```
### ❌ Ignoring Edge Cases
```bash
# BAD: Assumes exactly 2 --- markers
sed -n '/^---$/,/^---$/{ /^---$/d; p; }'
# GOOD: Handles --- in body
awk '/^---$/{i++; next} i>=2' # For body
```
## Conclusion
The `.claude/plugin-name.local.md` pattern provides:
- Simple, human-readable configuration
- Version-control friendly (gitignored)
- Per-project settings
- Easy parsing with standard bash tools
- Supports both structured config (YAML) and freeform content (markdown)
Use this pattern for any plugin that needs user-configurable behavior or state persistence.
---
## review-pr.md
# Comprehensive PR Review
Run a comprehensive pull request review using multiple specialized agents, each focusing on a different aspect of code quality.
**Review Aspects (optional):** "$ARGUMENTS"
## Review Workflow:
1. **Determine Review Scope**
- Check git status to identify changed files
- Parse arguments to see if user requested specific review aspects
- Default: Run all applicable reviews
2. **Available Review Aspects:**
- **comments** - Analyze code comment accuracy and maintainability
- **tests** - Review test coverage quality and completeness
- **errors** - Check error handling for silent failures
- **types** - Analyze type design and invariants (if new types added)
- **code** - General code review for project guidelines
- **simplify** - Simplify code for clarity and maintainability
- **all** - Run all applicable reviews (default)
3. **Identify Changed Files**
- Run `git diff --name-only` to see modified files
- Check if PR already exists: `gh pr view`
- Identify file types and what reviews apply
4. **Determine Applicable Reviews**
Based on changes:
- **Always applicable**: code-reviewer (general quality)
- **If test files changed**: pr-test-analyzer
- **If comments/docs added**: comment-analyzer
- **If error handling changed**: silent-failure-hunter
- **If types added/modified**: type-design-analyzer
- **After passing review**: code-simplifier (polish and refine)
5. **Launch Review Agents**
**Sequential approach** (one at a time):
- Easier to understand and act on
- Each report is complete before next
- Good for interactive review
**Parallel approach** (user can request):
- Launch all agents simultaneously
- Faster for comprehensive review
- Results come back together
6. **Aggregate Results**
After agents complete, summarize:
- **Critical Issues** (must fix before merge)
- **Important Issues** (should fix)
- **Suggestions** (nice to have)
- **Positive Observations** (what's good)
7. **Provide Action Plan**
Organize findings:
```markdown
# PR Review Summary
## Critical Issues (X found)
- [agent-name]: Issue description [file:line]
## Important Issues (X found)
- [agent-name]: Issue description [file:line]
## Suggestions (X found)
- [agent-name]: Suggestion [file:line]
## Strengths
- What's well-done in this PR
## Recommended Action
1. Fix critical issues first
2. Address important issues
3. Consider suggestions
4. Re-run review after fixes
```
## Usage Examples:
**Full review (default):**
```
/pr-review-toolkit:review-pr
```
**Specific aspects:**
```
/pr-review-toolkit:review-pr tests errors
# Reviews only test coverage and error handling
/pr-review-toolkit:review-pr comments
# Reviews only code comments
/pr-review-toolkit:review-pr simplify
# Simplifies code after passing review
```
**Parallel review:**
```
/pr-review-toolkit:review-pr all parallel
# Launches all agents in parallel
```
## Agent Descriptions:
**comment-analyzer**:
- Verifies comment accuracy vs code
- Identifies comment rot
- Checks documentation completeness
**pr-test-analyzer**:
- Reviews behavioral test coverage
- Identifies critical gaps
- Evaluates test quality
**silent-failure-hunter**:
- Finds silent failures
- Reviews catch blocks
- Checks error logging
**type-design-analyzer**:
- Analyzes type encapsulation
- Reviews invariant expression
- Rates type design quality
**code-reviewer**:
- Checks CLAUDE.md compliance
- Detects bugs and issues
- Reviews general code quality
**code-simplifier**:
- Simplifies complex code
- Improves clarity and readability
- Applies project standards
- Preserves functionality
## Tips:
- **Run early**: Before creating PR, not after
- **Focus on changes**: Agents analyze git diff by default
- **Address critical first**: Fix high-priority issues before lower priority
- **Re-run after fixes**: Verify issues are resolved
- **Use specific reviews**: Target specific aspects when you know the concern
## Workflow Integration:
**Before committing:**
```
1. Write code
2. Run: /pr-review-toolkit:review-pr code errors
3. Fix any critical issues
4. Commit
```
**Before creating PR:**
```
1. Stage all changes
2. Run: /pr-review-toolkit:review-pr all
3. Address all critical and important issues
4. Run specific reviews again to verify
5. Create PR
```
**After PR feedback:**
```
1. Make requested changes
2. Run targeted reviews based on feedback
3. Verify issues are resolved
4. Push updates
```
## Notes:
- Agents run autonomously and return detailed reports
- Each agent focuses on its specialty for deep analysis
- Results are actionable with specific file:line references
- Agents use appropriate models for their complexity
- All agents available in `/agents` list
---
## silent-failure-hunter.md
You are an elite error handling auditor with zero tolerance for silent failures and inadequate error handling. Your mission is to protect users from obscure, hard-to-debug issues by ensuring every error is properly surfaced, logged, and actionable.
## Core Principles
You operate under these non-negotiable rules:
1. **Silent failures are unacceptable** - Any error that occurs without proper logging and user feedback is a critical defect
2. **Users deserve actionable feedback** - Every error message must tell users what went wrong and what they can do about it
3. **Fallbacks must be explicit and justified** - Falling back to alternative behavior without user awareness is hiding problems
4. **Catch blocks must be specific** - Broad exception catching hides unrelated errors and makes debugging impossible
5. **Mock/fake implementations belong only in tests** - Production code falling back to mocks indicates architectural problems
## Your Review Process
When examining a PR, you will:
### 1. Identify All Error Handling Code
Systematically locate:
- All try-catch blocks (or try-except in Python, Result types in Rust, etc.)
- All error callbacks and error event handlers
- All conditional branches that handle error states
- All fallback logic and default values used on failure
- All places where errors are logged but execution continues
- All optional chaining or null coalescing that might hide errors
### 2. Scrutinize Each Error Handler
For every error handling location, ask:
**Logging Quality:**
- Is the error logged with appropriate severity (logError for production issues)?
- Does the log include sufficient context (what operation failed, relevant IDs, state)?
- Is there an error ID from constants/errorIds.ts for Sentry tracking?
- Would this log help someone debug the issue 6 months from now?
**User Feedback:**
- Does the user receive clear, actionable feedback about what went wrong?
- Does the error message explain what the user can do to fix or work around the issue?
- Is the error message specific enough to be useful, or is it generic and unhelpful?
- Are technical details appropriately exposed or hidden based on the user's context?
**Catch Block Specificity:**
- Does the catch block catch only the expected error types?
- Could this catch block accidentally suppress unrelated errors?
- List every type of unexpected error that could be hidden by this catch block
- Should this be multiple catch blocks for different error types?
**Fallback Behavior:**
- Is there fallback logic that executes when an error occurs?
- Is this fallback explicitly requested by the user or documented in the feature spec?
- Does the fallback behavior mask the underlying problem?
- Would the user be confused about why they're seeing fallback behavior instead of an error?
- Is this a fallback to a mock, stub, or fake implementation outside of test code?
**Error Propagation:**
- Should this error be propagated to a higher-level handler instead of being caught here?
- Is the error being swallowed when it should bubble up?
- Does catching here prevent proper cleanup or resource management?
### 3. Examine Error Messages
For every user-facing error message:
- Is it written in clear, non-technical language (when appropriate)?
- Does it explain what went wrong in terms the user understands?
- Does it provide actionable next steps?
- Does it avoid jargon unless the user is a developer who needs technical details?
- Is it specific enough to distinguish this error from similar errors?
- Does it include relevant context (file names, operation names, etc.)?
### 4. Check for Hidden Failures
Look for patterns that hide errors:
- Empty catch blocks (absolutely forbidden)
- Catch blocks that only log and continue
- Returning null/undefined/default values on error without logging
- Using optional chaining (?.) to silently skip operations that might fail
- Fallback chains that try multiple approaches without explaining why
- Retry logic that exhausts attempts without informing the user
### 5. Validate Against Project Standards
Ensure compliance with the project's error handling requirements:
- Never silently fail in production code
- Always log errors using appropriate logging functions
- Include relevant context in error messages
- Use proper error IDs for Sentry tracking
- Propagate errors to appropriate handlers
- Never use empty catch blocks
- Handle errors explicitly, never suppress them
## Your Output Format
For each issue you find, provide:
1. **Location**: File path and line number(s)
2. **Severity**: CRITICAL (silent failure, broad catch), HIGH (poor error message, unjustified fallback), MEDIUM (missing context, could be more specific)
3. **Issue Description**: What's wrong and why it's problematic
4. **Hidden Errors**: List specific types of unexpected errors that could be caught and hidden
5. **User Impact**: How this affects the user experience and debugging
6. **Recommendation**: Specific code changes needed to fix the issue
7. **Example**: Show what the corrected code should look like
## Your Tone
You are thorough, skeptical, and uncompromising about error handling quality. You:
- Call out every instance of inadequate error handling, no matter how minor
- Explain the debugging nightmares that poor error handling creates
- Provide specific, actionable recommendations for improvement
- Acknowledge when error handling is done well (rare but important)
- Use phrases like "This catch block could hide...", "Users will be confused when...", "This fallback masks the real problem..."
- Are constructively critical - your goal is to improve the code, not to criticize the developer
## Special Considerations
Be aware of project-specific patterns from CLAUDE.md:
- This project has specific logging functions: logForDebugging (user-facing), logError (Sentry), logEvent (Statsig)
- Error IDs should come from constants/errorIds.ts
- The project explicitly forbids silent failures in production code
- Empty catch blocks are never acceptable
- Tests should not be fixed by disabling them; errors should not be fixed by bypassing them
Remember: Every silent failure you catch prevents hours of debugging frustration for users and developers. Be thorough, be skeptical, and never let an error slip through unnoticed.
---
## skill-creator-original.md
# Skill Creator
This skill provides guidance for creating effective skills.
## About Skills
Skills are modular, self-contained packages that extend Claude's capabilities by providing
specialized knowledge, workflows, and tools. Think of them as "onboarding guides" for specific
domains or tasks—they transform Claude from a general-purpose agent into a specialized agent
equipped with procedural knowledge that no model can fully possess.
### What Skills Provide
1. Specialized workflows - Multi-step procedures for specific domains
2. Tool integrations - Instructions for working with specific file formats or APIs
3. Domain expertise - Company-specific knowledge, schemas, business logic
4. Bundled resources - Scripts, references, and assets for complex and repetitive tasks
### Anatomy of a Skill
Every skill consists of a required SKILL.md file and optional bundled resources:
```
skill-name/
├── SKILL.md (required)
│ ├── YAML frontmatter metadata (required)
│ │ ├── name: (required)
│ │ └── description: (required)
│ └── Markdown instructions (required)
└── Bundled Resources (optional)
├── scripts/ - Executable code (Python/Bash/etc.)
├── references/ - Documentation intended to be loaded into context as needed
└── assets/ - Files used in output (templates, icons, fonts, etc.)
```
#### SKILL.md (required)
**Metadata Quality:** The `name` and `description` in YAML frontmatter determine when Claude will use the skill. Be specific about what the skill does and when to use it. Use the third-person (e.g. "This skill should be used when..." instead of "Use this skill when...").
#### Bundled Resources (optional)
##### Scripts (`scripts/`)
Executable code (Python/Bash/etc.) for tasks that require deterministic reliability or are repeatedly rewritten.
- **When to include**: When the same code is being rewritten repeatedly or deterministic reliability is needed
- **Example**: `scripts/rotate_pdf.py` for PDF rotation tasks
- **Benefits**: Token efficient, deterministic, may be executed without loading into context
- **Note**: Scripts may still need to be read by Claude for patching or environment-specific adjustments
##### References (`references/`)
Documentation and reference material intended to be loaded as needed into context to inform Claude's process and thinking.
- **When to include**: For documentation that Claude should reference while working
- **Examples**: `references/finance.md` for financial schemas, `references/mnda.md` for company NDA template, `references/policies.md` for company policies, `references/api_docs.md` for API specifications
- **Use cases**: Database schemas, API documentation, domain knowledge, company policies, detailed workflow guides
- **Benefits**: Keeps SKILL.md lean, loaded only when Claude determines it's needed
- **Best practice**: If files are large (>10k words), include grep search patterns in SKILL.md
- **Avoid duplication**: Information should live in either SKILL.md or references files, not both. Prefer references files for detailed information unless it's truly core to the skill—this keeps SKILL.md lean while making information discoverable without hogging the context window. Keep only essential procedural instructions and workflow guidance in SKILL.md; move detailed reference material, schemas, and examples to references files.
##### Assets (`assets/`)
Files not intended to be loaded into context, but rather used within the output Claude produces.
- **When to include**: When the skill needs files that will be used in the final output
- **Examples**: `assets/logo.png` for brand assets, `assets/slides.pptx` for PowerPoint templates, `assets/frontend-template/` for HTML/React boilerplate, `assets/font.ttf` for typography
- **Use cases**: Templates, images, icons, boilerplate code, fonts, sample documents that get copied or modified
- **Benefits**: Separates output resources from documentation, enables Claude to use files without loading them into context
### Progressive Disclosure Design Principle
Skills use a three-level loading system to manage context efficiently:
1. **Metadata (name + description)** - Always in context (~100 words)
2. **SKILL.md body** - When skill triggers (<5k words)
3. **Bundled resources** - As needed by Claude (Unlimited*)
*Unlimited because scripts can be executed without reading into context window.
## Skill Creation Process
To create a skill, follow the "Skill Creation Process" in order, skipping steps only if there is a clear reason why they are not applicable.
### Step 1: Understanding the Skill with Concrete Examples
Skip this step only when the skill's usage patterns are already clearly understood. It remains valuable even when working with an existing skill.
To create an effective skill, clearly understand concrete examples of how the skill will be used. This understanding can come from either direct user examples or generated examples that are validated with user feedback.
For example, when building an image-editor skill, relevant questions include:
- "What functionality should the image-editor skill support? Editing, rotating, anything else?"
- "Can you give some examples of how this skill would be used?"
- "I can imagine users asking for things like 'Remove the red-eye from this image' or 'Rotate this image'. Are there other ways you imagine this skill being used?"
- "What would a user say that should trigger this skill?"
To avoid overwhelming users, avoid asking too many questions in a single message. Start with the most important questions and follow up as needed for better effectiveness.
Conclude this step when there is a clear sense of the functionality the skill should support.
### Step 2: Planning the Reusable Skill Contents
To turn concrete examples into an effective skill, analyze each example by:
1. Considering how to execute on the example from scratch
2. Identifying what scripts, references, and assets would be helpful when executing these workflows repeatedly
Example: When building a `pdf-editor` skill to handle queries like "Help me rotate this PDF," the analysis shows:
1. Rotating a PDF requires re-writing the same code each time
2. A `scripts/rotate_pdf.py` script would be helpful to store in the skill
Example: When designing a `frontend-webapp-builder` skill for queries like "Build me a todo app" or "Build me a dashboard to track my steps," the analysis shows:
1. Writing a frontend webapp requires the same boilerplate HTML/React each time
2. An `assets/hello-world/` template containing the boilerplate HTML/React project files would be helpful to store in the skill
Example: When building a `big-query` skill to handle queries like "How many users have logged in today?" the analysis shows:
1. Querying BigQuery requires re-discovering the table schemas and relationships each time
2. A `references/schema.md` file documenting the table schemas would be helpful to store in the skill
To establish the skill's contents, analyze each concrete example to create a list of the reusable resources to include: scripts, references, and assets.
### Step 3: Initializing the Skill
At this point, it is time to actually create the skill.
Skip this step only if the skill being developed already exists, and iteration or packaging is needed. In this case, continue to the next step.
When creating a new skill from scratch, always run the `init_skill.py` script. The script conveniently generates a new template skill directory that automatically includes everything a skill requires, making the skill creation process much more efficient and reliable.
Usage:
```bash
scripts/init_skill.py <skill-name> --path <output-directory>
```
The script:
- Creates the skill directory at the specified path
- Generates a SKILL.md template with proper frontmatter and TODO placeholders
- Creates example resource directories: `scripts/`, `references/`, and `assets/`
- Adds example files in each directory that can be customized or deleted
After initialization, customize or remove the generated SKILL.md and example files as needed.
### Step 4: Edit the Skill
When editing the (newly-generated or existing) skill, remember that the skill is being created for another instance of Claude to use. Focus on including information that would be beneficial and non-obvious to Claude. Consider what procedural knowledge, domain-specific details, or reusable assets would help another Claude instance execute these tasks more effectively.
#### Start with Reusable Skill Contents
To begin implementation, start with the reusable resources identified above: `scripts/`, `references/`, and `assets/` files. Note that this step may require user input. For example, when implementing a `brand-guidelines` skill, the user may need to provide brand assets or templates to store in `assets/`, or documentation to store in `references/`.
Also, delete any example files and directories not needed for the skill. The initialization script creates example files in `scripts/`, `references/`, and `assets/` to demonstrate structure, but most skills won't need all of them.
#### Update SKILL.md
**Writing Style:** Write the entire skill using **imperative/infinitive form** (verb-first instructions), not second person. Use objective, instructional language (e.g., "To accomplish X, do Y" rather than "You should do X" or "If you need to do X"). This maintains consistency and clarity for AI consumption.
To complete SKILL.md, answer the following questions:
1. What is the purpose of the skill, in a few sentences?
2. When should the skill be used?
3. In practice, how should Claude use the skill? All reusable skill contents developed above should be referenced so that Claude knows how to use them.
### Step 5: Packaging a Skill
Once the skill is ready, it should be packaged into a distributable zip file that gets shared with the user. The packaging process automatically validates the skill first to ensure it meets all requirements:
```bash
scripts/package_skill.py <path/to/skill-folder>
```
Optional output directory specification:
```bash
scripts/package_skill.py <path/to/skill-folder> ./dist
```
The packaging script will:
1. **Validate** the skill automatically, checking:
- YAML frontmatter format and required fields
- Skill naming conventions and directory structure
- Description completeness and quality
- File organization and resource references
2. **Package** the skill if validation passes, creating a zip file named after the skill (e.g., `my-skill.zip`) that includes all files and maintains the proper directory structure for distribution.
If validation fails, the script will report the errors and exit without creating a package. Fix any validation errors and run the packaging command again.
### Step 6: Iterate
After testing the skill, users may request improvements. Often this happens right after using the skill, with fresh context of how the skill performed.
**Iteration workflow:**
1. Use the skill on real tasks
2. Notice struggles or inefficiencies
3. Identify how SKILL.md or bundled resources should be updated
4. Implement changes and test again
---
## skill-reviewer.md
You are an expert skill architect specializing in reviewing and improving Claude Code skills for maximum effectiveness and reliability.
**Your Core Responsibilities:**
1. Review skill structure and organization
2. Evaluate description quality and triggering effectiveness
3. Assess progressive disclosure implementation
4. Check adherence to skill-creator best practices
5. Provide specific recommendations for improvement
**Skill Review Process:**
1. **Locate and Read Skill**:
- Find SKILL.md file (user should indicate path)
- Read frontmatter and body content
- Check for supporting directories (references/, examples/, scripts/)
2. **Validate Structure**:
- Frontmatter format (YAML between `---`)
- Required fields: `name`, `description`
- Optional fields: `version`, `when_to_use` (note: deprecated, use description only)
- Body content exists and is substantial
3. **Evaluate Description** (Most Critical):
- **Trigger Phrases**: Does description include specific phrases users would say?
- **Third Person**: Uses "This skill should be used when..." not "Load this skill when..."
- **Specificity**: Concrete scenarios, not vague
- **Length**: Appropriate (not too short <50 chars, not too long >500 chars for description)
- **Example Triggers**: Lists specific user queries that should trigger skill
4. **Assess Content Quality**:
- **Word Count**: SKILL.md body should be 1,000-3,000 words (lean, focused)
- **Writing Style**: Imperative/infinitive form ("To do X, do Y" not "You should do X")
- **Organization**: Clear sections, logical flow
- **Specificity**: Concrete guidance, not vague advice
5. **Check Progressive Disclosure**:
- **Core SKILL.md**: Essential information only
- **references/**: Detailed docs moved out of core
- **examples/**: Working code examples separate
- **scripts/**: Utility scripts if needed
- **Pointers**: SKILL.md references these resources clearly
6. **Review Supporting Files** (if present):
- **references/**: Check quality, relevance, organization
- **examples/**: Verify examples are complete and correct
- **scripts/**: Check scripts are executable and documented
7. **Identify Issues**:
- Categorize by severity (critical/major/minor)
- Note anti-patterns:
- Vague trigger descriptions
- Too much content in SKILL.md (should be in references/)
- Second person in description
- Missing key triggers
- No examples/references when they'd be valuable
8. **Generate Recommendations**:
- Specific fixes for each issue
- Before/after examples when helpful
- Prioritized by impact
**Quality Standards:**
- Description must have strong, specific trigger phrases
- SKILL.md should be lean (under 3,000 words ideally)
- Writing style must be imperative/infinitive form
- Progressive disclosure properly implemented
- All file references work correctly
- Examples are complete and accurate
**Output Format:**
## Skill Review: [skill-name]
### Summary
[Overall assessment and word counts]
### Description Analysis
**Current:** [Show current description]
**Issues:**
- [Issue 1 with description]
- [Issue 2...]
**Recommendations:**
- [Specific fix 1]
- Suggested improved description: "[better version]"
### Content Quality
**SKILL.md Analysis:**
- Word count: [count] ([assessment: too long/good/too short])
- Writing style: [assessment]
- Organization: [assessment]
**Issues:**
- [Content issue 1]
- [Content issue 2]
**Recommendations:**
- [Specific improvement 1]
- Consider moving [section X] to references/[filename].md
### Progressive Disclosure
**Current Structure:**
- SKILL.md: [word count]
- references/: [count] files, [total words]
- examples/: [count] files
- scripts/: [count] files
**Assessment:**
[Is progressive disclosure effective?]
**Recommendations:**
[Suggestions for better organization]
### Specific Issues
#### Critical ([count])
- [File/location]: [Issue] - [Fix]
#### Major ([count])
- [File/location]: [Issue] - [Recommendation]
#### Minor ([count])
- [File/location]: [Issue] - [Suggestion]
### Positive Aspects
- [What's done well 1]
- [What's done well 2]
### Overall Rating
[Pass/Needs Improvement/Needs Major Revision]
### Priority Recommendations
1. [Highest priority fix]
2. [Second priority]
3. [Third priority]
**Edge Cases:**
- Skill with no description issues: Focus on content and organization
- Very long skill (>5,000 words): Strongly recommend splitting into references
- New skill (minimal content): Provide constructive building guidance
- Perfect skill: Acknowledge quality and suggest minor enhancements only
- Missing referenced files: Report errors clearly with paths
```
This agent helps users create high-quality skills by applying the same standards used in plugin-dev's own skills.
---
## skill.md
# Financial Modeling Suite
A comprehensive financial modeling toolkit for investment analysis, valuation, and risk assessment using industry-standard methodologies.
## Core Capabilities
### 1. Discounted Cash Flow (DCF) Analysis
- Build complete DCF models with multiple growth scenarios
- Calculate terminal values using perpetuity growth and exit multiple methods
- Determine weighted average cost of capital (WACC)
- Generate enterprise and equity valuations
### 2. Sensitivity Analysis
- Test key assumptions impact on valuation
- Create data tables for multiple variables
- Generate tornado charts for sensitivity ranking
- Identify critical value drivers
### 3. Monte Carlo Simulation
- Run thousands of scenarios with probability distributions
- Model uncertainty in key inputs
- Generate confidence intervals for valuations
- Calculate probability of achieving targets
### 4. Scenario Planning
- Build best/base/worst case scenarios
- Model different economic environments
- Test strategic alternatives
- Compare outcome probabilities
## Input Requirements
### For DCF Analysis
- Historical financial statements (3-5 years)
- Revenue growth assumptions
- Operating margin projections
- Capital expenditure forecasts
- Working capital requirements
- Terminal growth rate or exit multiple
- Discount rate components (risk-free rate, beta, market premium)
### For Sensitivity Analysis
- Base case model
- Variable ranges to test
- Key metrics to track
### For Monte Carlo Simulation
- Probability distributions for uncertain variables
- Correlation assumptions between variables
- Number of iterations (typically 1,000-10,000)
### For Scenario Planning
- Scenario definitions and assumptions
- Probability weights for scenarios
- Key performance indicators to track
## Output Formats
### DCF Model Output
- Complete financial projections
- Free cash flow calculations
- Terminal value computation
- Enterprise and equity value summary
- Valuation multiples implied
- Excel workbook with full model
### Sensitivity Analysis Output
- Sensitivity tables showing value ranges
- Tornado chart of key drivers
- Break-even analysis
- Charts showing relationships
### Monte Carlo Output
- Probability distribution of valuations
- Confidence intervals (e.g., 90%, 95%)
- Statistical summary (mean, median, std dev)
- Risk metrics (VaR, probability of loss)
### Scenario Planning Output
- Scenario comparison table
- Probability-weighted expected values
- Decision tree visualization
- Risk-return profiles
## Model Types Supported
1. **Corporate Valuation**
- Mature companies with stable cash flows
- Growth companies with J-curve projections
- Turnaround situations
2. **Project Finance**
- Infrastructure projects
- Real estate developments
- Energy projects
3. **M&A Analysis**
- Acquisition valuations
- Synergy modeling
- Accretion/dilution analysis
4. **LBO Models**
- Leveraged buyout analysis
- Returns analysis (IRR, MOIC)
- Debt capacity assessment
## Best Practices Applied
### Modeling Standards
- Consistent formatting and structure
- Clear assumption documentation
- Separation of inputs, calculations, outputs
- Error checking and validation
- Version control and change tracking
### Valuation Principles
- Use multiple valuation methods for triangulation
- Apply appropriate risk adjustments
- Consider market comparables
- Validate against trading multiples
- Document key assumptions clearly
### Risk Management
- Identify and quantify key risks
- Use probability-weighted scenarios
- Stress test extreme cases
- Consider correlation effects
- Provide confidence intervals
## Example Usage
"Build a DCF model for this technology company using the attached financials"
"Run a Monte Carlo simulation on this acquisition model with 5,000 iterations"
"Create sensitivity analysis showing impact of growth rate and WACC on valuation"
"Develop three scenarios for this expansion project with probability weights"
## Scripts Included
- `dcf_model.py`: Complete DCF valuation engine
- `sensitivity_analysis.py`: Sensitivity testing framework
## Limitations and Disclaimers
- Models are only as good as their assumptions
- Past performance doesn't guarantee future results
- Market conditions can change rapidly
- Regulatory and tax changes may impact results
- Professional judgment required for interpretation
- Not a substitute for professional financial advice
## Quality Checks
The model automatically performs:
1. Balance sheet balancing checks
2. Cash flow reconciliation
3. Circular reference resolution
4. Sensitivity bound checking
5. Statistical validation of Monte Carlo results
## Updates and Maintenance
- Models use latest financial theory and practices
- Regular updates for market parameter defaults
- Incorporation of regulatory changes
- Continuous improvement based on usage patterns
---
## skill2.md
# Skill Development for Claude Code Plugins
This skill provides guidance for creating effective skills for Claude Code plugins.
## About Skills
Skills are modular, self-contained packages that extend Claude's capabilities by providing
specialized knowledge, workflows, and tools. Think of them as "onboarding guides" for specific
domains or tasks—they transform Claude from a general-purpose agent into a specialized agent
equipped with procedural knowledge that no model can fully possess.
### What Skills Provide
1. Specialized workflows - Multi-step procedures for specific domains
2. Tool integrations - Instructions for working with specific file formats or APIs
3. Domain expertise - Company-specific knowledge, schemas, business logic
4. Bundled resources - Scripts, references, and assets for complex and repetitive tasks
### Anatomy of a Skill
Every skill consists of a required SKILL.md file and optional bundled resources:
```
skill-name/
├── SKILL.md (required)
│ ├── YAML frontmatter metadata (required)
│ │ ├── name: (required)
│ │ └── description: (required)
│ └── Markdown instructions (required)
└── Bundled Resources (optional)
├── scripts/ - Executable code (Python/Bash/etc.)
├── references/ - Documentation intended to be loaded into context as needed
└── assets/ - Files used in output (templates, icons, fonts, etc.)
```
#### SKILL.md (required)
**Metadata Quality:** The `name` and `description` in YAML frontmatter determine when Claude will use the skill. Be specific about what the skill does and when to use it. Use the third-person (e.g. "This skill should be used when..." instead of "Use this skill when...").
#### Bundled Resources (optional)
##### Scripts (`scripts/`)
Executable code (Python/Bash/etc.) for tasks that require deterministic reliability or are repeatedly rewritten.
- **When to include**: When the same code is being rewritten repeatedly or deterministic reliability is needed
- **Example**: `scripts/rotate_pdf.py` for PDF rotation tasks
- **Benefits**: Token efficient, deterministic, may be executed without loading into context
- **Note**: Scripts may still need to be read by Claude for patching or environment-specific adjustments
##### References (`references/`)
Documentation and reference material intended to be loaded as needed into context to inform Claude's process and thinking.
- **When to include**: For documentation that Claude should reference while working
- **Examples**: `references/finance.md` for financial schemas, `references/mnda.md` for company NDA template, `references/policies.md` for company policies, `references/api_docs.md` for API specifications
- **Use cases**: Database schemas, API documentation, domain knowledge, company policies, detailed workflow guides
- **Benefits**: Keeps SKILL.md lean, loaded only when Claude determines it's needed
- **Best practice**: If files are large (>10k words), include grep search patterns in SKILL.md
- **Avoid duplication**: Information should live in either SKILL.md or references files, not both. Prefer references files for detailed information unless it's truly core to the skill—this keeps SKILL.md lean while making information discoverable without hogging the context window. Keep only essential procedural instructions and workflow guidance in SKILL.md; move detailed reference material, schemas, and examples to references files.
##### Assets (`assets/`)
Files not intended to be loaded into context, but rather used within the output Claude produces.
- **When to include**: When the skill needs files that will be used in the final output
- **Examples**: `assets/logo.png` for brand assets, `assets/slides.pptx` for PowerPoint templates, `assets/frontend-template/` for HTML/React boilerplate, `assets/font.ttf` for typography
- **Use cases**: Templates, images, icons, boilerplate code, fonts, sample documents that get copied or modified
- **Benefits**: Separates output resources from documentation, enables Claude to use files without loading them into context
### Progressive Disclosure Design Principle
Skills use a three-level loading system to manage context efficiently:
1. **Metadata (name + description)** - Always in context (~100 words)
2. **SKILL.md body** - When skill triggers (<5k words)
3. **Bundled resources** - As needed by Claude (Unlimited*)
*Unlimited because scripts can be executed without reading into context window.
## Skill Creation Process
To create a skill, follow the "Skill Creation Process" in order, skipping steps only if there is a clear reason why they are not applicable.
### Step 1: Understanding the Skill with Concrete Examples
Skip this step only when the skill's usage patterns are already clearly understood. It remains valuable even when working with an existing skill.
To create an effective skill, clearly understand concrete examples of how the skill will be used. This understanding can come from either direct user examples or generated examples that are validated with user feedback.
For example, when building an image-editor skill, relevant questions include:
- "What functionality should the image-editor skill support? Editing, rotating, anything else?"
- "Can you give some examples of how this skill would be used?"
- "I can imagine users asking for things like 'Remove the red-eye from this image' or 'Rotate this image'. Are there other ways you imagine this skill being used?"
- "What would a user say that should trigger this skill?"
To avoid overwhelming users, avoid asking too many questions in a single message. Start with the most important questions and follow up as needed for better effectiveness.
Conclude this step when there is a clear sense of the functionality the skill should support.
### Step 2: Planning the Reusable Skill Contents
To turn concrete examples into an effective skill, analyze each example by:
1. Considering how to execute on the example from scratch
2. Identifying what scripts, references, and assets would be helpful when executing these workflows repeatedly
Example: When building a `pdf-editor` skill to handle queries like "Help me rotate this PDF," the analysis shows:
1. Rotating a PDF requires re-writing the same code each time
2. A `scripts/rotate_pdf.py` script would be helpful to store in the skill
Example: When designing a `frontend-webapp-builder` skill for queries like "Build me a todo app" or "Build me a dashboard to track my steps," the analysis shows:
1. Writing a frontend webapp requires the same boilerplate HTML/React each time
2. An `assets/hello-world/` template containing the boilerplate HTML/React project files would be helpful to store in the skill
Example: When building a `big-query` skill to handle queries like "How many users have logged in today?" the analysis shows:
1. Querying BigQuery requires re-discovering the table schemas and relationships each time
2. A `references/schema.md` file documenting the table schemas would be helpful to store in the skill
**For Claude Code plugins:** When building a hooks skill, the analysis shows:
1. Developers repeatedly need to validate hooks.json and test hook scripts
2. `scripts/validate-hook-schema.sh` and `scripts/test-hook.sh` utilities would be helpful
3. `references/patterns.md` for detailed hook patterns to avoid bloating SKILL.md
To establish the skill's contents, analyze each concrete example to create a list of the reusable resources to include: scripts, references, and assets.
### Step 3: Create Skill Structure
For Claude Code plugins, create the skill directory structure:
```bash
mkdir -p plugin-name/skills/skill-name/{references,examples,scripts}
touch plugin-name/skills/skill-name/SKILL.md
```
**Note:** Unlike the generic skill-creator which uses `init_skill.py`, plugin skills are created directly in the plugin's `skills/` directory with a simpler manual structure.
### Step 4: Edit the Skill
When editing the (newly-created or existing) skill, remember that the skill is being created for another instance of Claude to use. Focus on including information that would be beneficial and non-obvious to Claude. Consider what procedural knowledge, domain-specific details, or reusable assets would help another Claude instance execute these tasks more effectively.
#### Start with Reusable Skill Contents
To begin implementation, start with the reusable resources identified above: `scripts/`, `references/`, and `assets/` files. Note that this step may require user input. For example, when implementing a `brand-guidelines` skill, the user may need to provide brand assets or templates to store in `assets/`, or documentation to store in `references/`.
Also, delete any example files and directories not needed for the skill. Create only the directories you actually need (references/, examples/, scripts/).
#### Update SKILL.md
**Writing Style:** Write the entire skill using **imperative/infinitive form** (verb-first instructions), not second person. Use objective, instructional language (e.g., "To accomplish X, do Y" rather than "You should do X" or "If you need to do X"). This maintains consistency and clarity for AI consumption.
**Description (Frontmatter):** Use third-person format with specific trigger phrases:
```yaml
---
name: Skill Name
description: This skill should be used when the user asks to "specific phrase 1", "specific phrase 2", "specific phrase 3". Include exact phrases users would say that should trigger this skill. Be concrete and specific.
version: 0.1.0
---
```
**Good description examples:**
```yaml
description: This skill should be used when the user asks to "create a hook", "add a PreToolUse hook", "validate tool use", "implement prompt-based hooks", or mentions hook events (PreToolUse, PostToolUse, Stop).
```
**Bad description examples:**
```yaml
description: Use this skill when working with hooks. # Wrong person, vague
description: Load when user needs hook help. # Not third person
description: Provides hook guidance. # No trigger phrases
```
To complete SKILL.md body, answer the following questions:
1. What is the purpose of the skill, in a few sentences?
2. When should the skill be used? (Include this in frontmatter description with specific triggers)
3. In practice, how should Claude use the skill? All reusable skill contents developed above should be referenced so that Claude knows how to use them.
**Keep SKILL.md lean:** Target 1,500-2,000 words for the body. Move detailed content to references/:
- Detailed patterns → `references/patterns.md`
- Advanced techniques → `references/advanced.md`
- Migration guides → `references/migration.md`
- API references → `references/api-reference.md`
**Reference resources in SKILL.md:**
```markdown
## Additional Resources
### Reference Files
For detailed patterns and techniques, consult:
- **`references/patterns.md`** - Common patterns
- **`references/advanced.md`** - Advanced use cases
### Example Files
Working examples in `examples/`:
- **`example-script.sh`** - Working example
```
### Step 5: Validate and Test
**For plugin skills, validation is different from generic skills:**
1. **Check structure**: Skill directory in `plugin-name/skills/skill-name/`
2. **Validate SKILL.md**: Has frontmatter with name and description
3. **Check trigger phrases**: Description includes specific user queries
4. **Verify writing style**: Body uses imperative/infinitive form, not second person
5. **Test progressive disclosure**: SKILL.md is lean (~1,500-2,000 words), detailed content in references/
6. **Check references**: All referenced files exist
7. **Validate examples**: Examples are complete and correct
8. **Test scripts**: Scripts are executable and work correctly
**Use the skill-reviewer agent:**
```
Ask: "Review my skill and check if it follows best practices"
```
The skill-reviewer agent will check description quality, content organization, and progressive disclosure.
### Step 6: Iterate
After testing the skill, users may request improvements. Often this happens right after using the skill, with fresh context of how the skill performed.
**Iteration workflow:**
1. Use the skill on real tasks
2. Notice struggles or inefficiencies
3. Identify how SKILL.md or bundled resources should be updated
4. Implement changes and test again
**Common improvements:**
- Strengthen trigger phrases in description
- Move long sections from SKILL.md to references/
- Add missing examples or scripts
- Clarify ambiguous instructions
- Add edge case handling
## Plugin-Specific Considerations
### Skill Location in Plugins
Plugin skills live in the plugin's `skills/` directory:
```
my-plugin/
├── .claude-plugin/
│ └── plugin.json
├── commands/
├── agents/
└── skills/
└── my-skill/
├── SKILL.md
├── references/
├── examples/
└── scripts/
```
### Auto-Discovery
Claude Code automatically discovers skills:
- Scans `skills/` directory
- Finds subdirectories containing `SKILL.md`
- Loads skill metadata (name + description) always
- Loads SKILL.md body when skill triggers
- Loads references/examples when needed
### No Packaging Needed
Plugin skills are distributed as part of the plugin, not as separate ZIP files. Users get skills when they install the plugin.
### Testing in Plugins
Test skills by installing plugin locally:
```bash
# Test with --plugin-dir
cc --plugin-dir /path/to/plugin
# Ask questions that should trigger the skill
# Verify skill loads correctly
```
## Examples from Plugin-Dev
Study the skills in this plugin as examples of best practices:
**hook-development skill:**
- Excellent trigger phrases: "create a hook", "add a PreToolUse hook", etc.
- Lean SKILL.md (1,651 words)
- 3 references/ files for detailed content
- 3 examples/ of working hooks
- 3 scripts/ utilities
**agent-development skill:**
- Strong triggers: "create an agent", "agent frontmatter", etc.
- Focused SKILL.md (1,438 words)
- References include the AI generation prompt from Claude Code
- Complete agent examples
**plugin-settings skill:**
- Specific triggers: "plugin settings", ".local.md files", "YAML frontmatter"
- References show real implementations (multi-agent-swarm, ralph-wiggum)
- Working parsing scripts
Each demonstrates progressive disclosure and strong triggering.
## Progressive Disclosure in Practice
### What Goes in SKILL.md
**Include (always loaded when skill triggers):**
- Core concepts and overview
- Essential procedures and workflows
- Quick reference tables
- Pointers to references/examples/scripts
- Most common use cases
**Keep under 3,000 words, ideally 1,500-2,000 words**
### What Goes in references/
**Move to references/ (loaded as needed):**
- Detailed patterns and advanced techniques
- Comprehensive API documentation
- Migration guides
- Edge cases and troubleshooting
- Extensive examples and walkthroughs
**Each reference file can be large (2,000-5,000+ words)**
### What Goes in examples/
**Working code examples:**
- Complete, runnable scripts
- Configuration files
- Template files
- Real-world usage examples
**Users can copy and adapt these directly**
### What Goes in scripts/
**Utility scripts:**
- Validation tools
- Testing helpers
- Parsing utilities
- Automation scripts
**Should be executable and documented**
## Writing Style Requirements
### Imperative/Infinitive Form
Write using verb-first instructions, not second person:
**Correct (imperative):**
```
To create a hook, define the event type.
Configure the MCP server with authentication.
Validate settings before use.
```
**Incorrect (second person):**
```
You should create a hook by defining the event type.
You need to configure the MCP server.
You must validate settings before use.
```
### Third-Person in Description
The frontmatter description must use third person:
**Correct:**
```yaml
description: This skill should be used when the user asks to "create X", "configure Y"...
```
**Incorrect:**
```yaml
description: Use this skill when you want to create X...
description: Load this skill when user asks...
```
### Objective, Instructional Language
Focus on what to do, not who should do it:
**Correct:**
```
Parse the frontmatter using sed.
Extract fields with grep.
Validate values before use.
```
**Incorrect:**
```
You can parse the frontmatter...
Claude should extract fields...
The user might validate values...
```
## Validation Checklist
Before finalizing a skill:
**Structure:**
- [ ] SKILL.md file exists with valid YAML frontmatter
- [ ] Frontmatter has `name` and `description` fields
- [ ] Markdown body is present and substantial
- [ ] Referenced files actually exist
**Description Quality:**
- [ ] Uses third person ("This skill should be used when...")
- [ ] Includes specific trigger phrases users would say
- [ ] Lists concrete scenarios ("create X", "configure Y")
- [ ] Not vague or generic
**Content Quality:**
- [ ] SKILL.md body uses imperative/infinitive form
- [ ] Body is focused and lean (1,500-2,000 words ideal, <5k max)
- [ ] Detailed content moved to references/
- [ ] Examples are complete and working
- [ ] Scripts are executable and documented
**Progressive Disclosure:**
- [ ] Core concepts in SKILL.md
- [ ] Detailed docs in references/
- [ ] Working code in examples/
- [ ] Utilities in scripts/
- [ ] SKILL.md references these resources
**Testing:**
- [ ] Skill triggers on expected user queries
- [ ] Content is helpful for intended tasks
- [ ] No duplicated information across files
- [ ] References load when needed
## Common Mistakes to Avoid
### Mistake 1: Weak Trigger Description
❌ **Bad:**
```yaml
description: Provides guidance for working with hooks.
```
**Why bad:** Vague, no specific trigger phrases, not third person
✅ **Good:**
```yaml
description: This skill should be used when the user asks to "create a hook", "add a PreToolUse hook", "validate tool use", or mentions hook events. Provides comprehensive hooks API guidance.
```
**Why good:** Third person, specific phrases, concrete scenarios
### Mistake 2: Too Much in SKILL.md
❌ **Bad:**
```
skill-name/
└── SKILL.md (8,000 words - everything in one file)
```
**Why bad:** Bloats context when skill loads, detailed content always loaded
✅ **Good:**
```
skill-name/
├── SKILL.md (1,800 words - core essentials)
└── references/
├── patterns.md (2,500 words)
└── advanced.md (3,700 words)
```
**Why good:** Progressive disclosure, detailed content loaded only when needed
### Mistake 3: Second Person Writing
❌ **Bad:**
```markdown
You should start by reading the configuration file.
You need to validate the input.
You can use the grep tool to search.
```
**Why bad:** Second person, not imperative form
✅ **Good:**
```markdown
Start by reading the configuration file.
Validate the input before processing.
Use the grep tool to search for patterns.
```
**Why good:** Imperative form, direct instructions
### Mistake 4: Missing Resource References
❌ **Bad:**
```markdown
# SKILL.md
[Core content]
[No mention of references/ or examples/]
```
**Why bad:** Claude doesn't know references exist
✅ **Good:**
```markdown
# SKILL.md
[Core content]
## Additional Resources
### Reference Files
- **`references/patterns.md`** - Detailed patterns
- **`references/advanced.md`** - Advanced techniques
### Examples
- **`examples/script.sh`** - Working example
```
**Why good:** Claude knows where to find additional information
## Quick Reference
### Minimal Skill
```
skill-name/
└── SKILL.md
```
Good for: Simple knowledge, no complex resources needed
### Standard Skill (Recommended)
```
skill-name/
├── SKILL.md
├── references/
│ └── detailed-guide.md
└── examples/
└── working-example.sh
```
Good for: Most plugin skills with detailed documentation
### Complete Skill
```
skill-name/
├── SKILL.md
├── references/
│ ├── patterns.md
│ └── advanced.md
├── examples/
│ ├── example1.sh
│ └── example2.json
└── scripts/
└── validate.sh
```
Good for: Complex domains with validation utilities
## Best Practices Summary
✅ **DO:**
- Use third-person in description ("This skill should be used when...")
- Include specific trigger phrases ("create X", "configure Y")
- Keep SKILL.md lean (1,500-2,000 words)
- Use progressive disclosure (move details to references/)
- Write in imperative/infinitive form
- Reference supporting files clearly
- Provide working examples
- Create utility scripts for common operations
- Study plugin-dev's skills as templates
❌ **DON'T:**
- Use second person anywhere
- Have vague trigger conditions
- Put everything in SKILL.md (>3,000 words without references/)
- Write in second person ("You should...")
- Leave resources unreferenced
- Include broken or incomplete examples
- Skip validation
## Additional Resources
### Study These Skills
Plugin-dev's skills demonstrate best practices:
- `../hook-development/` - Progressive disclosure, utilities
- `../agent-development/` - AI-assisted creation, references
- `../mcp-integration/` - Comprehensive references
- `../plugin-settings/` - Real-world examples
- `../command-development/` - Clear critical concepts
- `../plugin-structure/` - Good organization
### Reference Files
For complete skill-creator methodology:
- **`references/skill-creator-original.md`** - Full original skill-creator content
## Implementation Workflow
To create a skill for your plugin:
1. **Understand use cases**: Identify concrete examples of skill usage
2. **Plan resources**: Determine what scripts/references/examples needed
3. **Create structure**: `mkdir -p skills/skill-name/{references,examples,scripts}`
4. **Write SKILL.md**:
- Frontmatter with third-person description and trigger phrases
- Lean body (1,500-2,000 words) in imperative form
- Reference supporting files
5. **Add resources**: Create references/, examples/, scripts/ as needed
6. **Validate**: Check description, writing style, organization
7. **Test**: Verify skill loads on expected triggers
8. **Iterate**: Improve based on usage
Focus on strong trigger descriptions, progressive disclosure, and imperative writing style for effective skills that load when needed and provide targeted guidance.
---
## skills-382b48aed3.md
> ## Documentation Index
> Fetch the complete documentation index at: https://code.claude.com/docs/llms.txt
> Use this file to discover all available pages before exploring further.
# Extend Claude with skills
> Create, manage, and share skills to extend Claude's capabilities in Claude Code. Includes custom commands and bundled skills.
Skills extend what Claude can do. Create a `SKILL.md` file with instructions, and Claude adds it to its toolkit. Claude uses skills when relevant, or you can invoke one directly with `/skill-name`.
Create a skill when you keep pasting the same playbook, checklist, or multi-step procedure into chat, or when a section of CLAUDE.md has grown into a procedure rather than a fact. Unlike CLAUDE.md content, a skill's body loads only when it's used, so long reference material costs almost nothing until you need it.
<Note>
For built-in commands like `/help` and `/compact`, and bundled skills like `/debug` and `/simplify`, see the [commands reference](../02-Claude-Code-CLI/built-in-commands-claude-code-docs.md).
**Custom commands have been merged into skills.** A file at `.claude/commands/deploy.md` and a skill at `.claude/skills/deploy/SKILL.md` both create `/deploy` and work the same way. Your existing `.claude/commands/` files keep working. Skills add optional features: a directory for supporting files, frontmatter to [control whether you or Claude invokes them](#control-who-invokes-a-skill), and the ability for Claude to load them automatically when relevant.
</Note>
Claude Code skills follow the [Agent Skills](https://agentskills.io) open standard, which works across multiple AI tools. Claude Code extends the standard with additional features like [invocation control](#control-who-invokes-a-skill), [subagent execution](#run-skills-in-a-subagent), and [dynamic context injection](#inject-dynamic-context).
## Bundled skills
Claude Code includes a set of bundled skills that are available in every session, including `/simplify`, `/batch`, `/debug`, `/loop`, and `/claude-api`. Unlike most built-in commands, which execute fixed logic directly, bundled skills are prompt-based: they give Claude a detailed playbook and let it orchestrate the work using its tools. You invoke them the same way as any other skill, by typing `/` followed by the skill name.
Bundled skills are listed alongside built-in commands in the [commands reference](../02-Claude-Code-CLI/built-in-commands-claude-code-docs.md), marked **Skill** in the Purpose column.
## Getting started
### Create your first skill
This example creates a skill that teaches Claude to explain code using visual diagrams and analogies. Since it uses default frontmatter, Claude can load it automatically when you ask how something works, or you can invoke it directly with `/explain-code`.
<Steps>
<Step title="Create the skill directory">
Create a directory for the skill in your personal skills folder. Personal skills are available across all your projects.
```bash theme={null}
mkdir -p ~/.claude/skills/explain-code
```
</Step>
<Step title="Write SKILL.md">
Every skill needs a `SKILL.md` file with two parts: YAML frontmatter (between `---` markers) that tells Claude when to use the skill, and markdown content with instructions Claude follows when the skill is invoked. The `name` field becomes the `/slash-command`, and the `description` helps Claude decide when to load it automatically.
Create `~/.claude/skills/explain-code/SKILL.md`:
```yaml theme={null}
---
name: explain-code
description: Explains code with visual diagrams and analogies. Use when explaining how code works, teaching about a codebase, or when the user asks "how does this work?"
---
When explaining code, always include:
1. **Start with an analogy**: Compare the code to something from everyday life
2. **Draw a diagram**: Use ASCII art to show the flow, structure, or relationships
3. **Walk through the code**: Explain step-by-step what happens
4. **Highlight a gotcha**: What's a common mistake or misconception?
Keep explanations conversational. For complex concepts, use multiple analogies.
```
</Step>
<Step title="Test the skill">
You can test it two ways:
**Let Claude invoke it automatically** by asking something that matches the description:
```text theme={null}
How does this code work?
```
**Or invoke it directly** with the skill name:
```text theme={null}
/explain-code src/auth/login.ts
```
Either way, Claude should include an analogy and ASCII diagram in its explanation.
</Step>
</Steps>
### Where skills live
Where you store a skill determines who can use it:
| Location | Path | Applies to |
| :--------- | :-------------------------------------------------- | :----------------------------- |
| Enterprise | See [managed settings](/en/settings#settings-files) | All users in your organization |
| Personal | `~/.claude/skills/<skill-name>/SKILL.md` | All your projects |
| Project | `.claude/skills/<skill-name>/SKILL.md` | This project only |
| Plugin | `<plugin>/skills/<skill-name>/SKILL.md` | Where plugin is enabled |
When skills share the same name across levels, enterprise overrides personal, and personal overrides project. Plugin skills use a `plugin-name:skill-name` namespace, so they cannot conflict with other levels. If you have files in `.claude/commands/`, those work the same way, but if a skill and a command share the same name, the skill takes precedence.
#### Live change detection
Claude Code watches skill directories for file changes. Adding, editing, or removing a skill under `~/.claude/skills/`, the project `.claude/skills/`, or a `.claude/skills/` inside an `--add-dir` directory takes effect within the current session without restarting. Creating a top-level skills directory that did not exist when the session started requires restarting Claude Code so the new directory can be watched.
#### Automatic discovery from nested directories
When you work with files in subdirectories, Claude Code automatically discovers skills from nested `.claude/skills/` directories. For example, if you're editing a file in `packages/frontend/`, Claude Code also looks for skills in `packages/frontend/.claude/skills/`. This supports monorepo setups where packages have their own skills.
Each skill is a directory with `SKILL.md` as the entrypoint:
```text theme={null}
my-skill/
├── SKILL.md # Main instructions (required)
├── template.md # Template for Claude to fill in
├── examples/
│ └── sample.md # Example output showing expected format
└── scripts/
└── validate.sh # Script Claude can execute
```
The `SKILL.md` contains the main instructions and is required. Other files are optional and let you build more powerful skills: templates for Claude to fill in, example outputs showing the expected format, scripts Claude can execute, or detailed reference documentation. Reference these files from your `SKILL.md` so Claude knows what they contain and when to load them. See [Add supporting files](#add-supporting-files) for more details.
<Note>
Files in `.claude/commands/` still work and support the same [frontmatter](#frontmatter-reference). Skills are recommended since they support additional features like supporting files.
</Note>
#### Skills from additional directories
The `--add-dir` flag [grants file access](/en/permissions#additional-directories-grant-file-access-not-configuration) rather than configuration discovery, but skills are an exception: `.claude/skills/` within an added directory is loaded automatically. See [Live change detection](#live-change-detection) for how edits are picked up during a session.
Other `.claude/` configuration such as subagents, commands, and output styles is not loaded from additional directories. See the [exceptions table](/en/permissions#additional-directories-grant-file-access-not-configuration) for the complete list of what is and isn't loaded, and the recommended ways to share configuration across projects.
<Note>
CLAUDE.md files from `--add-dir` directories are not loaded by default. To load them, set `CLAUDE_CODE_ADDITIONAL_DIRECTORIES_CLAUDE_MD=1`. See [Load from additional directories](/en/memory#load-from-additional-directories).
</Note>
## Configure skills
Skills are configured through YAML frontmatter at the top of `SKILL.md` and the markdown content that follows.
### Types of skill content
Skill files can contain any instructions, but thinking about how you want to invoke them helps guide what to include:
**Reference content** adds knowledge Claude applies to your current work. Conventions, patterns, style guides, domain knowledge. This content runs inline so Claude can use it alongside your conversation context.
```yaml theme={null}
---
name: api-conventions
description: API design patterns for this codebase
---
When writing API endpoints:
- Use RESTful naming conventions
- Return consistent error formats
- Include request validation
```
**Task content** gives Claude step-by-step instructions for a specific action, like deployments, commits, or code generation. These are often actions you want to invoke directly with `/skill-name` rather than letting Claude decide when to run them. Add `disable-model-invocation: true` to prevent Claude from triggering it automatically.
```yaml theme={null}
---
name: deploy
description: Deploy the application to production
context: fork
disable-model-invocation: true
---
Deploy the application:
1. Run the test suite
2. Build the application
3. Push to the deployment target
```
Your `SKILL.md` can contain anything, but thinking through how you want the skill invoked (by you, by Claude, or both) and where you want it to run (inline or in a subagent) helps guide what to include. For complex skills, you can also [add supporting files](#add-supporting-files) to keep the main skill focused.
### Frontmatter reference
Beyond the markdown content, you can configure skill behavior using YAML frontmatter fields between `---` markers at the top of your `SKILL.md` file:
```yaml theme={null}
---
name: my-skill
description: What this skill does
disable-model-invocation: true
allowed-tools: Read Grep
---
Your skill instructions here...
```
All fields are optional. Only `description` is recommended so Claude knows when to use the skill.
| Field | Required | Description |
| :------------------------- | :---------- | :------------------------------------------------------------------------------------------------------------------------------------------------------------------------------------------------------------------------------------------------------------------------------------------------------------------ |
| `name` | No | Display name for the skill. If omitted, uses the directory name. Lowercase letters, numbers, and hyphens only (max 64 characters). |
| `description` | Recommended | What the skill does and when to use it. Claude uses this to decide when to apply the skill. If omitted, uses the first paragraph of markdown content. Front-load the key use case: the combined `description` and `when_to_use` text is truncated at 1,536 characters in the skill listing to reduce context usage. |
| `when_to_use` | No | Additional context for when Claude should invoke the skill, such as trigger phrases or example requests. Appended to `description` in the skill listing and counts toward the 1,536-character cap. |
| `argument-hint` | No | Hint shown during autocomplete to indicate expected arguments. Example: `[issue-number]` or `[filename] [format]`. |
| `arguments` | No | Named positional arguments for [`$name` substitution](#available-string-substitutions) in the skill content. Accepts a space-separated string or a YAML list. Names map to argument positions in order. |
| `disable-model-invocation` | No | Set to `true` to prevent Claude from automatically loading this skill. Use for workflows you want to trigger manually with `/name`. Also prevents the skill from being [preloaded into subagents](/en/sub-agents#preload-skills-into-subagents). Default: `false`. |
| `user-invocable` | No | Set to `false` to hide from the `/` menu. Use for background knowledge users shouldn't invoke directly. Default: `true`. |
| `allowed-tools` | No | Tools Claude can use without asking permission when this skill is active. Accepts a space-separated string or a YAML list. |
| `model` | No | Model to use when this skill is active. The override applies for the rest of the current turn and is not saved to settings; the session model resumes on your next prompt. Accepts the same values as [`/model`](../02-Claude-Code-CLI/model-config-ca429e15da.md), or `inherit` to keep the active model. |
| `effort` | No | [Effort level](/en/model-config#adjust-effort-level) when this skill is active. Overrides the session effort level. Default: inherits from session. Options: `low`, `medium`, `high`, `xhigh`, `max`; available levels depend on the model. |
| `context` | No | Set to `fork` to run in a forked subagent context. |
| `agent` | No | Which subagent type to use when `context: fork` is set. |
| `hooks` | No | Hooks scoped to this skill's lifecycle. See [Hooks in skills and agents](/en/hooks#hooks-in-skills-and-agents) for configuration format. |
| `paths` | No | Glob patterns that limit when this skill is activated. Accepts a comma-separated string or a YAML list. When set, Claude loads the skill automatically only when working with files matching the patterns. Uses the same format as [path-specific rules](/en/memory#path-specific-rules). |
| `shell` | No | Shell to use for `` !`command` `` and ` ```! ` blocks in this skill. Accepts `bash` (default) or `powershell`. Setting `powershell` runs inline shell commands via PowerShell on Windows. Requires `CLAUDE_CODE_USE_POWERSHELL_TOOL=1`. |
#### Available string substitutions
Skills support string substitution for dynamic values in the skill content:
| Variable | Description |
| :--------------------- | :--------------------------------------------------------------------------------------------------------------------------------------------------------------------------------------------------------------------------------------------------------------------------------------- |
| `$ARGUMENTS` | All arguments passed when invoking the skill. If `$ARGUMENTS` is not present in the content, arguments are appended as `ARGUMENTS: <value>`. |
| `$ARGUMENTS[N]` | Access a specific argument by 0-based index, such as `$ARGUMENTS[0]` for the first argument. |
| `$N` | Shorthand for `$ARGUMENTS[N]`, such as `$0` for the first argument or `$1` for the second. |
| `$name` | Named argument declared in the [`arguments`](#frontmatter-reference) frontmatter list. Names map to positions in order, so with `arguments: [issue, branch]` the placeholder `$issue` expands to the first argument and `$branch` to the second. |
| `${CLAUDE_SESSION_ID}` | The current session ID. Useful for logging, creating session-specific files, or correlating skill output with sessions. |
| `${CLAUDE_SKILL_DIR}` | The directory containing the skill's `SKILL.md` file. For plugin skills, this is the skill's subdirectory within the plugin, not the plugin root. Use this in bash injection commands to reference scripts or files bundled with the skill, regardless of the current working directory. |
Indexed arguments use shell-style quoting, so wrap multi-word values in quotes to pass them as a single argument. For example, `/my-skill "hello world" second` makes `$0` expand to `hello world` and `$1` to `second`. The `$ARGUMENTS` placeholder always expands to the full argument string as typed.
**Example using substitutions:**
```yaml theme={null}
---
name: session-logger
description: Log activity for this session
---
Log the following to logs/${CLAUDE_SESSION_ID}.log:
$ARGUMENTS
```
### Add supporting files
Skills can include multiple files in their directory. This keeps `SKILL.md` focused on the essentials while letting Claude access detailed reference material only when needed. Large reference docs, API specifications, or example collections don't need to load into context every time the skill runs.
```text theme={null}
my-skill/
├── SKILL.md (required - overview and navigation)
├── reference.md (detailed API docs - loaded when needed)
├── examples.md (usage examples - loaded when needed)
└── scripts/
└── helper.py (utility script - executed, not loaded)
```
Reference supporting files from `SKILL.md` so Claude knows what each file contains and when to load it:
```markdown theme={null}
## Additional resources
- For complete API details, see [reference.md](reference.md)
- For usage examples, see [examples.md](examples.md)
```
<Tip>Keep `SKILL.md` under 500 lines. Move detailed reference material to separate files.</Tip>
### Control who invokes a skill
By default, both you and Claude can invoke any skill. You can type `/skill-name` to invoke it directly, and Claude can load it automatically when relevant to your conversation. Two frontmatter fields let you restrict this:
* **`disable-model-invocation: true`**: Only you can invoke the skill. Use this for workflows with side effects or that you want to control timing, like `/commit`, `/deploy`, or `/send-slack-message`. You don't want Claude deciding to deploy because your code looks ready.
* **`user-invocable: false`**: Only Claude can invoke the skill. Use this for background knowledge that isn't actionable as a command. A `legacy-system-context` skill explains how an old system works. Claude should know this when relevant, but `/legacy-system-context` isn't a meaningful action for users to take.
This example creates a deploy skill that only you can trigger. The `disable-model-invocation: true` field prevents Claude from running it automatically:
```yaml theme={null}
---
name: deploy
description: Deploy the application to production
disable-model-invocation: true
---
Deploy $ARGUMENTS to production:
1. Run the test suite
2. Build the application
3. Push to the deployment target
4. Verify the deployment succeeded
```
Here's how the two fields affect invocation and context loading:
| Frontmatter | You can invoke | Claude can invoke | When loaded into context |
| :------------------------------- | :------------- | :---------------- | :----------------------------------------------------------- |
| (default) | Yes | Yes | Description always in context, full skill loads when invoked |
| `disable-model-invocation: true` | Yes | No | Description not in context, full skill loads when you invoke |
| `user-invocable: false` | No | Yes | Description always in context, full skill loads when invoked |
<Note>
In a regular session, skill descriptions are loaded into context so Claude knows what's available, but full skill content only loads when invoked. [Subagents with preloaded skills](/en/sub-agents#preload-skills-into-subagents) work differently: the full skill content is injected at startup.
</Note>
### Skill content lifecycle
When you or Claude invoke a skill, the rendered `SKILL.md` content enters the conversation as a single message and stays there for the rest of the session. Claude Code does not re-read the skill file on later turns, so write guidance that should apply throughout a task as standing instructions rather than one-time steps.
[Auto-compaction](/en/how-claude-code-works#when-context-fills-up) carries invoked skills forward within a token budget. When the conversation is summarized to free context, Claude Code re-attaches the most recent invocation of each skill after the summary, keeping the first 5,000 tokens of each. Re-attached skills share a combined budget of 25,000 tokens. Claude Code fills this budget starting from the most recently invoked skill, so older skills can be dropped entirely after compaction if you have invoked many in one session.
If a skill seems to stop influencing behavior after the first response, the content is usually still present and the model is choosing other tools or approaches. Strengthen the skill's `description` and instructions so the model keeps preferring it, or use [hooks](../07-Hooks/hooks-9168ed62a4.md) to enforce behavior deterministically. If the skill is large or you invoked several others after it, re-invoke it after compaction to restore the full content.
### Pre-approve tools for a skill
The `allowed-tools` field grants permission for the listed tools while the skill is active, so Claude can use them without prompting you for approval. It does not restrict which tools are available: every tool remains callable, and your [permission settings](../02-Claude-Code-CLI/configure-permissions-claude-code-docs-7b0e64d485.md) still govern tools that are not listed.
This skill lets Claude run git commands without per-use approval whenever you invoke it:
```yaml theme={null}
---
name: commit
description: Stage and commit the current changes
disable-model-invocation: true
allowed-tools: Bash(git add *) Bash(git commit *) Bash(git status *)
---
```
To block a skill from using certain tools, add deny rules in your [permission settings](../02-Claude-Code-CLI/configure-permissions-claude-code-docs-7b0e64d485.md) instead.
### Pass arguments to skills
Both you and Claude can pass arguments when invoking a skill. Arguments are available via the `$ARGUMENTS` placeholder.
This skill fixes a GitHub issue by number. The `$ARGUMENTS` placeholder gets replaced with whatever follows the skill name:
```yaml theme={null}
---
name: fix-issue
description: Fix a GitHub issue
disable-model-invocation: true
---
Fix GitHub issue $ARGUMENTS following our coding standards.
1. Read the issue description
2. Understand the requirements
3. Implement the fix
4. Write tests
5. Create a commit
```
When you run `/fix-issue 123`, Claude receives "Fix GitHub issue 123 following our coding standards..."
If you invoke a skill with arguments but the skill doesn't include `$ARGUMENTS`, Claude Code appends `ARGUMENTS: <your input>` to the end of the skill content so Claude still sees what you typed.
To access individual arguments by position, use `$ARGUMENTS[N]` or the shorter `$N`:
```yaml theme={null}
---
name: migrate-component
description: Migrate a component from one framework to another
---
Migrate the $ARGUMENTS[0] component from $ARGUMENTS[1] to $ARGUMENTS[2].
Preserve all existing behavior and tests.
```
Running `/migrate-component SearchBar React Vue` replaces `$ARGUMENTS[0]` with `SearchBar`, `$ARGUMENTS[1]` with `React`, and `$ARGUMENTS[2]` with `Vue`. The same skill using the `$N` shorthand:
```yaml theme={null}
---
name: migrate-component
description: Migrate a component from one framework to another
---
Migrate the $0 component from $1 to $2.
Preserve all existing behavior and tests.
```
## Advanced patterns
### Inject dynamic context
The `` !`<command>` `` syntax runs shell commands before the skill content is sent to Claude. The command output replaces the placeholder, so Claude receives actual data, not the command itself.
This skill summarizes a pull request by fetching live PR data with the GitHub CLI. The `` !`gh pr diff` `` and other commands run first, and their output gets inserted into the prompt:
```yaml theme={null}
---
name: pr-summary
description: Summarize changes in a pull request
context: fork
agent: Explore
allowed-tools: Bash(gh *)
---
## Pull request context
- PR diff: !`gh pr diff`
- PR comments: !`gh pr view --comments`
- Changed files: !`gh pr diff --name-only`
## Your task
Summarize this pull request...
```
When this skill runs:
1. Each `` !`<command>` `` executes immediately (before Claude sees anything)
2. The output replaces the placeholder in the skill content
3. Claude receives the fully-rendered prompt with actual PR data
This is preprocessing, not something Claude executes. Claude only sees the final result.
For multi-line commands, use a fenced code block opened with ` ```! ` instead of the inline form:
````markdown theme={null}
## Environment
```!
node --version
npm --version
git status --short
```
````
To disable this behavior for skills and custom commands from user, project, plugin, or [additional-directory](#skills-from-additional-directories) sources, set `"disableSkillShellExecution": true` in [settings](../02-Claude-Code-CLI/claude-code-settings-claude-code-docs-d4420b4b52.md). Each command is replaced with `[shell command execution disabled by policy]` instead of being run. Bundled and managed skills are not affected. This setting is most useful in [managed settings](/en/permissions#managed-settings), where users cannot override it.
<Tip>
To enable [extended thinking](/en/common-workflows#use-extended-thinking-thinking-mode) in a skill, include the word "ultrathink" anywhere in your skill content.
</Tip>
### Run skills in a subagent
Add `context: fork` to your frontmatter when you want a skill to run in isolation. The skill content becomes the prompt that drives the subagent. It won't have access to your conversation history.
<Warning>
`context: fork` only makes sense for skills with explicit instructions. If your skill contains guidelines like "use these API conventions" without a task, the subagent receives the guidelines but no actionable prompt, and returns without meaningful output.
</Warning>
Skills and [subagents](../09-Agents-Patterns/create-custom-subagents-claude-code-docs-7dc93e85c0.md) work together in two directions:
| Approach | System prompt | Task | Also loads |
| :--------------------------- | :---------------------------------------- | :-------------------------- | :--------------------------- |
| Skill with `context: fork` | From agent type (`Explore`, `Plan`, etc.) | SKILL.md content | CLAUDE.md |
| Subagent with `skills` field | Subagent's markdown body | Claude's delegation message | Preloaded skills + CLAUDE.md |
With `context: fork`, you write the task in your skill and pick an agent type to execute it. For the inverse (defining a custom subagent that uses skills as reference material), see [Subagents](/en/sub-agents#preload-skills-into-subagents).
#### Example: Research skill using Explore agent
This skill runs research in a forked Explore agent. The skill content becomes the task, and the agent provides read-only tools optimized for codebase exploration:
```yaml theme={null}
---
name: deep-research
description: Research a topic thoroughly
context: fork
agent: Explore
---
Research $ARGUMENTS thoroughly:
1. Find relevant files using Glob and Grep
2. Read and analyze the code
3. Summarize findings with specific file references
```
When this skill runs:
1. A new isolated context is created
2. The subagent receives the skill content as its prompt ("Research \$ARGUMENTS thoroughly...")
3. The `agent` field determines the execution environment (model, tools, and permissions)
4. Results are summarized and returned to your main conversation
The `agent` field specifies which subagent configuration to use. Options include built-in agents (`Explore`, `Plan`, `general-purpose`) or any custom subagent from `.claude/agents/`. If omitted, uses `general-purpose`.
### Restrict Claude's skill access
By default, Claude can invoke any skill that doesn't have `disable-model-invocation: true` set. Skills that define `allowed-tools` grant Claude access to those tools without per-use approval when the skill is active. Your [permission settings](../02-Claude-Code-CLI/configure-permissions-claude-code-docs-7b0e64d485.md) still govern baseline approval behavior for all other tools. A few built-in commands are also available through the Skill tool, including `/init`, `/review`, and `/security-review`. Other built-in commands such as `/compact` are not.
Three ways to control which skills Claude can invoke:
**Disable all skills** by denying the Skill tool in `/permissions`:
```text theme={null}
# Add to deny rules:
Skill
```
**Allow or deny specific skills** using [permission rules](../02-Claude-Code-CLI/configure-permissions-claude-code-docs-7b0e64d485.md):
```text theme={null}
# Allow only specific skills
Skill(commit)
Skill(review-pr *)
# Deny specific skills
Skill(deploy *)
```
Permission syntax: `Skill(name)` for exact match, `Skill(name *)` for prefix match with any arguments.
**Hide individual skills** by adding `disable-model-invocation: true` to their frontmatter. This removes the skill from Claude's context entirely.
<Note>
The `user-invocable` field only controls menu visibility, not Skill tool access. Use `disable-model-invocation: true` to block programmatic invocation.
</Note>
## Share skills
Skills can be distributed at different scopes depending on your audience:
* **Project skills**: Commit `.claude/skills/` to version control
* **Plugins**: Create a `skills/` directory in your [plugin](create-plugins-claude-code-docs.md)
* **Managed**: Deploy organization-wide through [managed settings](/en/settings#settings-files)
### Generate visual output
Skills can bundle and run scripts in any language, giving Claude capabilities beyond what's possible in a single prompt. One powerful pattern is generating visual output: interactive HTML files that open in your browser for exploring data, debugging, or creating reports.
This example creates a codebase explorer: an interactive tree view where you can expand and collapse directories, see file sizes at a glance, and identify file types by color.
Create the Skill directory:
```bash theme={null}
mkdir -p ~/.claude/skills/codebase-visualizer/scripts
```
Create `~/.claude/skills/codebase-visualizer/SKILL.md`. The description tells Claude when to activate this Skill, and the instructions tell Claude to run the bundled script:
````yaml theme={null}
---
name: codebase-visualizer
description: Generate an interactive collapsible tree visualization of your codebase. Use when exploring a new repo, understanding project structure, or identifying large files.
allowed-tools: Bash(python *)
---
# Codebase Visualizer
Generate an interactive HTML tree view that shows your project's file structure with collapsible directories.
## Usage
Run the visualization script from your project root:
```bash
python ~/.claude/skills/codebase-visualizer/scripts/visualize.py .
```
This creates `codebase-map.html` in the current directory and opens it in your default browser.
## What the visualization shows
- **Collapsible directories**: Click folders to expand/collapse
- **File sizes**: Displayed next to each file
- **Colors**: Different colors for different file types
- **Directory totals**: Shows aggregate size of each folder
````
Create `~/.claude/skills/codebase-visualizer/scripts/visualize.py`. This script scans a directory tree and generates a self-contained HTML file with:
* A **summary sidebar** showing file count, directory count, total size, and number of file types
* A **bar chart** breaking down the codebase by file type (top 8 by size)
* A **collapsible tree** where you can expand and collapse directories, with color-coded file type indicators
The script requires Python but uses only built-in libraries, so there are no packages to install:
```python expandable theme={null}
#!/usr/bin/env python3
"""Generate an interactive collapsible tree visualization of a codebase."""
import json
import sys
import webbrowser
from pathlib import Path
from collections import Counter
IGNORE = {'.git', 'node_modules', '__pycache__', '.venv', 'venv', 'dist', 'build'}
def scan(path: Path, stats: dict) -> dict:
result = {"name": path.name, "children": [], "size": 0}
try:
for item in sorted(path.iterdir()):
if item.name in IGNORE or item.name.startswith('.'):
continue
if item.is_file():
size = item.stat().st_size
ext = item.suffix.lower() or '(no ext)'
result["children"].append({"name": item.name, "size": size, "ext": ext})
result["size"] += size
stats["files"] += 1
stats["extensions"][ext] += 1
stats["ext_sizes"][ext] += size
elif item.is_dir():
stats["dirs"] += 1
child = scan(item, stats)
if child["children"]:
result["children"].append(child)
result["size"] += child["size"]
except PermissionError:
pass
return result
def generate_html(data: dict, stats: dict, output: Path) -> None:
ext_sizes = stats["ext_sizes"]
total_size = sum(ext_sizes.values()) or 1
sorted_exts = sorted(ext_sizes.items(), key=lambda x: -x[1])[:8]
colors = {
'.js': '#f7df1e', '.ts': '#3178c6', '.py': '#3776ab', '.go': '#00add8',
'.rs': '#dea584', '.rb': '#cc342d', '.css': '#264de4', '.html': '#e34c26',
'.json': '#6b7280', '.md': '#083fa1', '.yaml': '#cb171e', '.yml': '#cb171e',
'.mdx': '#083fa1', '.tsx': '#3178c6', '.jsx': '#61dafb', '.sh': '#4eaa25',
}
lang_bars = "".join(
f'<div class="bar-row"><span class="bar-label">{ext}</span>'
f'<div class="bar" style="width:{(size/total_size)*100}%;background:{colors.get(ext,"#6b7280")}"></div>'
f'<span class="bar-pct">{(size/total_size)*100:.1f}%</span></div>'
for ext, size in sorted_exts
)
def fmt(b):
if b < 1024: return f"{b} B"
if b < 1048576: return f"{b/1024:.1f} KB"
return f"{b/1048576:.1f} MB"
html = f'''<!DOCTYPE html>
<html><head>
<meta charset="utf-8"><title>Codebase Explorer</title>
<style>
body {{ font: 14px/1.5 system-ui, sans-serif; margin: 0; background: #1a1a2e; color: #eee; }}
.container {{ display: flex; height: 100vh; }}
.sidebar {{ width: 280px; background: #252542; padding: 20px; border-right: 1px solid #3d3d5c; overflow-y: auto; flex-shrink: 0; }}
.main {{ flex: 1; padding: 20px; overflow-y: auto; }}
h1 {{ margin: 0 0 10px 0; font-size: 18px; }}
h2 {{ margin: 20px 0 10px 0; font-size: 14px; color: #888; text-transform: uppercase; }}
.stat {{ display: flex; justify-content: space-between; padding: 8px 0; border-bottom: 1px solid #3d3d5c; }}
.stat-value {{ font-weight: bold; }}
.bar-row {{ display: flex; align-items: center; margin: 6px 0; }}
.bar-label {{ width: 55px; font-size: 12px; color: #aaa; }}
.bar {{ height: 18px; border-radius: 3px; }}
.bar-pct {{ margin-left: 8px; font-size: 12px; color: #666; }}
.tree {{ list-style: none; padding-left: 20px; }}
details {{ cursor: pointer; }}
summary {{ padding: 4px 8px; border-radius: 4px; }}
summary:hover {{ background: #2d2d44; }}
.folder {{ color: #ffd700; }}
.file {{ display: flex; align-items: center; padding: 4px 8px; border-radius: 4px; }}
.file:hover {{ background: #2d2d44; }}
.size {{ color: #888; margin-left: auto; font-size: 12px; }}
.dot {{ width: 8px; height: 8px; border-radius: 50%; margin-right: 8px; }}
</style>
</head><body>
<div class="container">
<div class="sidebar">
<h1>📊 Summary</h1>
<div class="stat"><span>Files</span><span class="stat-value">{stats["files"]:,}</span></div>
<div class="stat"><span>Directories</span><span class="stat-value">{stats["dirs"]:,}</span></div>
<div class="stat"><span>Total size</span><span class="stat-value">{fmt(data["size"])}</span></div>
<div class="stat"><span>File types</span><span class="stat-value">{len(stats["extensions"])}</span></div>
<h2>By file type</h2>
{lang_bars}
</div>
<div class="main">
<h1>📁 {data["name"]}</h1>
<ul class="tree" id="root"></ul>
</div>
</div>
<script>
const data = {json.dumps(data)};
const colors = {json.dumps(colors)};
function fmt(b) {{ if (b < 1024) return b + ' B'; if (b < 1048576) return (b/1024).toFixed(1) + ' KB'; return (b/1048576).toFixed(1) + ' MB'; }}
function render(node, parent) {{
if (node.children) {{
const det = document.createElement('details');
det.open = parent === document.getElementById('root');
det.innerHTML = `<summary><span class="folder">📁 ${{node.name}}</span><span class="size">${{fmt(node.size)}}</span></summary>`;
const ul = document.createElement('ul'); ul.className = 'tree';
node.children.sort((a,b) => (b.children?1:0)-(a.children?1:0) || a.name.localeCompare(b.name));
node.children.forEach(c => render(c, ul));
det.appendChild(ul);
const li = document.createElement('li'); li.appendChild(det); parent.appendChild(li);
}} else {{
const li = document.createElement('li'); li.className = 'file';
li.innerHTML = `<span class="dot" style="background:${{colors[node.ext]||'#6b7280'}}"></span>${{node.name}}<span class="size">${{fmt(node.size)}}</span>`;
parent.appendChild(li);
}}
}}
data.children.forEach(c => render(c, document.getElementById('root')));
</script>
</body></html>'''
output.write_text(html)
if __name__ == '__main__':
target = Path(sys.argv[1] if len(sys.argv) > 1 else '.').resolve()
stats = {"files": 0, "dirs": 0, "extensions": Counter(), "ext_sizes": Counter()}
data = scan(target, stats)
out = Path('codebase-map.html')
generate_html(data, stats, out)
print(f'Generated {out.absolute()}')
webbrowser.open(f'file://{out.absolute()}')
```
To test, open Claude Code in any project and ask "Visualize this codebase." Claude runs the script, generates `codebase-map.html`, and opens it in your browser.
This pattern works for any visual output: dependency graphs, test coverage reports, API documentation, or database schema visualizations. The bundled script does the heavy lifting while Claude handles orchestration.
## Troubleshooting
### Skill not triggering
If Claude doesn't use your skill when expected:
1. Check the description includes keywords users would naturally say
2. Verify the skill appears in `What skills are available?`
3. Try rephrasing your request to match the description more closely
4. Invoke it directly with `/skill-name` if the skill is user-invocable
### Skill triggers too often
If Claude uses your skill when you don't want it:
1. Make the description more specific
2. Add `disable-model-invocation: true` if you only want manual invocation
### Skill descriptions are cut short
Skill descriptions are loaded into context so Claude knows what's available. All skill names are always included, but if you have many skills, descriptions are shortened to fit the character budget, which can strip the keywords Claude needs to match your request. The budget scales dynamically at 1% of the context window, with a fallback of 8,000 characters.
To raise the limit, set the `SLASH_COMMAND_TOOL_CHAR_BUDGET` environment variable. Or trim the `description` and `when_to_use` text at the source: front-load the key use case, since each entry's combined text is capped at 1,536 characters regardless of budget.
## Related resources
* **[Debug your configuration](../02-Claude-Code-CLI/debug-your-config-615fc7cc73.md)**: diagnose why a skill isn't appearing or triggering
* **[Subagents](../09-Agents-Patterns/create-custom-subagents-claude-code-docs-7dc93e85c0.md)**: delegate tasks to specialized agents
* **[Plugins](create-plugins-claude-code-docs.md)**: package and distribute skills with other extensions
* **[Hooks](../07-Hooks/hooks-9168ed62a4.md)**: automate workflows around tool events
* **[Memory](../02-Claude-Code-CLI/how-claude-remembers-your-project-claude-code-docs-f1c064262d.md)**: manage CLAUDE.md files for persistent context
* **[Commands](../02-Claude-Code-CLI/built-in-commands-claude-code-docs.md)**: reference for built-in commands and bundled skills
* **[Permissions](../02-Claude-Code-CLI/configure-permissions-claude-code-docs-7b0e64d485.md)**: control tool and skill access
---
## skills-frontmatter-report.md
# Skills Frontmatter Analysis - Claude Code 2.1.72
Binary: `/home/zack/.local/share/claude/versions/2.1.72` (234MB, 13,675-line JS payload)
Extracted: `2.1.72_bunfs_extracted/src/entrypoints/cli.js`
## Frontmatter Fields (Complete)
| Field | Type | Default | Description |
|-------|------|---------|-------------|
| `name` | string | folder name | Display name |
| `description` | string | extracted from body | Shown in skill listing |
| `allowed-tools` | string[] | none | Tool permissions (e.g., `["Read", "Bash(gh:*)"]`) |
| `user-invocable` | boolean | `true` | User can invoke via `/skillname` |
| `disable-model-invocation` | boolean | `false` | Prevents model auto-invoke |
| `when_to_use` | string | none | Trigger phrases for model auto-invocation |
| `argument-hint` | string | none | Placeholder in UI (e.g., `[issue]`) |
| `arguments` | object | none | Named params with `$name` substitution |
| `model` | string | current | Override model (`inherit` = caller's) |
| `version` | string | none | Version tracking |
| `context` | `"fork"` | none | Fork execution (isolated) |
| `agent` | any | none | Agent configuration |
| `hooks` | object | none | Skill-specific hooks |
| `paths` | string | none | Path restrictions (e.g., `src/**`) |
## Invocation Matrix
```
+---------------------+-----------------+-------------------------+
| user-invocable | disable-model- | Result |
| | invocation | |
+---------------------+-----------------+-------------------------+
| true (default) | false (default) | User: /skill |
| | | Model: auto-invokes |
+---------------------+-----------------+-------------------------+
| true | true | User: /skill |
| | | Model: CANNOT invoke |
+---------------------+-----------------+-------------------------+
| false | false | User: hidden from / |
| | | Model: auto-invokes |
+---------------------+-----------------+-------------------------+
| false | true | Dead code (unreachable) |
+---------------------+-----------------+-------------------------+
```
## Model Invocation Logic
From `IV` memoized function (line ~6090):
```javascript
// Model-invocable skills filter:
filter((A) =>
A.type === "prompt" &&
!A.disableModelInvocation &&
A.source !== "builtin" &&
(A.hasUserSpecifiedDescription || A.whenToUse)
)
```
Model auto-invokes only when:
1. `disable-model-invocation` is NOT true
2. Source is not `builtin`
3. Has explicit `description` OR `when_to_use`
## Precedence (Loading Order)
```
+------------------------------------------------------------------+
| SKILL LOADING ORDER |
| (later entries override earlier by name) |
+------------------------------------------------------------------+
| 1. bundledSkills - Shipped in binary |
| 2. builtinPluginSkills - Plugin-provided builtins |
| 3. skillDirCommands - .claude/skills/ (project + user) |
| 4. MCP prompt skills - From MCP servers |
| 5. pluginSkills - Plugin-loaded skills |
| 6. RcA() (local) - Local slash commands (/help, /config) |
+------------------------------------------------------------------+
```
**Source types**:
- `builtin` - Hardcoded in binary
- `bundled` - Shipped SKILL.md in binary
- `project` - `.claude/skills/<name>/SKILL.md`
- `user` - `~/.claude/skills/<name>/SKILL.md`
- `plugin` - From installed plugin
- `mcp` - From MCP server prompts
**User overrides project**: User skills load after project skills, so same-name user skill wins.
## Related Surfaces
| Surface | Location | Key Frontmatter |
|---------|----------|-----------------|
| **Skills** | `.claude/skills/<name>/SKILL.md` | All fields above |
| **Agents** | `.claude/agents/<name>.md` | `name`, `description`, `tools`, `model`, `memory` |
| **MCP prompts** | Server `prompts/list` | Server-defined |
| **Hooks** | `settings.json` | N/A (JSON config) |
## Builtin Skills (2.1.72)
| Name | userInvocable | disableModelInvocation | Line |
|------|---------------|------------------------|------|
| `keybindings-help` | false | false | 7329 |
| `debug` | true | **true** | 7595 |
| `simplify` | true | false | 7776 |
## Key Functions
| Minified | Purpose | Line |
|----------|---------|------|
| `kP` | Register builtin skill | 6941+ |
| `cpH` | Load skills from directory | ~1472 |
| `rlf` | Construct skill object from frontmatter | ~1470 |
| `vw` | Parse frontmatter from markdown | (yaml parser) |
| `h0` | Get all skills (memoized) | ~6090 |
| `IV` | Get model-invocable skills | ~6090 |
## Example SKILL.md
```yaml
---
name: My Workflow
description: Does X when Y happens
when_to_use: "Use when user wants X. Examples: 'do X', 'run X'"
allowed-tools:
- Read
- Bash(git:*)
- Glob
user-invocable: true
disable-model-invocation: false
argument-hint: "[target file]"
arguments:
file: "The file to process"
model: sonnet
context: fork
version: "1.0.0"
paths: "src/**"
---
# My Workflow
Step 1: ...
```
## Notes
- `when_to_use` text is critical for model auto-invocation; should start with "Use when..."
- `context: fork` creates isolated execution (no mid-process user input)
- `allowed-tools` supports patterns like `Bash(gh:*)` for scoped permissions
- `paths` restricts skill to specific file paths (glob patterns)
- `model: inherit` uses caller's model instead of overriding
---
## skills-sdk.md
# Agent Skills in the SDK
Extend Claude with specialized capabilities using Agent Skills in the Claude Agent SDK
---
## Overview
Agent Skills extend Claude with specialized capabilities that Claude autonomously invokes when relevant. Skills are packaged as `SKILL.md` files containing instructions, descriptions, and optional supporting resources.
For comprehensive information about Skills, including benefits, architecture, and authoring guidelines, see the [Agent Skills overview](/docs/en/agents-and-tools/agent-skills/overview).
## How Skills Work with the SDK
When using the Claude Agent SDK, Skills are:
1. **Defined as filesystem artifacts**: Created as `SKILL.md` files in specific directories (`.claude/skills/`)
2. **Loaded from filesystem**: Skills are loaded from configured filesystem locations. You must specify `settingSources` (TypeScript) or `setting_sources` (Python) to load Skills from the filesystem
3. **Automatically discovered**: Once filesystem settings are loaded, Skill metadata is discovered at startup from user and project directories; full content loaded when triggered
4. **Model-invoked**: Claude autonomously chooses when to use them based on context
5. **Enabled via allowed_tools**: Add `"Skill"` to your `allowed_tools` to enable Skills
Unlike subagents (which can be defined programmatically), Skills must be created as filesystem artifacts. The SDK does not provide a programmatic API for registering Skills.
<Note>
**Default behavior**: By default, the SDK does not load any filesystem settings. To use Skills, you must explicitly configure `settingSources: ['user', 'project']` (TypeScript) or `setting_sources=["user", "project"]` (Python) in your options.
</Note>
## Using Skills with the SDK
To use Skills with the SDK, you need to:
1. Include `"Skill"` in your `allowed_tools` configuration
2. Configure `settingSources`/`setting_sources` to load Skills from the filesystem
Once configured, Claude automatically discovers Skills from the specified directories and invokes them when relevant to the user's request.
<CodeGroup>
```python Python
import asyncio
from claude_agent_sdk import query, ClaudeAgentOptions
async def main():
options = ClaudeAgentOptions(
cwd="/path/to/project", # Project with .claude/skills/
setting_sources=["user", "project"], # Load Skills from filesystem
allowed_tools=["Skill", "Read", "Write", "Bash"] # Enable Skill tool
)
async for message in query(
prompt="Help me process this PDF document",
options=options
):
print(message)
asyncio.run(main())
```
```typescript TypeScript
import { query } from "@anthropic-ai/claude-agent-sdk";
for await (const message of query({
prompt: "Help me process this PDF document",
options: {
cwd: "/path/to/project", // Project with .claude/skills/
settingSources: ["user", "project"], // Load Skills from filesystem
allowedTools: ["Skill", "Read", "Write", "Bash"] // Enable Skill tool
}
})) {
console.log(message);
}
```
</CodeGroup>
## Skill Locations
Skills are loaded from filesystem directories based on your `settingSources`/`setting_sources` configuration:
- **Project Skills** (`.claude/skills/`): Shared with your team via git - loaded when `setting_sources` includes `"project"`
- **User Skills** (`~/.claude/skills/`): Personal Skills across all projects - loaded when `setting_sources` includes `"user"`
- **Plugin Skills**: Bundled with installed Claude Code plugins
## Creating Skills
Skills are defined as directories containing a `SKILL.md` file with YAML frontmatter and Markdown content. The `description` field determines when Claude invokes your Skill.
**Example directory structure**:
```bash
.claude/skills/processing-pdfs/
└── SKILL.md
```
For complete guidance on creating Skills, including SKILL.md structure, multi-file Skills, and examples, see:
- [Agent Skills in Claude Code](extend-claude-with-skills-claude-code-docs.md): Complete guide with examples
- [Agent Skills Best Practices](/docs/en/agents-and-tools/agent-skills/best-practices): Authoring guidelines and naming conventions
## Tool Restrictions
<Note>
The `allowed-tools` frontmatter field in SKILL.md is only supported when using Claude Code CLI directly. **It does not apply when using Skills through the SDK**.
When using the SDK, control tool access through the main `allowedTools` option in your query configuration.
</Note>
To restrict tools for Skills in SDK applications, use the `allowedTools` option:
<Note>
Import statements from the first example are assumed in the following code snippets.
</Note>
<CodeGroup>
```python Python
options = ClaudeAgentOptions(
setting_sources=["user", "project"], # Load Skills from filesystem
allowed_tools=["Skill", "Read", "Grep", "Glob"] # Restricted toolset
)
async for message in query(
prompt="Analyze the codebase structure",
options=options
):
print(message)
```
```typescript TypeScript
// Skills can only use Read, Grep, and Glob tools
for await (const message of query({
prompt: "Analyze the codebase structure",
options: {
settingSources: ["user", "project"], // Load Skills from filesystem
allowedTools: ["Skill", "Read", "Grep", "Glob"] // Restricted toolset
}
})) {
console.log(message);
}
```
</CodeGroup>
## Discovering Available Skills
To see which Skills are available in your SDK application, simply ask Claude:
<CodeGroup>
```python Python
options = ClaudeAgentOptions(
setting_sources=["user", "project"], # Load Skills from filesystem
allowed_tools=["Skill"]
)
async for message in query(
prompt="What Skills are available?",
options=options
):
print(message)
```
```typescript TypeScript
for await (const message of query({
prompt: "What Skills are available?",
options: {
settingSources: ["user", "project"], // Load Skills from filesystem
allowedTools: ["Skill"]
}
})) {
console.log(message);
}
```
</CodeGroup>
Claude will list the available Skills based on your current working directory and installed plugins.
## Testing Skills
Test Skills by asking questions that match their descriptions:
<CodeGroup>
```python Python
options = ClaudeAgentOptions(
cwd="/path/to/project",
setting_sources=["user", "project"], # Load Skills from filesystem
allowed_tools=["Skill", "Read", "Bash"]
)
async for message in query(
prompt="Extract text from invoice.pdf",
options=options
):
print(message)
```
```typescript TypeScript
for await (const message of query({
prompt: "Extract text from invoice.pdf",
options: {
cwd: "/path/to/project",
settingSources: ["user", "project"], // Load Skills from filesystem
allowedTools: ["Skill", "Read", "Bash"]
}
})) {
console.log(message);
}
```
</CodeGroup>
Claude automatically invokes the relevant Skill if the description matches your request.
## Troubleshooting
### Skills Not Found
**Check settingSources configuration**: Skills are only loaded when you explicitly configure `settingSources`/`setting_sources`. This is the most common issue:
<CodeGroup>
```python Python
# Wrong - Skills won't be loaded
options = ClaudeAgentOptions(
allowed_tools=["Skill"]
)
# Correct - Skills will be loaded
options = ClaudeAgentOptions(
setting_sources=["user", "project"], # Required to load Skills
allowed_tools=["Skill"]
)
```
```typescript TypeScript
// Wrong - Skills won't be loaded
const options = {
allowedTools: ["Skill"]
};
// Correct - Skills will be loaded
const options = {
settingSources: ["user", "project"], // Required to load Skills
allowedTools: ["Skill"]
};
```
</CodeGroup>
For more details on `settingSources`/`setting_sources`, see the [TypeScript SDK reference](/docs/en/agent-sdk/typescript#settingsource) or [Python SDK reference](/docs/en/agent-sdk/python#settingsource).
**Check working directory**: The SDK loads Skills relative to the `cwd` option. Ensure it points to a directory containing `.claude/skills/`:
<CodeGroup>
```python Python
# Ensure your cwd points to the directory containing .claude/skills/
options = ClaudeAgentOptions(
cwd="/path/to/project", # Must contain .claude/skills/
setting_sources=["user", "project"], # Required to load Skills
allowed_tools=["Skill"]
)
```
```typescript TypeScript
// Ensure your cwd points to the directory containing .claude/skills/
const options = {
cwd: "/path/to/project", // Must contain .claude/skills/
settingSources: ["user", "project"], // Required to load Skills
allowedTools: ["Skill"]
};
```
</CodeGroup>
See the "Using Skills with the SDK" section above for the complete pattern.
**Verify filesystem location**:
```bash
# Check project Skills
ls .claude/skills/*/SKILL.md
# Check personal Skills
ls ~/.claude/skills/*/SKILL.md
```
### Skill Not Being Used
**Check the Skill tool is enabled**: Confirm `"Skill"` is in your `allowedTools`.
**Check the description**: Ensure it's specific and includes relevant keywords. See [Agent Skills Best Practices](/docs/en/agents-and-tools/agent-skills/best-practices#writing-effective-descriptions) for guidance on writing effective descriptions.
### Additional Troubleshooting
For general Skills troubleshooting (YAML syntax, debugging, etc.), see the [Claude Code Skills troubleshooting section](extend-claude-with-skills-claude-code-docs.md#troubleshooting).
## Related Documentation
### Skills Guides
- [Agent Skills in Claude Code](extend-claude-with-skills-claude-code-docs.md): Complete Skills guide with creation, examples, and troubleshooting
- [Agent Skills Overview](/docs/en/agents-and-tools/agent-skills/overview): Conceptual overview, benefits, and architecture
- [Agent Skills Best Practices](/docs/en/agents-and-tools/agent-skills/best-practices): Authoring guidelines for effective Skills
- [Agent Skills Cookbook](https://platform.claude.com/cookbook/skills-notebooks-01-skills-introduction): Example Skills and templates
### SDK Resources
- [Subagents in the SDK](/docs/en/agent-sdk/subagents): Similar filesystem-based agents with programmatic options
- [Slash Commands in the SDK](/docs/en/agent-sdk/slash-commands): User-invoked commands
- [SDK Overview](/docs/en/agent-sdk/overview): General SDK concepts
- [TypeScript SDK Reference](/docs/en/agent-sdk/typescript): Complete API documentation
- [Python SDK Reference](/docs/en/agent-sdk/python): Complete API documentation
---
## skills.md
> Fetch the complete documentation index at: https://code.claude.com/docs/llms.txt
> Use this file to discover all available pages before exploring further.
# Extend Claude with skills
> Create, manage, and share skills to extend Claude's capabilities in Claude Code. Includes custom slash commands.
Skills extend what Claude can do. Create a `SKILL.md` file with instructions, and Claude adds it to its toolkit. Claude uses skills when relevant, or you can invoke one directly with `/skill-name`.
<Note>
For built-in commands like `/help` and `/compact`, see [interactive mode](/en/interactive-mode#built-in-commands).
**Custom slash commands have been merged into skills.** A file at `.claude/commands/review.md` and a skill at `.claude/skills/review/SKILL.md` both create `/review` and work the same way. Your existing `.claude/commands/` files keep working. Skills add optional features: a directory for supporting files, frontmatter to [control whether you or Claude invokes them](#control-who-invokes-a-skill), and the ability for Claude to load them automatically when relevant.
</Note>
Claude Code skills follow the [Agent Skills](https://agentskills.io) open standard, which works across multiple AI tools. Claude Code extends the standard with additional features like [invocation control](#control-who-invokes-a-skill), [subagent execution](#run-skills-in-a-subagent), and [dynamic context injection](#inject-dynamic-context).
## Getting started
### Create your first skill
This example creates a skill that teaches Claude to explain code using visual diagrams and analogies. Since it uses default frontmatter, Claude can load it automatically when you ask how something works, or you can invoke it directly with `/explain-code`.
<Steps>
<Step title="Create the skill directory">
Create a directory for the skill in your personal skills folder. Personal skills are available across all your projects.
```bash theme={null}
mkdir -p ~/.claude/skills/explain-code
```
</Step>
<Step title="Write SKILL.md">
Every skill needs a `SKILL.md` file with two parts: YAML frontmatter (between `---` markers) that tells Claude when to use the skill, and markdown content with instructions Claude follows when the skill is invoked. The `name` field becomes the `/slash-command`, and the `description` helps Claude decide when to load it automatically.
Create `~/.claude/skills/explain-code/SKILL.md`:
```yaml theme={null}
---
name: explain-code
description: Explains code with visual diagrams and analogies. Use when explaining how code works, teaching about a codebase, or when the user asks "how does this work?"
---
When explaining code, always include:
1. **Start with an analogy**: Compare the code to something from everyday life
2. **Draw a diagram**: Use ASCII art to show the flow, structure, or relationships
3. **Walk through the code**: Explain step-by-step what happens
4. **Highlight a gotcha**: What's a common mistake or misconception?
Keep explanations conversational. For complex concepts, use multiple analogies.
```
</Step>
<Step title="Test the skill">
You can test it two ways:
**Let Claude invoke it automatically** by asking something that matches the description:
```
How does this code work?
```
**Or invoke it directly** with the skill name:
```
/explain-code src/auth/login.ts
```
Either way, Claude should include an analogy and ASCII diagram in its explanation.
</Step>
</Steps>
### Where skills live
Where you store a skill determines who can use it:
| Location | Path | Applies to |
| :--------- | :----------------------------------------------- | :----------------------------- |
| Enterprise | See [managed settings](/en/iam#managed-settings) | All users in your organization |
| Personal | `~/.claude/skills/<skill-name>/SKILL.md` | All your projects |
| Project | `.claude/skills/<skill-name>/SKILL.md` | This project only |
| Plugin | `<plugin>/skills/<skill-name>/SKILL.md` | Where plugin is enabled |
When skills share the same name across levels, higher-priority locations win: enterprise > personal > project. Plugin skills use a `plugin-name:skill-name` namespace, so they cannot conflict with other levels. If you have files in `.claude/commands/`, those work the same way, but if a skill and a command share the same name, the skill takes precedence.
#### Automatic discovery from nested directories
When you work with files in subdirectories, Claude Code automatically discovers skills from nested `.claude/skills/` directories. For example, if you're editing a file in `packages/frontend/`, Claude Code also looks for skills in `packages/frontend/.claude/skills/`. This supports monorepo setups where packages have their own skills.
Each skill is a directory with `SKILL.md` as the entrypoint:
```
my-skill/
├── SKILL.md # Main instructions (required)
├── template.md # Template for Claude to fill in
├── examples/
│ └── sample.md # Example output showing expected format
└── scripts/
└── validate.sh # Script Claude can execute
```
The `SKILL.md` contains the main instructions and is required. Other files are optional and let you build more powerful skills: templates for Claude to fill in, example outputs showing the expected format, scripts Claude can execute, or detailed reference documentation. Reference these files from your `SKILL.md` so Claude knows what they contain and when to load them. See [Add supporting files](#add-supporting-files) for more details.
<Note>
Files in `.claude/commands/` still work and support the same [frontmatter](#frontmatter-reference). Skills are recommended since they support additional features like supporting files.
</Note>
## Configure skills
Skills are configured through YAML frontmatter at the top of `SKILL.md` and the markdown content that follows.
### Types of skill content
Skill files can contain any instructions, but thinking about how you want to invoke them helps guide what to include:
**Reference content** adds knowledge Claude applies to your current work. Conventions, patterns, style guides, domain knowledge. This content runs inline so Claude can use it alongside your conversation context.
```yaml theme={null}
---
name: api-conventions
description: API design patterns for this codebase
---
When writing API endpoints:
- Use RESTful naming conventions
- Return consistent error formats
- Include request validation
```
**Task content** gives Claude step-by-step instructions for a specific action, like deployments, commits, or code generation. These are often actions you want to invoke directly with `/skill-name` rather than letting Claude decide when to run them. Add `disable-model-invocation: true` to prevent Claude from triggering it automatically.
```yaml theme={null}
---
name: deploy
description: Deploy the application to production
context: fork
disable-model-invocation: true
---
Deploy the application:
1. Run the test suite
2. Build the application
3. Push to the deployment target
```
Your `SKILL.md` can contain anything, but thinking through how you want the skill invoked (by you, by Claude, or both) and where you want it to run (inline or in a subagent) helps guide what to include. For complex skills, you can also [add supporting files](#add-supporting-files) to keep the main skill focused.
### Frontmatter reference
Beyond the markdown content, you can configure skill behavior using YAML frontmatter fields between `---` markers at the top of your `SKILL.md` file:
```yaml theme={null}
---
name: my-skill
description: What this skill does
disable-model-invocation: true
allowed-tools: Read, Grep
---
Your skill instructions here...
```
All fields are optional. Only `description` is recommended so Claude knows when to use the skill.
| Field | Required | Description |
| :------------------------- | :---------- | :---------------------------------------------------------------------------------------------------------------------------------------------------- |
| `name` | No | Display name for the skill. If omitted, uses the directory name. Lowercase letters, numbers, and hyphens only (max 64 characters). |
| `description` | Recommended | What the skill does and when to use it. Claude uses this to decide when to apply the skill. If omitted, uses the first paragraph of markdown content. |
| `argument-hint` | No | Hint shown during autocomplete to indicate expected arguments. Example: `[issue-number]` or `[filename] [format]`. |
| `disable-model-invocation` | No | Set to `true` to prevent Claude from automatically loading this skill. Use for workflows you want to trigger manually with `/name`. Default: `false`. |
| `user-invocable` | No | Set to `false` to hide from the `/` menu. Use for background knowledge users shouldn't invoke directly. Default: `true`. |
| `allowed-tools` | No | Tools Claude can use without asking permission when this skill is active. |
| `model` | No | Model to use when this skill is active. |
| `context` | No | Set to `fork` to run in a forked subagent context. |
| `agent` | No | Which subagent type to use when `context: fork` is set. |
| `hooks` | No | Hooks scoped to this skill's lifecycle. See [Hooks in skills and agents](/en/hooks#hooks-in-skills-and-agents) for configuration format. |
#### Available string substitutions
Skills support string substitution for dynamic values in the skill content:
| Variable | Description |
| :--------------------- | :------------------------------------------------------------------------------------------------------------------------------------------- |
| `$ARGUMENTS` | All arguments passed when invoking the skill. If `$ARGUMENTS` is not present in the content, arguments are appended as `ARGUMENTS: <value>`. |
| `$ARGUMENTS[N]` | Access a specific argument by 0-based index, such as `$ARGUMENTS[0]` for the first argument. |
| `$N` | Shorthand for `$ARGUMENTS[N]`, such as `$0` for the first argument or `$1` for the second. |
| `${CLAUDE_SESSION_ID}` | The current session ID. Useful for logging, creating session-specific files, or correlating skill output with sessions. |
**Example using substitutions:**
```yaml theme={null}
---
name: session-logger
description: Log activity for this session
---
Log the following to logs/${CLAUDE_SESSION_ID}.log:
$ARGUMENTS
```
### Add supporting files
Skills can include multiple files in their directory. This keeps `SKILL.md` focused on the essentials while letting Claude access detailed reference material only when needed. Large reference docs, API specifications, or example collections don't need to load into context every time the skill runs.
```
my-skill/
├── SKILL.md (required - overview and navigation)
├── reference.md (detailed API docs - loaded when needed)
├── examples.md (usage examples - loaded when needed)
└── scripts/
└── helper.py (utility script - executed, not loaded)
```
Reference supporting files from `SKILL.md` so Claude knows what each file contains and when to load it:
```markdown theme={null}
## Additional resources
- For complete API details, see [reference.md](reference.md)
- For usage examples, see [examples.md](examples.md)
```
<Tip>Keep `SKILL.md` under 500 lines. Move detailed reference material to separate files.</Tip>
### Control who invokes a skill
By default, both you and Claude can invoke any skill. You can type `/skill-name` to invoke it directly, and Claude can load it automatically when relevant to your conversation. Two frontmatter fields let you restrict this:
* **`disable-model-invocation: true`**: Only you can invoke the skill. Use this for workflows with side effects or that you want to control timing, like `/commit`, `/deploy`, or `/send-slack-message`. You don't want Claude deciding to deploy because your code looks ready.
* **`user-invocable: false`**: Only Claude can invoke the skill. Use this for background knowledge that isn't actionable as a command. A `legacy-system-context` skill explains how an old system works. Claude should know this when relevant, but `/legacy-system-context` isn't a meaningful action for users to take.
This example creates a deploy skill that only you can trigger. The `disable-model-invocation: true` field prevents Claude from running it automatically:
```yaml theme={null}
---
name: deploy
description: Deploy the application to production
disable-model-invocation: true
---
Deploy $ARGUMENTS to production:
1. Run the test suite
2. Build the application
3. Push to the deployment target
4. Verify the deployment succeeded
```
Here's how the two fields affect invocation and context loading:
| Frontmatter | You can invoke | Claude can invoke | When loaded into context |
| :------------------------------- | :------------- | :---------------- | :----------------------------------------------------------- |
| (default) | Yes | Yes | Description always in context, full skill loads when invoked |
| `disable-model-invocation: true` | Yes | No | Description not in context, full skill loads when you invoke |
| `user-invocable: false` | No | Yes | Description always in context, full skill loads when invoked |
<Note>
In a regular session, skill descriptions are loaded into context so Claude knows what's available, but full skill content only loads when invoked. [Subagents with preloaded skills](/en/sub-agents#preload-skills-into-subagents) work differently: the full skill content is injected at startup.
</Note>
### Restrict tool access
Use the `allowed-tools` field to limit which tools Claude can use when a skill is active. This skill creates a read-only mode where Claude can explore files but not modify them:
```yaml theme={null}
---
name: safe-reader
description: Read files without making changes
allowed-tools: Read, Grep, Glob
---
```
### Pass arguments to skills
Both you and Claude can pass arguments when invoking a skill. Arguments are available via the `$ARGUMENTS` placeholder.
This skill fixes a GitHub issue by number. The `$ARGUMENTS` placeholder gets replaced with whatever follows the skill name:
```yaml theme={null}
---
name: fix-issue
description: Fix a GitHub issue
disable-model-invocation: true
---
Fix GitHub issue $ARGUMENTS following our coding standards.
1. Read the issue description
2. Understand the requirements
3. Implement the fix
4. Write tests
5. Create a commit
```
When you run `/fix-issue 123`, Claude receives "Fix GitHub issue 123 following our coding standards..."
If you invoke a skill with arguments but the skill doesn't include `$ARGUMENTS`, Claude Code appends `ARGUMENTS: <your input>` to the end of the skill content so Claude still sees what you typed.
To access individual arguments by position, use `$ARGUMENTS[N]` or the shorter `$N`:
```yaml theme={null}
---
name: migrate-component
description: Migrate a component from one framework to another
---
Migrate the $ARGUMENTS[0] component from $ARGUMENTS[1] to $ARGUMENTS[2].
Preserve all existing behavior and tests.
```
Running `/migrate-component SearchBar React Vue` replaces `$ARGUMENTS[0]` with `SearchBar`, `$ARGUMENTS[1]` with `React`, and `$ARGUMENTS[2]` with `Vue`. The same skill using the `$N` shorthand:
```yaml theme={null}
---
name: migrate-component
description: Migrate a component from one framework to another
---
Migrate the $0 component from $1 to $2.
Preserve all existing behavior and tests.
```
## Advanced patterns
### Inject dynamic context
The `!`command\`\` syntax runs shell commands before the skill content is sent to Claude. The command output replaces the placeholder, so Claude receives actual data, not the command itself.
This skill summarizes a pull request by fetching live PR data with the GitHub CLI. The `!`gh pr diff\`\` and other commands run first, and their output gets inserted into the prompt:
```yaml theme={null}
---
name: pr-summary
description: Summarize changes in a pull request
context: fork
agent: Explore
allowed-tools: Bash(gh *)
---
## Pull request context
- PR diff: !`gh pr diff`
- PR comments: !`gh pr view --comments`
- Changed files: !`gh pr diff --name-only`
## Your task
Summarize this pull request...
```
When this skill runs:
1. Each `!`command\`\` executes immediately (before Claude sees anything)
2. The output replaces the placeholder in the skill content
3. Claude receives the fully-rendered prompt with actual PR data
This is preprocessing, not something Claude executes. Claude only sees the final result.
<Tip>
To enable [extended thinking](/en/common-workflows#use-extended-thinking-thinking-mode) in a skill, include the word "ultrathink" anywhere in your skill content.
</Tip>
### Run skills in a subagent
Add `context: fork` to your frontmatter when you want a skill to run in isolation. The skill content becomes the prompt that drives the subagent. It won't have access to your conversation history.
<Warning>
`context: fork` only makes sense for skills with explicit instructions. If your skill contains guidelines like "use these API conventions" without a task, the subagent receives the guidelines but no actionable prompt, and returns without meaningful output.
</Warning>
Skills and [subagents](../09-Agents-Patterns/create-custom-subagents-claude-code-docs-7dc93e85c0.md) work together in two directions:
| Approach | System prompt | Task | Also loads |
| :--------------------------- | :---------------------------------------- | :-------------------------- | :--------------------------- |
| Skill with `context: fork` | From agent type (`Explore`, `Plan`, etc.) | SKILL.md content | CLAUDE.md |
| Subagent with `skills` field | Subagent's markdown body | Claude's delegation message | Preloaded skills + CLAUDE.md |
With `context: fork`, you write the task in your skill and pick an agent type to execute it. For the inverse (defining a custom subagent that uses skills as reference material), see [Subagents](/en/sub-agents#preload-skills-into-subagents).
#### Example: Research skill using Explore agent
This skill runs research in a forked Explore agent. The skill content becomes the task, and the agent provides read-only tools optimized for codebase exploration:
```yaml theme={null}
---
name: deep-research
description: Research a topic thoroughly
context: fork
agent: Explore
---
Research $ARGUMENTS thoroughly:
1. Find relevant files using Glob and Grep
2. Read and analyze the code
3. Summarize findings with specific file references
```
When this skill runs:
1. A new isolated context is created
2. The subagent receives the skill content as its prompt ("Research \$ARGUMENTS thoroughly...")
3. The `agent` field determines the execution environment (model, tools, and permissions)
4. Results are summarized and returned to your main conversation
The `agent` field specifies which subagent configuration to use. Options include built-in agents (`Explore`, `Plan`, `general-purpose`) or any custom subagent from `.claude/agents/`. If omitted, uses `general-purpose`.
### Restrict Claude's skill access
By default, Claude can invoke any skill that doesn't have `disable-model-invocation: true` set. Skills that define `allowed-tools` grant Claude access to those tools without per-use approval when the skill is active. Your [permission settings](/en/iam) still govern baseline approval behavior for all other tools. Built-in commands like `/compact` and `/init` are not available through the Skill tool.
Three ways to control which skills Claude can invoke:
**Disable all skills** by denying the Skill tool in `/permissions`:
```
# Add to deny rules:
Skill
```
**Allow or deny specific skills** using [permission rules](/en/iam):
```
# Allow only specific skills
Skill(commit)
Skill(review-pr *)
# Deny specific skills
Skill(deploy *)
```
Permission syntax: `Skill(name)` for exact match, `Skill(name *)` for prefix match with any arguments.
**Hide individual skills** by adding `disable-model-invocation: true` to their frontmatter. This removes the skill from Claude's context entirely.
<Note>
The `user-invocable` field only controls menu visibility, not Skill tool access. Use `disable-model-invocation: true` to block programmatic invocation.
</Note>
## Share skills
Skills can be distributed at different scopes depending on your audience:
* **Project skills**: Commit `.claude/skills/` to version control
* **Plugins**: Create a `skills/` directory in your [plugin](create-plugins-claude-code-docs.md)
* **Managed**: Deploy organization-wide through [managed settings](/en/iam#managed-settings)
### Generate visual output
Skills can bundle and run scripts in any language, giving Claude capabilities beyond what's possible in a single prompt. One powerful pattern is generating visual output: interactive HTML files that open in your browser for exploring data, debugging, or creating reports.
This example creates a codebase explorer: an interactive tree view where you can expand and collapse directories, see file sizes at a glance, and identify file types by color.
Create the Skill directory:
```bash theme={null}
mkdir -p ~/.claude/skills/codebase-visualizer/scripts
```
Create `~/.claude/skills/codebase-visualizer/SKILL.md`. The description tells Claude when to activate this Skill, and the instructions tell Claude to run the bundled script:
````yaml theme={null}
---
name: codebase-visualizer
description: Generate an interactive collapsible tree visualization of your codebase. Use when exploring a new repo, understanding project structure, or identifying large files.
allowed-tools: Bash(python *)
---
# Codebase Visualizer
Generate an interactive HTML tree view that shows your project's file structure with collapsible directories.
## Usage
Run the visualization script from your project root:
```bash
python ~/.claude/skills/codebase-visualizer/scripts/visualize.py .
```
This creates `codebase-map.html` in the current directory and opens it in your default browser.
## What the visualization shows
- **Collapsible directories**: Click folders to expand/collapse
- **File sizes**: Displayed next to each file
- **Colors**: Different colors for different file types
- **Directory totals**: Shows aggregate size of each folder
````
Create `~/.claude/skills/codebase-visualizer/scripts/visualize.py`. This script scans a directory tree and generates a self-contained HTML file with:
* A **summary sidebar** showing file count, directory count, total size, and number of file types
* A **bar chart** breaking down the codebase by file type (top 8 by size)
* A **collapsible tree** where you can expand and collapse directories, with color-coded file type indicators
The script requires Python but uses only built-in libraries, so there are no packages to install:
```python expandable theme={null}
#!/usr/bin/env python3
"""Generate an interactive collapsible tree visualization of a codebase."""
import json
import sys
import webbrowser
from pathlib import Path
from collections import Counter
IGNORE = {'.git', 'node_modules', '__pycache__', '.venv', 'venv', 'dist', 'build'}
def scan(path: Path, stats: dict) -> dict:
result = {"name": path.name, "children": [], "size": 0}
try:
for item in sorted(path.iterdir()):
if item.name in IGNORE or item.name.startswith('.'):
continue
if item.is_file():
size = item.stat().st_size
ext = item.suffix.lower() or '(no ext)'
result["children"].append({"name": item.name, "size": size, "ext": ext})
result["size"] += size
stats["files"] += 1
stats["extensions"][ext] += 1
stats["ext_sizes"][ext] += size
elif item.is_dir():
stats["dirs"] += 1
child = scan(item, stats)
if child["children"]:
result["children"].append(child)
result["size"] += child["size"]
except PermissionError:
pass
return result
def generate_html(data: dict, stats: dict, output: Path) -> None:
ext_sizes = stats["ext_sizes"]
total_size = sum(ext_sizes.values()) or 1
sorted_exts = sorted(ext_sizes.items(), key=lambda x: -x[1])[:8]
colors = {
'.js': '#f7df1e', '.ts': '#3178c6', '.py': '#3776ab', '.go': '#00add8',
'.rs': '#dea584', '.rb': '#cc342d', '.css': '#264de4', '.html': '#e34c26',
'.json': '#6b7280', '.md': '#083fa1', '.yaml': '#cb171e', '.yml': '#cb171e',
'.mdx': '#083fa1', '.tsx': '#3178c6', '.jsx': '#61dafb', '.sh': '#4eaa25',
}
lang_bars = "".join(
f'<div class="bar-row"><span class="bar-label">{ext}</span>'
f'<div class="bar" style="width:{(size/total_size)*100}%;background:{colors.get(ext,"#6b7280")}"></div>'
f'<span class="bar-pct">{(size/total_size)*100:.1f}%</span></div>'
for ext, size in sorted_exts
)
def fmt(b):
if b < 1024: return f"{b} B"
if b < 1048576: return f"{b/1024:.1f} KB"
return f"{b/1048576:.1f} MB"
html = f'''<!DOCTYPE html>
<html><head>
<meta charset="utf-8"><title>Codebase Explorer</title>
<style>
body {{ font: 14px/1.5 system-ui, sans-serif; margin: 0; background: #1a1a2e; color: #eee; }}
.container {{ display: flex; height: 100vh; }}
.sidebar {{ width: 280px; background: #252542; padding: 20px; border-right: 1px solid #3d3d5c; overflow-y: auto; flex-shrink: 0; }}
.main {{ flex: 1; padding: 20px; overflow-y: auto; }}
h1 {{ margin: 0 0 10px 0; font-size: 18px; }}
h2 {{ margin: 20px 0 10px 0; font-size: 14px; color: #888; text-transform: uppercase; }}
.stat {{ display: flex; justify-content: space-between; padding: 8px 0; border-bottom: 1px solid #3d3d5c; }}
.stat-value {{ font-weight: bold; }}
.bar-row {{ display: flex; align-items: center; margin: 6px 0; }}
.bar-label {{ width: 55px; font-size: 12px; color: #aaa; }}
.bar {{ height: 18px; border-radius: 3px; }}
.bar-pct {{ margin-left: 8px; font-size: 12px; color: #666; }}
.tree {{ list-style: none; padding-left: 20px; }}
details {{ cursor: pointer; }}
summary {{ padding: 4px 8px; border-radius: 4px; }}
summary:hover {{ background: #2d2d44; }}
.folder {{ color: #ffd700; }}
.file {{ display: flex; align-items: center; padding: 4px 8px; border-radius: 4px; }}
.file:hover {{ background: #2d2d44; }}
.size {{ color: #888; margin-left: auto; font-size: 12px; }}
.dot {{ width: 8px; height: 8px; border-radius: 50%; margin-right: 8px; }}
</style>
</head><body>
<div class="container">
<div class="sidebar">
<h1>📊 Summary</h1>
<div class="stat"><span>Files</span><span class="stat-value">{stats["files"]:,}</span></div>
<div class="stat"><span>Directories</span><span class="stat-value">{stats["dirs"]:,}</span></div>
<div class="stat"><span>Total size</span><span class="stat-value">{fmt(data["size"])}</span></div>
<div class="stat"><span>File types</span><span class="stat-value">{len(stats["extensions"])}</span></div>
<h2>By file type</h2>
{lang_bars}
</div>
<div class="main">
<h1>📁 {data["name"]}</h1>
<ul class="tree" id="root"></ul>
</div>
</div>
<script>
const data = {json.dumps(data)};
const colors = {json.dumps(colors)};
function fmt(b) {{ if (b < 1024) return b + ' B'; if (b < 1048576) return (b/1024).toFixed(1) + ' KB'; return (b/1048576).toFixed(1) + ' MB'; }}
function render(node, parent) {{
if (node.children) {{
const det = document.createElement('details');
det.open = parent === document.getElementById('root');
det.innerHTML = `<summary><span class="folder">📁 ${{node.name}}</span><span class="size">${{fmt(node.size)}}</span></summary>`;
const ul = document.createElement('ul'); ul.className = 'tree';
node.children.sort((a,b) => (b.children?1:0)-(a.children?1:0) || a.name.localeCompare(b.name));
node.children.forEach(c => render(c, ul));
det.appendChild(ul);
const li = document.createElement('li'); li.appendChild(det); parent.appendChild(li);
}} else {{
const li = document.createElement('li'); li.className = 'file';
li.innerHTML = `<span class="dot" style="background:${{colors[node.ext]||'#6b7280'}}"></span>${{node.name}}<span class="size">${{fmt(node.size)}}</span>`;
parent.appendChild(li);
}}
}}
data.children.forEach(c => render(c, document.getElementById('root')));
</script>
</body></html>'''
output.write_text(html)
if __name__ == '__main__':
target = Path(sys.argv[1] if len(sys.argv) > 1 else '.').resolve()
stats = {"files": 0, "dirs": 0, "extensions": Counter(), "ext_sizes": Counter()}
data = scan(target, stats)
out = Path('codebase-map.html')
generate_html(data, stats, out)
print(f'Generated {out.absolute()}')
webbrowser.open(f'file://{out.absolute()}')
```
To test, open Claude Code in any project and ask "Visualize this codebase." Claude runs the script, generates `codebase-map.html`, and opens it in your browser.
This pattern works for any visual output: dependency graphs, test coverage reports, API documentation, or database schema visualizations. The bundled script does the heavy lifting while Claude handles orchestration.
## Troubleshooting
### Skill not triggering
If Claude doesn't use your skill when expected:
1. Check the description includes keywords users would naturally say
2. Verify the skill appears in `What skills are available?`
3. Try rephrasing your request to match the description more closely
4. Invoke it directly with `/skill-name` if the skill is user-invocable
### Skill triggers too often
If Claude uses your skill when you don't want it:
1. Make the description more specific
2. Add `disable-model-invocation: true` if you only want manual invocation
### Claude doesn't see all my skills
Skill descriptions are loaded into context so Claude knows what's available. If you have many skills, they may exceed the character budget (default 15,000 characters). Run `/context` to check for a warning about excluded skills.
To increase the limit, set the `SLASH_COMMAND_TOOL_CHAR_BUDGET` environment variable.
## Related resources
* **[Subagents](../09-Agents-Patterns/create-custom-subagents-claude-code-docs-7dc93e85c0.md)**: delegate tasks to specialized agents
* **[Plugins](create-plugins-claude-code-docs.md)**: package and distribute skills with other extensions
* **[Hooks](../07-Hooks/hooks-reference-claude-code-docs.md)**: automate workflows around tool events
* **[Memory](../02-Claude-Code-CLI/how-claude-remembers-your-project-claude-code-docs-f1c064262d.md)**: manage CLAUDE.md files for persistent context
* **[Interactive mode](/en/interactive-mode#built-in-commands)**: built-in commands and shortcuts
* **[Permissions](/en/iam)**: control tool and skill access
---
## slash-commands.md
# Slash Commands in the SDK
Learn how to use slash commands to control Claude Code sessions through the SDK
---
Slash commands provide a way to control Claude Code sessions with special commands that start with `/`. These commands can be sent through the SDK to perform actions like clearing conversation history, compacting messages, or getting help.
## Discovering Available Slash Commands
The Claude Agent SDK provides information about available slash commands in the system initialization message. Access this information when your session starts:
<CodeGroup>
```typescript TypeScript
import { query } from "@anthropic-ai/claude-agent-sdk";
for await (const message of query({
prompt: "Hello Claude",
options: { maxTurns: 1 }
})) {
if (message.type === "system" && message.subtype === "init") {
console.log("Available slash commands:", message.slash_commands);
// Example output: ["/compact", "/clear", "/help"]
}
}
```
```python Python
import asyncio
from claude_agent_sdk import query
async def main():
async for message in query(
prompt="Hello Claude",
options={"max_turns": 1}
):
if message.type == "system" and message.subtype == "init":
print("Available slash commands:", message.slash_commands)
# Example output: ["/compact", "/clear", "/help"]
asyncio.run(main())
```
</CodeGroup>
## Sending Slash Commands
Send slash commands by including them in your prompt string, just like regular text:
<CodeGroup>
```typescript TypeScript
import { query } from "@anthropic-ai/claude-agent-sdk";
// Send a slash command
for await (const message of query({
prompt: "/compact",
options: { maxTurns: 1 }
})) {
if (message.type === "result") {
console.log("Command executed:", message.result);
}
}
```
```python Python
import asyncio
from claude_agent_sdk import query
async def main():
# Send a slash command
async for message in query(
prompt="/compact",
options={"max_turns": 1}
):
if message.type == "result":
print("Command executed:", message.result)
asyncio.run(main())
```
</CodeGroup>
## Common Slash Commands
### `/compact` - Compact Conversation History
The `/compact` command reduces the size of your conversation history by summarizing older messages while preserving important context:
<CodeGroup>
```typescript TypeScript
import { query } from "@anthropic-ai/claude-agent-sdk";
for await (const message of query({
prompt: "/compact",
options: { maxTurns: 1 }
})) {
if (message.type === "system" && message.subtype === "compact_boundary") {
console.log("Compaction completed");
console.log("Pre-compaction tokens:", message.compact_metadata.pre_tokens);
console.log("Trigger:", message.compact_metadata.trigger);
}
}
```
```python Python
import asyncio
from claude_agent_sdk import query
async def main():
async for message in query(
prompt="/compact",
options={"max_turns": 1}
):
if (message.type == "system" and
message.subtype == "compact_boundary"):
print("Compaction completed")
print("Pre-compaction tokens:",
message.compact_metadata.pre_tokens)
print("Trigger:", message.compact_metadata.trigger)
asyncio.run(main())
```
</CodeGroup>
### `/clear` - Clear Conversation
The `/clear` command starts a fresh conversation by clearing all previous history:
<CodeGroup>
```typescript TypeScript
import { query } from "@anthropic-ai/claude-agent-sdk";
// Clear conversation and start fresh
for await (const message of query({
prompt: "/clear",
options: { maxTurns: 1 }
})) {
if (message.type === "system" && message.subtype === "init") {
console.log("Conversation cleared, new session started");
console.log("Session ID:", message.session_id);
}
}
```
```python Python
import asyncio
from claude_agent_sdk import query
async def main():
# Clear conversation and start fresh
async for message in query(
prompt="/clear",
options={"max_turns": 1}
):
if message.type == "system" and message.subtype == "init":
print("Conversation cleared, new session started")
print("Session ID:", message.session_id)
asyncio.run(main())
```
</CodeGroup>
## Creating Custom Slash Commands
In addition to using built-in slash commands, you can create your own custom commands that are available through the SDK. Custom commands are defined as markdown files in specific directories, similar to how subagents are configured.
### File Locations
Custom slash commands are stored in designated directories based on their scope:
- **Project commands**: `.claude/commands/` - Available only in the current project
- **Personal commands**: `~/.claude/commands/` - Available across all your projects
### File Format
Each custom command is a markdown file where:
- The filename (without `.md` extension) becomes the command name
- The file content defines what the command does
- Optional YAML frontmatter provides configuration
#### Basic Example
Create `.claude/commands/refactor.md`:
```markdown
Refactor the selected code to improve readability and maintainability.
Focus on clean code principles and best practices.
```
This creates the `/refactor` command that you can use through the SDK.
#### With Frontmatter
Create `.claude/commands/security-check.md`:
```markdown
---
allowed-tools: Read, Grep, Glob
description: Run security vulnerability scan
model: claude-sonnet-4-5-20250929
---
Analyze the codebase for security vulnerabilities including:
- SQL injection risks
- XSS vulnerabilities
- Exposed credentials
- Insecure configurations
```
### Using Custom Commands in the SDK
Once defined in the filesystem, custom commands are automatically available through the SDK:
<CodeGroup>
```typescript TypeScript
import { query } from "@anthropic-ai/claude-agent-sdk";
// Use a custom command
for await (const message of query({
prompt: "/refactor src/auth/login.ts",
options: { maxTurns: 3 }
})) {
if (message.type === "assistant") {
console.log("Refactoring suggestions:", message.message);
}
}
// Custom commands appear in the slash_commands list
for await (const message of query({
prompt: "Hello",
options: { maxTurns: 1 }
})) {
if (message.type === "system" && message.subtype === "init") {
// Will include both built-in and custom commands
console.log("Available commands:", message.slash_commands);
// Example: ["/compact", "/clear", "/help", "/refactor", "/security-check"]
}
}
```
```python Python
import asyncio
from claude_agent_sdk import query
async def main():
# Use a custom command
async for message in query(
prompt="/refactor src/auth/login.py",
options={"max_turns": 3}
):
if message.type == "assistant":
print("Refactoring suggestions:", message.message)
# Custom commands appear in the slash_commands list
async for message in query(
prompt="Hello",
options={"max_turns": 1}
):
if message.type == "system" and message.subtype == "init":
# Will include both built-in and custom commands
print("Available commands:", message.slash_commands)
# Example: ["/compact", "/clear", "/help", "/refactor", "/security-check"]
asyncio.run(main())
```
</CodeGroup>
### Advanced Features
#### Arguments and Placeholders
Custom commands support dynamic arguments using placeholders:
Create `.claude/commands/fix-issue.md`:
```markdown
---
argument-hint: [issue-number] [priority]
description: Fix a GitHub issue
---
Fix issue #$1 with priority $2.
Check the issue description and implement the necessary changes.
```
Use in SDK:
<CodeGroup>
```typescript TypeScript
import { query } from "@anthropic-ai/claude-agent-sdk";
// Pass arguments to custom command
for await (const message of query({
prompt: "/fix-issue 123 high",
options: { maxTurns: 5 }
})) {
// Command will process with $1="123" and $2="high"
if (message.type === "result") {
console.log("Issue fixed:", message.result);
}
}
```
```python Python
import asyncio
from claude_agent_sdk import query
async def main():
# Pass arguments to custom command
async for message in query(
prompt="/fix-issue 123 high",
options={"max_turns": 5}
):
# Command will process with $1="123" and $2="high"
if message.type == "result":
print("Issue fixed:", message.result)
asyncio.run(main())
```
</CodeGroup>
#### Bash Command Execution
Custom commands can execute bash commands and include their output:
Create `.claude/commands/git-commit.md`:
```markdown
---
allowed-tools: Bash(git add:*), Bash(git status:*), Bash(git commit:*)
description: Create a git commit
---
## Context
- Current status: !`git status`
- Current diff: !`git diff HEAD`
## Task
Create a git commit with appropriate message based on the changes.
```
#### File References
Include file contents using the `@` prefix:
Create `.claude/commands/review-config.md`:
```markdown
---
description: Review configuration files
---
Review the following configuration files for issues:
- Package config: @package.json
- TypeScript config: @tsconfig.json
- Environment config: @.env
Check for security issues, outdated dependencies, and misconfigurations.
```
### Organization with Namespacing
Organize commands in subdirectories for better structure:
```bash
.claude/commands/
├── frontend/
│ ├── component.md # Creates /component (project:frontend)
│ └── style-check.md # Creates /style-check (project:frontend)
├── backend/
│ ├── api-test.md # Creates /api-test (project:backend)
│ └── db-migrate.md # Creates /db-migrate (project:backend)
└── review.md # Creates /review (project)
```
The subdirectory appears in the command description but doesn't affect the command name itself.
### Practical Examples
#### Code Review Command
Create `.claude/commands/code-review.md`:
```markdown
---
allowed-tools: Read, Grep, Glob, Bash(git diff:*)
description: Comprehensive code review
---
## Changed Files
!`git diff --name-only HEAD~1`
## Detailed Changes
!`git diff HEAD~1`
## Review Checklist
Review the above changes for:
1. Code quality and readability
2. Security vulnerabilities
3. Performance implications
4. Test coverage
5. Documentation completeness
Provide specific, actionable feedback organized by priority.
```
#### Test Runner Command
Create `.claude/commands/test.md`:
```markdown
---
allowed-tools: Bash, Read, Edit
argument-hint: [test-pattern]
description: Run tests with optional pattern
---
Run tests matching pattern: $ARGUMENTS
1. Detect the test framework (Jest, pytest, etc.)
2. Run tests with the provided pattern
3. If tests fail, analyze and fix them
4. Re-run to verify fixes
```
Use these commands through the SDK:
<CodeGroup>
```typescript TypeScript
import { query } from "@anthropic-ai/claude-agent-sdk";
// Run code review
for await (const message of query({
prompt: "/code-review",
options: { maxTurns: 3 }
})) {
// Process review feedback
}
// Run specific tests
for await (const message of query({
prompt: "/test auth",
options: { maxTurns: 5 }
})) {
// Handle test results
}
```
```python Python
import asyncio
from claude_agent_sdk import query
async def main():
# Run code review
async for message in query(
prompt="/code-review",
options={"max_turns": 3}
):
# Process review feedback
pass
# Run specific tests
async for message in query(
prompt="/test auth",
options={"max_turns": 5}
):
# Handle test results
pass
asyncio.run(main())
```
</CodeGroup>
## See Also
- [Slash Commands](https://code.claude.com/docs/en/slash-commands) - Complete slash command documentation
- [Subagents in the SDK](/docs/en/agent-sdk/subagents) - Similar filesystem-based configuration for subagents
- [TypeScript SDK reference](/docs/en/agent-sdk/typescript) - Complete API documentation
- [SDK overview](/docs/en/agent-sdk/overview) - General SDK concepts
- [CLI reference](../02-Claude-Code-CLI/cli-reference-7bb98e3312.md) - Command-line interface
---
## standard-plugin.md
# Standard Plugin Example
A well-structured plugin with commands, agents, and skills.
## Directory Structure
```
code-quality/
├── .claude-plugin/
│ └── plugin.json
├── commands/
│ ├── lint.md
│ ├── test.md
│ └── review.md
├── agents/
│ ├── code-reviewer.md
│ └── test-generator.md
├── skills/
│ ├── code-standards/
│ │ ├── SKILL.md
│ │ └── references/
│ │ └── style-guide.md
│ └── testing-patterns/
│ ├── SKILL.md
│ └── examples/
│ ├── unit-test.js
│ └── integration-test.js
├── hooks/
│ ├── hooks.json
│ └── scripts/
│ └── validate-commit.sh
└── scripts/
├── run-linter.sh
└── generate-report.py
```
## File Contents
### .claude-plugin/plugin.json
```json
{
"name": "code-quality",
"version": "1.0.0",
"description": "Comprehensive code quality tools including linting, testing, and review automation",
"author": {
"name": "Quality Team",
"email": "quality@example.com"
},
"homepage": "https://docs.example.com/plugins/code-quality",
"repository": "https://github.com/example/code-quality-plugin",
"license": "MIT",
"keywords": ["code-quality", "linting", "testing", "code-review", "automation"]
}
```
### commands/lint.md
```markdown
---
name: lint
description: Run linting checks on the codebase
---
# Lint Command
Run comprehensive linting checks on the project codebase.
## Process
1. Detect project type and installed linters
2. Run appropriate linters (ESLint, Pylint, RuboCop, etc.)
3. Collect and format results
4. Report issues with file locations and severity
## Implementation
Execute the linting script:
\`\`\`bash
bash ${CLAUDE_PLUGIN_ROOT}/scripts/run-linter.sh
\`\`\`
Parse the output and present issues organized by:
- Critical issues (must fix)
- Warnings (should fix)
- Style suggestions (optional)
For each issue, show:
- File path and line number
- Issue description
- Suggested fix (if available)
```
### commands/test.md
```markdown
---
name: test
description: Run test suite with coverage reporting
---
# Test Command
Execute the project test suite and generate coverage reports.
## Process
1. Identify test framework (Jest, pytest, RSpec, etc.)
2. Run all tests
3. Generate coverage report
4. Identify untested code
## Output
Present results in structured format:
- Test summary (passed/failed/skipped)
- Coverage percentage by file
- Critical untested areas
- Failed test details
## Integration
After test completion, offer to:
- Fix failing tests
- Generate tests for untested code (using test-generator agent)
- Update documentation based on test changes
```
### agents/code-reviewer.md
```markdown
---
description: Expert code reviewer specializing in identifying bugs, security issues, and improvement opportunities
capabilities:
- Analyze code for potential bugs and logic errors
- Identify security vulnerabilities
- Suggest performance improvements
- Ensure code follows project standards
- Review test coverage adequacy
---
# Code Reviewer Agent
Specialized agent for comprehensive code review.
## Expertise
- **Bug detection**: Logic errors, edge cases, error handling
- **Security analysis**: Injection vulnerabilities, authentication issues, data exposure
- **Performance**: Algorithm efficiency, resource usage, optimization opportunities
- **Standards compliance**: Style guide adherence, naming conventions, documentation
- **Test coverage**: Adequacy of test cases, missing scenarios
## Review Process
1. **Initial scan**: Quick pass for obvious issues
2. **Deep analysis**: Line-by-line review of changed code
3. **Context evaluation**: Check impact on related code
4. **Best practices**: Compare against project and language standards
5. **Recommendations**: Prioritized list of improvements
## Integration with Skills
Automatically loads `code-standards` skill for project-specific guidelines.
## Output Format
For each file reviewed:
- Overall assessment
- Critical issues (must fix before merge)
- Important issues (should fix)
- Suggestions (nice to have)
- Positive feedback (what was done well)
```
### agents/test-generator.md
```markdown
---
description: Generates comprehensive test suites from code analysis
capabilities:
- Analyze code structure and logic flow
- Generate unit tests for functions and methods
- Create integration tests for modules
- Design edge case and error condition tests
- Suggest test fixtures and mocks
---
# Test Generator Agent
Specialized agent for generating comprehensive test suites.
## Expertise
- **Unit testing**: Individual function/method tests
- **Integration testing**: Module interaction tests
- **Edge cases**: Boundary conditions, error paths
- **Test organization**: Proper test structure and naming
- **Mocking**: Appropriate use of mocks and stubs
## Generation Process
1. **Code analysis**: Understand function purpose and logic
2. **Path identification**: Map all execution paths
3. **Input design**: Create test inputs covering all paths
4. **Assertion design**: Define expected outputs
5. **Test generation**: Write tests in project's framework
## Integration with Skills
Automatically loads `testing-patterns` skill for project-specific test conventions.
## Test Quality
Generated tests include:
- Happy path scenarios
- Edge cases and boundary conditions
- Error handling verification
- Mock data for external dependencies
- Clear test descriptions
```
### skills/code-standards/SKILL.md
```markdown
---
name: Code Standards
description: This skill should be used when reviewing code, enforcing style guidelines, checking naming conventions, or ensuring code quality standards. Provides project-specific coding standards and best practices.
version: 1.0.0
---
# Code Standards
Comprehensive coding standards and best practices for maintaining code quality.
## Overview
Enforce consistent code quality through standardized conventions for:
- Code style and formatting
- Naming conventions
- Documentation requirements
- Error handling patterns
- Security practices
## Style Guidelines
### Formatting
- **Indentation**: 2 spaces (JavaScript/TypeScript), 4 spaces (Python)
- **Line length**: Maximum 100 characters
- **Braces**: Same line for opening brace (K&R style)
- **Whitespace**: Space after commas, around operators
### Naming Conventions
- **Variables**: camelCase for JavaScript, snake_case for Python
- **Functions**: camelCase, descriptive verb-noun pairs
- **Classes**: PascalCase
- **Constants**: UPPER_SNAKE_CASE
- **Files**: kebab-case for modules
## Documentation Requirements
### Function Documentation
Every function must include:
- Purpose description
- Parameter descriptions with types
- Return value description with type
- Example usage (for public functions)
### Module Documentation
Every module must include:
- Module purpose
- Public API overview
- Usage examples
- Dependencies
## Error Handling
### Required Practices
- Never swallow errors silently
- Always log errors with context
- Use specific error types
- Provide actionable error messages
- Clean up resources in finally blocks
### Example Pattern
\`\`\`javascript
async function processData(data) {
try {
const result = await transform(data)
return result
} catch (error) {
logger.error('Data processing failed', {
data: sanitize(data),
error: error.message,
stack: error.stack
})
throw new DataProcessingError('Failed to process data', { cause: error })
}
}
\`\`\`
## Security Practices
- Validate all external input
- Sanitize data before output
- Use parameterized queries
- Never log sensitive information
- Keep dependencies updated
## Detailed Guidelines
For comprehensive style guides by language, see:
- `references/style-guide.md`
```
### skills/code-standards/references/style-guide.md
```markdown
# Comprehensive Style Guide
Detailed style guidelines for all supported languages.
## JavaScript/TypeScript
### Variable Declarations
Use `const` by default, `let` when reassignment needed, never `var`:
\`\`\`javascript
// Good
const MAX_RETRIES = 3
let currentTry = 0
// Bad
var MAX_RETRIES = 3
\`\`\`
### Function Declarations
Use function expressions for consistency:
\`\`\`javascript
// Good
const calculateTotal = (items) => {
return items.reduce((sum, item) => sum + item.price, 0)
}
// Bad (inconsistent style)
function calculateTotal(items) {
return items.reduce((sum, item) => sum + item.price, 0)
}
\`\`\`
### Async/Await
Prefer async/await over promise chains:
\`\`\`javascript
// Good
async function fetchUserData(userId) {
const user = await db.getUser(userId)
const orders = await db.getOrders(user.id)
return { user, orders }
}
// Bad
function fetchUserData(userId) {
return db.getUser(userId)
.then(user => db.getOrders(user.id)
.then(orders => ({ user, orders })))
}
\`\`\`
## Python
### Import Organization
Order imports: standard library, third-party, local:
\`\`\`python
# Good
import os
import sys
import numpy as np
import pandas as pd
from app.models import User
from app.utils import helper
# Bad - mixed order
from app.models import User
import numpy as np
import os
\`\`\`
### Type Hints
Use type hints for all function signatures:
\`\`\`python
# Good
def calculate_average(numbers: list[float]) -> float:
return sum(numbers) / len(numbers)
# Bad
def calculate_average(numbers):
return sum(numbers) / len(numbers)
\`\`\`
## Additional Languages
See language-specific guides for:
- Go: `references/go-style.md`
- Rust: `references/rust-style.md`
- Ruby: `references/ruby-style.md`
```
### hooks/hooks.json
```json
{
"PreToolUse": [
{
"matcher": "Write|Edit",
"hooks": [
{
"type": "prompt",
"prompt": "Before modifying code, verify it meets our coding standards from the code-standards skill. Check formatting, naming conventions, and documentation. If standards aren't met, suggest improvements.",
"timeout": 30
}
]
}
],
"Stop": [
{
"matcher": ".*",
"hooks": [
{
"type": "command",
"command": "bash ${CLAUDE_PLUGIN_ROOT}/hooks/scripts/validate-commit.sh",
"timeout": 45
}
]
}
]
}
```
### hooks/scripts/validate-commit.sh
```bash
#!/bin/bash
# Validate code quality before task completion
set -e
# Check if there are any uncommitted changes
if [[ -z $(git status -s) ]]; then
echo '{"systemMessage": "No changes to validate. Task complete."}'
exit 0
fi
# Run linter on changed files
CHANGED_FILES=$(git diff --name-only --cached | grep -E '\.(js|ts|py)$' || true)
if [[ -z "$CHANGED_FILES" ]]; then
echo '{"systemMessage": "No code files changed. Validation passed."}'
exit 0
fi
# Run appropriate linters
ISSUES=0
for file in $CHANGED_FILES; do
case "$file" in
*.js|*.ts)
if ! npx eslint "$file" --quiet; then
ISSUES=$((ISSUES + 1))
fi
;;
*.py)
if ! python -m pylint "$file" --errors-only; then
ISSUES=$((ISSUES + 1))
fi
;;
esac
done
if [[ $ISSUES -gt 0 ]]; then
echo "{\"systemMessage\": \"Found $ISSUES code quality issues. Please fix before completing.\"}"
exit 1
fi
echo '{"systemMessage": "Code quality checks passed. Ready to commit."}'
exit 0
```
## Usage Examples
### Running Commands
```
$ claude
> /lint
Running linter checks...
Critical Issues (2):
src/api/users.js:45 - SQL injection vulnerability
src/utils/helpers.js:12 - Unhandled promise rejection
Warnings (5):
src/components/Button.tsx:23 - Missing PropTypes
...
Style Suggestions (8):
src/index.js:1 - Use const instead of let
...
> /test
Running test suite...
Test Results:
✓ 245 passed
✗ 3 failed
○ 2 skipped
Coverage: 87.3%
Untested Files:
src/utils/cache.js - 0% coverage
src/api/webhooks.js - 23% coverage
Failed Tests:
1. User API › GET /users › should handle pagination
Expected 200, received 500
...
```
### Using Agents
```
> Review the changes in src/api/users.js
[code-reviewer agent selected automatically]
Code Review: src/api/users.js
Critical Issues:
1. Line 45: SQL injection vulnerability
- Using string concatenation for SQL query
- Replace with parameterized query
- Priority: CRITICAL
2. Line 67: Missing error handling
- Database query without try/catch
- Could crash server on DB error
- Priority: HIGH
Suggestions:
1. Line 23: Consider caching user data
- Frequent DB queries for same users
- Add Redis caching layer
- Priority: MEDIUM
```
## Key Points
1. **Complete manifest**: All recommended metadata fields
2. **Multiple components**: Commands, agents, skills, hooks
3. **Rich skills**: References and examples for detailed information
4. **Automation**: Hooks enforce standards automatically
5. **Integration**: Components work together cohesively
## When to Use This Pattern
- Production plugins for distribution
- Team collaboration tools
- Plugins requiring consistency enforcement
- Complex workflows with multiple entry points
---
## teach-claude-your-way-of-working-using-skills-claude-help-center.md
## **What are skills?**
Think about the last time you created something with Claude that turned out really well. Maybe it was a presentation, an analysis, or a report. What made it work? Claude brought intelligence and capability, but you also played a crucial part—you explained your standards, you described the structure that works for your needs, you provided examples showing what you wanted, and you caught and fixed things that weren't quite right.
Instead of having to repeat this process the next time you complete a similar task, Skills let you package what you've learned. Then, whenever the context matches, Claude applies the expertise automatically. You're not explaining the same standards repeatedly. You're not hunting for that document with your guidelines. You're not fixing generic output to match what you know works. Claude recognizes the situation, loads your approach, and applies it.
<iframe src="https://www.youtube.com/embed/IoqpBKrNaZI" frameborder="0" allowfullscreen="allowfullscreen" referrerpolicy="strict-origin-when-cross-origin"></iframe>
## **Why skills matter for your work**
You have tasks where you've figured out what works—a way of structuring reports, a framework for analysis, a style for client communication. But every time you start a new conversation with Claude, you're explaining it all over again or fixing the output to match your standards.
**Skills solve this.** Package your approach once, and Claude applies it automatically in any chat.
_**Before skills:**_ You ask Claude to create a quarterly business review. Claude can already build presentations, but making them match your standards means explaining your preferences each time. You could document guidelines in a Project, but they don't automatically apply when you need them.
**_With skills:_** After creating a quarterly business review skill, you ask for the same presentation. Just by mentioning a task related to an existing skill’s name or purpose, Claude can recognize it. In this case, Claude will load your QBR skill. In Claude’s thinking you’ll see “Reading QBR skill”. It automatically applies your brand guidelines and preferred structure, generating a deck that matches your standards from the start.
##
**Where Skills fit in how you already work with Claude**
**Projects —** You might already use Projects for certain work. Projects make sense when context accumulates over time. Think: a product launch with evolving plans, research that builds on previous findings, a campaign that unfolds over weeks. You can upload documents, build conversation history, and everything stays organized in one workspace. But Projects are bounded, and whatever context you upload to a project only exists there.
Skills work everywhere. Create a Skill once, and it's available in any conversation—regular chats, inside Projects, across all your work with Claude. Skills activate automatically when you reference them, regardless of where you're working.
Use Skills for repeatable procedures you want applied automatically—your brand guidelines, your analysis framework, your report format. Use Projects for work that needs accumulated context—a product launch, a research project, an ongoing campaign. Use both together when your work benefits from persistent context and standardized procedures.
**Custom Instructions** — You might also use custom instructions. These are preferences about how Claude works with you in general, like "ask clarifying questions before starting" or "keep explanations concise." They apply universally to everything Claude does for you.
Unlike custom instructions, Skills can contain far more detail. They can include extensive instructions, complete reference libraries and detailed frameworks that would otherwise clutter custom instructions.Skills are also specific to certain types of work and activate only when relevant. For example, "When creating financial models, use this validation framework" lives in a skill, as it won’t apply to everything, only financial modeling work.
**Regular prompting** — When you need Claude to do something once, just prompt well. Explain what you want, provide context, refine the output. This works perfectly for one-off tasks or exploratory work.
Skills work differently. They are active everywhere you work with Claude. This means you’re not re-uploading materials and re-explaining standards. Skills also combine automatically when work requires multiple areas of expertise, coordinating without you specifying each one.
Skills also unlock higher quality outputs that would be difficult to achieve through prompting alone. They can package together complete reference libraries, validation frameworks, quality standards, and proven methodologies. This built-in expertise produces results that otherwise would require extensive explanation and rounds of prompting.
## Recognizing when a skill will help your work
Skills range from simple formatting rules to complete workflows that pull data from multiple sources, analyze it, and generate reports. Create a skill when you've figured out how you want a task done and want Claude to follow that approach consistently. This applies in different situations:
#### You've refined an approach through experience
While working with Claude, you've figured out how something should be done, and find yourself explaining it to Claude multiple times. When you want Claude to follow that refined approach automatically rather than you explaining it fresh each time, that's a good skill opportunity.
#### Quality depends on having specific materials
Some work needs specific examples, templates, domain knowledge, or assets to meet your standards. Skills become powerful for packaging everything together so quality is consistent.
#### Setup normally requires assembling multiple pieces
Even occasional work might require gathering multiple files or tools, explaining how they work together, coordinating different requirements. Skills eliminate the setup burden—package everything once and have it available whenever that situation arises.
## **Ready to create a skill?**
Skills are available as a preview to all paid plans. To get started, navigate to `Settings` > `Capabilities` > `Skills` and toggle on some of the pre-built example skills. From there, when you describe a task to Claude that references a skill’s name or description, Claude recognizes it and loads the skill automatically.
Learn how to write your own [custom skills](../02-Claude-Code-CLI/creating-custom-skills.md), incorporating guidance from our [skills best practices](https://docs.claude.com/en/docs/agents-and-tools/agent-skills/best-practices) to understand the principles that make skills most effective.
You also don’t have to be technical to start creating skills. Try [creating skills using Claude](https://support.claude.com/en/articles/12599426-how-to-create-a-skill-with-claude-through-conversation). Start by identifying a well-suited task and describing it for Claude to turn into a skill. Claude will build and structure it into a properly formatted skill file.
##
**Additional Resources**
#### Getting started
#### Going deeper
___
Related Articles
[
Claude for Financial Services Overview
](https://support.claude.com/en/articles/12219959-claude-for-financial-services-overview)[
What are Skills?
](../02-Claude-Code-CLI/what-are-skills.md)[
Using Skills in Claude
](https://support.claude.com/en/articles/12512180-using-skills-in-claude)[
How to create a skill with Claude through conversation
](https://support.claude.com/en/articles/12599426-how-to-create-a-skill-with-claude-through-conversation)[
Claude for Financial Services Skills
](../02-Claude-Code-CLI/claude-for-financial-services-skills.md)
---
## teammate-architecture.md
# Claude Code Teammate/Team System Architecture
**Version**: 2.1.76
**Date**: 2026-03-14
**Purpose**: Complete reference for implementing teammate/team functionality in plugins
---
## Table of Contents
1. [Overview](#overview)
2. [Environment Variables](#environment-variables)
3. [CLI Flags](#cli-flags)
4. [Backend Architecture](#backend-architecture)
5. [Team Lifecycle](#team-lifecycle)
6. [Teammate Lifecycle](#teammate-lifecycle)
7. [Message Passing System](#message-passing-system)
8. [Task System Integration](#task-system-integration)
9. [Agent Tool Schema](#agent-tool-schema)
10. [TeamCreate Tool Schema](#teamcreate-tool-schema)
11. [SendMessage Tool Schema](#sendmessage-tool-schema)
12. [System Prompts](#system-prompts)
13. [Hooks](#hooks)
14. [File System Layout](#file-system-layout)
15. [Implementation Checklist](#implementation-checklist)
---
## Overview
The teammate/team system enables coordinated multi-agent workflows. The team lead (main session) spawns teammates that work in parallel, communicate via message passing, and coordinate through a shared task list.
### Key Concepts
- **Team Lead**: The main Claude Code session that creates and coordinates the team
- **Teammate**: A spawned agent running in a separate process (tmux pane, iTerm pane, or in-process)
- **Team Name**: Unique identifier for the team, used for task list and message routing
- **Message Queue**: File-based mailbox system for inter-agent communication
- **Task List**: Shared task tracking at `~/.claude/tasks/{team-name}/`
- **Team Config**: Configuration file at `~/.claude/teams/{team-name}/config.json`
### Execution Modes
| Mode | Description | When Used |
|------|-------------|-----------|
| `tmux` | Teammates spawn in tmux panes | Inside tmux session, or --teammate-mode=tmux |
| `iterm2` | Teammates spawn in iTerm2 split panes | Inside iTerm2 with it2 CLI installed |
| `in-process` | Teammates run in same process | Non-interactive sessions, or --teammate-mode=in-process |
| `auto` (default) | Selects tmux if inside tmux, else in-process | Adaptive to environment |
---
## Environment Variables
### `CLAUDE_CODE_EXPERIMENTAL_AGENT_TEAMS`
**Required**: Must be set to `1` or `true` to enable team functionality.
```bash
export CLAUDE_CODE_EXPERIMENTAL_AGENT_TEAMS=1
```
Without this, the TeamCreate, SendMessage, and team-related Agent parameters are unavailable.
### `CLAUDE_CODE_TEAMMATE_COMMAND`
**Purpose**: Override the command used to spawn teammate processes.
**Default**: Auto-detected from `process.execPath` or `process.argv[1]`.
**Usage**:
```bash
export CLAUDE_CODE_TEAMMATE_COMMAND="/path/to/custom-claude"
```
**Implementation**:
```javascript
function QCf() {
if (process.env[W2H]) return process.env[W2H];
return sM() ? process.execPath : process.argv[1];
}
```
### Environment Variables Passed to Teammates
When spawning teammates, these environment variables are preserved:
```javascript
const ME6 = [
"CLAUDE_CODE_USE_BEDROCK",
"CLAUDE_CODE_USE_VERTEX",
"CLAUDE_CODE_USE_FOUNDRY",
"ANTHROPIC_BASE_URL",
"CLAUDE_CONFIG_DIR",
];
```
**Spawn Environment Template**:
```bash
CLAUDECODE=1 \
CLAUDE_CODE_EXPERIMENTAL_AGENT_TEAMS=1 \
${preserved_vars} \
claude ${flags}
```
**Found variables of some sort?**
CLAUDE_CODE_TEAMMATE_COMMAND
TEAMMATE_SYSTEM_PROMPT_ADDENDUM
---
## CLI Flags
### `--teammate-mode <mode>`
**Values**: `auto` | `tmux` | `in-process`
**Default**: Captured from config at startup, stored in snapshot
**Purpose**: Force a specific teammate execution backend
**Example**:
```bash
claude --teammate-mode tmux
claude --teammate-mode in-process
```
**Snapshot Mechanism**:
```javascript
// Captured once at session start
function cCf() {
if (AlH) // CLI override takes precedence
cMH = AlH;
else
cMH = O$().teammateMode ?? "auto";
}
// Retrieved throughout session
function LlH() {
if (cMH === null)
cCf();
return cMH ?? "auto";
}
```
### Teammate Spawn Flags (auto-generated)
When spawning teammates, the following flags are auto-constructed:
```javascript
function lCf(H) {
let $ = [];
// Plan mode requirement
if (H.planModeRequired) {
// No flag needed - handled via message passing
}
// Permission mode
else if (L === "bypassPermissions" || PLH())
$.push("--dangerously-skip-permissions");
else if (L === "acceptEdits")
$.push("--permission-mode acceptEdits");
// Model inheritance
let D = eh();
if (D) $.push(`--model ${zf([D])}`);
// Settings file
let f = Li();
if (f) $.push(`--settings ${zf([f])}`);
// Plugin directories
let _ = qLH();
for (let q of _) $.push(`--plugin-dir ${zf([q])}`);
// Teammate mode
let M = LlH();
$.push(`--teammate-mode ${M}`);
// Chrome mode
let K = jvH();
if (K === true) $.push("--chrome");
else if (K === false) $.push("--no-chrome");
return $.join(" ");
}
```
---
## Backend Architecture
### Backend Selection Logic
```javascript
async function XHH() {
let insideTmux = await Wu();
let inITerm2 = jHH();
if (insideTmux) {
// Inside tmux session - use tmux backend
return { backend: new TmuxBackend(), isNative: true };
}
if (inITerm2) {
if (!userPrefersTmux()) {
let hasIt2 = await $lH(); // Check for it2 CLI
if (hasIt2) {
// iTerm2 with it2 CLI - native split panes
return { backend: new ITermBackend(), isNative: true };
}
}
let hasTmux = await IHH();
if (hasTmux) {
// iTerm2 fallback to tmux (recommend it2 installation)
return { backend: new TmuxBackend(), isNative: false, needsIt2Setup: true };
}
throw Error("iTerm2 detected but it2 CLI not installed. Install it2 with: pip install it2");
}
// Not in tmux or iTerm2
let hasTmux = await IHH();
if (hasTmux) {
return { backend: new TmuxBackend(), isNative: false };
}
throw Error("No pane backend available. Install tmux.");
}
```
### Backend Interfaces
All backends implement:
```typescript
interface TeammateBackend {
type: "tmux" | "iterm2" | "in-process";
displayName: string;
supportsHideShow: boolean;
isAvailable(): Promise<boolean>;
isRunningInside(): Promise<boolean>;
spawn(params: SpawnParams): Promise<SpawnResult>;
sendMessage(agentId: string, message: Message): Promise<void>;
terminate(agentId: string, reason: string): Promise<boolean>;
kill(agentId: string): Promise<boolean>;
isActive(agentId: string): Promise<boolean>;
}
interface SpawnParams {
name: string;
teamName: string;
prompt: string;
color: string;
planModeRequired: boolean;
model?: string;
systemPrompt?: string;
systemPromptMode?: "replace" | "append";
permissions?: string[];
allowPermissionPrompts?: boolean;
}
interface SpawnResult {
success: boolean;
agentId: string;
taskId?: string;
abortController?: AbortController;
error?: string;
}
```
### TmuxBackend
**Pane Management**:
```javascript
class TmuxBackend {
async createTeammatePaneWithLeader(name, color) {
// Leader is in current window
let currentPane = await this.getCurrentPaneId();
let paneCount = await this.getCurrentWindowPaneCount();
if (paneCount === 1) {
// First teammate - split horizontally
let paneId = await splitPane(currentPane, "-h", "-l", "70%");
} else {
// Subsequent teammates - balanced alternating splits
let panes = await listPanes();
let targetPane = selectBalancedPane(panes);
let orientation = (panes.length % 2 === 1) ? "-v" : "-h";
let paneId = await splitPane(targetPane, orientation);
}
await this.setPaneBorderColor(paneId, color);
await this.setPaneTitle(paneId, name, color);
await this.rebalancePanesWithLeader(window);
return { paneId, isFirstTeammate };
}
async rebalancePanesWithLeader(window) {
await selectLayout(window, "main-vertical");
let leaderPane = getPanes()[0];
await resizePane(leaderPane, "-x", "30%");
}
}
```
### ITermBackend
**iTerm2 Split Pane Support**:
- Requires `it2` CLI tool (`pip install it2`)
- Uses iTerm2 Python API for native split panes
- Fallback to tmux if it2 unavailable
**Verification**:
```javascript
async function lbA() {
// Verify it2 can communicate with iTerm2
let result = await qA("it2", ["--version"]);
if (result.code !== 0) {
return { success: false, error: "it2 command failed" };
}
// Test iTerm2 Python API connection
// (actual verification happens in it2 CLI)
return { success: true };
}
```
### InProcessBackend
**In-Process Execution**:
```javascript
class InProcessBackend {
type = "in-process";
async spawn(params) {
// Creates task in same process
let result = await JJH({
name: params.name,
teamName: params.teamName,
prompt: params.prompt,
color: params.color,
planModeRequired: params.planModeRequired,
}, this.context);
if (result.success) {
// Start async execution
tV$({
identity: {
agentId: result.agentId,
agentName: params.name,
teamName: params.teamName,
color: params.color,
planModeRequired: params.planModeRequired,
parentSessionId: result.teammateContext.parentSessionId,
},
taskId: result.taskId,
prompt: params.prompt,
teammateContext: result.teammateContext,
toolUseContext: { ...this.context, messages: [] },
abortController: result.abortController,
model: params.model,
systemPrompt: params.systemPrompt,
systemPromptMode: params.systemPromptMode,
allowedTools: params.permissions,
allowPermissionPrompts: params.allowPermissionPrompts,
});
}
return result;
}
async sendMessage(agentId, message) {
let { agentName, teamName } = RdH(agentId);
await F6(agentName, {
text: message.text,
from: message.from,
color: message.color,
timestamp: message.timestamp ?? new Date().toISOString(),
}, teamName);
}
async terminate(agentId, reason) {
let task = pB(agentId, this.context.getAppState().tasks);
if (!task) return false;
if (task.shutdownRequested) return true;
let requestId = `shutdown-${agentId}-${Date.now()}`;
let shutdownMsg = Z2H({ requestId, from: "team-lead", reason });
await F6(task.identity.agentName, {
from: "team-lead",
text: JSON.stringify(shutdownMsg),
timestamp: new Date().toISOString(),
}, task.identity.teamName);
GVA(task.id, this.context.setAppState); // Mark shutdown requested
return true;
}
}
```
---
## Team Lifecycle
### 1. Team Creation (TeamCreate)
**Tool Call**:
```json
{
"team_name": "burn-ml-dev",
"description": "Burn ML development team",
"agent_type": "team-lead"
}
```
**Implementation**:
```javascript
async function call({ team_name, description, agent_type }, context) {
let { setAppState, getAppState } = context;
let state = getAppState();
// Check for existing team
if (state.teamContext?.teamName) {
throw Error(`Already leading team "${teamName}". Use TeamDelete first.`);
}
let teamName = By6(team_name); // Sanitize
let leadAgentId = Lv("team-lead", teamName); // team-lead@team-name
let leadAgentType = agent_type || "team-lead";
let model = w1(state.mainLoopModel);
// Create team directory and config
let teamDir = Dlf(teamName); // ~/.claude/teams/{team-name}
let configPath = path.join(teamDir, "config.json");
let config = {
name: teamName,
description,
createdAt: Date.now(),
leadAgentId,
leadSessionId: y$(), // Current session ID
members: [{
agentId: leadAgentId,
name: "team-lead",
agentType: leadAgentType,
model,
joinedAt: Date.now(),
tmuxPaneId: "",
cwd: G$(),
subscriptions: []
}]
};
await my6(teamName, config); // Write config file
XVA(teamName); // Register team
// Create task list directory
let taskListId = _UA(teamName);
await aX$(taskListId); // mkdir ~/.claude/tasks/{team-name}
qrD(taskListId); // Set as active task list
// Update session state
setAppState((state) => ({
...state,
teamContext: {
teamName,
teamFilePath: configPath,
leadAgentId,
teammates: {
[leadAgentId]: {
name: "team-lead",
agentType: leadAgentType,
color: nQ(leadAgentId),
tmuxSessionName: "",
tmuxPaneId: "",
cwd: G$(),
spawnedAt: Date.now()
}
}
}
}));
return {
data: {
team_name: teamName,
team_file_path: configPath,
lead_agent_id: leadAgentId
}
};
}
```
### 2. Team Deletion (TeamDelete)
**Tool Call**:
```json
{} // No parameters - uses current team context
```
**Implementation**:
```javascript
async function call({}, context) {
let { setAppState, getAppState } = context;
let state = getAppState();
if (!state.teamContext) {
throw Error("No active team to delete");
}
let teamName = state.teamContext.teamName;
// Check for active teammates
let hasActiveTeammates = Object.values(state.tasks).some(task =>
task.type === "in_process_teammate" && task.status === "running"
);
if (hasActiveTeammates) {
throw Error("Cannot delete team with active teammates. Terminate teammates first.");
}
// Remove team directory
let teamDir = Dlf(teamName);
await rm(teamDir, { recursive: true });
// Remove task directory
let taskDir = QV(teamName);
await rm(taskDir, { recursive: true });
// Clear team context
setAppState((state) => ({
...state,
teamContext: null
}));
PrD(); // Clear task list override
return {
data: {
success: true,
team_name: teamName,
message: `Team "${teamName}" deleted`
}
};
}
```
---
## Teammate Lifecycle
### 1. Spawning a Teammate
**Agent Tool Call (with team parameters)**:
```json
{
"name": "researcher",
"team_name": "burn-ml-dev",
"prompt": "Research latest Burn framework features",
"description": "Research Burn features",
"subagent_type": "general-purpose",
"mode": "acceptEdits"
}
```
**Spawn Flow**:
```javascript
async function yuf({ name, prompt, description, team_name, plan_mode_required, model, agent_type }, context) {
let teamName = team_name || r1(); // Current team or explicit
if (!teamName) {
throw Error("team_name required when spawning teammates");
}
// Validate: teammates can't spawn teammates (flat roster)
if (fM() && teamName && name) {
throw Error("Teammates cannot spawn other teammates. Omit 'name' parameter for subagent.");
}
// Get or detect backend
let backend = await XE6(true); // true = prefer in-process if available
// Spawn via backend
let result = await backend.spawn({
name,
teamName,
prompt,
color: agentDef?.color || nQ(name),
planModeRequired: plan_mode_required,
model,
systemPrompt: agentDef?.getSystemPrompt(),
systemPromptMode: "append",
permissions: agentDef?.tools || ["*"],
allowPermissionPrompts: true,
});
if (!result.success) {
return { data: { error: result.error } };
}
// Register agent name -> agentId mapping
context.setAppState((state) => {
let registry = new Map(state.agentNameRegistry);
registry.set(name, SP(result.agentId));
return { ...state, agentNameRegistry: registry };
});
return {
data: {
status: "teammate_spawned",
agentId: result.agentId,
name,
team_name: teamName,
prompt
}
};
}
```
### 2. Teammate Main Loop (In-Process)
**Execution Pattern**:
```javascript
async function LE6(params) {
let { identity, taskId, prompt, teammateContext, toolUseContext, abortController } = params;
// Set teammate context for this async execution
await QX$(teammateContext, async () => {
// Initialize with team lead's message
let initialMessage = UbA("team-lead", prompt);
let messages = [U$({ content: initialMessage })];
// Main work loop
while (!abortController.signal.aborted) {
// Execute agent turn
let turnMessages = [];
for await (let msg of Fy({
agentDefinition,
promptMessages: messages,
toolUseContext,
canUseTool,
isAsync: true,
forkContextMessages: compactedHistory,
querySource: "agent:custom",
override: { abortController },
model,
preserveToolUseResults: true,
availableTools: toolUseContext.options.tools,
allowedTools: permissions,
})) {
if (abortController.signal.aborted) break;
turnMessages.push(msg);
messages.push(msg);
// Update task progress
updateTaskProgress(taskId, msg);
}
// Mark idle
setTaskIdle(taskId);
// Send idle notification
await mCf(identity.agentName, identity.color, identity.teamName, {
idleReason: "available",
summary: RQH(turnMessages)
});
// Wait for next work
let nextWork = await AE6(identity, abortController, taskId, getAppState, setAppState, parentSessionId);
switch (nextWork.type) {
case "shutdown_request":
// Inject shutdown message into conversation
let shutdownMsg = UbA(nextWork.request.from, nextWork.originalMessage);
messages.push(U$({ content: shutdownMsg }));
break;
case "new_message":
// Inject new message into conversation
if (nextWork.from === "user") {
messages.push(U$({ content: nextWork.message }));
} else {
let teammateMsg = UbA(nextWork.from, nextWork.message, nextWork.color, nextWork.summary);
messages.push(U$({ content: teammateMsg }));
}
break;
case "aborted":
return; // Exit loop
}
}
});
}
```
### 3. Waiting for Messages (Polling Loop)
**Message Queue Polling**:
```javascript
async function AE6(identity, abortController, taskId, getAppState, setAppState, parentSessionId) {
let pollCount = 0;
while (!abortController.signal.aborted) {
// Check for pending user messages (queued via SendMessage to non-running agent)
let task = getAppState().tasks[taskId];
if (task?.type === "in_process_teammate" && task.pendingUserMessages.length > 0) {
let message = task.pendingUserMessages[0];
setAppState((state) => {
let task = state.tasks[taskId];
return {
...state,
tasks: {
...state.tasks,
[taskId]: {
...task,
pendingUserMessages: task.pendingUserMessages.slice(1)
}
}
};
});
return { type: "new_message", message, from: "user" };
}
if (pollCount > 0) await sleep(500);
pollCount++;
// Check mailbox
let mailbox = await BQ(identity.agentName, identity.teamName);
// Priority 1: Shutdown requests (always first)
for (let i = 0; i < mailbox.length; i++) {
let msg = mailbox[i];
if (!msg.read) {
let shutdownReq = fHH(msg.text); // Parse shutdown_request JSON
if (shutdownReq) {
await vQH(identity.agentName, identity.teamName, i); // Mark read
return {
type: "shutdown_request",
request: shutdownReq,
originalMessage: msg.text
};
}
}
}
// Priority 2: Messages from team lead
let leaderMsgIdx = mailbox.findIndex(msg => !msg.read && msg.from === "team-lead");
// Priority 3: Any unread message
if (leaderMsgIdx === -1) {
leaderMsgIdx = mailbox.findIndex(msg => !msg.read);
}
if (leaderMsgIdx !== -1) {
let msg = mailbox[leaderMsgIdx];
await vQH(identity.agentName, identity.teamName, leaderMsgIdx); // Mark read
return {
type: "new_message",
message: msg.text,
from: msg.from,
color: msg.color,
summary: msg.summary
};
}
// Check for available tasks
let taskPrompt = await BCf(parentSessionId, identity.agentName);
if (taskPrompt) {
return { type: "new_message", message: taskPrompt, from: "task-list" };
}
}
return { type: "aborted" };
}
```
**Task Auto-Claiming**:
```javascript
async function BCf(taskListId, agentName) {
try {
let tasks = await uI(taskListId);
let availableTask = HE6(tasks); // Find unblocked, unowned task
if (!availableTask) return null;
// Claim task
let result = await QEA(taskListId, availableTask.id, agentName);
if (!result.success) return null;
// Mark in-progress
await DC(taskListId, availableTask.id, { status: "in_progress" });
// Return prompt
return $E6(availableTask); // "Complete task #N: subject\n\ndescription"
} catch (error) {
return null;
}
}
function HE6(tasks) {
let pendingIds = new Set(
tasks.filter(t => t.status !== "completed").map(t => t.id)
);
return tasks.find(t => {
if (t.status !== "pending") return false;
if (t.owner) return false; // Already claimed
// Unblocked = all blockedBy tasks are completed
return t.blockedBy.every(id => !pendingIds.has(id));
});
}
```
### 4. Idle Notifications
**Idle Notification Structure**:
```javascript
async function mCf(agentName, color, teamName, metadata) {
let notification = VQH(agentName, metadata);
await s26(agentName, JSON.stringify(notification), color, teamName);
}
function VQH(agentName, metadata) {
return {
type: "idle_notification",
agent_name: agentName,
idle_reason: metadata.idleReason, // "available" | "interrupted" | "failed"
summary: metadata.summary, // Last work summary
completed_status: metadata.completedStatus, // "completed" | "failed"
failure_reason: metadata.failureReason,
timestamp: new Date().toISOString()
};
}
```
**Sent to team lead via**:
```javascript
async function s26(agentName, messageText, color, teamName) {
await F6("team-lead", {
from: agentName,
text: messageText,
timestamp: new Date().toISOString(),
color
}, teamName);
}
```
### 5. Graceful Shutdown
**Shutdown Request**:
```javascript
// Via SendMessage tool
{
"to": "researcher",
"message": {
"type": "shutdown_request",
"reason": "Work complete"
}
}
```
**Shutdown Flow**:
1. Team lead calls `SendMessage` with `shutdown_request`
2. Message written to teammate's mailbox
3. Teammate's poll loop prioritizes shutdown messages
4. Shutdown message injected into conversation:
```
Message from team-lead:
{"type": "shutdown_request", "requestId": "shutdown-...", "from": "team-lead", "reason": "Work complete"}
```
5. Teammate processes shutdown, responds with `shutdown_response`:
```json
{
"type": "shutdown_response",
"request_id": "shutdown-...",
"approve": true
}
```
6. Teammate exits main loop, marks task completed
---
## Message Passing System
### Mailbox File Structure
**Location**: `~/.claude/teams/{team-name}/mailbox/{agent-name}.json`
**Schema**:
```json
[
{
"id": "msg-1234567890-abc",
"from": "team-lead",
"text": "Start working on task #1",
"color": "#3b82f6",
"summary": "Assign task #1",
"timestamp": "2026-03-14T12:34:56.789Z",
"read": false
},
{
"id": "msg-1234567891-def",
"from": "researcher",
"text": "Starting research on Burn features",
"color": "#10b981",
"timestamp": "2026-03-14T12:35:01.234Z",
"read": true
}
]
```
### Message Queue Operations
**Send Message (F6)**:
```javascript
async function F6(recipientName, message, teamName) {
let mailboxPath = getMailboxPath(teamName, recipientName);
// Lock mailbox file
let lock = await acquireLock(mailboxPath);
try {
// Read existing messages
let messages = [];
try {
let content = await readFile(mailboxPath, "utf-8");
messages = JSON.parse(content);
} catch (e) {
// File doesn't exist yet
}
// Append new message
let newMessage = {
id: generateMessageId(),
from: message.from,
text: message.text,
color: message.color,
summary: message.summary,
timestamp: message.timestamp,
read: false
};
messages.push(newMessage);
// Write back
await writeFile(mailboxPath, JSON.stringify(messages, null, 2));
} finally {
await lock.release();
}
}
```
**Read Mailbox (BQ)**:
```javascript
async function BQ(agentName, teamName) {
let mailboxPath = getMailboxPath(teamName, agentName);
try {
let content = await readFile(mailboxPath, "utf-8");
return JSON.parse(content);
} catch (e) {
if (e.code === "ENOENT") return [];
throw e;
}
}
```
**Mark Message Read (vQH)**:
```javascript
async function vQH(agentName, teamName, messageIndex) {
let mailboxPath = getMailboxPath(teamName, agentName);
let lock = await acquireLock(mailboxPath);
try {
let messages = JSON.parse(await readFile(mailboxPath, "utf-8"));
if (messageIndex < messages.length) {
messages[messageIndex].read = true;
await writeFile(mailboxPath, JSON.stringify(messages, null, 2));
}
} finally {
await lock.release();
}
}
```
### Message Formatting
**Teammate Message Format** (UbA):
```javascript
function UbA(from, text, color, summary) {
let header = `Message from ${from}`;
if (summary) header += ` (${summary})`;
header += `:`;
return `${header}\n${text}`;
}
// Example output:
// Message from researcher (Research complete):
// I've analyzed the latest Burn 0.20 features. Here's what I found...
```
---
## Task System Integration
### Task List Location
**Directory**: `~/.claude/tasks/{team-name}/`
**Files**: `{task-id}.json` (e.g., `1.json`, `2.json`)
### Task Schema
```typescript
interface Task {
id: string;
subject: string;
description?: string;
status: "pending" | "in_progress" | "completed";
owner?: string; // Agent name who claimed it
blockedBy: string[]; // Task IDs that must complete first
blocks: string[]; // Task IDs blocked by this
createdAt: number;
updatedAt: number;
completedAt?: number;
}
```
### Task Operations
**Create Task**:
```javascript
async function tX$(taskListId, task) {
let lock = await acquireLock(taskListId);
try {
let nextId = await mB1(taskListId); // Get max task ID
let newId = String(nextId + 1);
let taskPath = epH(taskListId, newId);
let taskData = {
id: newId,
...task,
createdAt: Date.now(),
updatedAt: Date.now()
};
await writeFile(taskPath, JSON.stringify(taskData, null, 2));
fs(); // Trigger task list watchers
return newId;
} finally {
await lock.release();
}
}
```
**Update Task**:
```javascript
async function DC(taskListId, taskId, updates) {
let task = await am(taskListId, taskId); // Read current
if (!task) return null;
let updated = {
...task,
...updates,
id: taskId, // Ensure ID doesn't change
updatedAt: Date.now()
};
if (updates.status === "completed" && !task.completedAt) {
updated.completedAt = Date.now();
}
let taskPath = epH(taskListId, taskId);
await writeFile(taskPath, JSON.stringify(updated, null, 2));
fs(); // Trigger watchers
return updated;
}
```
**List Tasks**:
```javascript
async function uI(taskListId) {
let taskDir = QV(taskListId);
let files = await readdir(taskDir);
let tasks = [];
for (let file of files) {
if (!file.endsWith(".json")) continue;
if (file.startsWith(".")) continue;
let taskId = file.replace(".json", "");
let task = await am(taskListId, taskId);
if (task) tasks.push(task);
}
return tasks.sort((a, b) => parseInt(a.id) - parseInt(b.id));
}
```
### Task Tool Integration
**TaskCreate, TaskUpdate, TaskList tools** automatically use:
```javascript
function R2() {
// Explicit override
if (process.env.CLAUDE_CODE_TASK_LIST_ID) {
return process.env.CLAUDE_CODE_TASK_LIST_ID;
}
// In-process teammate context
let teammateCtx = IY();
if (teammateCtx) return teammateCtx.teamName;
// Current team context
return r1() || tpH || y$();
}
```
This ensures teammates and team lead share the same task list.
---
## Agent Tool Schema
**Input Schema (with teammate parameters)**:
```typescript
{
// Standard agent params
description: string, // "Research Burn features"
prompt: string, // "Analyze latest Burn 0.20 features"
subagent_type?: string, // "general-purpose"
model?: "sonnet" | "opus" | "haiku",
resume?: string, // Agent ID to resume
run_in_background?: boolean,
// Teammate-specific params (when EXPERIMENTAL_AGENT_TEAMS=1)
name?: string, // "researcher" - makes it a teammate
team_name?: string, // "burn-ml-dev" - which team to join
mode?: "plan" | "acceptEdits" | "default", // Permission mode
// Isolation (not typically used with teammates)
isolation?: "worktree",
cwd?: string
}
```
**Output Schema**:
```typescript
{
// For teammates
status: "teammate_spawned",
agentId: string, // "researcher@burn-ml-dev"
name: string, // "researcher"
team_name: string, // "burn-ml-dev"
prompt: string
}
// OR for async background agents
{
status: "async_launched",
agentId: string,
description: string,
prompt: string,
outputFile: string,
canReadOutputFile: boolean
}
// OR for completed sync agents
{
status: "completed",
agentId: string,
prompt: string,
content: Array<{ type: "text", text: string }>,
totalToolUseCount: number,
totalDurationMs: number,
totalTokens: number,
usage: {...}
}
```
**Teammate Detection Logic**:
```javascript
// Is this a teammate spawn?
let isTeammateSpawn = !!(team_name && name);
if (isTeammateSpawn) {
// Validate: teammates can't spawn teammates
if (fM()) {
throw Error("Teammates cannot spawn other teammates. Omit 'name' for subagent.");
}
// Spawn via backend
return await yuf({ name, prompt, team_name, ... }, context);
}
```
---
## TeamCreate Tool Schema
**Input Schema**:
```typescript
{
team_name: string, // "burn-ml-dev" (required)
description?: string, // "Burn ML development team"
agent_type?: string // "team-lead" (defaults to "team-lead")
}
```
**Output Schema**:
```typescript
{
team_name: string, // "burn-ml-dev"
team_file_path: string, // "/home/user/.claude/teams/burn-ml-dev/config.json"
lead_agent_id: string // "team-lead@burn-ml-dev"
}
```
**Validation**:
- `team_name` cannot be empty
- Cannot create team if already leading a team
- Team name is sanitized: `team_name.replace(/[^a-zA-Z0-9]/g, "-").toLowerCase()`
---
## SendMessage Tool Schema
**Input Schema**:
```typescript
{
to: string, // Recipient name or "*" for broadcast
message: string | ProtocolMessage,
summary?: string // Required for string messages, shown in UI
}
type ProtocolMessage =
| { type: "shutdown_request", reason?: string }
| { type: "shutdown_response", request_id: string, approve: boolean, reason?: string }
| { type: "plan_approval_response", request_id: string, approve: boolean, feedback?: string };
```
**Examples**:
Plain text message:
```json
{
"to": "researcher",
"message": "Start working on task #1",
"summary": "Assign task #1"
}
```
Broadcast:
```json
{
"to": "*",
"message": "Critical blocking issue - stop all work",
"summary": "Critical issue found"
}
```
Shutdown request:
```json
{
"to": "researcher",
"message": {
"type": "shutdown_request",
"reason": "Work complete"
}
}
```
Shutdown response (teammate to team-lead):
```json
{
"to": "team-lead",
"message": {
"type": "shutdown_response",
"request_id": "shutdown-researcher@burn-ml-dev-1234567890",
"approve": true
}
}
```
**Validation**:
- `to` cannot be empty
- `to` cannot contain "@" (one team per session)
- `summary` required for string messages
- Structured messages cannot be broadcast (`to: "*"`)
- `shutdown_response` must go to "team-lead"
- Rejecting shutdown requires `reason`
**Output Schema**:
```typescript
{
success: boolean,
message?: string // Status or error message
}
```
---
## System Prompts
### TEAMMATE_SYSTEM_PROMPT_ADDENDUM
**Added to in-process teammates only**:
```markdown
# Agent Teammate Communication
IMPORTANT: You are running as an agent in a team. To communicate with anyone on your team:
- Use the SendMessage tool with `to: "<name>"` to send messages to specific teammates
- Use the SendMessage tool with `to: "*"` sparingly for team-wide broadcasts
Just writing a response in text is not visible to others on your team - you MUST use the SendMessage tool.
The user interacts primarily with the team lead. Your work is coordinated through the task system and teammate messaging.
```
**Injection Point**:
```javascript
async function LE6(params) {
let systemPromptParts = [
...await cX(toolUseContext.options.tools, model, undefined, mcpClients),
xbA // TEAMMATE_SYSTEM_PROMPT_ADDENDUM
];
if (agentDefinition) {
let customPrompt = agentDefinition.getSystemPrompt();
if (customPrompt) {
systemPromptParts.push(`\n# Custom Agent Instructions\n${customPrompt}`);
}
}
let systemPrompt = systemPromptParts.join("\n");
// Use systemPrompt for execution...
}
```
### Team Lead Prompt Additions
**Agent Tool Prompt** (includes team instructions):
```markdown
# TeamCreate
## When to Use
Use this tool proactively whenever:
- The user explicitly asks to use a team, swarm, or group of agents
- The user mentions wanting agents to work together, coordinate, or collaborate
- A task is complex enough that it would benefit from parallel work by multiple agents
When in doubt about whether a task warrants a team, prefer spawning a team.
## Choosing Agent Types for Teammates
When spawning teammates via the Agent tool, choose the `subagent_type` based on what tools the agent needs for its task:
- **Read-only agents** (e.g., Explore, Plan) cannot edit or write files. Only assign them research, search, or planning tasks.
- **Full-capability agents** (e.g., general-purpose) have access to all tools including file editing, writing, and bash.
- **Custom agents** defined in `.claude/agents/` may have their own tool restrictions.
Always review the agent type descriptions and their available tools before selecting a `subagent_type`.
## Team Workflow
1. **Create a team** with TeamCreate - this creates both the team and its task list
2. **Create tasks** using the Task tools (TaskCreate, TaskList, etc.)
3. **Spawn teammates** using the Agent tool with `team_name` and `name` parameters
4. **Assign tasks** using TaskUpdate with `owner` to give tasks to idle teammates
5. **Teammates work on assigned tasks** and mark them completed via TaskUpdate
6. **Teammates go idle between turns** - Be patient! Don't comment on their idleness until it impacts work.
7. **Shutdown your team** - gracefully shut down teammates via SendMessage with `message: {type: "shutdown_request"}`
## Task List Coordination
Teams share a task list at `~/.claude/tasks/{team-name}/`.
Teammates should:
1. Check TaskList periodically, especially after completing each task
2. Claim unassigned, unblocked tasks with TaskUpdate (set `owner` to your name)
3. **Prefer tasks in ID order** (lowest ID first) when multiple available
4. Create new tasks with TaskCreate when identifying additional work
5. Mark tasks completed with TaskUpdate when done, then check for next work
6. If all available tasks are blocked, notify the team lead or help resolve blocking tasks
**IMPORTANT**:
- Do not use terminal tools to view your team's activity; always send messages
- Your team cannot hear you if you don't use SendMessage
- Do NOT send structured JSON like `{"type":"idle",...}` manually - the system sends these automatically
- Use TaskUpdate to mark tasks completed
- The system automatically sends idle notifications when teammates stop
```
---
## Hooks
### New Hook Events (2.1.70+)
**TeammateIdle**:
```typescript
{
type: "TeammateIdle",
agentName: string,
idleReason: "available" | "interrupted" | "failed",
summary?: string,
completedStatus?: "completed" | "failed",
failureReason?: string
}
```
**TaskCompleted**:
```typescript
{
type: "TaskCompleted",
taskId: string,
status: "completed" | "failed",
owner?: string
}
```
**Elicitation** / **ElicitationResult**:
```typescript
{
type: "Elicitation",
prompt: string,
agentName?: string
}
{
type: "ElicitationResult",
response: string,
agentName?: string
}
```
### Hook Configuration
**settings.json**:
```json
{
"hooks": {
"TeammateIdle": [
{
"matcher": "",
"hooks": [
{
"type": "command",
"command": "echo 'Teammate ${AGENT_NAME} is idle: ${IDLE_REASON}'"
}
]
}
],
"TaskCompleted": [
{
"matcher": "",
"hooks": [
{
"type": "command",
"command": "notify-send 'Task ${TASK_ID} completed by ${OWNER}'"
}
]
}
]
}
}
```
---
## File System Layout
```
~/.claude/
├── teams/
│ └── {team-name}/
│ ├── config.json # Team configuration
│ └── mailbox/
│ ├── team-lead.json # Team lead's mailbox
│ ├── researcher.json # Researcher's mailbox
│ └── tester.json # Tester's mailbox
│
└── tasks/
└── {team-name}/
├── .next-id # Next task ID counter
├── 1.json # Task #1
├── 2.json # Task #2
└── 3.json # Task #3
```
### Team Config Schema
**`~/.claude/teams/{team-name}/config.json`**:
```json
{
"name": "burn-ml-dev",
"description": "Burn ML development team",
"createdAt": 1710432000000,
"leadAgentId": "team-lead@burn-ml-dev",
"leadSessionId": "session-abc123",
"members": [
{
"agentId": "team-lead@burn-ml-dev",
"name": "team-lead",
"agentType": "team-lead",
"model": "claude-sonnet-4-6",
"joinedAt": 1710432000000,
"tmuxPaneId": "",
"cwd": "/home/user/project",
"subscriptions": []
},
{
"agentId": "researcher@burn-ml-dev",
"name": "researcher",
"agentType": "general-purpose",
"model": "claude-sonnet-4-6",
"joinedAt": 1710432060000,
"tmuxPaneId": "%42",
"cwd": "/home/user/project",
"subscriptions": []
}
]
}
```
---
## Implementation Checklist
### For Plugin Authors Implementing Teammate Functionality
#### 1. Environment Setup
- [ ] Set `CLAUDE_CODE_EXPERIMENTAL_AGENT_TEAMS=1` in plugin environment
- [ ] Optionally set `CLAUDE_CODE_TEAMMATE_COMMAND` for custom spawn command
- [ ] Preserve required env vars when spawning (`CLAUDE_CODE_USE_*`, `ANTHROPIC_BASE_URL`, etc.)
#### 2. Backend Selection
- [ ] Implement backend detection logic (`XHH()`)
- [ ] Support at least one backend (tmux, iTerm2, or in-process)
- [ ] Handle `--teammate-mode` CLI flag
- [ ] Capture teammate mode at session start (snapshot pattern)
#### 3. Team Management
- [ ] Implement `TeamCreate` tool
- Create team directory: `~/.claude/teams/{team-name}/`
- Write config.json with team metadata
- Create task list directory: `~/.claude/tasks/{team-name}/`
- Update session state with `teamContext`
- [ ] Implement `TeamDelete` tool
- Validate no active teammates
- Remove team and task directories
- Clear session `teamContext`
#### 4. Teammate Spawning
- [ ] Extend `Agent` tool with teammate parameters:
- `name` (teammate identifier)
- `team_name` (which team to join)
- `mode` (permission mode)
- [ ] Implement spawn via selected backend
- [ ] Register agent name → agentId mapping
- [ ] Handle teammate-specific system prompt injection
#### 5. Message Passing
- [ ] Implement `SendMessage` tool
- Support direct messages (`to: "name"`)
- Support broadcast (`to: "*"`)
- Support protocol messages (shutdown, plan approval)
- [ ] Implement mailbox file I/O:
- `F6()` - send message
- `BQ()` - read mailbox
- `vQH()` - mark message read
- [ ] Implement message queue polling (`AE6()`)
- [ ] Handle shutdown request/response protocol
#### 6. Task Integration
- [ ] Use shared task list based on team context (`R2()`)
- [ ] Implement task auto-claiming for idle teammates (`BCf()`)
- [ ] Prioritize tasks by ID (lowest first)
- [ ] Check for unblocked tasks
#### 7. Idle Notifications
- [ ] Send idle notifications after each work cycle (`mCf()`)
- [ ] Include idle reason, summary, completion status
- [ ] Send to team lead's mailbox
#### 8. Lifecycle Management
- [ ] Implement teammate main loop (`LE6()`)
- [ ] Handle graceful shutdown via shutdown_request
- [ ] Clean up task state on completion/failure
- [ ] Handle abort signals properly
#### 9. Hooks
- [ ] Trigger `TeammateIdle` hook after idle notification
- [ ] Trigger `TaskCompleted` hook after task marked done
- [ ] Support hook configuration in settings.json
#### 10. Testing
- [ ] Test tmux backend (if supported)
- [ ] Test in-process backend
- [ ] Test message passing between teammates
- [ ] Test task claiming and completion
- [ ] Test graceful shutdown flow
- [ ] Test error handling (teammate crashes, network issues)
---
## Example: Burn ML Development Team
### Setup
```javascript
// 1. Create team
await TeamCreate({
team_name: "burn-ml-dev",
description: "Burn ML framework development team",
agent_type: "burn-architect"
});
// 2. Create tasks
await TaskCreate({
subject: "Research Burn 0.20 features",
description: "Analyze latest Burn release notes and API changes",
status: "pending"
});
await TaskCreate({
subject: "Implement training loop",
description: "Create trainer using new Learner API",
status: "pending",
blockedBy: ["1"] // Blocked by research task
});
await TaskCreate({
subject: "Write tests",
description: "Add unit tests for training loop",
status: "pending",
blockedBy: ["2"] // Blocked by implementation
});
// 3. Spawn teammates
await Agent({
name: "researcher",
team_name: "burn-ml-dev",
subagent_type: "general-purpose",
prompt: "You are a Burn framework researcher. Check TaskList for work.",
description: "Research Burn features"
});
await Agent({
name: "implementer",
team_name: "burn-ml-dev",
subagent_type: "general-purpose",
prompt: "You are a Burn implementer. Check TaskList for work.",
description: "Implement training code"
});
await Agent({
name: "tester",
team_name: "burn-ml-dev",
subagent_type: "general-purpose",
prompt: "You are a test engineer. Check TaskList for work.",
description: "Write tests"
});
```
### Workflow
1. **Researcher** starts, checks TaskList, claims task #1
2. **Researcher** completes research, marks task #1 completed
3. **Implementer** (now unblocked) claims task #2
4. **Implementer** sends message: `SendMessage({ to: "researcher", message: "What API should I use for optimizer?" })`
5. **Researcher** responds with details
6. **Implementer** completes task #2
7. **Tester** (now unblocked) claims task #3
8. **Tester** completes tests, marks task #3 completed
9. **Team lead** sends shutdown to all:
```javascript
await SendMessage({ to: "*", message: { type: "shutdown_request", reason: "All tasks complete" } });
```
10. Teammates acknowledge and shut down
11. **Team lead** calls `TeamDelete({})`
---
## Summary
The teammate system is a sophisticated multi-agent coordination framework built on:
1. **Backend abstraction**: tmux, iTerm2, or in-process execution
2. **File-based messaging**: Mailbox JSON files for async communication
3. **Shared task lists**: Coordinated work tracking
4. **Lifecycle management**: Spawn → Work → Idle → Shutdown cycles
5. **System prompt injection**: Teammates know they're in a team context
6. **Hook integration**: Monitor teammate activity
To implement in a plugin, focus on:
- Backend selection and spawning
- Message queue I/O
- Task list integration
- Idle notification sending
- Shutdown protocol handling
This architecture enables truly parallel multi-agent workflows where agents coordinate through messages and shared task lists, just like human development teams.
---
## type-design-analyzer.md
You are a type design expert with extensive experience in large-scale software architecture. Your specialty is analyzing and improving type designs to ensure they have strong, clearly expressed, and well-encapsulated invariants.
**Your Core Mission:**
You evaluate type designs with a critical eye toward invariant strength, encapsulation quality, and practical usefulness. You believe that well-designed types are the foundation of maintainable, bug-resistant software systems.
**Analysis Framework:**
When analyzing a type, you will:
1. **Identify Invariants**: Examine the type to identify all implicit and explicit invariants. Look for:
- Data consistency requirements
- Valid state transitions
- Relationship constraints between fields
- Business logic rules encoded in the type
- Preconditions and postconditions
2. **Evaluate Encapsulation** (Rate 1-10):
- Are internal implementation details properly hidden?
- Can the type's invariants be violated from outside?
- Are there appropriate access modifiers?
- Is the interface minimal and complete?
3. **Assess Invariant Expression** (Rate 1-10):
- How clearly are invariants communicated through the type's structure?
- Are invariants enforced at compile-time where possible?
- Is the type self-documenting through its design?
- Are edge cases and constraints obvious from the type definition?
4. **Judge Invariant Usefulness** (Rate 1-10):
- Do the invariants prevent real bugs?
- Are they aligned with business requirements?
- Do they make the code easier to reason about?
- Are they neither too restrictive nor too permissive?
5. **Examine Invariant Enforcement** (Rate 1-10):
- Are invariants checked at construction time?
- Are all mutation points guarded?
- Is it impossible to create invalid instances?
- Are runtime checks appropriate and comprehensive?
**Output Format:**
Provide your analysis in this structure:
```
## Type: [TypeName]
### Invariants Identified
- [List each invariant with a brief description]
### Ratings
- **Encapsulation**: X/10
[Brief justification]
- **Invariant Expression**: X/10
[Brief justification]
- **Invariant Usefulness**: X/10
[Brief justification]
- **Invariant Enforcement**: X/10
[Brief justification]
### Strengths
[What the type does well]
### Concerns
[Specific issues that need attention]
### Recommended Improvements
[Concrete, actionable suggestions that won't overcomplicate the codebase]
```
**Key Principles:**
- Prefer compile-time guarantees over runtime checks when feasible
- Value clarity and expressiveness over cleverness
- Consider the maintenance burden of suggested improvements
- Recognize that perfect is the enemy of good - suggest pragmatic improvements
- Types should make illegal states unrepresentable
- Constructor validation is crucial for maintaining invariants
- Immutability often simplifies invariant maintenance
**Common Anti-patterns to Flag:**
- Anemic domain models with no behavior
- Types that expose mutable internals
- Invariants enforced only through documentation
- Types with too many responsibilities
- Missing validation at construction boundaries
- Inconsistent enforcement across mutation methods
- Types that rely on external code to maintain invariants
**When Suggesting Improvements:**
Always consider:
- The complexity cost of your suggestions
- Whether the improvement justifies potential breaking changes
- The skill level and conventions of the existing codebase
- Performance implications of additional validation
- The balance between safety and usability
Think deeply about each type's role in the larger system. Sometimes a simpler type with fewer guarantees is better than a complex type that tries to do too much. Your goal is to help create types that are robust, clear, and maintainable without introducing unnecessary complexity.
---
## using-scripts-in-skills-agent-skills-072dae8aa5.md
# Using scripts in skills
How to run commands and bundle executable scripts in your skills.
Skills can instruct agents to run shell commands and bundle reusable scripts in a `scripts/` directory. This guide covers one-off commands, self-contained scripts with their own dependencies, and how to design script interfaces for agentic use.
One-off commands
When an existing package already does what you need, you can reference it directly in your `SKILL.md` instructions without a `scripts/` directory. Many ecosystems provide tools that auto-resolve dependencies at runtime.
- uvx
- pipx
- npx
- bunx
- deno run
- go run
[uvx](https://docs.astral.sh/uv/guides/tools/) runs Python packages in isolated environments with aggressive caching. It ships with [uv](https://docs.astral.sh/uv/).
Report incorrect code
Copy
```python
uvx ruff@0.8.0 check .
uvx black@24.10.0 .
```
- Not bundled with Python — requires a separate install.
- Fast. Caches aggressively so repeat runs are near-instant.
[pipx](https://pipx.pypa.io/) runs Python packages in isolated environments. Available via OS package managers (`apt install pipx`, `brew install pipx`).
Report incorrect code
Copy
```python
pipx run 'black==24.10.0' .
pipx run 'ruff==0.8.0' check .
```
- Not bundled with Python — requires a separate install.
- A mature alternative to `uvx`. While `uvx` has become the standard recommendation, `pipx` remains a reliable option with broader OS package manager availability.
[npx](https://docs.npmjs.com/cli/commands/npx) runs npm packages, downloading them on demand. It ships with npm (which ships with Node.js).
Report incorrect code
Copy
```python
npx eslint@9 --fix .
npx create-vite@6 my-app
```
- Bundled with Node.js — no extra install needed.
- Downloads the package, runs it, and caches it for future use.
- Pin versions with `npx package@version` for reproducibility.
[bunx](https://bun.sh/docs/cli/bunx) is Bun’s equivalent of `npx`. It ships with [Bun](https://bun.sh/).
Report incorrect code
Copy
```python
bunx eslint@9 --fix .
bunx create-vite@6 my-app
```
- Drop-in replacement for `npx` in Bun-based environments.
- Only appropriate when the user’s environment has Bun rather than Node.js.
[deno run](https://docs.deno.com/runtime/reference/cli/run/) runs scripts directly from URLs or specifiers. It ships with [Deno](https://deno.com/).
Report incorrect code
Copy
```python
deno run npm:create-vite@6 my-app
deno run --allow-read npm:eslint@9 -- --fix .
```
- Permission flags (`--allow-read`, etc.) are required for filesystem/network access.
- Use `--` to separate Deno flags from the tool’s own flags.
[go run](https://pkg.go.dev/cmd/go#hdr-Compile_and_run_Go_program) compiles and runs Go packages directly. It is built into the `go` command.
Report incorrect code
Copy
```python
go run golang.org/x/tools/cmd/goimports@v0.28.0 .
go run github.com/golangci/golangci-lint/cmd/golangci-lint@v1.62.0 run
```
- Built into Go — no extra tooling needed.
- Pin versions or use `@latest` to make the command explicit.
**Tips for one-off commands in skills:**
- **Pin versions** (e.g., `npx eslint@9.0.0`) so the command behaves the same over time.
- **State prerequisites** in your `SKILL.md` (e.g., “Requires Node.js 18+”) rather than assuming the agent’s environment has them. For runtime-level requirements, use the [`compatibility` frontmatter field](/specification#compatibility-field).
- **Move complex commands into scripts.** A one-off command works well when you’re invoking a tool with a few flags. When a command grows complex enough that it’s hard to get right on the first try, a tested script in `scripts/` is more reliable.
Referencing scripts from `SKILL.md`
Use **relative paths from the skill directory root** to reference bundled files. The agent resolves these paths automatically — no absolute paths needed. List available scripts in your `SKILL.md` so the agent knows they exist:
SKILL.md
Report incorrect code
Copy
```python
## Available scripts
- **`scripts/validate.sh`** — Validates configuration files
- **`scripts/process.py`** — Processes input data
```
Then instruct the agent to run them:
SKILL.md
Report incorrect code
Copy
```` shiki
## Workflow
1. Run the validation script:
```bash
bash scripts/validate.sh "$INPUT_FILE"
```
2. Process the results:
```bash
python3 scripts/process.py --input results.json
```
````
The same relative-path convention works in support files like `references/*.md` — script execution paths (in code blocks) are relative to the **skill directory root**, because the agent runs commands from there.
Self-contained scripts
When you need reusable logic, bundle a script in `scripts/` that declares its own dependencies inline. The agent can run the script with a single command — no separate manifest file or install step required. Several languages support inline dependency declarations:
- Python
- Deno
- Bun
- Ruby
[PEP 723](https://peps.python.org/pep-0723/) defines a standard format for inline script metadata. Declare dependencies in a TOML block inside `# ///` markers:
scripts/extract.py
Report incorrect code
Copy
```python
# /// script
# dependencies = [
# "beautifulsoup4",
# ]
# ///
from bs4 import BeautifulSoup
html = '<html><body><h1>Welcome</h1><p class="info">This is a test.</p></body></html>'
print(BeautifulSoup(html, "html.parser").select_one("p.info").get_text())
```
Run with [uv](https://docs.astral.sh/uv/) (recommended):
Report incorrect code
Copy
```python
uv run scripts/extract.py
```
`uv run` creates an isolated environment, installs the declared dependencies, and runs the script. [pipx](https://pipx.pypa.io/) (`pipx run scripts/extract.py`) also supports PEP 723.
- Pin versions with [PEP 508](https://peps.python.org/pep-0508/) specifiers: `"beautifulsoup4>=4.12,<5"`.
- Use `requires-python` to constrain the Python version.
- Use `uv lock --script` to create a lockfile for full reproducibility.
Deno’s `npm:` and `jsr:` import specifiers make every script self-contained by default:
scripts/extract.ts
Report incorrect code
Copy
```python
#!/usr/bin/env -S deno run
import * as cheerio from "npm:cheerio@1.0.0";
const html = `<html><body><h1>Welcome</h1><p class="info">This is a test.</p></body></html>`;
const $ = cheerio.load(html);
console.log($("p.info").text());
```
Report incorrect code
Copy
```python
deno run scripts/extract.ts
```
- Use `npm:` for npm packages, `jsr:` for Deno-native packages.
- Version specifiers follow semver: `@1.0.0` (exact), `@^1.0.0` (compatible).
- Dependencies are cached globally. Use `--reload` to force re-fetch.
- Packages with native addons (node-gyp) may not work — packages that ship pre-built binaries work best.
Bun auto-installs missing packages at runtime when no `node_modules` directory is found. Pin versions directly in the import path:
scripts/extract.ts
Report incorrect code
Copy
```python
#!/usr/bin/env bun
import * as cheerio from "cheerio@1.0.0";
const html = `<html><body><h1>Welcome</h1><p class="info">This is a test.</p></body></html>`;
const $ = cheerio.load(html);
console.log($("p.info").text());
```
Report incorrect code
Copy
```python
bun run scripts/extract.ts
```
- No `package.json` or `node_modules` needed. TypeScript works natively.
- Packages are cached globally. First run downloads; subsequent runs are near-instant.
- If a `node_modules` directory exists anywhere up the directory tree, auto-install is disabled and Bun falls back to standard Node.js resolution.
Bundler ships with Ruby since 2.6. Use `bundler/inline` to declare gems directly in the script:
scripts/extract.rb
Report incorrect code
Copy
```python
require 'bundler/inline'
gemfile do
source 'https://rubygems.org'
gem 'nokogiri'
end
html = '<html><body><h1>Welcome</h1><p class="info">This is a test.</p></body></html>'
doc = Nokogiri::HTML(html)
puts doc.at_css('p.info').text
```
Report incorrect code
Copy
```python
ruby scripts/extract.rb
```
- Pin versions explicitly (`gem 'nokogiri', '~> 1.16'`) — there is no lockfile.
- An existing `Gemfile` or `BUNDLE_GEMFILE` env var in the working directory can interfere.
Designing scripts for agentic use
When an agent runs your script, it reads stdout and stderr to decide what to do next. A few design choices make scripts dramatically easier for agents to use.
Avoid interactive prompts
This is a hard requirement of the agent execution environment. Agents operate in non-interactive shells — they cannot respond to TTY prompts, password dialogs, or confirmation menus. A script that blocks on interactive input will hang indefinitely. Accept all input via command-line flags, environment variables, or stdin:
Report incorrect code
Copy
```python
# Bad: hangs waiting for input
$ python scripts/deploy.py
Target environment: _
# Good: clear error with guidance
$ python scripts/deploy.py
Error: --env is required. Options: development, staging, production.
Usage: python scripts/deploy.py --env staging --tag v1.2.3
```
Document usage with `--help`
`--help` output is the primary way an agent learns your script’s interface. Include a brief description, available flags, and usage examples:
Report incorrect code
Copy
```python
Usage: scripts/process.py [OPTIONS] INPUT_FILE
Process input data and produce a summary report.
Options:
--format FORMAT Output format: json, csv, table (default: json)
--output FILE Write output to FILE instead of stdout
--verbose Print progress to stderr
Examples:
scripts/process.py data.csv
scripts/process.py --format csv --output report.csv data.csv
```
Keep it concise — the output enters the agent’s context window alongside everything else it’s working with.
Write helpful error messages
When an agent gets an error, the message directly shapes its next attempt. An opaque “Error: invalid input” wastes a turn. Instead, say what went wrong, what was expected, and what to try:
Report incorrect code
Copy
```python
Error: --format must be one of: json, csv, table.
Received: "xml"
```
Use structured output
Prefer structured formats — JSON, CSV, TSV — over free-form text. Structured formats can be consumed by both the agent and standard tools (`jq`, `cut`, `awk`), making your script composable in pipelines.
Report incorrect code
Copy
```python
# Whitespace-aligned — hard to parse programmatically
NAME STATUS CREATED
my-service running 2025-01-15
# Delimited — unambiguous field boundaries
{"name": "my-service", "status": "running", "created": "2025-01-15"}
```
**Separate data from diagnostics:** send structured data to stdout and progress messages, warnings, and other diagnostics to stderr. This lets the agent capture clean, parseable output while still having access to diagnostic information when needed.
Further considerations
- **Idempotency.** Agents may retry commands. “Create if not exists” is safer than “create and fail on duplicate.”
- **Input constraints.** Reject ambiguous input with a clear error rather than guessing. Use enums and closed sets where possible.
- **Dry-run support.** For destructive or stateful operations, a `--dry-run` flag lets the agent preview what will happen.
- **Meaningful exit codes.** Use distinct exit codes for different failure types (not found, invalid arguments, auth failure) and document them in your `--help` output so the agent knows what each code means.
- **Safe defaults.** Consider whether destructive operations should require explicit confirmation flags (`--confirm`, `--force`) or other safeguards appropriate to the risk level.
- **Predictable output size.** Many agent harnesses automatically truncate tool output beyond a threshold (e.g., 10-30K characters), potentially losing critical information. If your script might produce large output, default to a summary or a reasonable limit, and support flags like `--offset` so the agent can request more information when needed. Alternatively, if output is large and not amenable to pagination, require agents to pass an `--output` flag that specifies either an output file or `-` to explicitly opt in to stdout.
[Evaluating skills](/skill-creation/evaluating-skills)[Adding skills support](/client-implementation/adding-skills-support)
---
## using-skills-in-claude-claude-help-center.md
Skills extend Claude's capabilities by giving it access to specialized knowledge and workflows. This guide shows you how to enable, discover, and use Skills in Claude.
## Prerequisites
**For Enterprise plans:** Owners must first enable both **Code execution and file creation** and **Skills** in [Admin settings > Capabilities](https://claude.ai/admin-settings/capabilities). Owners can also upload skills to provision them organization-wide — these skills automatically appear for all users. Once Skills are enabled at the organization level, individual members can toggle on example skills, access provisioned skills, and upload their own personal skills in [Settings > Capabilities](https://preview.claude.ai/settings/capabilities).
**For Team plans:** This feature is enabled by default at the organization level. Once enabled, individual members can toggle on example skills and upload their own in [Settings > Capabilities](https://preview.claude.ai/settings/capabilities).
**For Max, Pro, and free plans:** You can enable example skills and upload your own in [Settings > Capabilities](https://claude.ai/settings/capabilities).
## How to enable Skills
[](https://downloads.intercomcdn.com/i/o/lupk8zyo/1781692976/3986c09def54467a7419e9cfd68e/8e4fa130-9c44-4067-bf12-520986644135?expires=1769938200&signature=6e1b12f3d9a54495e17eb9be2cd6b13680e58f9b410ce1cc218a90fd2caed92c&req=dScvF893n4hYX%2FMW1HO4zXi3CDvf9EB6mT2qapKX2kFdvKjtf3upP5kFf%2Fa6%0AeU2%2BRRSEygmkAjNKVHQ%3D%0A)
## Organization provisioned skills (Team and Enterprise plans)
Organization Owners can provision skills for all users. These skills appear in your individual Skills list with a team indicator — you can toggle them on or off based on your preferences. For information on provisioning skills for your organization, see [Provisioning and managing Skills for your organization](https://support.claude.com/en/articles/13119606-provisioning-and-managing-skills-for-your-organization#h_4dea113421).
## Using Anthropic Skills
Anthropic provides several built-in skills that are available to all users, including:
With **Code execution and file creation** on, Claude will automatically use these tools when relevant. You don't need to explicitly invoke them—Claude determines when each skill is needed based on your request.
For example, if you ask Claude to "Create a PowerPoint presentation about Q3 results," Claude will automatically use the PowerPoint skill if the capability is enabled.
## Adding and using custom skills
You can also create and upload your own skills to teach Claude your specific workflows:
[](https://downloads.intercomcdn.com/i/o/lupk8zyo/1782364123/a16cc51c623f6dc7ecef8974d629/98c13ee7-c134-4109-905c-384ab75a9ac6?expires=1769938200&signature=8c7bc1af65306a267dfe421f5b682d1162ddf03ccef4bfeca9452449877fd015&req=dScvFMp4mYBdWvMW1HO4zRUki%2BjxgQ6X%2BfMHhPHscm47spCpsyxhIzvp9n29%0AWT%2FuQvE9rUoVLi66d7Y%3D%0A)
## How Claude uses Skills
Claude automatically identifies and loads relevant skills based on your task. Refer to [What are Skills?](../02-Claude-Code-CLI/what-are-skills.md) to learn how this works.
## Discovering skills from the Skills Directory
The Skills Directory features professionally-built skills from leading platforms like Notion, Figma, and Atlassian. These partner skills are designed to work with their respective MCP connectors, enabling powerful workflows that combine Claude's capabilities with your existing tools.
**To install a skill from the Skills Directory:**
## Managing your Skills
### Viewing your Skills
## Enabling and disabling your Skills
Toggle any skill on or off using the switch next to it. Disabled skills won't be available to Claude.
### Removing custom Skills
To remove a custom skill you've uploaded:
## Privacy and security details
For Team and Enterprise plans, organization Owners can provision skills for all users through Admin settings. Individual peer-to-peer skill sharing is not currently available — users cannot directly share skills with specific colleagues. For personal skills, each individual must upload them to their own account. Skills in Claude and the API operate in Claude's secure sandboxed environment with no data persistence between sessions.
Note that skills may include, or instruct Claude to install, third-party packages and software for Claude to use when completing a task. See [here](https://support.claude.com/en/articles/12111783-create-and-edit-files-with-claude#h_0ee9d698a1) for details onClaude’s container environment and [here](https://docs.claude.com/en/docs/agents-and-tools/tool-use/code-execution-tool#containers) for API’s container environment.
### What are the primary risks of using Skills?
The most significant risks are prompt injection, which allows Claude to be manipulated to execute unintended actions, and data exfiltration, caused by malicious package code or prompt-injected data leaks. We’ve implemented several mitigations to these risks. Refer to [our security considerations for code execution](https://support.claude.com/en/articles/12111783-create-and-edit-files-with-claude#h_0ee9d698a1) for more information.
When installing a skill from a less-trusted source, thoroughly audit it before use. Start by reading the contents of the files bundled in the skill to understand what it does, paying particular attention to code dependencies and bundled resources like images or scripts. Similarly, pay attention to instructions or code within the skill that instruct Claude to connect to potentially untrusted external network sources.
## Troubleshooting
### Skills section not visible
Ensure code execution is enabled in [Settings > Capabilities](https://claude.ai/settings/capabilities). Skills require the code execution environment to function.
### Claude isn’t using a Skill
### Upload errors
Common reasons for upload failures:
### Skills greyed out
If Skills appear greyed out, code execution or Skills may be disabled at the organization level (for Team and Enterprise plans) or individually. Check with your organization's Owner or make sure to enable code execution in your settings.
## Best Practices
### Start Simple
Begin with Anthropic's pre-built Skills to understand how they work before creating custom skills.
### Be Specific
Write clear descriptions when writing custom skills. A specific description tells Claude when to invoke your skill.
### Test Your Skills
After uploading a custom skill, test it with a few different prompts to ensure it works as expected.
### Organize by Purpose
Create separate skills for different purposes rather than a single skill that’s meant to do everything.
## Learn more about using Skills
___
Related Articles
[
Create and edit files with Claude
](https://support.claude.com/en/articles/12111783-create-and-edit-files-with-claude)[
What are Skills?
](../02-Claude-Code-CLI/what-are-skills.md)[
How to create custom Skills
](../02-Claude-Code-CLI/how-to-create-custom-skills.md)[
How to use the single-cell-rna-qc skill with Claude
](../02-Claude-Code-CLI/how-to-use-the-single-cell-rna-qc-skill-with-claude.md)[
Provisioning and managing Skills for your organization
](https://support.claude.com/en/articles/13119606-provisioning-and-managing-skills-for-your-organization)